Category
MyLO Assignments
Setting up a Group Assignment for submission of group work
Unless you want to mark an individual submission from every member of a group, it is best to allow groups to submit assessments to a Group Assignment Submission folder. This way, you only need to collect one submission from the group and grade it accordingly.
As long as a Grade Item is assigned to the Assignment, the grade given to the group submission will automatically be applied to each student in the group. For example, if Peta submitted a task on behalf of her group, I could grade the task with 5 points out of 10. When I publish the grade, Peta, as well as her fellow group members will also have 5 points recorded next to their names in the Grades tool. The image below shows how a grade given against a submission is allocated to each member of the group in the Grades tool.
FAQs about using a Group Assignment
How do I set up a Group Assignment Submission Folder?
First, you’re going to need to set up student groups using the Groups tool. There are several grouping options available, if you’re not sure which to use please consult a member of the Flexible Education Team for further advice.
Once you have set up Groups, you can set up an Assignment Submission Folder. Click on ‘Assessment’ then go to ‘Assignments’ then click ‘New Folder’.
The IMPORTANT setting you will need to change is the Folder type – as seen in the image below, you must select the Group Submission Folder option and select the Group category to apply it to.
Can I change the grade assigned to an individual group member?
Yes, but only after you have graded the group submission. For this reason, you may wish to hide the associated Grade Item until after you have finished grading.
Once you have graded the group’s submission, go to the Grades tool. Locate the column (Grade Item) associated with the assessment task. Locate the student whose grade you wish to change. Click on the grade allocated to the student. Your cursor should appear in the grade field, allowing you to type in a new grade. Remember to save your changes and un-hide the Grade Item when you’re ready to release the grades to students.
Setting up an Assignment Submission Folder to collect student assignments
MyLO’s Assignment Submission Folder tool allows students to upload a file, or collection of files, for assessment.
You can create a Submission Folder for individual students to submit to, or you can create a Group Submission Folder so one student can submit on behalf of a group of students.
These instructions will show you how to create a Submission Folder for individual students to submit their work to. If you wish to mark students’ work online, you must also associate a Grade Item with your Submission Folder.
TIPS
Setting up your Submission Folder for Turnitin and Grademark
If you intend to use Turnitin to check student submissions and/or you want to provide students with feedback using Grademark you must enable Turnitin when setting up the Submission Folder.
Note that Turnitin can only generate Originality Reports for certain file types. Grademark/Feedback Studio can be used with a broader range of file types, but you must enable this in the Submission Folder settings. Further information about file types that will work with Turnitin and Grademark is available here.
Link a Grade Item with a Dropbox, Discussion or Quiz
Grade Items act as the connection between an assessment item – like an assignment – and the Grades tool. If you want to mark and record grades online, you may need to associate a Grade Item with an assessment item.
You can link an existing grade item to an Assignment Submission folder, Quiz or Discussion Topic.
- Go to the assessment item you need to attach a grade to. Whether you’re creating a new one, or editing an existing one – find the section where you add a grade (either properties or assessment), then click the drop-down box under the heading ‘Grade Item’ and select an existing grade. If the grade item you had previously created does not appear it likely means this grade item is already being used elsewhere or has been set up as a ‘category’ (you can’t link a category, only individual grades).
You can create a new Grade Item whilst setting up or editing an Assignment Submission folder, Quiz or Discussion Topic. This grade item will then be connected to the assessment item.
- To do so as you create a new assessment item, or edit an existing item you will see (either on the ‘Properties’ tab or the ‘Assessment’ tab) an option for ‘Create a new grade item’.

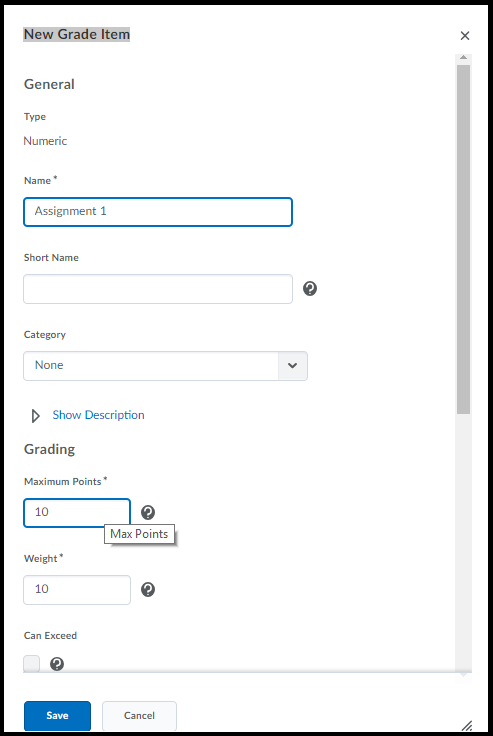
When you click ‘New Grade Item’ a window will pop up – in which you can enter the grade’s name, out of value and weight. If you’re not sure about any of the options here you can just leave them. You can edit this grade later in the Grades tool at any time. When you click ‘Save’ the grade will be created AND it will then be selected to be associated with the assessment you’re currently working in.
Create a MyLO Rubric that will calculate a grade (Custom Points Rubric)
You can grade student assignments using MyLO Rubrics. Creating an Analytic > Custom Points type Rubric will allow you to generate a score for each student, based on the weighting of each criteria, and the levels (e.g. HD, DN, etc.) selected for each criteria. The score does not need to be made visible to the student. You can also record feedback against each criteria if you wish to.
Creating Custom Points Rubrics is somewhat complicated. In some faculties, your local blended learning/distance learning support team may be able to create a Custom Points Rubric on your behalf. You will need to provide them with:
- A word document containing the criteria and level descriptions;
- Weighting or Points values for each criteria, totalling either 100% or up to the points value of the assignment.
- Details of the Assignment Submission Folder or Grade Item that you want the Rubric attached to.
You may be asked to check the Rubric before it is Finalised and attached to an Assignment Submission Folder/Grade Item, as Rubrics cannot be altered once marking commences.
Create a Custom Points Rubric from scratch
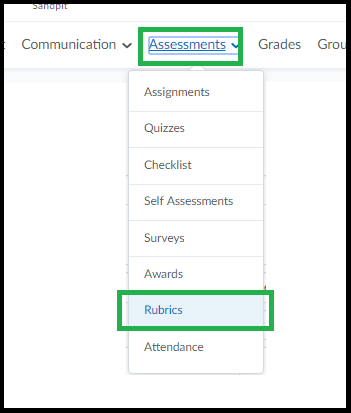
First go to the unit & choose Assessment – Rubrics from the toolbar.
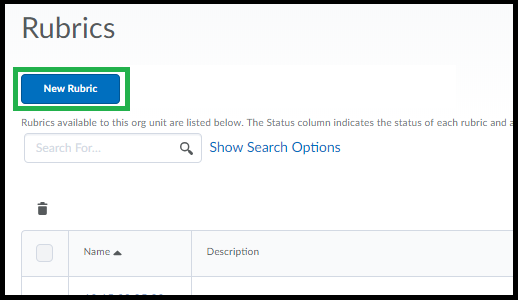
If you don’t already have a rubric to edit just click “New Rubric”.
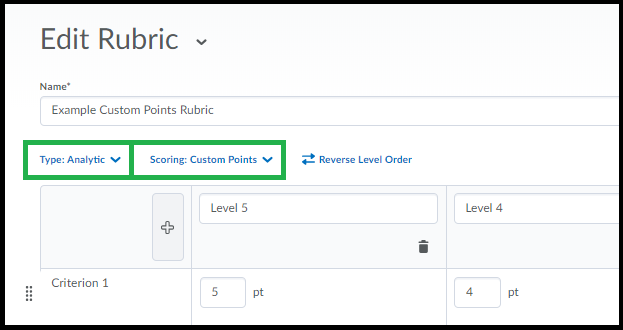
It may take a minute for the page to load, give it a name & check the first set of settings across the top.
Analytic rubric setting means it will calculate a score from multiple criteria. Holistic is one criteria only.
Points vs Custom Points – if your criteria are weighted differently to each other (have different points values to each other) choose ‘Custom Points’. If all of your criteria are worth the same each, you can leave it as “points”. In this help guide we will create ‘custom points’ rubric as this is the most complex.
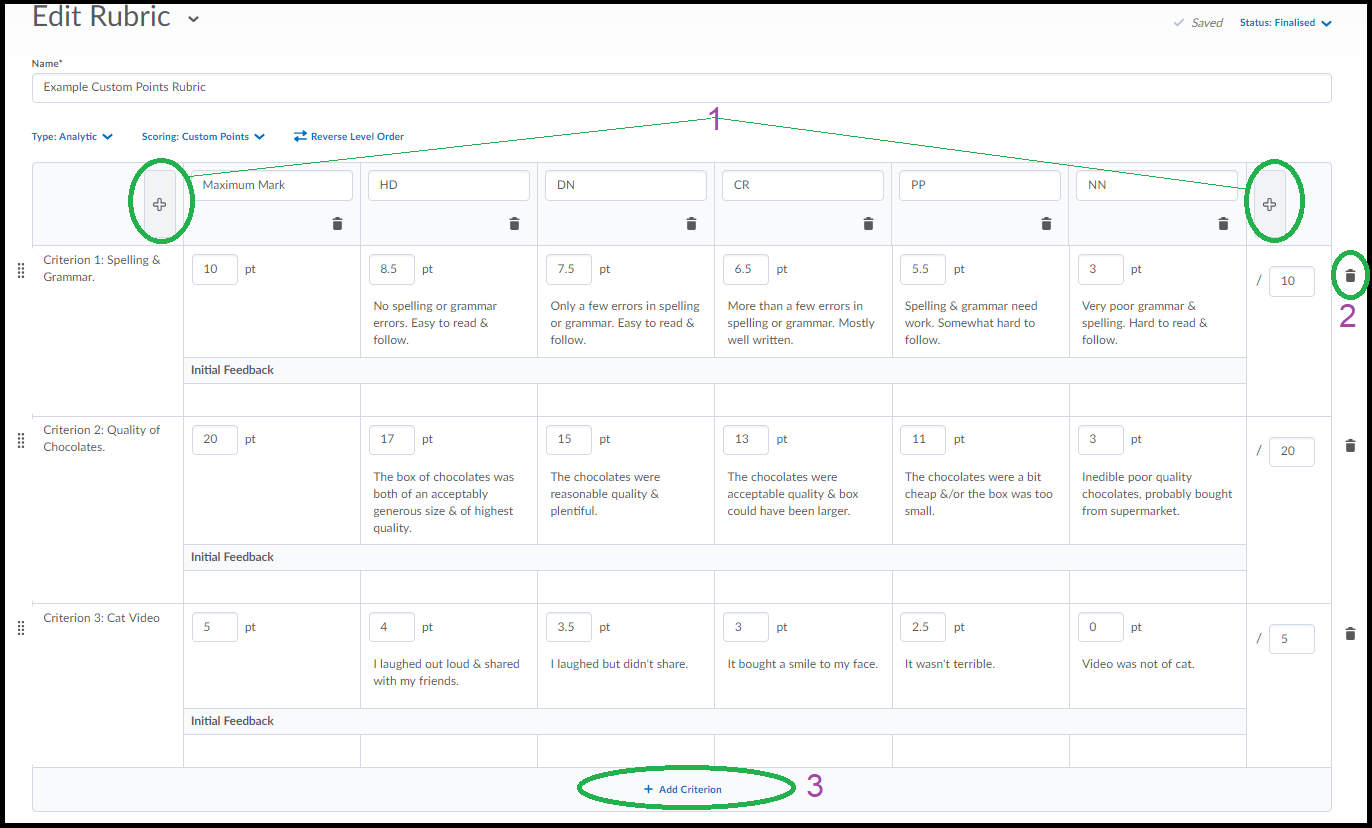
The table will be pre-populated with default values. You can edit any of these values just by clicking into the text & typing. You can also copy/paste text to the cells from Word. Note there is a limit on the number of characters you can use in the Criteria Name column. The rubric tool will SAVE as you go.
1. You can add another column either to the left or right of your columns by clicking either of the [+] buttons at the top.
2. You can remove a criteria by clicking the bin icon to the right of the criteria row.
3. You can add another criteria to the end of the list by clicking ‘Add Criterion’ at the end of the list.
NOTE: With either Points or Custom Points – one column (the default is the right-most) MUST have the maximum obtainable mark for each criteria in it, this is how MyLO Rubric knows how much the rubric is out of. You can , if you want to avoid having the HD column be set at the maximum, use a ‘maximum achievable’ column. Other columns can be set as something lower than the maximum if you prefer. For standard UTAS grades (ie HD, DN etc) the values you use for the DN, CR, PP columns will need to fall into the range defined by the criteria. (HD = 80% – 100%, DN = 70% – 79% etc).
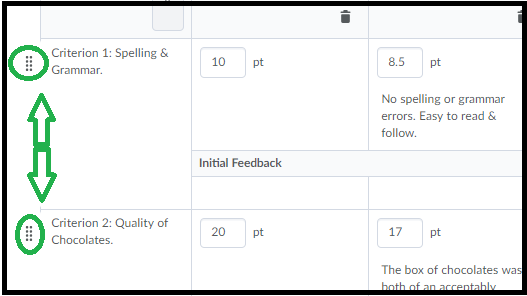
To re-order the criteria just click & drag the criteria using the small icon to the left as circled below.
Once you are done setting up your criteria you can scroll down to check the “overall score” area that calculates an overall level. You can change the default values. You can add or delete extraneous levels entirely by clicking the Plus sign or the Garbage bins. You can delete all but 1 (so you could just have a ‘complete’ level based on any score out above 0 if you want).

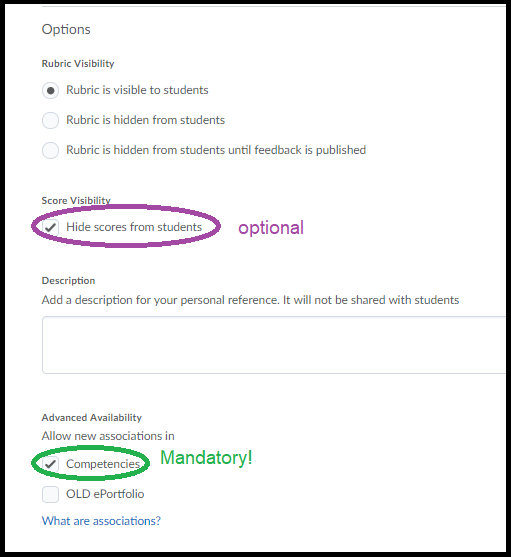
Scroll down a wee bit further and click on “Options” to show important options.
The first set of 3 options defines when the rubric is visible to students. Note that students do like to work “to the rubric” so keep in mind they may ask about it if you decide to turn it off here you might consider giving them a PDF rubric.
Score Visibility: this refers to the scores in individual criteria levels not the overall score. If you check this it just means they’ll see what level they got for each criteria but not the specific number associated with each. They will still see their overall grade. This option is useful to keep as ‘hide’ as it allows for discretion in marking & moderation.
The two options under the description are to “allow associations” which is a rather confusing way of saying “this rubric can be attached to things” – so leave at least the first one checked ON or you can’t then use the rubric anywhere in MyLO because if you un-check it the rubric can’t be added to assignments for … some reason.
You’re not quite done yet!
Scroll all the way back to the top-right to find the option to set the rubric as “Finalised” (why is it up here? why not both at the top & at the bottom?) To use the rubric anywhere it has to be set to “finalised”.

Once Finalised you can now attach this rubric to assignments, grades, or discussions. As you use it for marking it will also auto-save as you go.


