Category
MyLO Basics
Create a new MyLO page based on the ICB template or an existing page
The Interactive Content Builder (ICB) template allows you to easily incorporate a variety of visual elements and basic interaction into HTML (web) pages on your unit’s MyLO site.
Once the template is installed on your MyLO site*, complete the following steps to create a new, fresh page based on the template OR create a new page based on an existing page.
Instructions
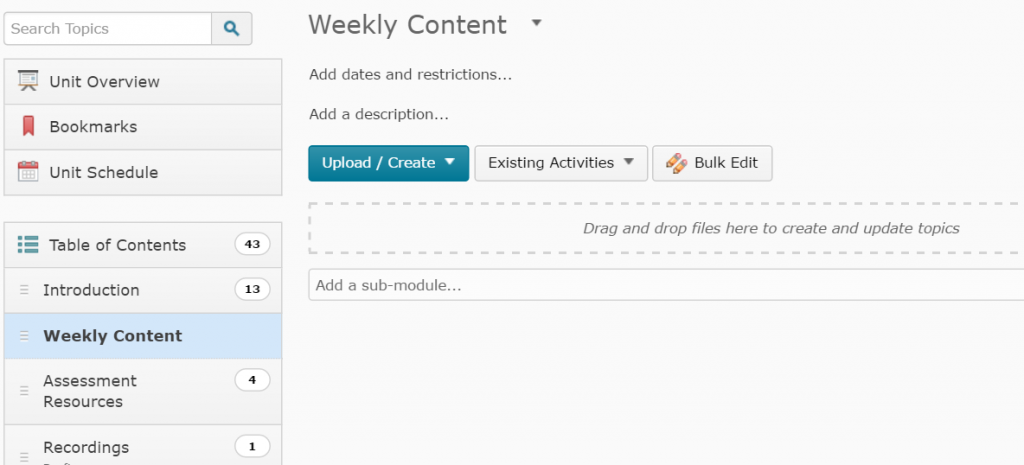
Go to Content and locate the folder where you would like your new page to appear. For example, here I have chosen Weekly Content. Make sure the folder is highlighted (usually in a darker colour) in the Table of Contents.
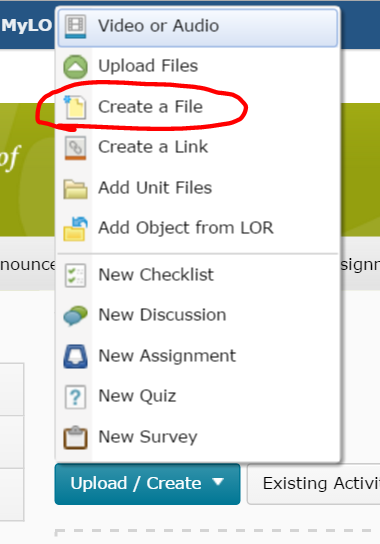
Click on the Upload/Create button, then select the Create a File option.
Click on the Browse for a template button.
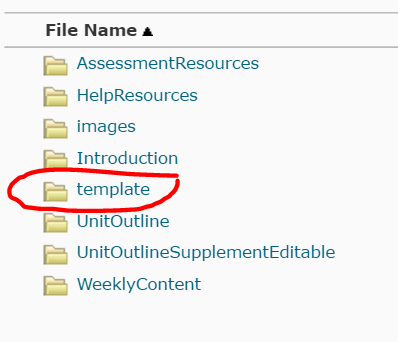
If you’re basing a brand new file on the template, browse for a folder called template, and click on it once. NOTE: You will only see this folder if the template has been added to your unit*. If you’re basing your page on an existing file, choose the folder in which the original file lives. For example, Weekly Content > Week 1.
Now check the radio button next to the template.html file (for a blank template page), or the file you would like to base your new page on (e.g. Week_01.html). Click on the Add button.
The page contents will load. Before you start working on them, record a file name for the new file in name field (this will be the name of the file as seen in the File Manager).
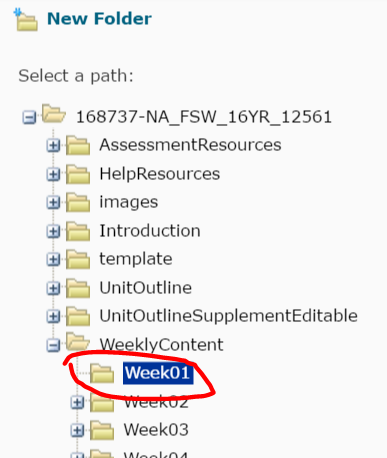
It is good practice to save your newly created pages to a folder. It isn’t the end of the world if you forget to do this, but it is a good habit to get into! Before you start editing the page, scroll down to the bottom of the screen and click on the Change Path button.
Choose the folder where you would like the file to live in. If you’re using a sub folder, you may have to click the expand icon next to the parent folder (+) to see it. Make sure the folder you want the file to live in is selected (it will be highlighted in a darker colour), then click on the Select Path folder.
Click the Save as Draft button.
![]()
You can now edit your file. Change the title to something you would like students to see. Don’t forget to Save or Publish your changes.
*The ICB template files must be installed on your unit’s MyLO site before you can use them. Please contact your local team for assistance: the Blended Learning Unit can help staff members teaching Faculty of Arts units; TSBE staff can approach the Flexible Education Team.
Edit a Checklist from Content
If your Ed-Tech has created a set of checklists for you and added them to your content area you may then need to go into each one and flesh out the details. You may also want to make a quick change to a checklist that you have previously edited or created.
Or you might have copied a unit from another semester and need to update your existing checklists.
The good news is, you can do it all from where they sit in the Content area with very little fuss!
First click the ‘Content’ button on the toolbar to load up the Content area.
Click the module/folder that contains your checklist, usually these will be in Learning Hub possibly in their own subfolder.
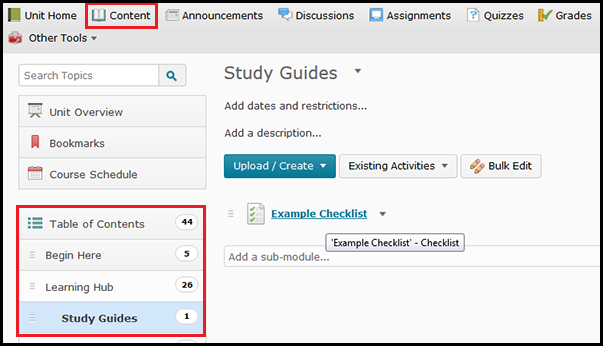
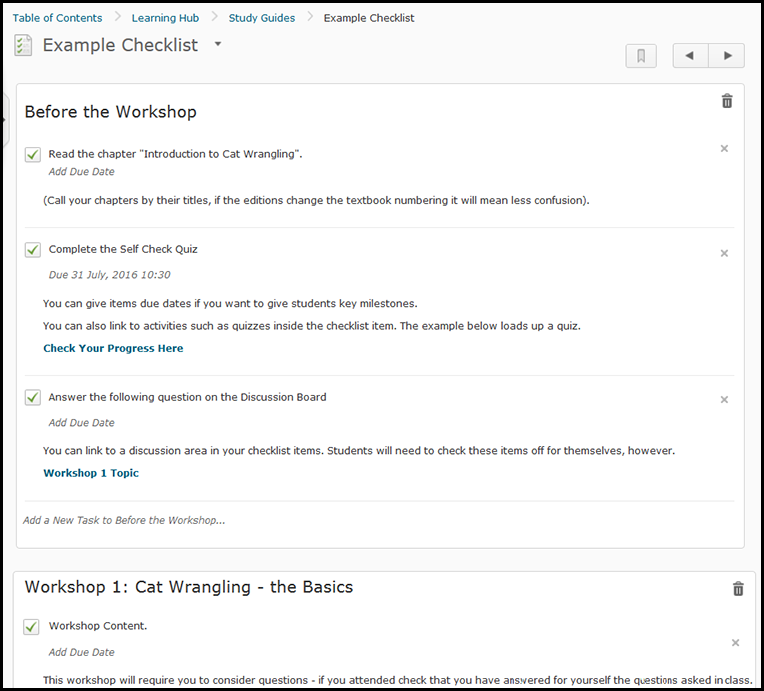
In this example I have clicked Content then Learning Hub and Study Guides to find the example checklist I will edit.
When you see a link to your checklist on the left part of the screen just click on it and it will load up in to the screen, similar to the example checklist in the screenshot below.
Editing Checklist Items
Once you’ve clicked on your checklist you’ll see each item listed out – (ignore the little checkbox icon). The example below shows the category headings and checklist items for the checklist “Example Checklist”. When you move your mouse over any item it will highlight in grey, this grey indicates it is an item that you can click on to change.
To edit any item- click on the text that you need to edit.
Category or Task Names:
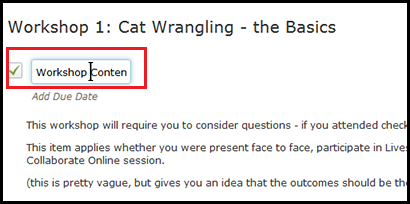
If you click on a title to change the text (as shown in the example below), you will see a text field to type into. Make any changes you need then click elsewhere on the page. This works for both Category names and Task names.
Descriptions:
If you click on one of the ‘description’ areas it will load a bigger more feature laden text field that allows you to do more advanced text editing, this tool is found throughout MyLO. There are further instructions for using this text editing tool listed below the screenshot. Click the “Update” button when you are done adding text to any area that loads up one of the Text Editor boxes.
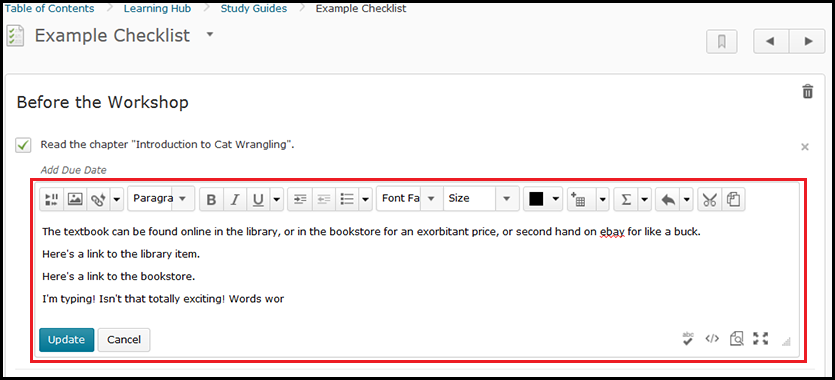
Most ‘description’ fields load up with the text editor tool. Don’t forget to click “Update” when you are done!
How to use the Text Editor (Page) Tool – list of resources (PDF | Video)
Deleting Items from the Checklist
To the right of any category is a bin icon – if you click the Bin icon you will delete the category and all of the items within this category.
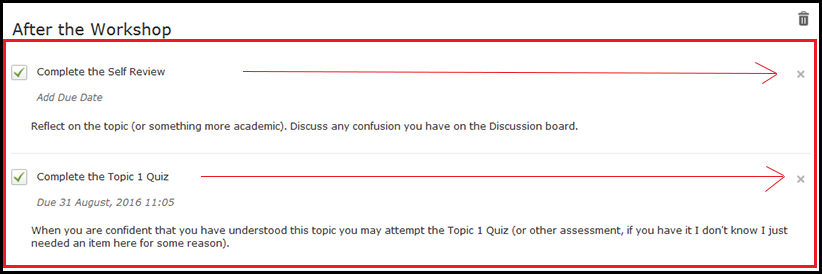
To the right of any checklist item is a small (x) – if you click the small (x) it will delete that checklist item.
Adding Checklist Tasks and Categories to your checklist.
To the bottom of each category is a little area that has “Add a New Task to (category name)” – this will add a new checklist item to that category. It allows you to add checklist items on the fly to any category you have in your checklist. When you add it, click on the text to edit the title and description.
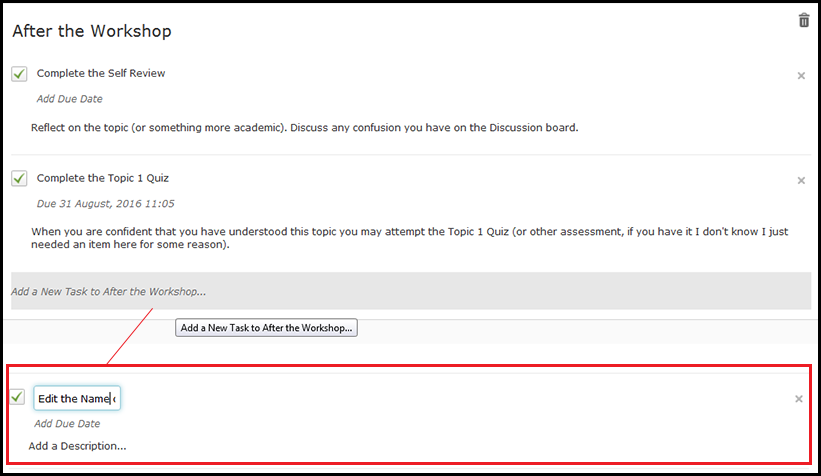
Click on the ‘Add a new task’ text as shown in grey above to add a new checklist item. Then you can click on the checklist item to edit it.
To the very bottom of the checklist is an item oddly named “Add a New List” – it should say ‘Add a new category’ because that’s what it does but, well, boosucks to logic. Click the “Add a new list” and you’ll get a new category just called “List (number)” but you can click on the title to edit the Category name, and add items as per ‘add new task’.
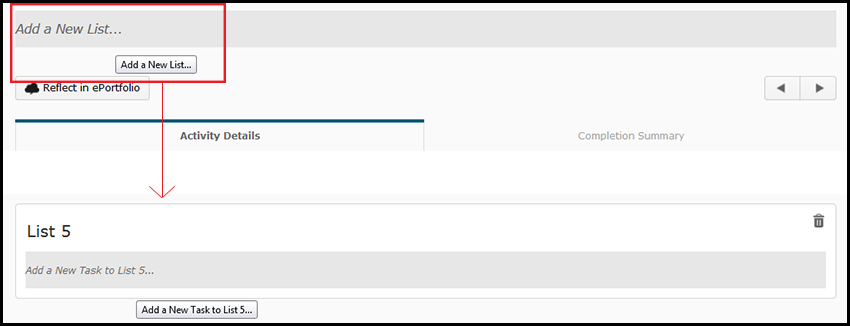
Click the Add a New List right at the very bottom of the checklist (just above the ‘activity details’ tab). Then you can edit the new Category that has appeared.
NOTE: If you do decide to add a new category here it will be added at the bottom of the checklist – however you can re-order items in your checklist from the Checklists tool itself. For further instruction on re-ordering items see the help sheet for Checklists: Reordering and Restrictions.
How to Create a Checklist
This document covers creation of a basic checklist.
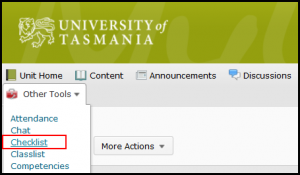
First go to ‘Other Tools’ and then click “Checklist” from the menu.
There may well be a checklist or two loaded into your unit. TSBE units will have the Step 3 agreement in the checklist items.
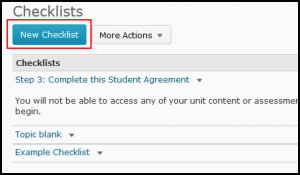
To create a new checklist click the “New Checklist” button at the top of the checklists page as shown below.
When you create a new checklist a window will load that asks you to type in a name and description.
When you type your name, as noted above, be sure to make it one that will make sense in the context of the content it is being created for. For example – if this is a checklist for your Week 1 Study Guide, then this is the name you would give it. Whatever you type into the Name field becomes the link that students see and click on to access the checklist.
Click ‘Save’.
When you first save your checklist new options appear as outlined above in red. This is also the screen you will see if you click on an existing checklist inside of the checklist tool. The example above hasn’t got any items or categories yet so let’s talk about what these are and how to add them.
Categories.
A category is simply a way to ‘group’ a list of items together visually. It adds a sub-heading to your checklist and is useful for breaking up content into logical chunks inside of a checklist. A category does not have an associated ‘checkbox’ and is only there for visual clarification. Your checklist does need to have at least 1 category, so to start with add a new category to your checklist.
To add a category just click the “New Category” button and fill in the name and description.
Remember to give your category a descriptive name, this text will be shown as a sub-heading inside of your checklist. When you click Save you will be taken back to the main Checklist page and you’ll see your category listed just under the buttons.
To add individual item to your checklist click the “New Item” button. It will load up a window similar to the one we just saw for a category with some extra options.
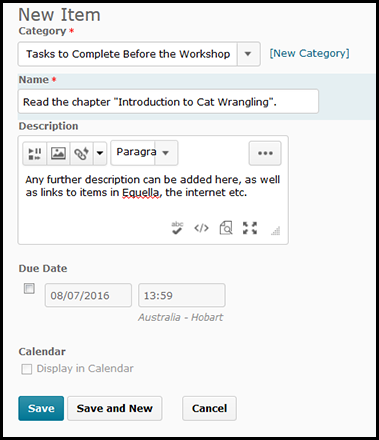
New Checklist Item page, again type a descriptive name and add some useful instruction in the ‘description’ field.
The first extra option to be aware of is the “Category” option. Make sure this item is in the correct category – choose from the dropbox at the top.
Give your item a descriptive name, this text will sit to the right of the checklist button that students click so make it an “actiony” name – ie something that they need to do that they can then check as “done”.
The Description field is optional but important too – here you can add instructions and even links, images, media and so forth. This is the standard “text editor” that appears elsewhere in MyLO too and there is a list of instructional videos that cover how to use this tool for structuring your text.
Optionally you can add a “due date” to your checklist item – it doesn’t “block” a student from doing it late but it will flag the ones that do. It may be a handy way to add important milestones into the calendar as you can add this item to the calendar if you give it a due date.
Click save when you are done, or save and new to add another Checklist Item.
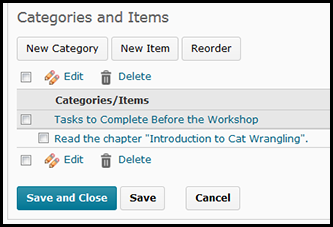
As you can see when the item is saved, it appears indented under the category it was linked to. Wrong category? Just click any item to re-open the ‘edit item’ screen to choose the correct category. You can also re-order categories with the “Reorder” button.
Below is a screenshot of a checklist that has a few categories and items in it:
Here’s a checklist that has many items in it, it’s not a perfect example it’s just for showing how it looks. The items that have a strange grey icon to the right are those that have a nominated ‘due date’ and the date is shown to the right. Any item can be edited by clicking on it.
To add this to your Learning Hub or other Content area you need to first save and close this checklist then navigate to your content area and choose “Existing Activity” then “Checklist”.
When you choose “Checklist” a list of the available checklists will appear, just click on one and it will be loaded to your content page.
From here you can further edit/refine your checklist – however there is an alternate set of instruction for this in another entry.
Adding a hyperlink [link] into your MyLO unit
You can add a hyperlink to a website or other resource (such as a PDF) that is available on the internet. Hyperlinks can be added to several locations inside your MyLO unit, including:
- News Items;
- Discussion posts (including a Topic description, Threads and Replies);
- MyLO Emails (emails that you write to students using email in MyLO);
- MyLO Checklist Category and Item descriptions;
- HTML Pages;
- Anywhere that you can add a description; or
- As a link inside a Folder in the Content tool.
These instructions show you how to create a hyperlink in MyLO.
How can I see the emails that I have sent from within MyLO?
MyLO allows you to send emails to individual students or groups of students, from a range of different tools.
MyLO does keep a record of the emails that you have sent from within the system*. Here’s how to check your Sent Items in MyLO:
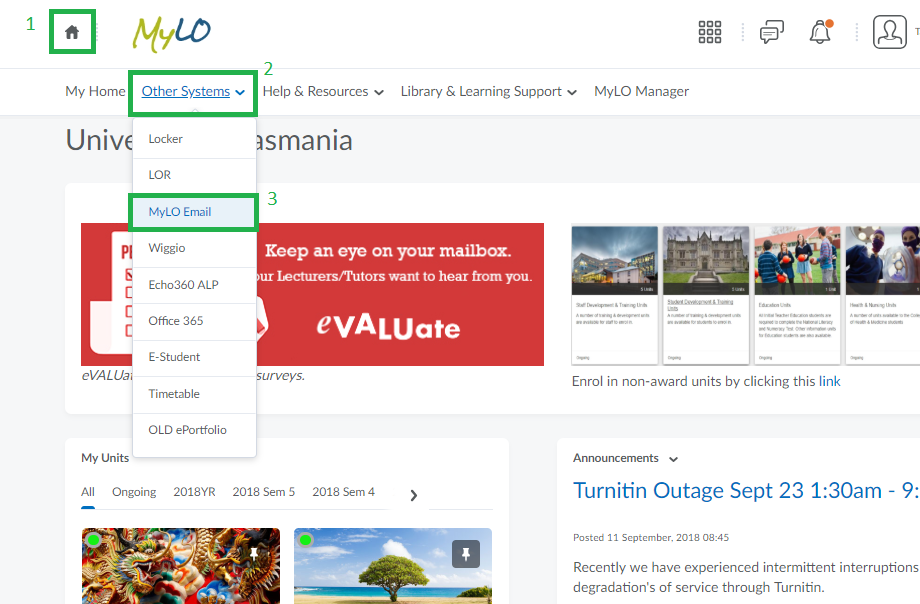
- Go out of any unit and back to the MyLO Homepage by clicking the ‘House’ icon on the top-left of the page.
- Find the menu “Other Systems”.
- Choose ‘MyLO Mail’.
- The ‘Sent Mail’ is a grey button on the top right of the MyLO Mail page.
*MyLO will not keep a record of emails that have been sent to students as the result of an Intelligent Agent.
Help students locate Quiz results and feedback
Would you like your students to see the results of a Quiz that you have published? Make sure your students know where to look to get the information they need.
Use our template to quickly and easily create a News item, an HTML page, an email (sent from MyLO) or a Checklist item. The template contains instructions, with matching images, to help students find their results. You can see what it looks like by downloading this PDF. And yes – you can edit it to meet your needs.
To use the template, follow these steps:
1 – Use your mouse to highlight all the text in the box below.
<p>Hello everyone,</p> <p>I am writing to let you know that the results of the INSERT QUIZ OR TASK NAME HERE are now available.</p> <p><<REMOVE THIS SENTENCE AND THE NEXT SECTION IF YOU DO NOT WANT STUDENTS TO SEE THEIR ANSWERS, OR CORRECT ANSWERS>></p> <p>You can access your results and other information using the <em><strong>Quizzes</strong></em> tool. To do this, follow the instructions below. Alternatively, <a rel="noopener" href="https://mylo.utas.edu.au/d2l/lor/viewer/view.d2l?ou=6607&loIdentId=63929" target="_blank">this document</a> provides step-by-step instructions explaining how to access and interpret your results.</p> <p>To check your results, select <em>Assessments</em> then <em>Quizzes</em> from the MyLO toolbar. It appears just under the MyLO and UTAS logos</p> <p>Once the <em><strong>Quizzes</strong></em> tool has opened, locate the quiz and click on the dropdown arrow that appears next to it. Select the <em><strong>Submissions</strong></em><strong> </strong>option. <br /><br /><img src="http://blogs.utas.edu.au/teaching-at-tsbe/files/2015/01/Quiz-student-access-quiz-for-marks.gif" alt="Locating a quiz and selecting Submissions option" title="Locating a quiz and selecting Submissions option" height="116" width="537" /><br />You will see the number of attempts you have completed, along with your score for the quiz to the right. To see <<REMOVE ANY OPTIONS THAT DO NOT APPLY>> your answers and the correct answers, click on the attempt number (this will generally be<em> Attempt 1</em>).<br /><br /><img src="http://blogs.utas.edu.au/teaching-at-tsbe/files/2015/01/Quiz-student-access-quiz-for-marks-attempt-link.gif" alt="Image showing how to access answers, correct answers and so forth by clicking on the Attempt link" title="Image showing how to access answers, correct answers and so forth by clicking on the Attempt link" height="149" width="543" /></p> <p></p>
2 – Once all the text has been selected, right-click (CTRL + mouse click on a Mac) and select the Copy option or press CTRL and C on your keyboard (Command + C on a Mac). This will copy the code onto your computer’s temporary memory.
3 – Create a new Announcement, an HTML page, an email (sent from MyLO) or a Checklist item. The example seen below is a new Announcement. Give the new item a title/headline, then move on to the next field (where you put the bulk of your message/content). By default, the WYSIWYG (What You See Is What You Get) editor will open. Click on the HTML Code symbol, seen at the bottom right of the WYSIWYG editor. It looks like this </>
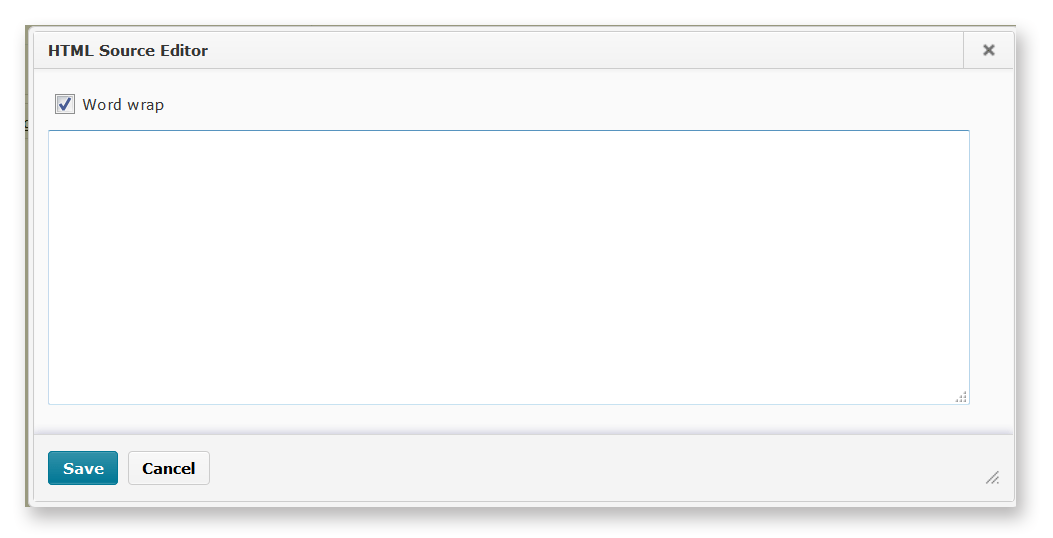
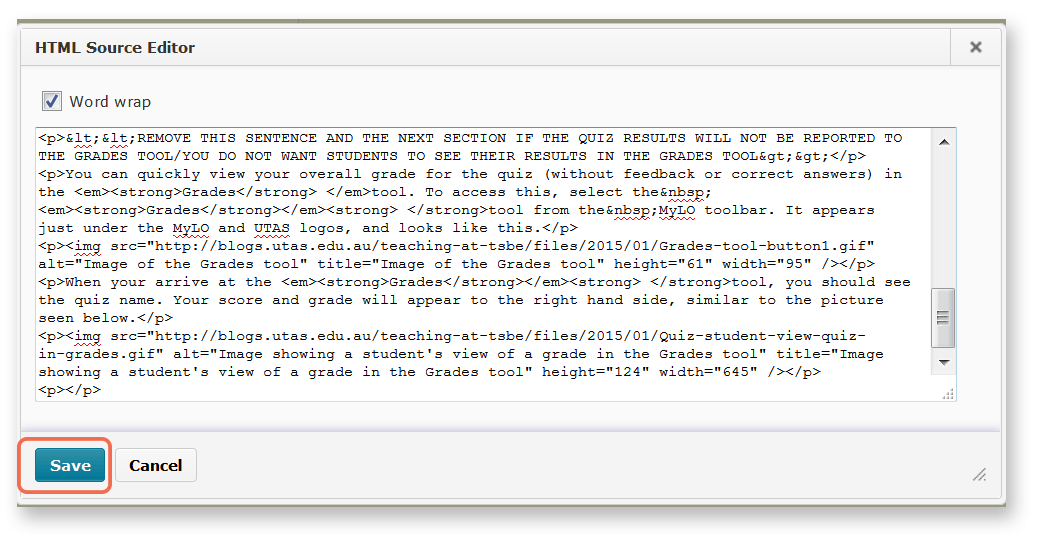
4 – A pop-up window will open.
5 – Right-click (CTRL + click on a Mac) over the empty field and select Paste, or click your mouse on the empty field and press CTRL and V (Command + V on a Mac) your keyboard. The code will appear in the field. Click the Save button.
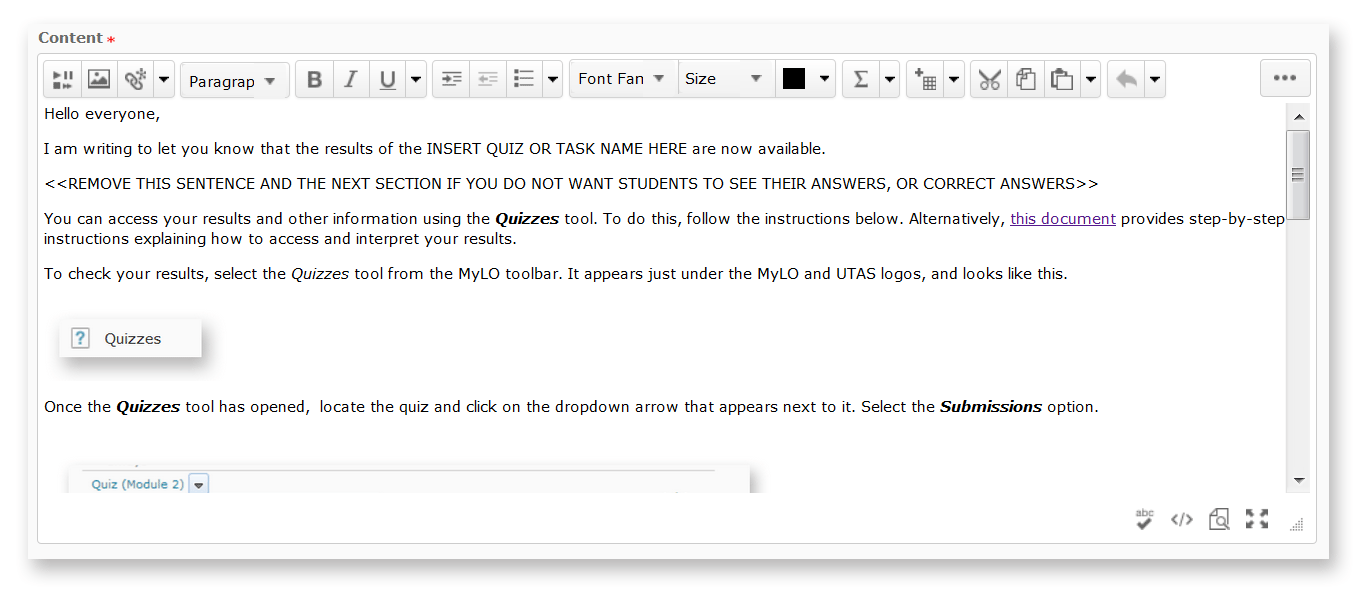
6 – The window will close. You will now notice that the template appears in the WYSIWYG view. You can edit it as you would a Word document, by adding or removing text. We have indicated sections that you may want to edit or remove using upper case text <<LIKE THIS>>. Remember to press Publish or Save (this will depend on which tool you are using) to save your changes.
MyLO Basics: Log in to MyLO and MyLO Manager
To log into either MyLO or MyLO Manager go to the UTAS Homepage & click the ‘MyLO’ link at the top right of the page.
From here you can log into either MyLO or MyLO Manager. Please note you can also find help documents provided by ITR & links to other teaching related tools such as MyMedia.
Important!
You must use your staff username and password to log in to MyLO. This means that you must have an active employment contract with UTAS. If you try to log in to MyLO (or your Unit Coordinator tries to give you access to a MyLO Unit, but cannot add you as a staff member), it is possible that your contract has not yet been approved.
If you are studying with and working for UTAS (e.g. studying as a research higher degree student and tutoring into a unit), you may find that a conflict between your ‘staff’ profile and ‘student’ profile prevents you from logging into MyLO. Alternatively, you may have trouble accessing the units that you should be able to see. If this occurs, please contact the IT Service Desk.
Setting up Assignments for submission of group assessment tasks
Are you planning to use group assessment tasks in your unit? A list of useful links are provided below to help you create your chosen Assignment type (and an associated Survey if you need one).
Useful resources
- Setting up a Group Assignment Submission for submission of group work
Provides step-by-step instructions to help you create a Group Assignment Submission Folder. Contains useful tips about marking too. - Setting up an Assignment Submission Folder to collect student assignments
Step-by-step instructions showing how to create an Individual Assignment Submission Folder. - Setting up a Survey and a Report
Explains how to create a Survey, step by step. Also explains how to set up a Report associated with your Survey. - Accessing a Survey Report
Explains how to generate a Report to see the results of a Survey. You can save the results as a PDF and share them with students or colleagues, if you wish to.

