Category
MyLO Content
Moving Content in MyLO
This document covers moving content like files, modules(folders) etc in the Content tool of MyLO.
Each item in the content area, be it a single file, URL or a whole module – has an icon to the left of it that looks like this:
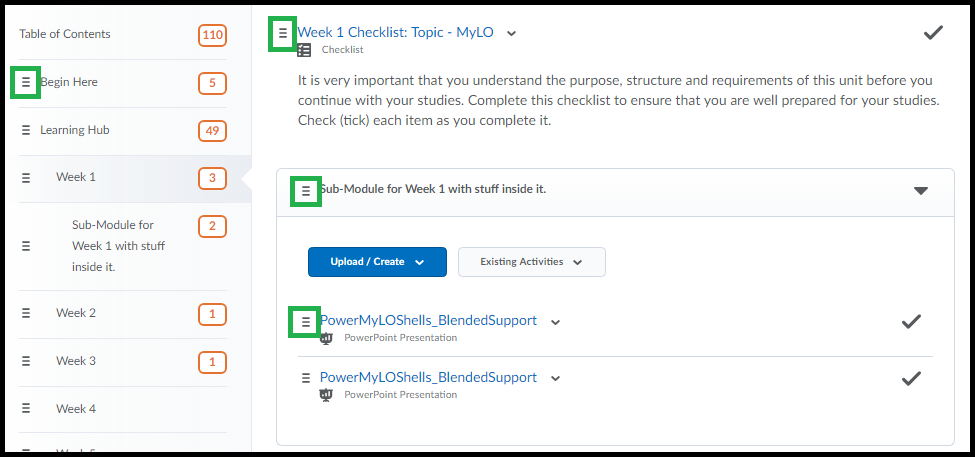
In the screenshot below I’ve highlighted some instances of this icon to show that it appears both in the Content Viewer (the right side of the content area) and the Left Side Menu.
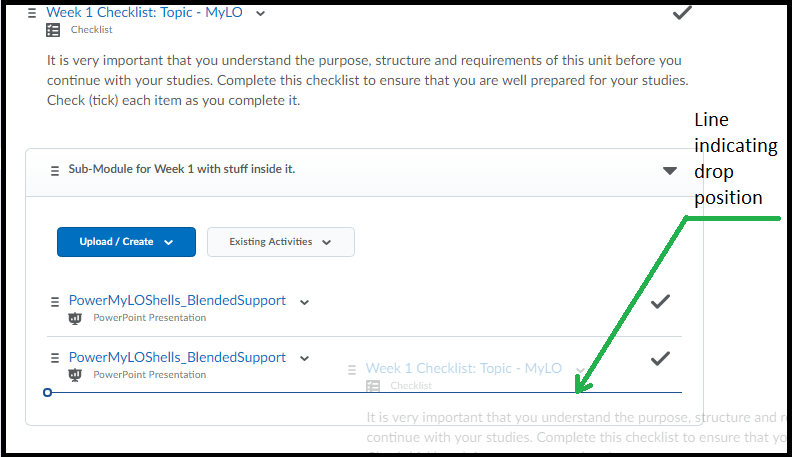
This icon indicated this item can be ‘dragged’ to somewhere else. To ‘drag’ any content item click the left mouse button and hold (or touch and hold if using a mobile device) until you see a ghosted version of the item appear as shown in the example below. You may also see your cursor change shape (example icon shown below is the default on my PC).
As you move your item you will see a line appear – this line indicates where the will end up if you release the mouse button/touch.
The exception to this is an empty folder – if you drag an item over an empty folder an area inside of it will turn ‘blue’ indicating the item will end up there.
You can Drag an item/module from somewhere in the Content area (on the right) to anywhere else in the content area. You can also Drag an item from anywhere in the Left Side Menu to somewhere else in the Left Side Menu. Keep an eye on where the ‘line’ is to ensure it is ‘dropped’ into the correct location.
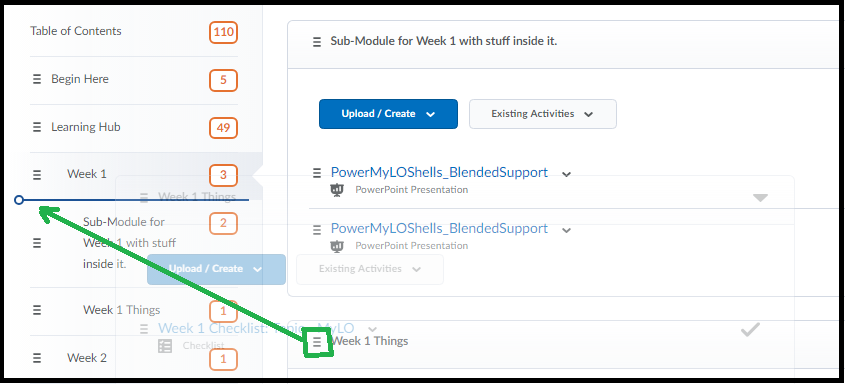
You can also drag an item from the Content Viewer (on the right) over to the Left Side Menu (on the left) by moving the icon over to the left. You will see either a Line that indicates where the item will be placed between modules as it’s own module [Shown Below]
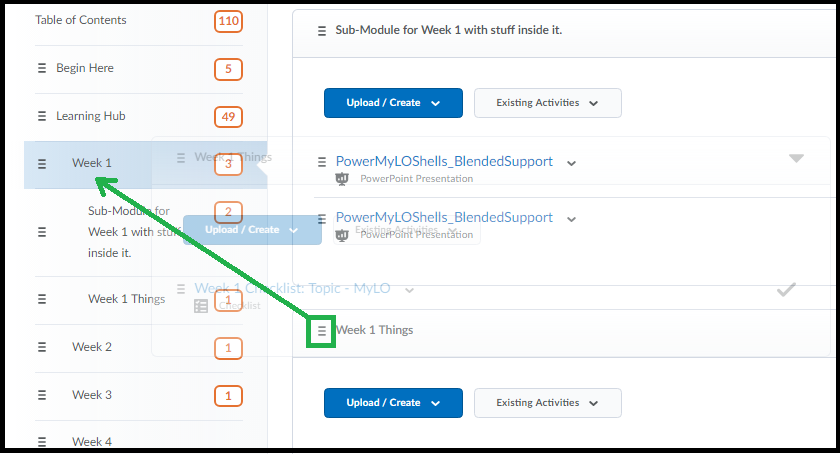
OR you will see a module(folder) highlighted indicating the item will end up Inside that module [Shown Below].
You can’t drag an item from the Left Side Menu over to the ‘content’ area. If you need to put one module INSIDE of another, you will need to do this by dragging it from somewhere in the Left Side Menu to somewhere else in the Left Side Menu then going into that module/folder to further move if necessary. Any item/module can be drag/dropped as many times as you need.
Lost something? Click each of the folders in your Left Side Menu and check the content viewer on the right – once you find your lost item, drag/drop to the correct location. Note some movements may require a couple of steps.
Hiding Content in MyLO
Have something you don’t want students to see just yet? There are ways to hide content from all students – the easiest is to set the content to ‘Draft’ mode. This document covers how to do this with modules/folders and individual files.
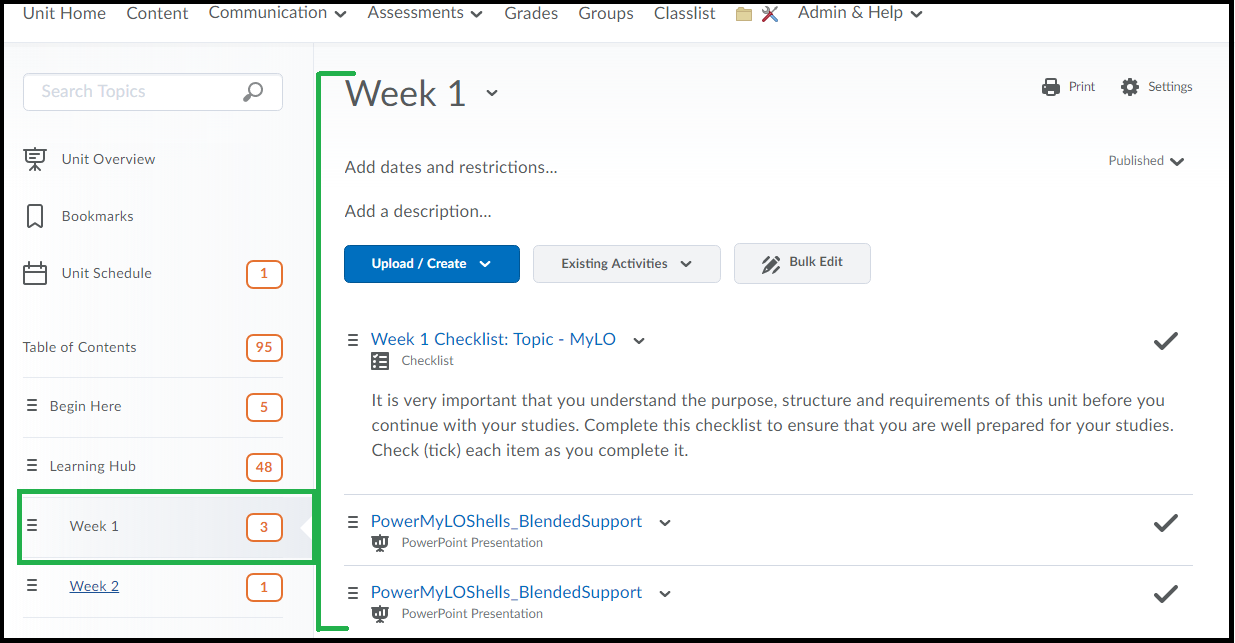
Head to the ‘Content’ area in MyLO where you can see the list of the folders/modules on the left, and their content on the right.
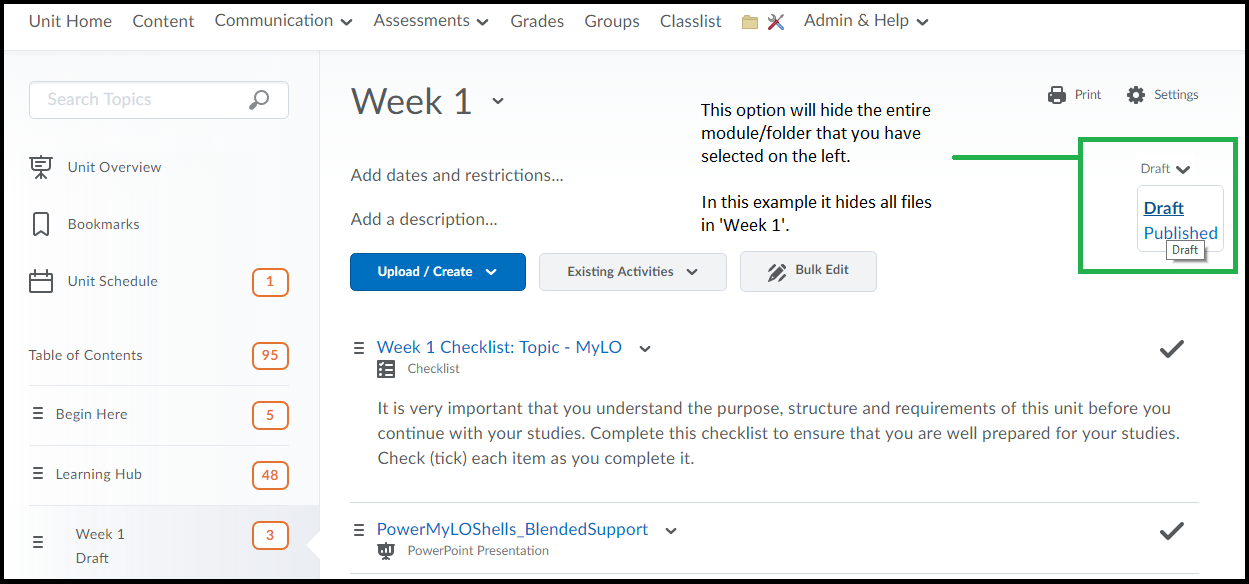
You can set a module (folder) to draft and hide all of the items within.
* Select the Module/Folder on the Left.
* On the right go to the top/right area and choose ‘Draft’ from the menu as circled in the screenshot.
You can set an individual item (like a file) to ‘draft’ also:
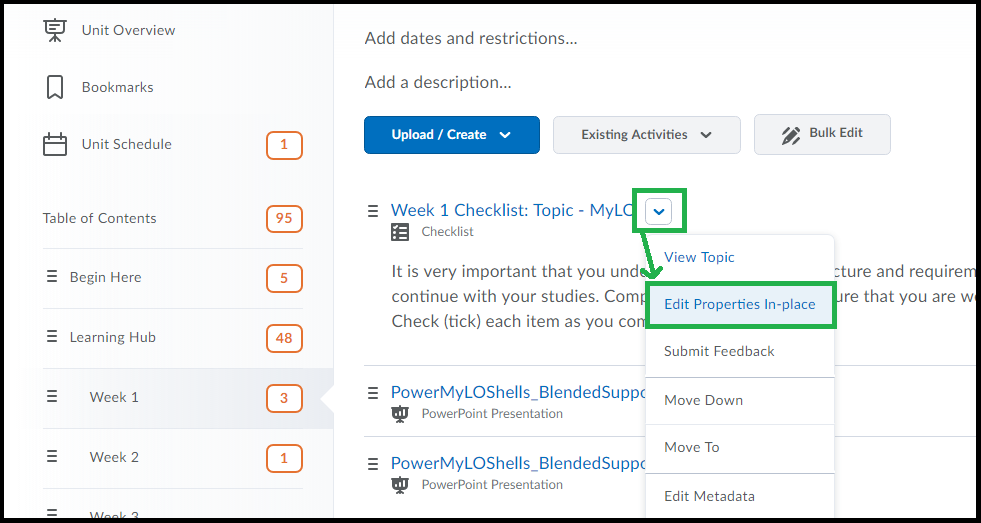
* Select the module/folder this item is contained within on the left, so that you can see the link to this item on the right.
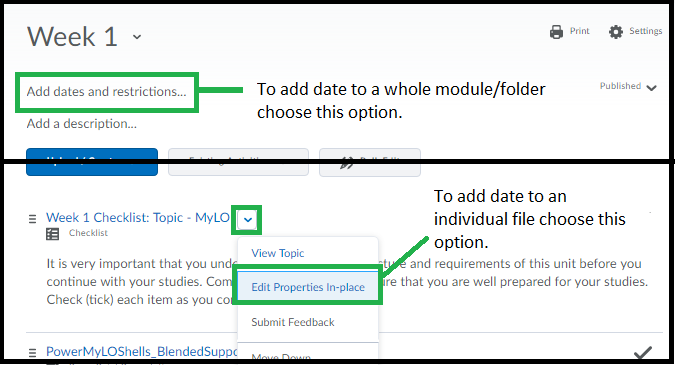
* Click the triangle menu to the right of the item and choose ‘Edit Properties in Place’.
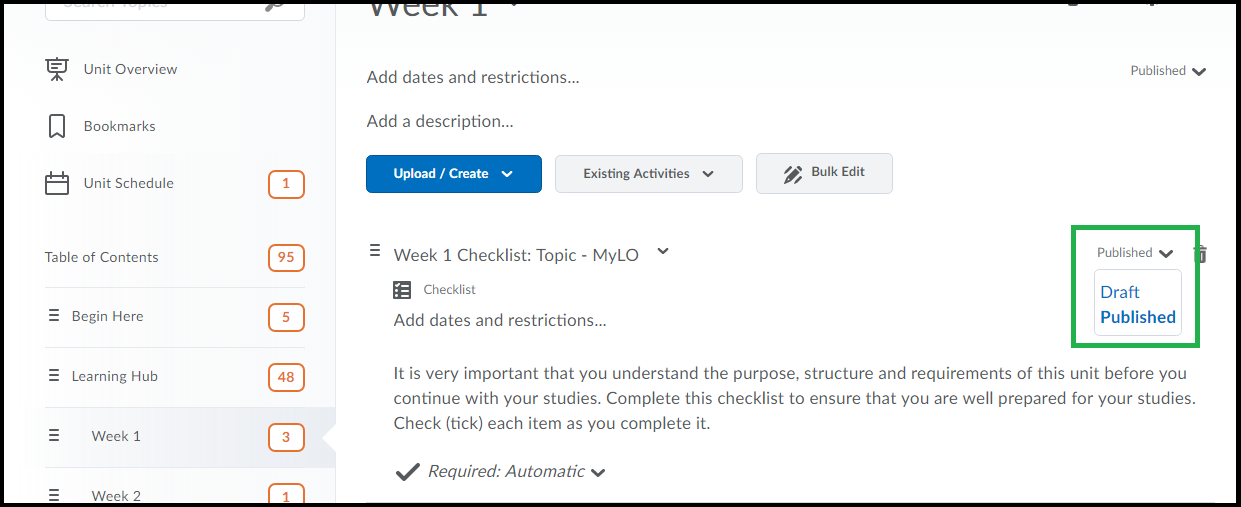
* Now you can select ‘Draft’ from the menu to the right of the item.
To make any item visible again click the ‘Draft’ option and choose ‘Published’.
Bulk Edit allows you to see the option for ‘draft/published’ for multiple files at once.
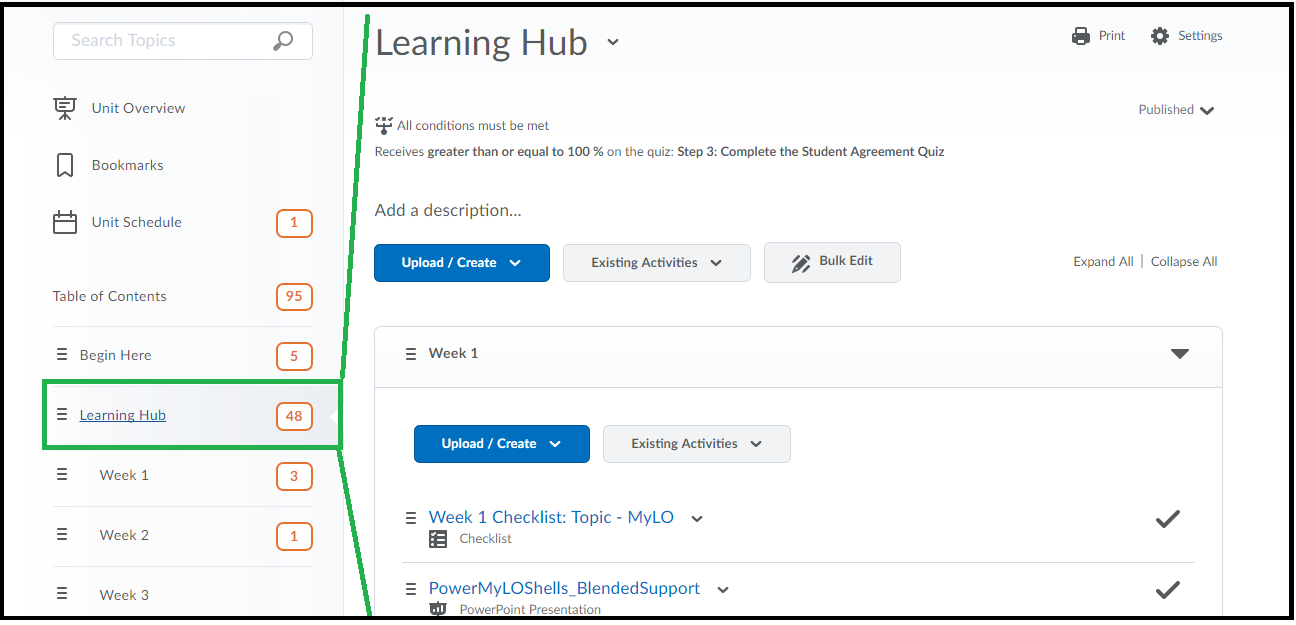
* Click the containing folder/module on the left (ie, the folder/module that contains all the items you wish to make draft/published). In this example I select the Learning Hub, although I want the folder ‘Learning Hub’ itself to still be visible but hide content within.
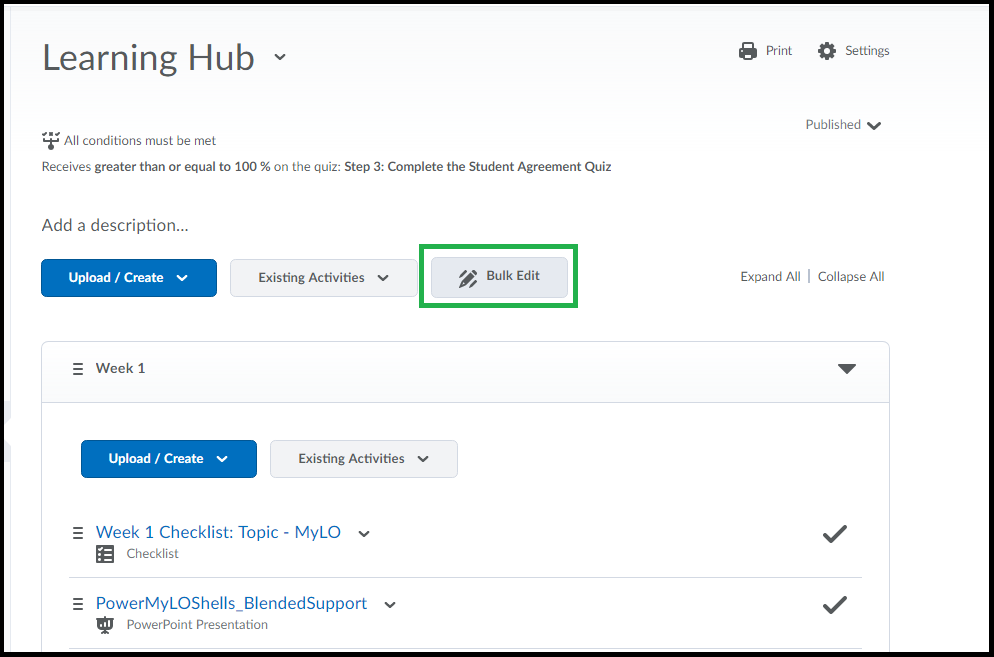
* On the right, at the top there should be a ‘Bulk Edit’ button. Click this button.
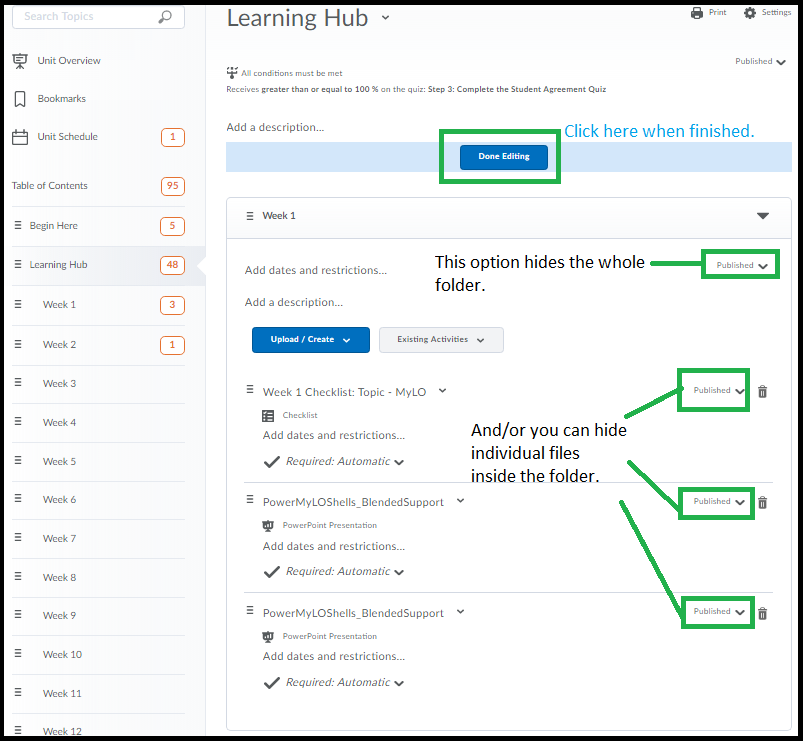
* Now option to make ‘Draft’ or ‘Published’ appears for each folder in the list. Select ‘Draft/Published’ as required for things you want hidden and then click ‘Done Editing’ back at the top of the page.
You can go back to ‘Bulk Edit’ to switch items to ‘Published’ as well, though once set to ‘draft’ the option stays visible on the page and you can click this option to switch to ‘Published’ at any time.
You can alternatively add a start date to folders/modules and files, if you do this you don’t need to also switch to ‘draft’ mode as the item will be hidden until that date is reached.
* Click the containing folder on the left.
* Click the ‘Add Dates and Restrictions’ option on the right OR choose ‘Edit Properties’ if it’s a file.
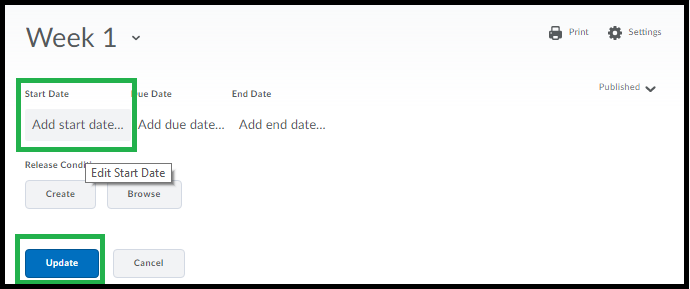
* Click ‘Add Start Date’ and choose a ‘Start’ date/time and click ‘Update’. You don’t need to set ‘due date’ or ‘end date’ unless you also want to use those options.
To edit any date you choose just click on it again, or click the [X] next to the date to remove it.
(Note: Other staff in your unit will always see items set to ‘draft’ or with dates and other restrictions set)
ADVANCED: How to force a space after the last element in an HTML page
From time to time, your colleagues may ask for help because they cannot insert a new element at the bottom of an HTML page based on the ICB Template..
While this problem can be avoided through the use of spacer elements, it won’t always be avoidable.
Here’s how to insert a paragraph space after the last element on a page so that further elements can be added. This is an advanced technique, involving some basic editing of HTML Source Code! If you are not confident doing this yourself, ask your local support team for assistance.
Step 1
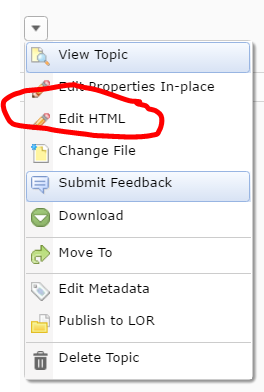
Ensure that your colleague has saved the page and is no longer editing it. Locate the page in the Content tool, select the little black arrowhead to the right of the page name, then choose Edit HTML from the menu.
Step 2
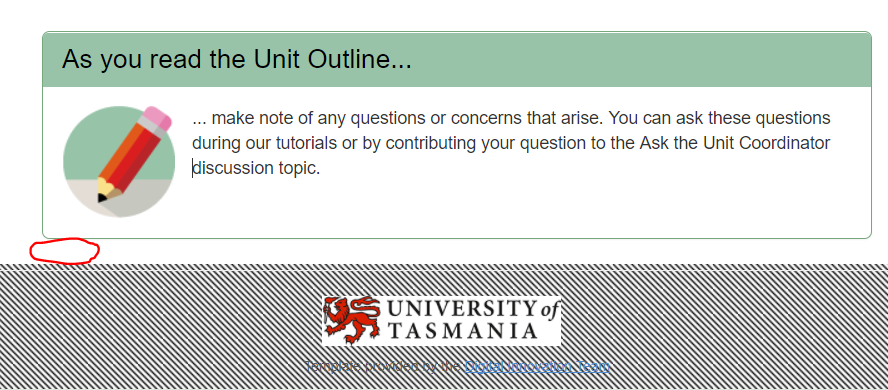
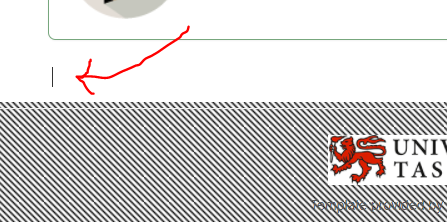
The WYSIWYG editor will open. Scroll to the bottom of the page.When you try to select this space/place your cursor in between the last element and the page footer, you will notice that you cannot select/get the cursor to appear. This means that there is no space remaining. You will need to code in a new space (essentially, a paragraph containing no characters).
Step 3
You should notice the HTML Source Editor symbol appears towards the bottom right corner of the page. It looks like this. – </>. Select the HTML Source Editor symbol.
Step 4
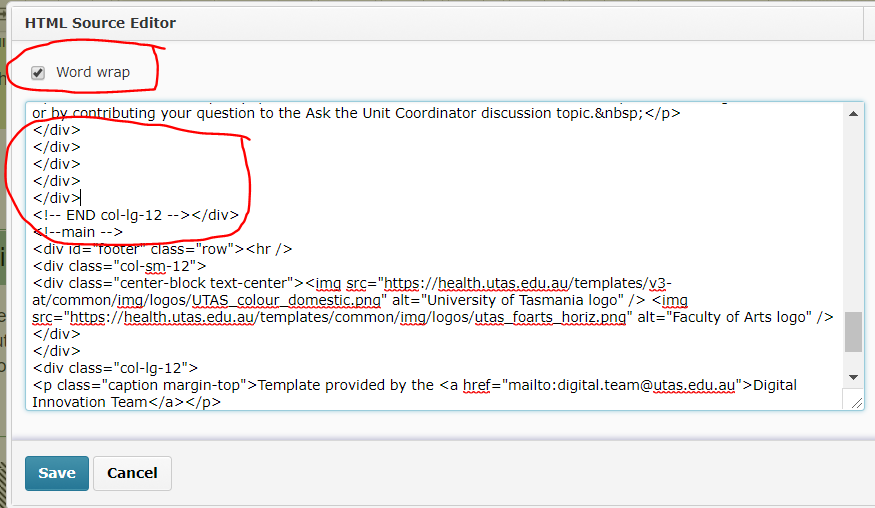
The HTML Source Editor will open. Ensure that the Word Wrap option is selected, then scroll down towards the very bottom of the source code. Around 18-20 lines up from the bottom, you should see the code shown in the image below. Look in particular for a line of code that says <!– END col-lg-12 –></div>. The next line of code should say <!–main –> . If you have trouble finding this snippet of code, press CTRL + F (PC) or Command + F on your keyboard, then type END col-lg-12 into the search field. Press Enter or Return on your keyboard. This should help you find the correct code snippet (it will usually highlight a matching result for you).
Step 5
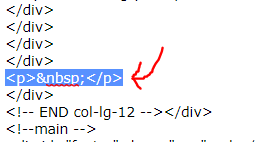
Once you have found the <!– END col-lg-12 –></div> code snippet, look just above it. You should see about five lines of code, each with the identical tag, </div>. Place your cursor just behind the fourth </div> tag in the list, then press the Enter or Return key on your keyboard to create a new line. Type the following text into the new line – <p> </p> – as shown below.
IMPORTANT!: The new code must go after the fourth </div> tag in the list. If you place it higher in the list, or at the end of the list, you may accidentally alter the alignment of text on the page, or the properties of an existing template element.
Step 6
Press the Save button to return to the WYSIWYG view of the HTML page. A paragraph space should now appear at the bottom of the page. You should be able to place your cursor in this new space. You may wish to add some Spacer template elements to the area, so your colleague doesn’t ask you to repeat this process again for them in the near future. Don’t forget to save the changes you have made to the page!
Open a MyLO HTML page in editing mode
In MyLO, an HTML page is like a web page. It can contain different types of content, including formatted text, images and multimedia (like embedded videos). If a page is based on the Interactive Content Builder (ICB) template (open in new window), you can use a range of elements to improve general look and feel, as well as interactivity, of an HTML page.
To change the existing content of a page, remove existing content or add new content you will need to choose to edit the page.
Choose to edit a page
First, navigate to the page you wish to edit on your unit’s MyLO site. It can usually be found somewhere in the Content tool.
You can choose to edit the page BEFORE you open it, or AFTER you open it. Simply select the small black arrowhead that appears to the right of the page name. Select Edit HTML from the menu.
How will I know that a page is in editing mode?
When a page is in editing mode, you will notice that the editing toolbar appears towards the top of the page. These tools can be used to add media, insert hyperlinks (known as Quicklinks) and apply formatting to text.
Track whether students have accessed an Item in MyLO Content
If you need to keep track of student access to an Item in your MyLO unit’s Content tool, using the Reports tool will allow you to get a quick overview of who has, or hasn’t, accessed the Item.
Step 1
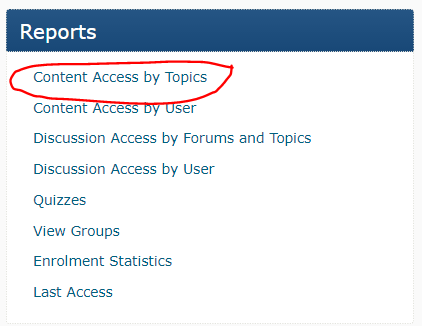
Navigate to your MyLO unit’s Home page (this is the first page you see when you access the unit). You should see a Reports widget to the right hand side of the screen. This contains links to a variety of reports. Select Content Access by Topic.
Step 2
The report will open. You will see a list of all the Content items in your unit, presented in a table. As in the Content tool, the items are organised into Modules (folders) and Sub-modules. Locate the Item that you wish to see results for. You may need to scroll down to find it. Select the number recorded in the Users Visited column (second column from the right side). For example, here we will select Week 1 Activities & Resources page from the Week 1 Discussion: Single page approach Module.
Step 3
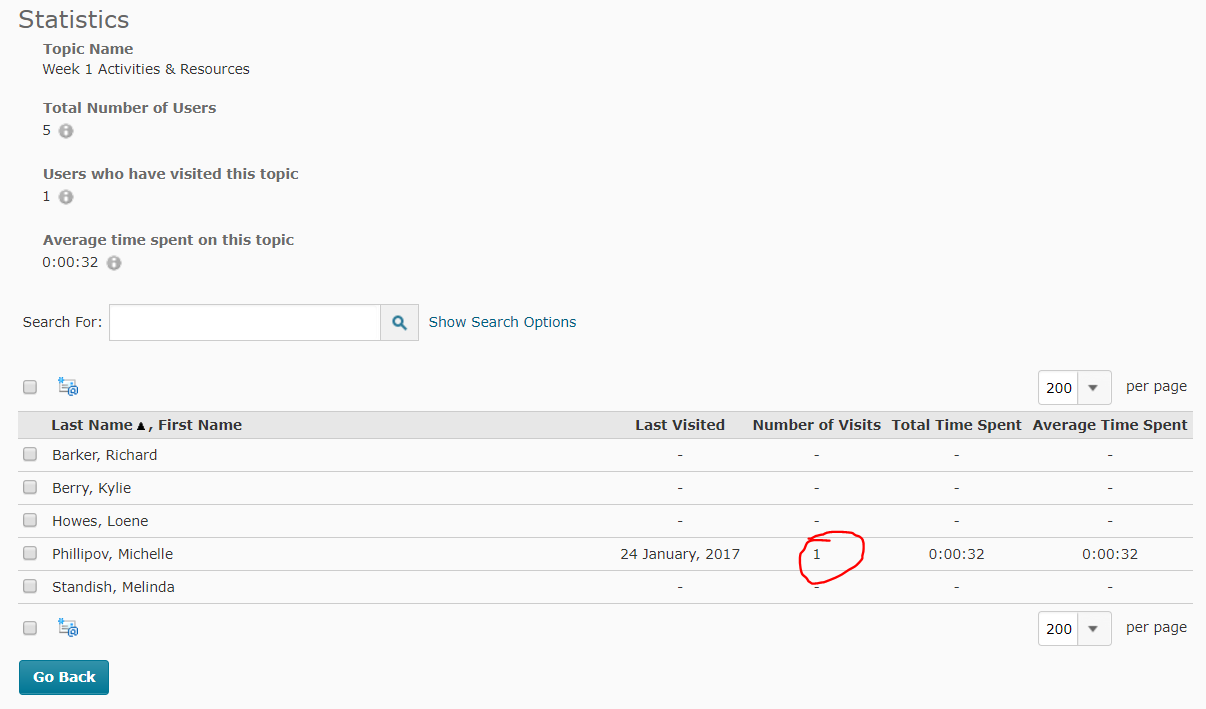
You should now see a list of students enrolled in your unit (to see more than 20 on a page, use the per page drop down menu to the top right of the table to select 200).
TIP: If you only wish to see a selection of students, you can filter by group, using the View by options seen above the table of results. For example, you could choose to see only off-campus students by selecting the group, Default Group Study Mode External. This post provides more information about how to filter results by group.
You should be able to see the Number of Visits students have made to the item. For example, in the example below, Michelle has made one visit to the item.
Step 4 (optional)
If you would prefer to have a printable version of the results, ensure that you have the window selected, then select CTRL + P on your keyboard (for a PC) or Command + Print (for a Mac). This should generate a printable version of the report page. If your students are spread out across several pages, you will need to repeat this process for each page.
Link to items inside, and outside, of your MyLO unit
MyLO includes a powerful tool known as Quicklinks. This tool allows you to link to a range of items inside and outside of your MyLO site. You can use this tool to create links pretty much anywhere in MyLO including Announcements; Descriptions of Modules and Items; HTML Pages; Discussion posts; and feedback in Assignment Submission Folders, Rubrics and Quizzes.
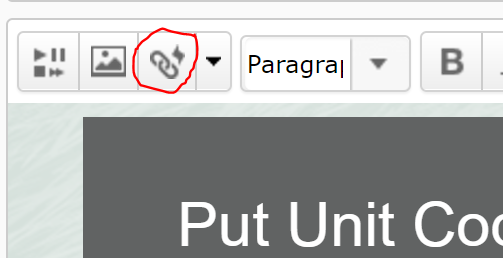
As a general rule, if you can see this icon when creating or editing something, you can use the Quicklinks tool!
In this post, we show you how to insert a Quicklink. including how to choose linking options, in five (5) steps. We then provide a summary of the types of items you can link to, and the best target behaviour to use with each item type.
How to insert a Quicklink and choose your linking options
Step 1
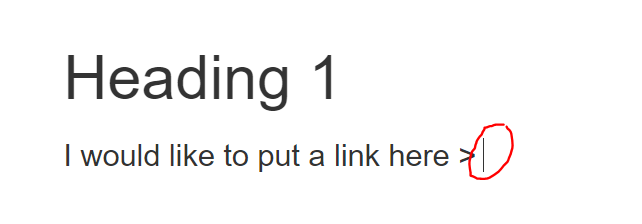
When editing an item in MyLO, place your cursor where you would like the link to appear.
Step 2
Select the Quicklinks tool. It should appear towards the top left of the editing window and will be the third icon from the left hand side.
Step 3
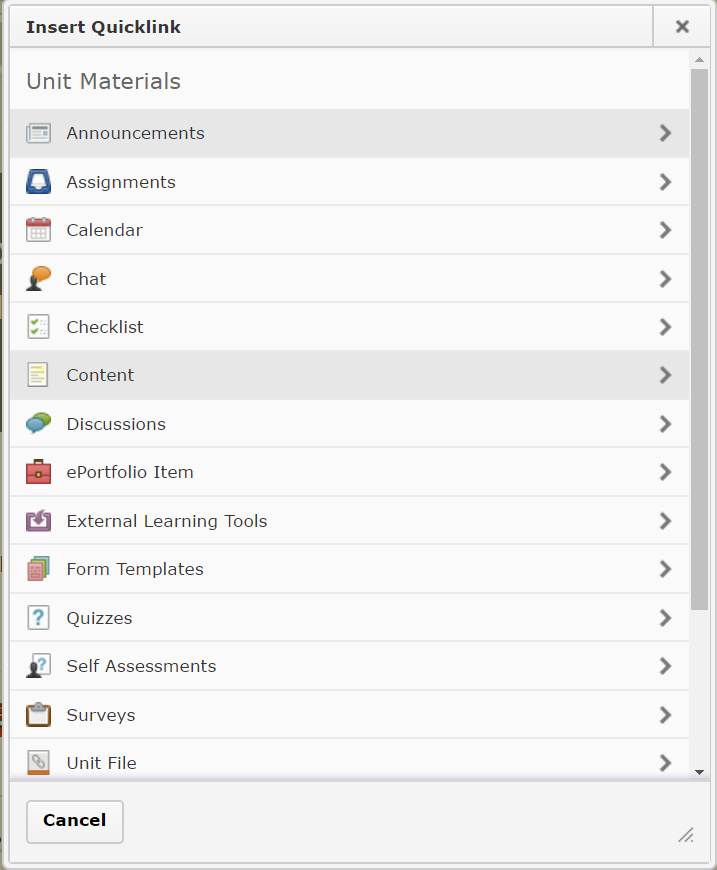
The Insert Quicklink window will open. Select the type of item you wish to insert a link to (for example, here we have selected Content).
Step 4
Work your way through until you have found the item you wish to link to. Select the pencil icon to the left of the item. This allows you to insert a meaningful link text, and control the target behaviour of your link. If you’ve gone too far, use the left-facing arrow symbol (within the Insert Quicklink window) to go back as many times as needed until you reach your preferred option, or press the Cancel button to start again.
NOTE: You cannot select a specific tool or a Content Module to link to. You can only link to items within Tools or Modules. For example, you cannot link to the Assignment Submissions Folder tool, but you can link to an Assignment Submission Folder within the tool.
![]()
Step 5
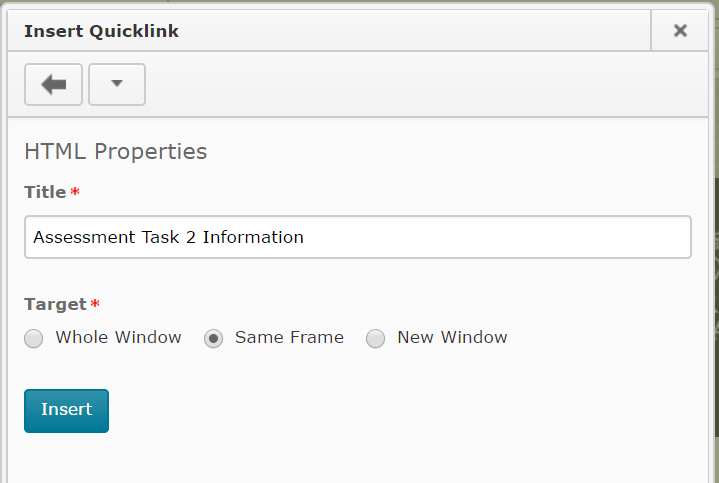
You should now see two options. You can change the default Title text (usually the name of the item) so that it is more meaningful to students. To do this, simply replace the text in the Title field. You can also change the Target. By default, this will be Same Frame. However, we have found that this target behaviour does not work well with many item types. To see if you should change the Target behaviour for a Quicklink, refer to the table towards the end of this page.
TIP: If using the New Window Target behaviour, include the following phrase at the end of your link Title so students know what will happen when they click on the link: (opens in new window). For example: Access the Week 1 Checklist here (opens in new window).
Once you have chosen your options, select the Insert button. Your Quicklink should now appear in the editing window. Continue to edit as normal and don’t forget to Save your work regularly!
Item types and target behaviours
Please note that we have excluded some Quicklinks options as they do not function effectively or are rarely used at UTAS.
| Item Type | Recommended Target Behaviour | Notes |
|---|---|---|
| Assignments | Whole Window | Link directly to an Assignment Submission Folder. |
| Calendar | Whole Window | Link to a Calendar item. |
| Chat | Whole Window | Link to a Chat room. If you haven’t already created a room, you will have the option to Create New Chat. |
| Checklist | Whole Window/New Window | Link to an existing Checklist, or create a new one by selecting Create New Checklist. It can be useful to open a Checklist in a new window if students need to work through the Checklist whilst completing other activities on the MyLO page where you placed the link. |
| Content | Same Frame | Allows you to link to items seen in Modules in Content. Note that you cannot link directly to a Module (folder) using this tool. Some staff find it easier to have a Materials module that they upload class materials to (e.g. Powerpoint Presentations and PDFs). They then use the Content Quicklink, rather than uploading files ad-hoc via the Unit Files Quicklink tool. |
| Discussions | Whole Window | Allows you to link to Forums (best when you have several Group Topics in the one Forum) or individual Topics.To link to a Forum, locate the Forum, and select it. You will see the Forum name, along with all the Topics included in the Forum. Select the small + icon that appears to the right of the Forum name.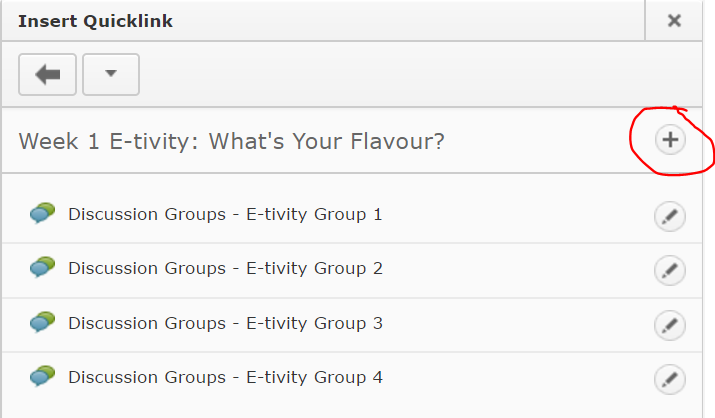 You cannot link to a thread using this method, though that is possible using the Url Quicklink option. |
| External Learning Tools > MyMedia Recordings (ALP) | Whole Window | Creates a link to your Echo360 Section, or to an individual recording in your section (Class). Once the Quicklink is created, you will need to save/preview your item, so that you can follow the link that you have created. You will then need to select the Section/Class you wish to link to take students to. Further instructions are available here for linking to a Section, or here for linking to a single recording (Class). |
| External Learning Tools > MyMedia Recordings (ALP) | Same Frame | Web Conferencing – creates a link to the Web Conferencing tool, so students can then launch the 24-7 room (by selecting the Join Room) or a session (by selecting the session name). |
| Quizzes | Whole Window | Note that students will receive an error message if they try to follow this link before the Start Date or after the End Date has been reached. You may like to mention this in the link text. For example: Please note that you will receive an error message if you try to access the Quiz before DATE/TIME or after DATE/TIME) |
| Surveys | Whole Window/New Window | If students have already completed the maximum number of attempts, they will see a message saying they have no more attempts left. |
| Unit File | New Window | Allows you to select a file from the Manage Files tool (if you have already uploaded the file to MyLO) OR to upload a file from your computer. Uploading a file from your computer via this Quicklink tool will NOT allow you to choose a Target behaviour. We have found this problematic in some cases. You may find it easier to upload files to Manage FIles before linking to them. Alternatively, upload them to a Module (folder) in Content, and link to them using the Content Quicklink. |
| Url | New Window | Allows you to link to a web address (URL). This is typically used to send students to a website outside of MyLO. |
| Equella Select or Add Item | No choice | Allows you to create and link to a new item in the university’s Digital Copyright Management System, known as Equella. You can also link to existing items. This system is generally used to house student readings (like PDFs of a chapter from a book or an article) that are not already available via the UTAS Library. |
| Web Conferencing | N/A | DO NOT USE: Use External Learning Tools option instead. |
Using the ICB with MyLO: Work-around
During the most recent MyLO update (November 24, 2016), we (temporarily) lost the ability to copy items from the Interactive Content Builder (ICB) into a MyLO page. The text will copy over, but the formatting wrapped around the text is stripped out.
The MyLO team and ICB template developers are currently working on this issue. In the interim, the following method will allow you to continue to insert ICB elements into your pages in MyLO.
TIP: If a new page will contain the same or similar elements to pages that you have already created, it may be quicker to create a new page based on an existing page.
Step 1
Locate the page in MyLO that you wish to edit. Click on the Edit HTML button (usually seen at the bottom of the page). Alternatively, click the small black arrow head next to the page’s name and select Edit HTML option from the menu.
Step 2
In a separate tab or window, go to the ICB template page (opens in new window), locate the element you wish to copy, and click on the Copy to Clipboard button that appears beneath the element.
Step 3
Return to the MyLO tab/window. Place your cursor where you want the ICB element to appear on your page. Towards the top left of the editing window, you should see a tool that looks like the one shown below. It should be the first button on the far left side. This is called the Insert Stuff button. Click on the Insert Stuff button.
Step 4
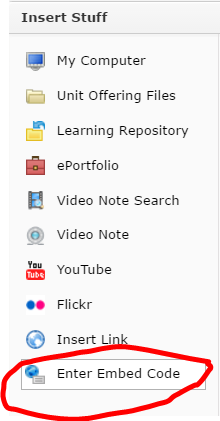
A window will open. Select the Enter Embed Code option from the menu on the left-hand side.
Step 5
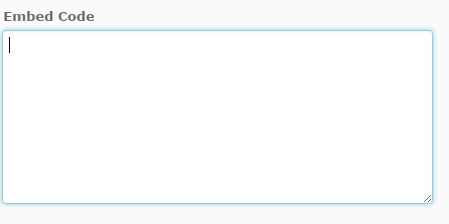
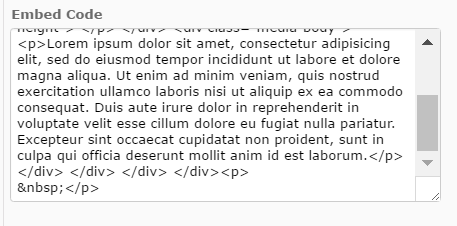
You will see a white space to the right-hand side. Place your cursor in the white space, then paste as you normally would. For example, press CTRL + V (PC) or Command + V (Mac) on your keyboard; or right click over the white space and select Paste; etc. You should then see some code appear in the white space.
Step 6
Now click the Next button (bottom left-hand corner). You will see a preview. This may not show you what you expect it to, but trust us, this will work! Finally, click the Insert button.
Done!
You should now see the ICB element in your page. Continue to edit as you normally would.
Creating a VideoNote video in MyLO
VideoNote is a tool included with MyLO. It allows you to capture short videos of up to three (3) minutes using a webcam and microphone*. The tool is available anywhere that you can see the WYSIWYG (What You See Is What You Get) editor in MyLO, including: HTML pages; Discussion descriptions and posts; Quiz questions answer options and feedback; the Announcements, Assignment Submission Folder General Feedback field; and more. To learn how to use VideoNote, refer to the How to section below or download this PDF from the MyLO Support Team. The PDF also includes instructions showing how to locate and embed an existing VideoNote.
FAQs
- What is VideoNote best used for?
VideoNote is best for one-take, short videos, such as module introductions, short explanations/stories to illustrate concepts, and provide video feedback to students. - Can I capture my screen activity with VideoNote?
No. VideoNote only captures webcam video. If you’d like to capture activity on your monitor (e.g. a PowerPoint presentation), use Echo360 ALP Personal Capture. - Can students download a VideoNote video?
No. VideoNote videos are streamed, meaning they must be viewed online. This is generally OK, as the videos are quite short. Videos uploaded to Echo360 ALP can be downloaded or viewed online. - Can I edit a VideoNote recording?
No. VideoNote is designed for short, one-take videos. If you wish to create videos that will need editing, use Echo360 ALP Personal Capture.
How to
NOTE: You must use a device with a recent version of Adobe Flash Player enabled in order to record VideoNotes at this time. This generally means that you will not be able to create a VideoNote
You can use VideoNote anywhere you see the WYSIWYG editor (usually when you are creating something for the first time or editing it). Specifically, you will need to see the Insert Stuff tool. It will be the first tool on the left hand side, and will look like this:
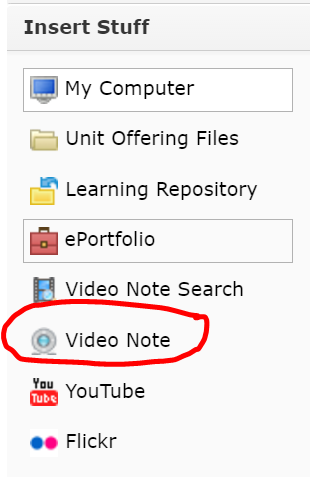
The Insert Stuff window will open. Choose the Video Note option from the side menu.
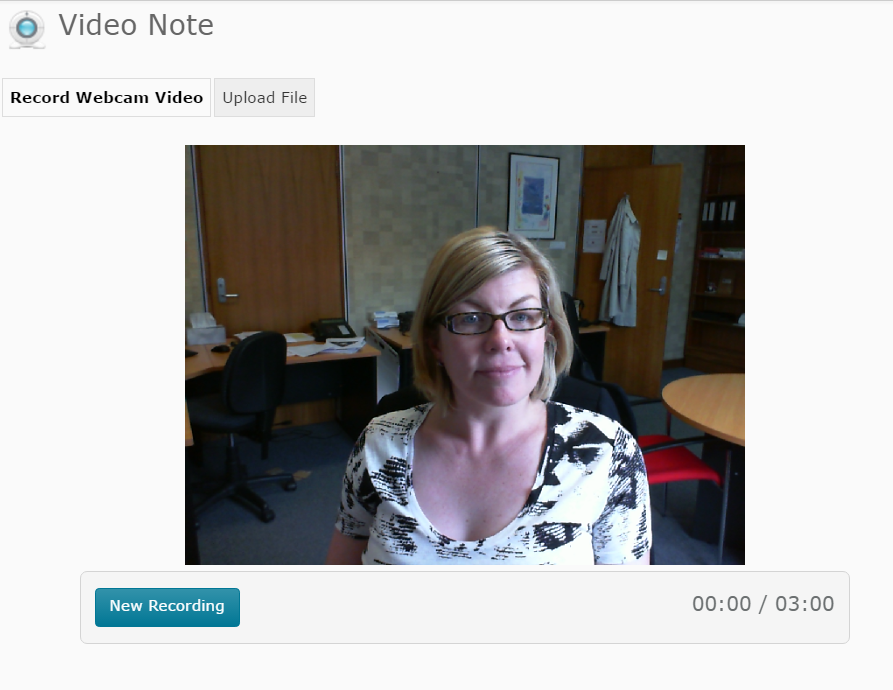
You will see a preview of your webcam video appear on screen. NOTE: You may be prompted to Allow something at this point. If so, check the Allow option. When you’re ready to record, click on the New Recording button to start recording. The recording will start straight away.
As you’re recording, you will see the time count down towards the bottom right of the window. When you’re ready to stop, click on the Stop Recording button. Note that the recording will end automatically at 3:00 duration.
As soon as you click Stop Recording, a preview of the video will play. If you’re not happy with it and would like to record again, click the New Recording button. If you’re happy with the video, click on the Next button that appears to the bottom left of the screen.
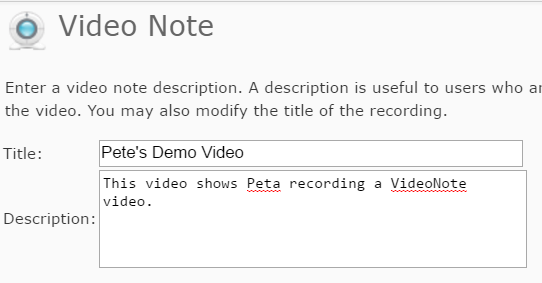
You will be prompted to add a Title and a Description. IMPORTANT: Make note of the title, as it can be very useful when searching for your existing VideoNotes in the future. The Description is shown to users who cannot see the video due to browser limitations.
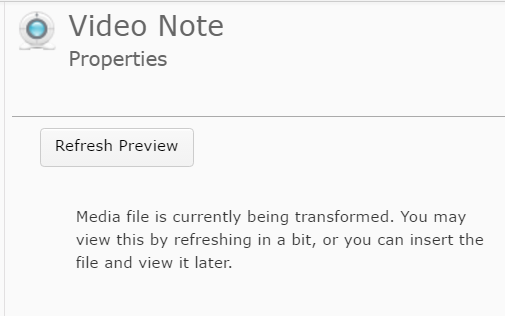
Click the Next button. You should now see a preview of your video. You may not see the preview immediately, as it can take a while for the video to process. If you see a screen like this…
and you want to see a preview, wait a few moments and click Refresh Preview. If you’re happy to continue, click the Insert button that appears towards the bottom left of the window.
Your video (or the ‘processing’ message) should now appear in the page/description/post/field that you are editing. Once you have finished editing, click Save/Save and Close/Publish.
*Most webcams include a microphone, however, these microphones are not very useful for recording in environments with a lot of background noise (e.g. a shared office). They also tend to have a limited range, so are not very good if you tend move away from your computer (e.g. where the web cam is positioned). Using a USB headset is a good alternative to a webcam microphone, and tends to capture higher quality audio without the background noise. Consult your local IT Hub to ask about acquiring a USB headset.
Create a new MyLO page based on the ICB template or an existing page
The Interactive Content Builder (ICB) template allows you to easily incorporate a variety of visual elements and basic interaction into HTML (web) pages on your unit’s MyLO site.
Once the template is installed on your MyLO site*, complete the following steps to create a new, fresh page based on the template OR create a new page based on an existing page.
Instructions
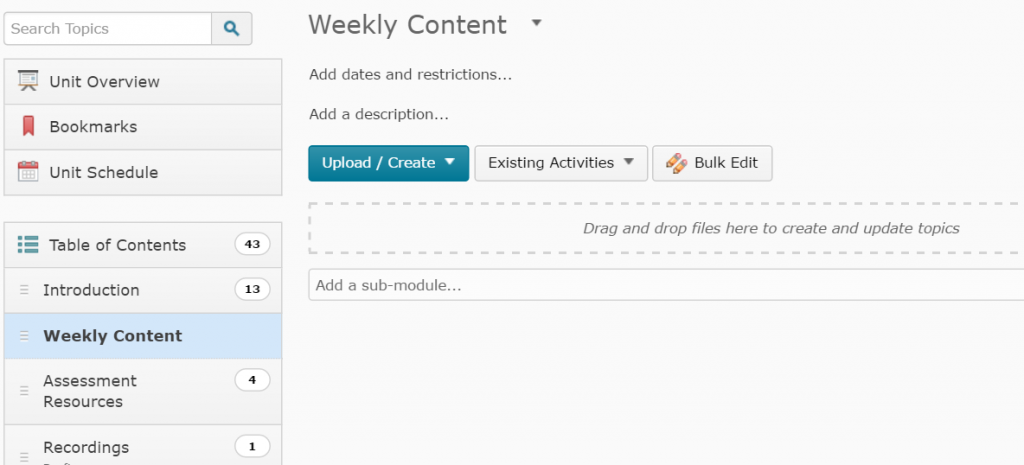
Go to Content and locate the folder where you would like your new page to appear. For example, here I have chosen Weekly Content. Make sure the folder is highlighted (usually in a darker colour) in the Table of Contents.
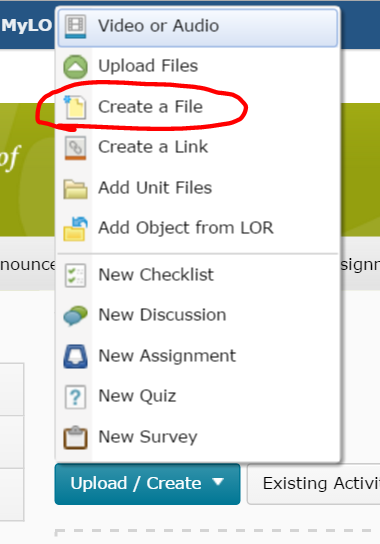
Click on the Upload/Create button, then select the Create a File option.
Click on the Browse for a template button.
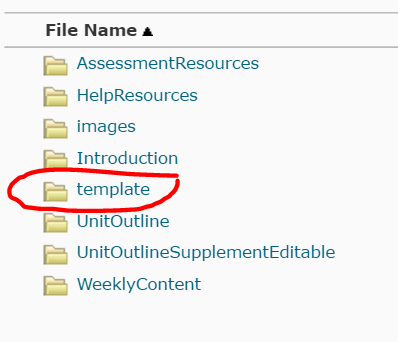
If you’re basing a brand new file on the template, browse for a folder called template, and click on it once. NOTE: You will only see this folder if the template has been added to your unit*. If you’re basing your page on an existing file, choose the folder in which the original file lives. For example, Weekly Content > Week 1.
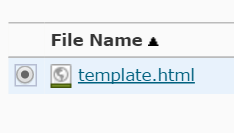
Now check the radio button next to the template.html file (for a blank template page), or the file you would like to base your new page on (e.g. Week_01.html). Click on the Add button.
The page contents will load. Before you start working on them, record a file name for the new file in name field (this will be the name of the file as seen in the File Manager).
It is good practice to save your newly created pages to a folder. It isn’t the end of the world if you forget to do this, but it is a good habit to get into! Before you start editing the page, scroll down to the bottom of the screen and click on the Change Path button.
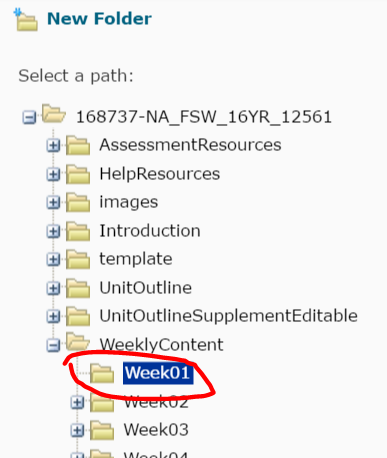
Choose the folder where you would like the file to live in. If you’re using a sub folder, you may have to click the expand icon next to the parent folder (+) to see it. Make sure the folder you want the file to live in is selected (it will be highlighted in a darker colour), then click on the Select Path folder.
Click the Save as Draft button.
![]()
You can now edit your file. Change the title to something you would like students to see. Don’t forget to Save or Publish your changes.
*The ICB template files must be installed on your unit’s MyLO site before you can use them. Please contact your local team for assistance: the Blended Learning Unit can help staff members teaching Faculty of Arts units; TSBE staff can approach the Flexible Education Team.
Edit a Checklist from Content
If your Ed-Tech has created a set of checklists for you and added them to your content area you may then need to go into each one and flesh out the details. You may also want to make a quick change to a checklist that you have previously edited or created.
Or you might have copied a unit from another semester and need to update your existing checklists.
The good news is, you can do it all from where they sit in the Content area with very little fuss!
First click the ‘Content’ button on the toolbar to load up the Content area.
Click the module/folder that contains your checklist, usually these will be in Learning Hub possibly in their own subfolder.
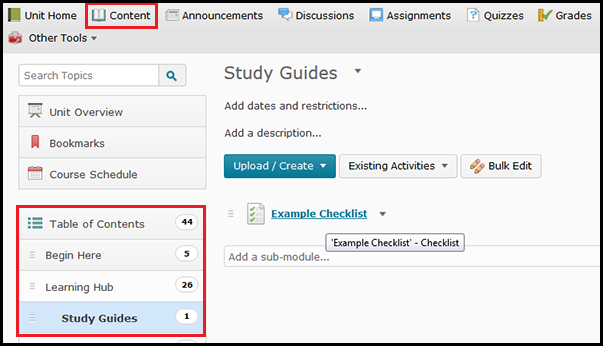
In this example I have clicked Content then Learning Hub and Study Guides to find the example checklist I will edit.
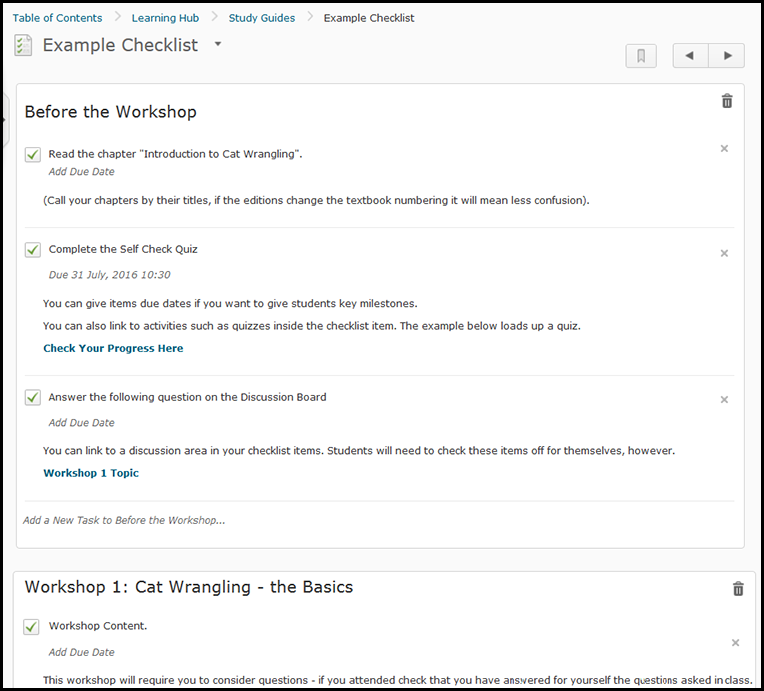
When you see a link to your checklist on the left part of the screen just click on it and it will load up in to the screen, similar to the example checklist in the screenshot below.
Editing Checklist Items
Once you’ve clicked on your checklist you’ll see each item listed out – (ignore the little checkbox icon). The example below shows the category headings and checklist items for the checklist “Example Checklist”. When you move your mouse over any item it will highlight in grey, this grey indicates it is an item that you can click on to change.
To edit any item- click on the text that you need to edit.
Category or Task Names:
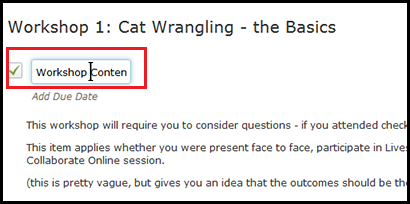
If you click on a title to change the text (as shown in the example below), you will see a text field to type into. Make any changes you need then click elsewhere on the page. This works for both Category names and Task names.
Descriptions:
If you click on one of the ‘description’ areas it will load a bigger more feature laden text field that allows you to do more advanced text editing, this tool is found throughout MyLO. There are further instructions for using this text editing tool listed below the screenshot. Click the “Update” button when you are done adding text to any area that loads up one of the Text Editor boxes.
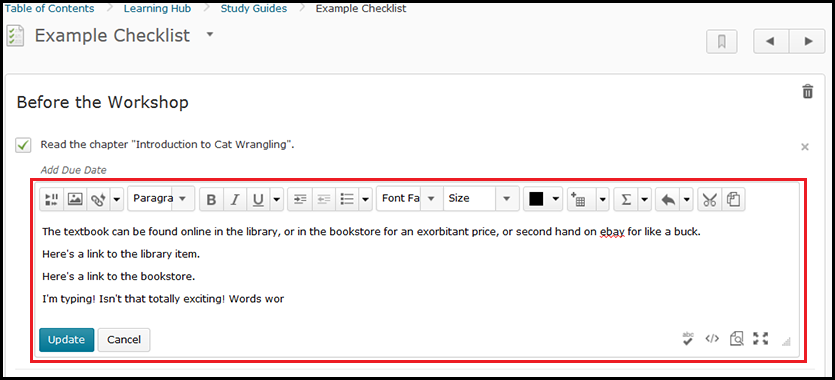
Most ‘description’ fields load up with the text editor tool. Don’t forget to click “Update” when you are done!
How to use the Text Editor (Page) Tool – list of resources (PDF | Video)
Deleting Items from the Checklist
To the right of any category is a bin icon – if you click the Bin icon you will delete the category and all of the items within this category.
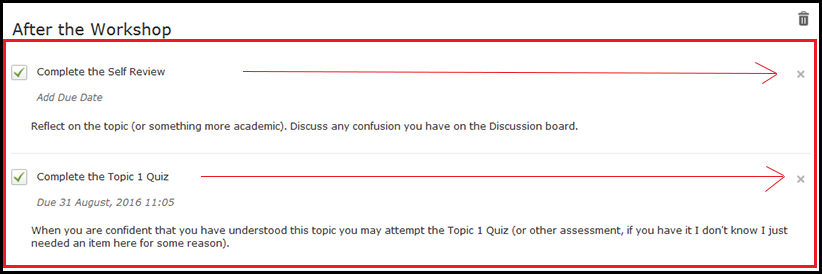
To the right of any checklist item is a small (x) – if you click the small (x) it will delete that checklist item.
Adding Checklist Tasks and Categories to your checklist.
To the bottom of each category is a little area that has “Add a New Task to (category name)” – this will add a new checklist item to that category. It allows you to add checklist items on the fly to any category you have in your checklist. When you add it, click on the text to edit the title and description.
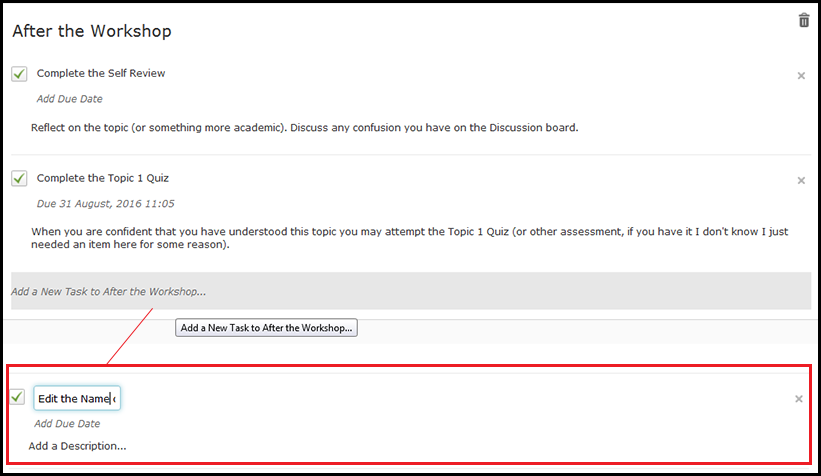
Click on the ‘Add a new task’ text as shown in grey above to add a new checklist item. Then you can click on the checklist item to edit it.
To the very bottom of the checklist is an item oddly named “Add a New List” – it should say ‘Add a new category’ because that’s what it does but, well, boosucks to logic. Click the “Add a new list” and you’ll get a new category just called “List (number)” but you can click on the title to edit the Category name, and add items as per ‘add new task’.
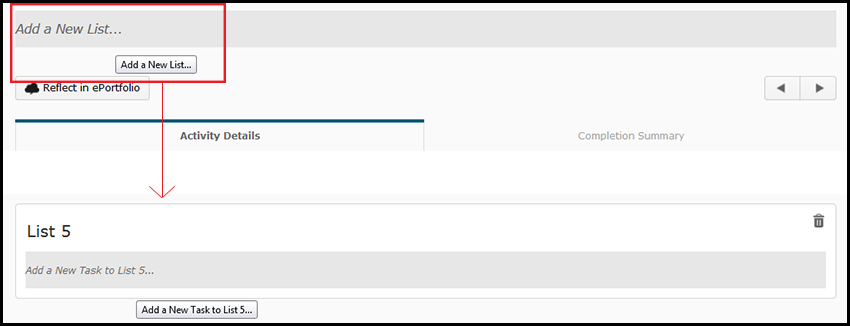
Click the Add a New List right at the very bottom of the checklist (just above the ‘activity details’ tab). Then you can edit the new Category that has appeared.
NOTE: If you do decide to add a new category here it will be added at the bottom of the checklist – however you can re-order items in your checklist from the Checklists tool itself. For further instruction on re-ordering items see the help sheet for Checklists: Reordering and Restrictions.

