Category
Resources for students
Help students locate Assignment Submission Folder results and feedback
Would you like your students to access grades and feedback in a Assignment Submission Folder, as well as feedback you have marked up on their submission using Grademark/Feedback Studio? Make sure your students know where to look to get the information they need!
Use our template to quickly and easily create an Announcement, an HTML page, an email (sent from MyLO) or a Checklist. The template contains instructions, with matching images, to help students find their results. You can edit the template to meet your needs.
To use the template, follow these steps:
1 – Use your mouse to select all the text, then copy all the text seen inside the box below.
<p>Dear {firstname},</p>
<p>I am writing to let you know that the results of <<INSERT ASSIGNMENT NAME HERE>> are now available. </p>
<p>Follow the instructions below to access your results and feedback.</p>
<p>To check your results, select the <b><em>Assessments</em>, then <em>Assignments</em></b> from the MyLO toolbar. </p>
<p>You will see a table listing all the <em><strong>Assignment Submission Folders</strong></em> available in the unit (similar to the table seen below). Find the relevant <em><strong>Submission Folder</strong> </em>(the name appears in the far left column). Your score will appear in the <em><strong>Score</strong> </em>column (second column from the left). The <em><strong>Feedback</strong></em><strong> </strong>column (2nd from the right) contains a <em><strong>View</strong></em><strong> </strong>link. Click on the <strong><em>View</em> </strong>link.</p>
<p><img src="http://blogs.utas.edu.au/teaching-at-tsbe/files/2015/01/Assignment-Submission-Folder-student-view-with-View-link-to-feedback.png" alt="Image showing an Assignment Submission and the View icon that can be clicked to view feedback" title="Image showing an Assignment Submission and the View icon that can be clicked to view feedback" width="603" height="74" border="2px" /><br /><br />You will then see a page that includes <<a marked-up rubric that shows the level you attained for each criteria followed by>> some general feedback and your grade. <<I have also provided you with additional feedback using the <em><strong>Grademark</strong></em> tool. I have used this tool to add comments to the document that you have submitted. You can access this feedback by clicking on the small document icon that appears in the <em><strong>Grademark</strong></em><strong> </strong>column. It should look similar to the example shown in the image below.</p>
<p><img src="http://blogs.utas.edu.au/teaching-at-tsbe/files/2015/01/Dropbox-View-Feedback-Grademark.gif" alt="Image showing where to click to access Grademark feedback" title="Image showing where to click to access Grademark feedback" height="184" width="615" border="2px" /></p>
<p>Note that, when Grademark (also known as Feedback Studio) opens, you'll see blue icons with a speech bubble inside them, like this.</p>
<p><img src="http://blogs.utas.edu.au/teaching-at-tsbe/files/2015/01/Comment-icon.png" alt="Bubble Comment in Grademark/Feedback Studio" title="Bubble Comment in Grademark/Feedback Studio" width="71" height="62" border="2px" /></p>
<p>Click on the icons to see the comments made on your work. Alternatively, you can choose to download your work and feedback as a PDF, which you can print out if you wish to. The full comments are shown in order at the end of the PDF. The way you do this will depend on whether the new (Feedback Studio) or 'classic' view of Grademark opens for you. </p>
<p>Look for either a download icon towards the right of the screen, like this<br /><br /><img src="http://blogs.utas.edu.au/teaching-at-tsbe/files/2015/01/Download-option.png" alt="Download link in Feedback Studio" title="Download link in Feedback Studio" border="2px" /></p>
<p>or a Print icon towards the bottom left of the screen, like this.</p>
<p><img src="http://blogs.utas.edu.au/teaching-at-tsbe/files/2015/01/Grademark-Classic-Print-icon.png" alt="Print icon in Grademark Classic" title="Print icon in Grademark Classic" border="2px" /></p>
<p>Choose one of the following options to download and/or print your feedback: <em>Current View; </em>or <em>Download PDF of current view for printing.>></em></p>
<p>Should you have any questions about the grade or feedback that I have provided you with, please don't hesitate to contact me.</p>
<p></p>
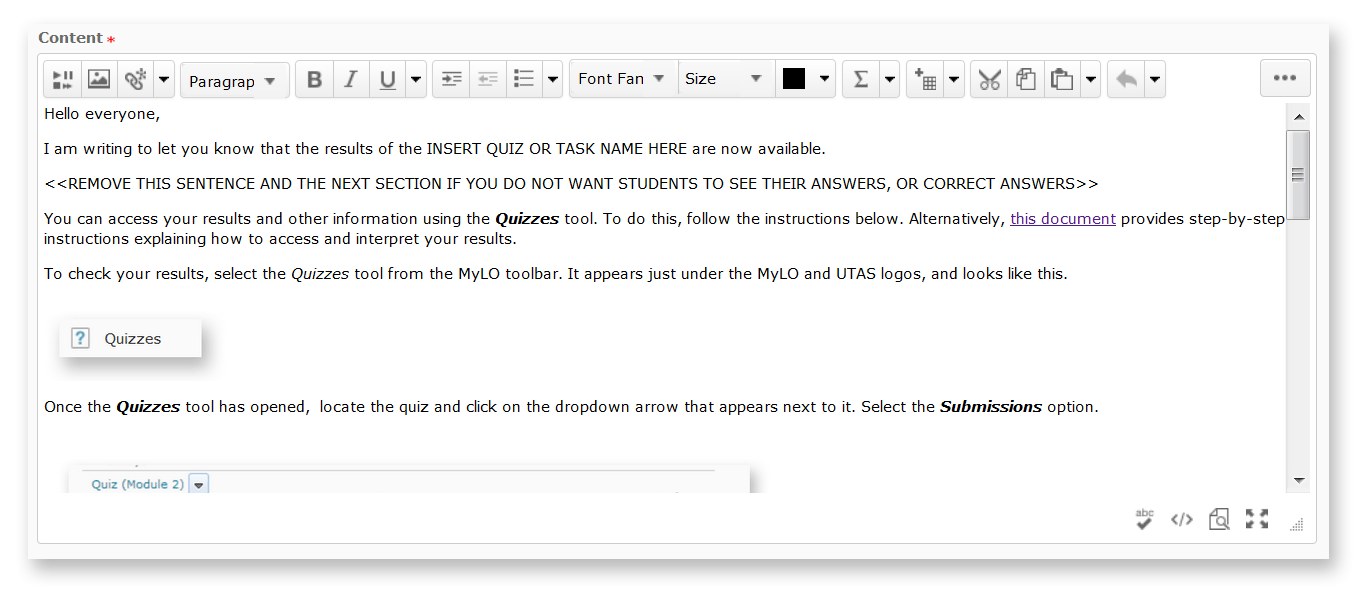
2 – In your MyLO unit, create a new Announcement, HTML page, email or a Checklist task. The example seen below is a new Announcement. Give the new item a title/headline, then move on to the next field (where you put the bulk of your message/content). By default, the WYSIWYG editor will open. Click on the source code symbol, seen at the bottom right of the WYSIWYG editor. It looks like this </>![]()
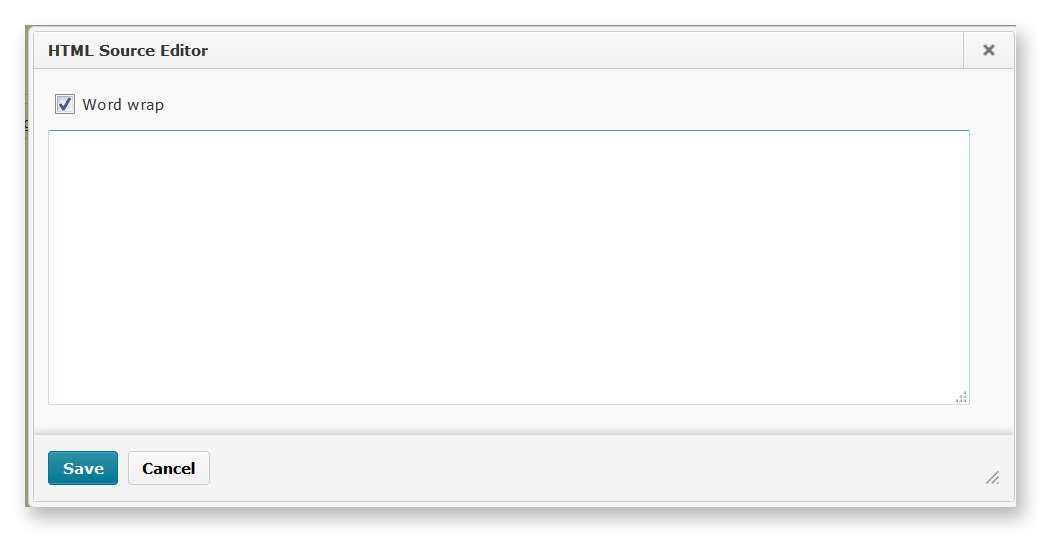
3 – A pop-up window will open. Place your cursor into the blank field, then paste in the code you copied earlier. The code will appear in the field. Click the Save button.
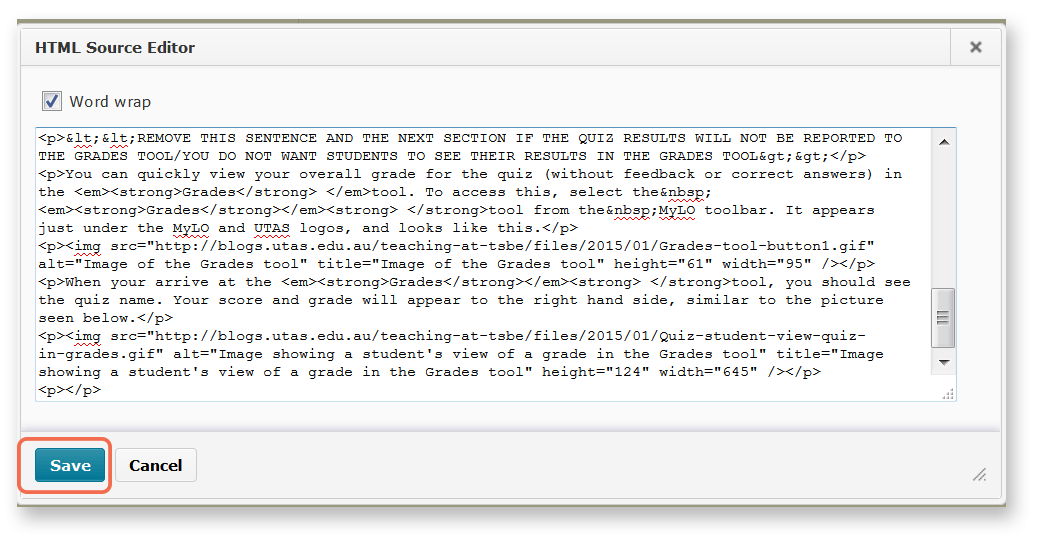
4 – The window will close. You will now notice that the template appears in the WYSIWYG view. You can edit it as you would a Word document, by adding or removing text. We have indicated sections that you may want to edit or remove using brackets <<like this>>. Remember to press Publish or Save (this will depend on which tool you are using) to save your changes.
Help students locate Quiz results and feedback
Would you like your students to see the results of a Quiz that you have published? Make sure your students know where to look to get the information they need.
Use our template to quickly and easily create a News item, an HTML page, an email (sent from MyLO) or a Checklist item. The template contains instructions, with matching images, to help students find their results. You can see what it looks like by downloading this PDF. And yes – you can edit it to meet your needs.
To use the template, follow these steps:
1 – Use your mouse to highlight all the text in the box below.
<p>Hello everyone,</p> <p>I am writing to let you know that the results of the INSERT QUIZ OR TASK NAME HERE are now available.</p> <p><<REMOVE THIS SENTENCE AND THE NEXT SECTION IF YOU DO NOT WANT STUDENTS TO SEE THEIR ANSWERS, OR CORRECT ANSWERS>></p> <p>You can access your results and other information using the <em><strong>Quizzes</strong></em> tool. To do this, follow the instructions below. Alternatively, <a rel="noopener" href="https://mylo.utas.edu.au/d2l/lor/viewer/view.d2l?ou=6607&loIdentId=63929" target="_blank">this document</a> provides step-by-step instructions explaining how to access and interpret your results.</p> <p>To check your results, select <em>Assessments</em> then <em>Quizzes</em> from the MyLO toolbar. It appears just under the MyLO and UTAS logos</p> <p>Once the <em><strong>Quizzes</strong></em> tool has opened, locate the quiz and click on the dropdown arrow that appears next to it. Select the <em><strong>Submissions</strong></em><strong> </strong>option. <br /><br /><img src="http://blogs.utas.edu.au/teaching-at-tsbe/files/2015/01/Quiz-student-access-quiz-for-marks.gif" alt="Locating a quiz and selecting Submissions option" title="Locating a quiz and selecting Submissions option" height="116" width="537" /><br />You will see the number of attempts you have completed, along with your score for the quiz to the right. To see <<REMOVE ANY OPTIONS THAT DO NOT APPLY>> your answers and the correct answers, click on the attempt number (this will generally be<em> Attempt 1</em>).<br /><br /><img src="http://blogs.utas.edu.au/teaching-at-tsbe/files/2015/01/Quiz-student-access-quiz-for-marks-attempt-link.gif" alt="Image showing how to access answers, correct answers and so forth by clicking on the Attempt link" title="Image showing how to access answers, correct answers and so forth by clicking on the Attempt link" height="149" width="543" /></p> <p></p>
2 – Once all the text has been selected, right-click (CTRL + mouse click on a Mac) and select the Copy option or press CTRL and C on your keyboard (Command + C on a Mac). This will copy the code onto your computer’s temporary memory.
3 – Create a new Announcement, an HTML page, an email (sent from MyLO) or a Checklist item. The example seen below is a new Announcement. Give the new item a title/headline, then move on to the next field (where you put the bulk of your message/content). By default, the WYSIWYG (What You See Is What You Get) editor will open. Click on the HTML Code symbol, seen at the bottom right of the WYSIWYG editor. It looks like this </>
4 – A pop-up window will open.
5 – Right-click (CTRL + click on a Mac) over the empty field and select Paste, or click your mouse on the empty field and press CTRL and V (Command + V on a Mac) your keyboard. The code will appear in the field. Click the Save button.
6 – The window will close. You will now notice that the template appears in the WYSIWYG view. You can edit it as you would a Word document, by adding or removing text. We have indicated sections that you may want to edit or remove using upper case text <<LIKE THIS>>. Remember to press Publish or Save (this will depend on which tool you are using) to save your changes.
Improve your productivity with PowerPoint
Do you use PowerPoint to create learning resources? This great slideshow presents a range of tips to boost your productivity with PowerPoint.
Our favourite tip from the slides is to hold down CTRL + SHIFT on your keyboard as you click and drag an object: this will duplicate the object and place the new object in perfect alignment with the original object!
Setting expectations and guidelines for Discussion activities
When setting up Discussion activities, it is important to make the purpose of the discussion and the rules of engagement very clear.
Include clear instructions, a purpose for the discussion and some rules in the Description of your Discussion Topic.
Here is an example of a Description for a Discussion Topic. It was used by Educational Designer/Developer, Peta Statham, when she coordinated the UnitStart Distance unit. You are welcome to adapt it for use in your own units. For information about how to set up a Discussion Topic, including a Description, click here.
Got a question about UniStart or the university culture?
Please add your questions by selecting the Start a New Thread button. Before you do, take a quick look through the existing threads in the discussion. Someone may already have asked a similar question and the answer may be here already. You can search for a keyword using the search field seen at the top right of the Discussion window.
We will attempt to respond to your posts within 2 business days. We will do so by replying to your thread.
Please note that this is public forum. If your question is personal in nature, contact us directly by email.
When using this topic, observe these rules:
- Do not post personal information like your address and phone number.
- If you have a question that is personal in nature (e.g. regarding illness or other issues impacting on your studies), please email or phone the Distance Support Team directly.
- Use clear, simple language and avoid the use of jargon, slang or ‘text’ (mobile phone) speak.
- Use the discussion for the purpose it was intended for: to ask questions about this unit and university study generally, and to find answers. Please do not use this topic for social purposes or to make general comments. Suggestions or feedback about the unit can be emailed to the Unit Coordinator directly.
- Do not swear or put down others. This is meant to be a supportive environment, not a place for conflict or power-plays.
- This is not a platform to push personal opinions or ideals. Any critique or comments you make should be supported by evidence, related directly to the unit content, activities and assessment, and phrased in a constructive manner. You will find these starter phrases helpful when trying to express agreement or disagreement in a constructive manner.
- A post or reply that does not adhere to these rules may be deemed inappropriate. Inappropriate posts will may be removed at the discretion of the Unit Coordinator. Students who continue to add inappropriate posts may have their access to the discussion topic removed altogether.
- If you spot an inappropriate post, please contact the Unit Coordinator immediately by email. Don’t try and respond to the post yourself.
Modelling discussion techniques
Never assume that your students know HOW to discuss effectively. Providing sample sentence starters may help your students frame a question, agreement or disagreement more effectively and help them feel confident in their reply. Here are some examples that you are welcome to provide to your students.
Agreeing with a comment
- I agree with your comment because…
- I really like the way you have…, because…
- One of the strong points of your argument/comment is…, because…
- I find your perspective on this interesting because…
Disagreeing with a comment
- While I can understand the point of view that you have offered, I feel that…, because…
- I question the validity of this comment because…
- I disagree with this comments because…
- I appreciate that this might be the case in some circumstances, however…
- I find it difficult to agree with this comment…
- I have a different take on this because…
Asking for clarification
- I found your comment interesting. Could you provide some examples of what it might mean?
- How might this apply in other situations?
- Could you please explain your comment in more detail?
- It would be useful if you could provide some examples of this.
- It would be useful if you could illustrate this in more detail.
Adding additional information/thoughts to a comment
- I thought it might be useful to add that…
- Another interpretation of this could be…
- … is another example of this.
- Some useful/further examples of this are…
- What other questions should we be asking about…?
- What other approaches could we take to this?
Student Resource: How to locate Grades and feedback associated with an assignment submission
This Blog Entry explains how students can find their grade, feedback, Rubric feedback and Grademark feedback via the Assignment tool.
Please feel free to add the link to your MyLO site, or print it and hand it out to students, if you feel it would be helpful.
Student Resource: How to configure Google Scholar to search for journal articles, then access the articles through the UTAS Library
Google Scholar (www.scholar.google.com.au) is a very useful tool you can use to find journal articles. However, if you use Scholar to search for articles while off-campus, you may be prompted to pay for access the full text version of the article. Fortunately, you can configure Google Scholar to search for an article in a UTAS Library. If an article is available at UTAS, the user can click on a check for full text at UTAS link. After entering their UTAS username and password, they are generally given full access to the article listing, including the full-text article (if available).
The video below explains how to configure Google Scholar to search the UTAS Library. Please feel free to embed it in your unit if you feel if will be of help to your students. You’re also welcome to use the text from the top of this article. Click here for instructions showing how to embed a YouTube video in a MyLO unit [refer to PART D: Add an Unlisted YouTube video, on page 7].
Student Resource: Include images in discussion posts
This resource [PDF] explains how to include an image (from a computer or the web), or embed a YouTube video in a discussion post. This can be a very useful skill to teach students when you want them to share ideas and viewpoints that they have found on the web, in articles or in the media.
Please feel free to upload the PDF to your MyLO site, or print it and hand it out to students, if you feel it would be helpful.
Student Resource: How to attach a document to a discussion post
This resource [PDF] explains how to attach a document, like a PDF or a Word file, to a post in a discussion thread. This is a very useful document to provide to students when you want them to share resources or perhaps post some work for feedback from other students.
Please feel free to upload the PDF to your MyLO site, or print it and hand it out to students, if you feel it would be helpful.
How to set up your MyLO News Notifications
To set up notifications of new announcements in your unit follow the steps below.
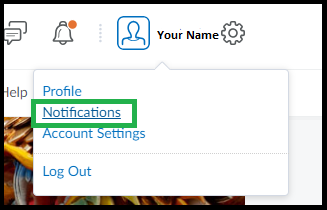
1. Locate your profile icon at the top-right of the page and click on it.

2. A small menu should show, click ‘Notifications’.
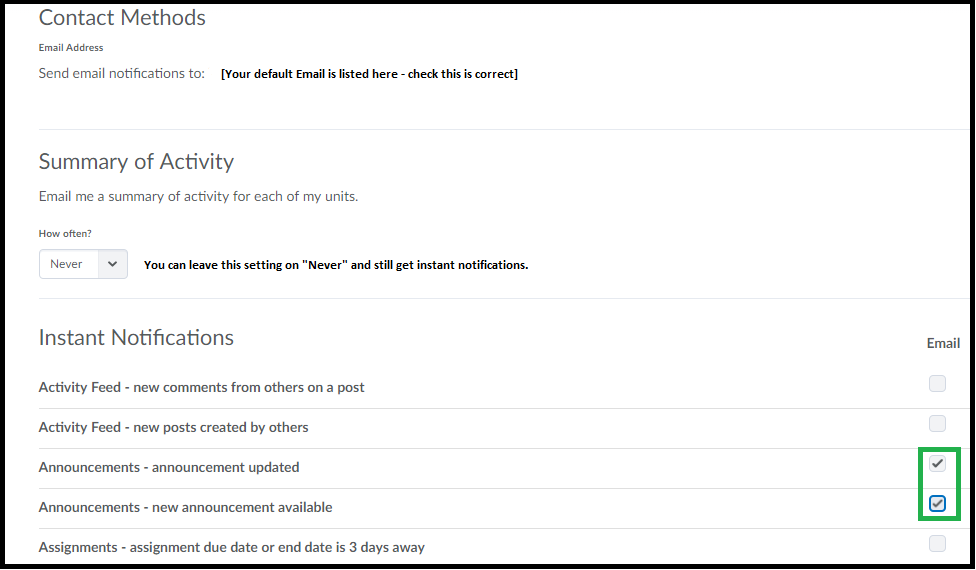
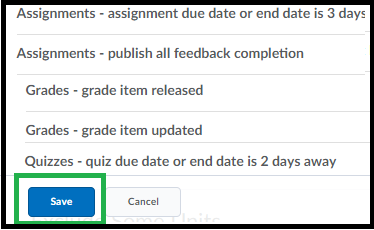
3. From the page that loads you can check the email address that notifications will be sent to. You can choose how often you’d like to be notified of general activity (this is a summary of activity you can choose ‘daily’ or ‘never’). To have Instant notification of announcements ensure the options for announcements are checked (shown below).
While you are on this page you can choose to be notified of other options as well – when you are done making selections click “Save” at the bottom of the screen to finish.
Help students keep track of Announcements
Do you use the Announcements tool to communicate with students on MyLO?
Here are two things you can do to help students keep track of the important announcements you add to the Announcements tool.
Tell students about the Announcements button
Students can now access Announcements from just about anywhere in a MyLO unit by clicking on the Communication menu option, then the Announcements option. It appears towards the top of the MyLO window.
Tell students to set up Notifications for Announcements.
Students can alter their Notifications settings in MyLO so that they receive email notifications whenever Announcements are added or updated. We have prepared some instructions explaining how students can do this. You can share these instructions by providing this link to your students: You can share these instructions with your students to help them complete this task.
If you would like to know how to set up Announcements on your MyLO site, you will find this information helpful.

