Embed an image or YouTube video in MyLO News and other items
MyLO allows you to easily include images and YouTube videos in a variety of items, including News, Discussion posts, Module pages and descriptions, Quizzes and more.
These instructions explain how to embed images from the web or from you computer (refer to Parts A and B). Information about embedding YouTube videos is also included (refer to Part C).
Tam has also produced this video to outline how you can embed YouTube videos, as well as media from other commonly used sites like SoundCloud, into a News item, Discussion post and so forth.
Use MyLO Manager to manage your unit
If you ever want to:
- Change the release dates (known as Access Dates) of your MyLO unit;
- Change the title of your MyLO Unit site;
- Enrol additional cohorts of students; or
- Enrol fellow staff so that they can provide you with feedback on your unit,
you will need to use the MyLO Manager tool.
Tam Lynch, an Educational Technologist with the TSBE, has developed a series of videos to take the mystery out of using MyLO Manager.
Here is a selection of videos that Unit Coordinators and Lecturers might find useful. All the videos are hosted on YouTube. Once a video page has loaded, you can expand a videos to full screen to see it in more detail.
- How to log in to MyLO Manager
- An overview of the MyLO Manager screen
- How to search for a unit
- How to change the access start and end dates for a unit
- Edit student cohorts (that can access your unit)
- Add staff to a unit
- Add additional students to a unit
Use video to model question analysis
Ms Wendy Fleet, a Launceston-based Lecturer and Teaching Fellow, has developed a video that models the process of analysing an accounting essay question. The video has been included in a series called Thinking like an Accountant, part of the Accounting Communication Matters website. The video was embedded in one of the first year units in the Masters of Professional Accounting, a program with a high proportion of international students. The video was produced by Kevin Lyall and Beverly Goldfarb from the TSBE, together with Richard Barker from the Faculty of Arts.
Peta Statham interviewed Wendy to find out more about the video project and to ask her advice about creating videos for teaching purposes.
Q |
Wendy, tell us a little about the rationale behind this video series. | |
A |
The idea was to get students engaged with the analysis of [an essay] question. We were trying to get students to think like an accountant, to think about how a professional would approach question analysis. | |
Q |
You approached staff at Deloitte (Launceston) to star in the video. Tell us a little more about this. | |
A |
I sent an essay question to a contact at Deloitte for his feedback. He replied, ‘Oh, we talked about this over lunch’ and described the discussion they’d had. It struck me that what he described was exactly the sort of thing I wanted my students to see: a bunch of accountants sitting around a table analysing the question and sharing their thoughts about the topic. So we filmed his team sitting around a table at their offices. They discussed the topic, and broke it down into steps for the students. It was completely unscripted – they just did what they would naturally do. One of the best things was that they all kept referring to the Accounting Standards. That was great because we often have trouble getting students into the habit of referring to the Standards! | |
Q |
You chose to film professionals, rather than finding actors and following a script. Why was that? | |
A |
It was really the process of thinking like an accountant that we wanted to model, and who better to do that than actual accountants. However, if it was a case study or a story that we had wanted to capture, I think it would be appropriate to use actors, perhaps even our own students. If you were to do that it would really be a process of working with Heads of Schools [e.g. Performing Arts] to see if they’re interested. In my experience, people are usually generous with their time, interested and helpful if they understand what it is you’re doing and why you’re trying to do it. Although the students and I benefit initially, in the longer term it helps the industry because communication, and written communication in particular, have been highlighted as a problem for accounting graduates for many years. | |
Q |
Once you had the videos created, how did you embed them within your teaching? | |
A |
The first thing I did was to cut the video up into component parts. I then embedded the videos on a website amongst some reflective questions. So, the idea is that you watch a bit and then you have a question to think about. But the website alone is not enough – students are not going to go there voluntarily. So the videos became part of the scaffolding for written communication skills within the unit. To help students with their writing we had tutorial exercises that included watching some of the videos. The aim was to lead the students towards developing a research plan for their essay. In tangent with this, the Student Learning team (from the Student Centre) ran writing workshops. In essence, this video was just one component of the scaffolding that supports the essay-writing task. | |
Q |
Have you been happy with the results? | |
A |
I don’t think the video was utilised as much as it could have been. The evaluations that I conducted suggested that the videos were too long. I originally broke the video up into 10 minute slots, followed by questions, but I think I probably want to break the video up into smaller chunks in future. One of the other problems is that our students don’t like writing, so they try to avoid it. One of the difficulties is trying to enforce that writing is an important part of the accounting profession. It [the videos] made an impact on at least one person: for the first time, the top essay mark was gained by an International student. It was clear that the student had modelled their essay writing process based on what they had seen in the video series. | |
Q |
What advice would you give to other staff who are considering using video in their teaching? | |
A |
Have a clear vision, shared by all the people involved, of what you want to achieve at the end of the process. Also, you can’t just stop with the video. The students have to have a reason to go to the video, or any resource for that matter. It is not enough to have the information there. We have the resources but we have to provide the students with the reason to go to those resources, tell them how to get there, and provide advice about what to do with the resources when they get there. |
Can I change a MyLO Survey to remove anonymity?
MyLO Surveys can be set up so that student responses are anonymous or linked by name to users.
Once you check the make results anonymous checkbox and save your survey, anonymity cannot be removed, even if no students have completed your survey.
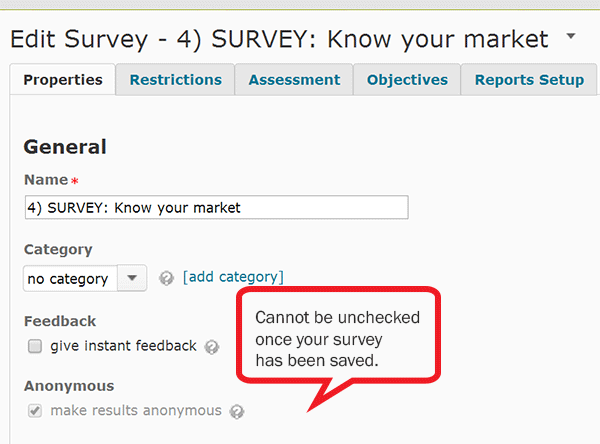
So, if you want to create a survey, but you’re not sure whether anonymity is appropriate for your survey, avoid checking the make results anonymous option until just before you’re ready to make your survey public.
Create a MyLO Rubric that will calculate a grade (Custom Points Rubric)
You can grade student assignments using MyLO Rubrics. Creating an Analytic > Custom Points type Rubric will allow you to generate a score for each student, based on the weighting of each criteria, and the levels (e.g. HD, DN, etc.) selected for each criteria. The score does not need to be made visible to the student. You can also record feedback against each criteria if you wish to.
Creating Custom Points Rubrics is somewhat complicated. In some faculties, your local blended learning/distance learning support team may be able to create a Custom Points Rubric on your behalf. You will need to provide them with:
- A word document containing the criteria and level descriptions;
- Weighting or Points values for each criteria, totalling either 100% or up to the points value of the assignment.
- Details of the Assignment Submission Folder or Grade Item that you want the Rubric attached to.
You may be asked to check the Rubric before it is Finalised and attached to an Assignment Submission Folder/Grade Item, as Rubrics cannot be altered once marking commences.
Create a Custom Points Rubric from scratch
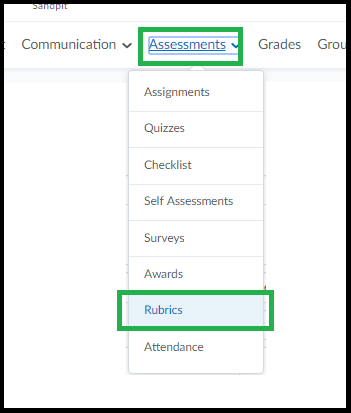
First go to the unit & choose Assessment – Rubrics from the toolbar.
If you don’t already have a rubric to edit just click “New Rubric”.
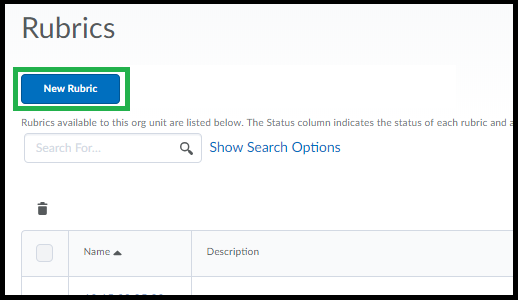
It may take a minute for the page to load, give it a name & check the first set of settings across the top.
Analytic rubric setting means it will calculate a score from multiple criteria. Holistic is one criteria only.
Points vs Custom Points – if your criteria are weighted differently to each other (have different points values to each other) choose ‘Custom Points’. If all of your criteria are worth the same each, you can leave it as “points”. In this help guide we will create ‘custom points’ rubric as this is the most complex.
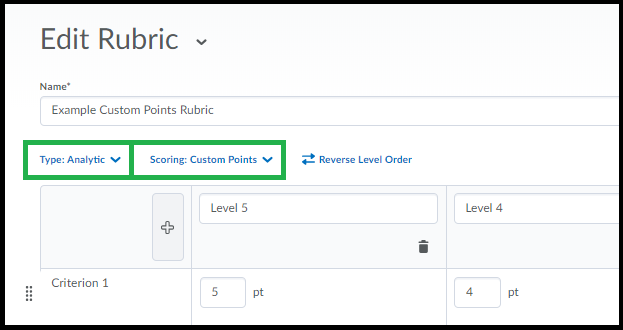
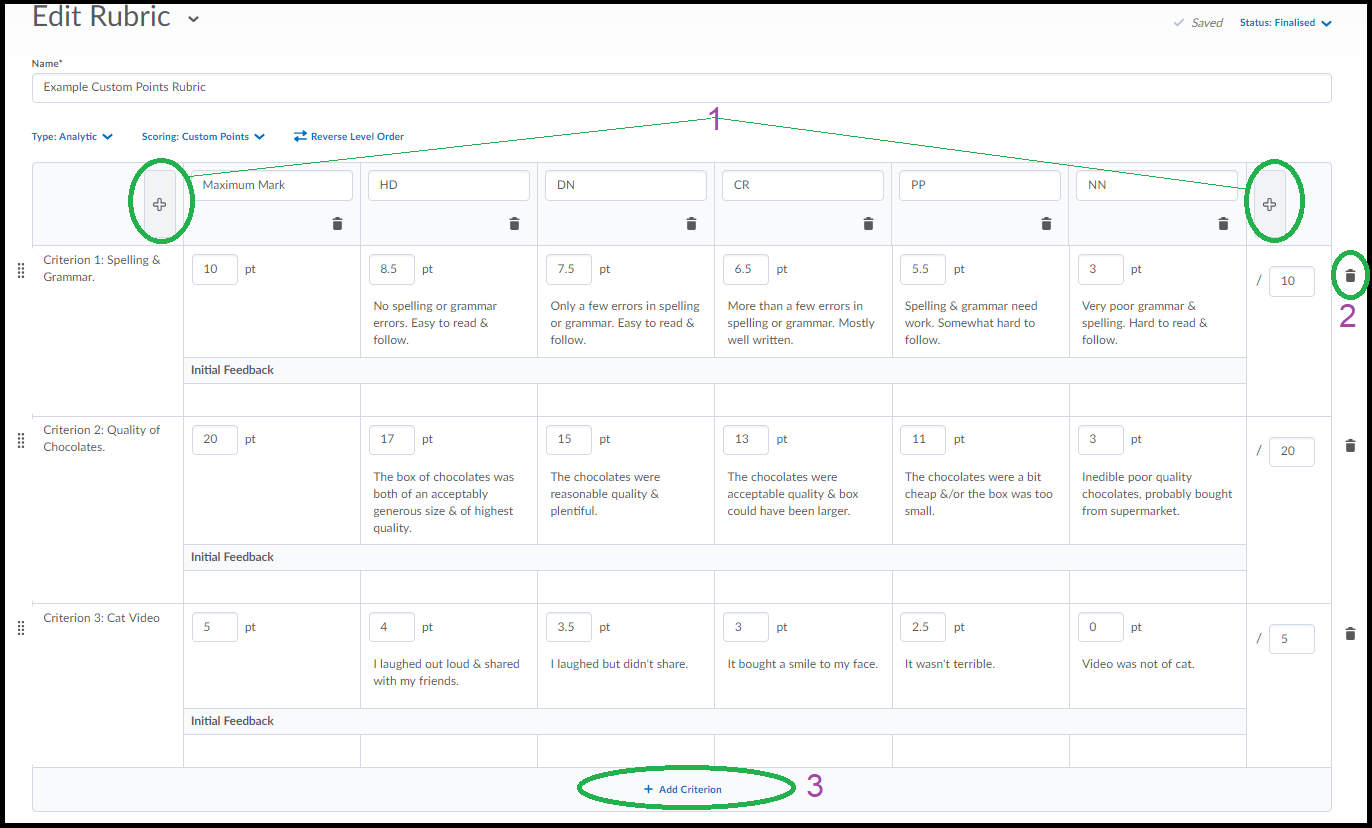
The table will be pre-populated with default values. You can edit any of these values just by clicking into the text & typing. You can also copy/paste text to the cells from Word. Note there is a limit on the number of characters you can use in the Criteria Name column. The rubric tool will SAVE as you go.
1. You can add another column either to the left or right of your columns by clicking either of the [+] buttons at the top.
2. You can remove a criteria by clicking the bin icon to the right of the criteria row.
3. You can add another criteria to the end of the list by clicking ‘Add Criterion’ at the end of the list.
NOTE: With either Points or Custom Points – one column (the default is the right-most) MUST have the maximum obtainable mark for each criteria in it, this is how MyLO Rubric knows how much the rubric is out of. You can , if you want to avoid having the HD column be set at the maximum, use a ‘maximum achievable’ column. Other columns can be set as something lower than the maximum if you prefer. For standard UTAS grades (ie HD, DN etc) the values you use for the DN, CR, PP columns will need to fall into the range defined by the criteria. (HD = 80% – 100%, DN = 70% – 79% etc).
To re-order the criteria just click & drag the criteria using the small icon to the left as circled below.
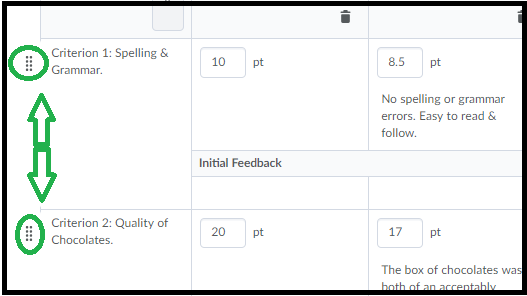
Once you are done setting up your criteria you can scroll down to check the “overall score” area that calculates an overall level. You can change the default values. You can add or delete extraneous levels entirely by clicking the Plus sign or the Garbage bins. You can delete all but 1 (so you could just have a ‘complete’ level based on any score out above 0 if you want).

Scroll down a wee bit further and click on “Options” to show important options.
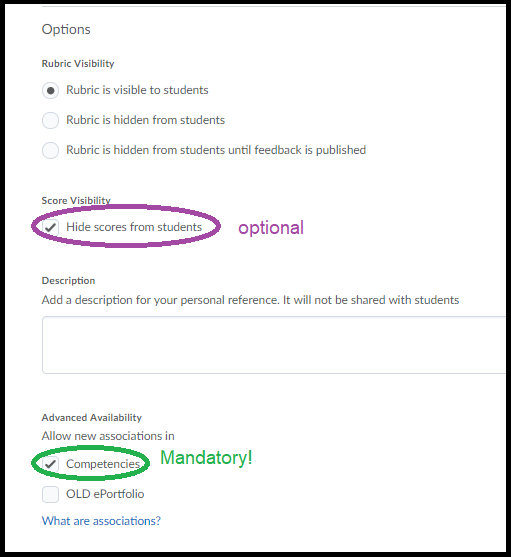
The first set of 3 options defines when the rubric is visible to students. Note that students do like to work “to the rubric” so keep in mind they may ask about it if you decide to turn it off here you might consider giving them a PDF rubric.
Score Visibility: this refers to the scores in individual criteria levels not the overall score. If you check this it just means they’ll see what level they got for each criteria but not the specific number associated with each. They will still see their overall grade. This option is useful to keep as ‘hide’ as it allows for discretion in marking & moderation.
The two options under the description are to “allow associations” which is a rather confusing way of saying “this rubric can be attached to things” – so leave at least the first one checked ON or you can’t then use the rubric anywhere in MyLO because if you un-check it the rubric can’t be added to assignments for … some reason.
You’re not quite done yet!
Scroll all the way back to the top-right to find the option to set the rubric as “Finalised” (why is it up here? why not both at the top & at the bottom?) To use the rubric anywhere it has to be set to “finalised”.

Once Finalised you can now attach this rubric to assignments, grades, or discussions. As you use it for marking it will also auto-save as you go.
Use Rubric statistics to assist with assessment moderation
The MyLO Rubrics statistics feature shows you how grades/levels are distributed across the class, and the average grade/level for each criterion.
To view the Rubric statistics:
Step 1
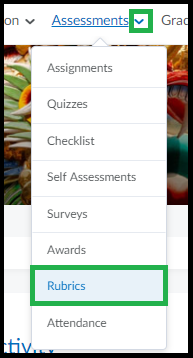
Go to the MyLO site for your unit. Select Assessments > Rubrics.
Step 2
Locate the Rubric you wish to review. Click on the small arrowhead next to the Rubric name, then select View Statistics from the menu.
Step 3
You will see the average score (if a Custom Points Rubric has been used) and average level for the class. To see more, click on the small graph icon that appears in the Actions column.
You will now see three tabs to choose from. The first is Overall. This shows you the percentage of students who have reached each level (e.g. HD, DN, CR…)
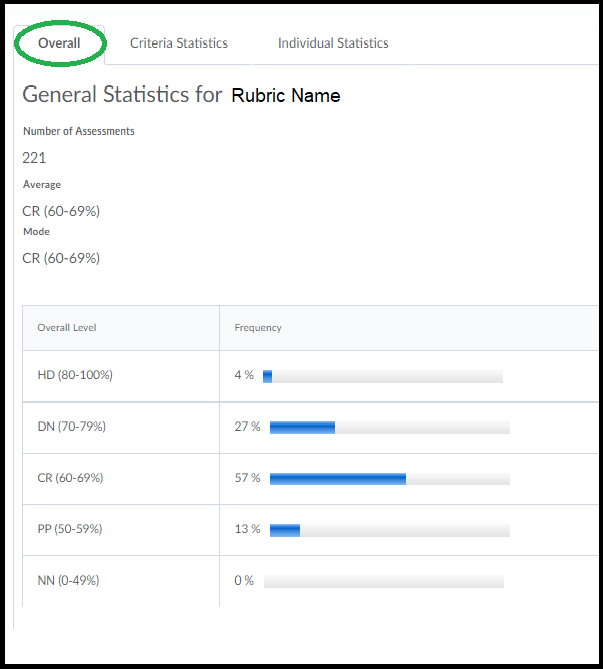
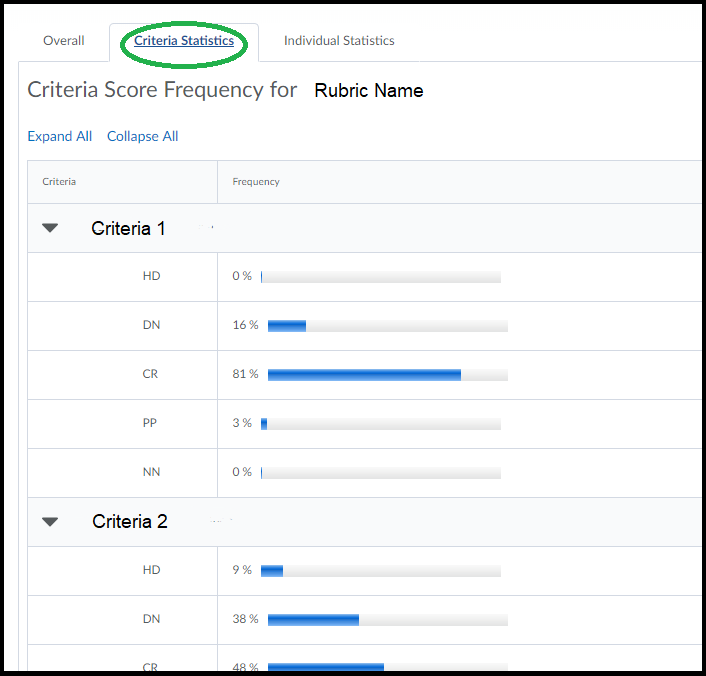
The second tab is Criteria Statistics. This is a very useful view which tells you the percentage of students who have reached each level (e.g. HD, DN, CR…) for each of the rubric criteria.
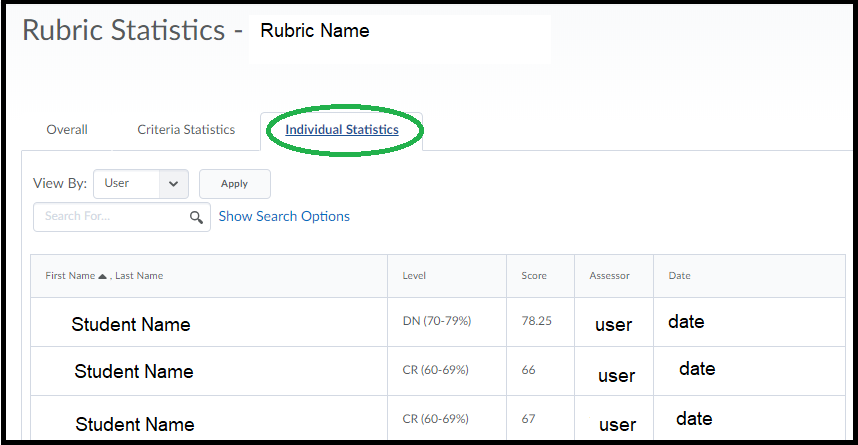
The third tab is Individual Statistics. This will show you the overall level and score (points) attained by each student. You can re-organise the table by student name or assessor name.
Track participation in tutorials and workshops
Do you monitor or assess student participation in tutorials, workshops or online classes? Tracking participation in tutorials can be quite difficult and time-consuming, especially when multiple staff are involved.
Using the MyLO Grades tool
Dr Gemma Lewis coordinates a large first-year undergraduate unit with over 450 students. Tutorials are included in the unit, and a range of tutors are responsible for collecting data on student participation. In the past, tutors completed a form for each tutorial and returned it to Gemma. Gemma would manually enter the data from the forms into an Excel spreadsheet. However, this was time consuming and forms were nor always delivered to her in a reasonable timeframe.
Gemma decided to use MyLO to remove the need for double-handling of participation data. She created 12 Grade Items in her unit’s MyLO Grades tool, one for each week. She developed a marking schema for tutors to use: 0 for no-show; 1 for attended with minimal participation; 2 for attended and contributed; 3 for attended and made contributions supported by theory. A similar set-up is explained here.
Tutors received training in how to filter the Grades tool for their convenience, as well as how to enter marks. Though some continued to make paper notes during class, all recorded marks into the relevant Grade Item rather than sending through a handwritten note or spreadsheet. All the Grade Items were organised under a Category, which automatically calculated a cumulative overall result for the each student.
Using participation cards
Dr Gail Ridley (Tasmanian School of Business and Economics) uses this process in her classes.
- Gail prints participation cards on coloured card as per the image below. The same cards are used every week.
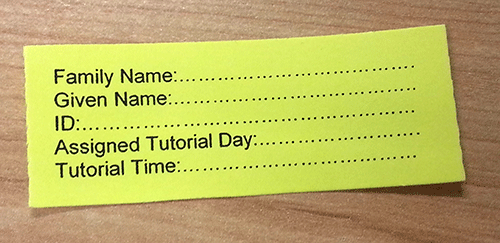
- Each card has room for a student’s name, student number and tutorial day and time.
- In the first tutorial for the semester, Gail hands one participation card to each student.
- The students are asked to complete the card with their details and to place their card on the edge of their desk.
- When a student shows a level of participation that satisfies Gail, she picks up the card from their desk (or asks them to hand it to her).
- Gail records a student’s participation mark in the MyLO Grades tool after the tutorial, then hands them back their card at the start of the next tutorial.
- Gail keeps the cards in an envelope between tutorials. In case some of the cards are not collected, Gail always keeps a few temporary cards on hand.
This method has an added benefit – the collection of the participation card is recognition of a student’s effort. In turn, quiet or shy students now have a role model that they can watch and listen to for ideas about how they might participate in future.
In addition, the participation card method allows the lecturer or tutor to focus on teaching, rather than distracting administrative tasks, during a tutorial.
Help students master disciplinary vocabulary
A lack of disciplinary vocabulary can be a significant set-back for students as they listen to lectures, complete readings and construct assessment tasks. Here are some activities that could help students become familiar with the language of your discipline.
OPTION 1: Pop quiz
- Get students to complete a MyLO Quiz at the end of a recorded lecture or reading activity. Include automated feedback. While a quiz must be associated with a score, the score itself does not have to be recorded as a Grade Item, meaning that these sorts of tasks can be used for formative feedback.
- Quickly and easily create vocabulary lessons with Quizlet. It allows students to learn vocabulary in a variety of ways, including electronic flip cards, drag and drop matching games and more. You will need to provide students with a link to the Quizlet quiz.
OPTION 2: Flip cards, fill-in-the-blanks, crosswords and more
H5P is an opensource interactivity development tool. You can sign up for free and create a range of interactive activities, including dialog cards, drag-the-words, fill-in-the-blanks, mark-the-words and memory activities. Once you have created an activity, you can link to it or embed it within a MyLO HTML Page. Note that the results WILL NOT be recorded in MyLO Grades, nor will a record of completion. See the example below.
Hot Potatoes, developed by the University of Victoria (Canada) Humanities, Computing and Media Centre, is a free application that generates crosswords (see image on right), quizzes, cloze passages and more. Packages created with Hot Potatoes can be uploaded to MyLO for completion by students. The graphics are a little dated, but it still functions OK in Google Chrome browser. May not work on mobile devices. Note that the results WILL NOT be recorded in MyLO Grades, nor will a record of completion.
OPTION 3: Word of the week
Include a Word of the week in your weekly introduction (video or presentation), perhaps in an Announcement on MyLO.
OPTION 4: Glossary
You can create a glossary of discipline specific terms. Though MyLO has a Glassary tool, we do not feel that it contains sufficient functionality. Instead, we recommend creating an HTML page with a list of Glossary terms. You don’t have to make up all the definitions yourself. Instead, provide links to definitions on the web.
For more information about these options, contact your local blended learning/online learning team.
Help students keep track of Announcements
Do you use the Announcements tool to communicate with students on MyLO?
Here are two things you can do to help students keep track of the important announcements you add to the Announcements tool.
Tell students about the Announcements button
Students can now access Announcements from just about anywhere in a MyLO unit by clicking on the Communication menu option, then the Announcements option. It appears towards the top of the MyLO window.
Tell students to set up Notifications for Announcements.
Students can alter their Notifications settings in MyLO so that they receive email notifications whenever Announcements are added or updated. We have prepared some instructions explaining how students can do this. You can share these instructions by providing this link to your students: You can share these instructions with your students to help them complete this task.
If you would like to know how to set up Announcements on your MyLO site, you will find this information helpful.

