How to Pin Units to your MyLO Homepage
The new MyLO ‘Daylight’ interface allows you to pin your units to your MyLO Homepage. This guide will go through how to access your MyLO Homepage and how to pin a unit.
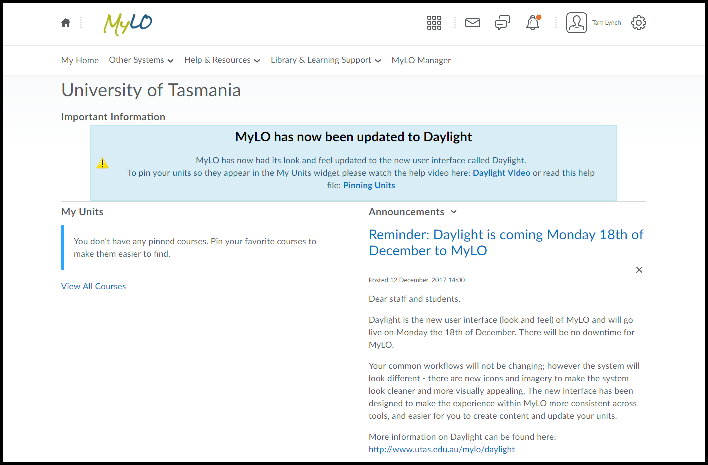
First access the MyLO Homepage by logging in with your Student Username and Password from http://www.utas.edu.au/mylo
You will see a page similar to the screenshot below.
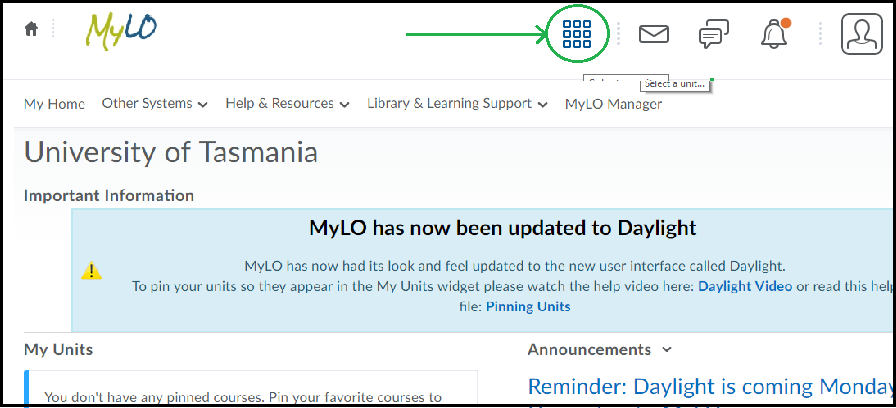
At first you may not see your units right away, to access the list of units click on the ‘Waffle’ icon at the top as circled in the screenshot below.
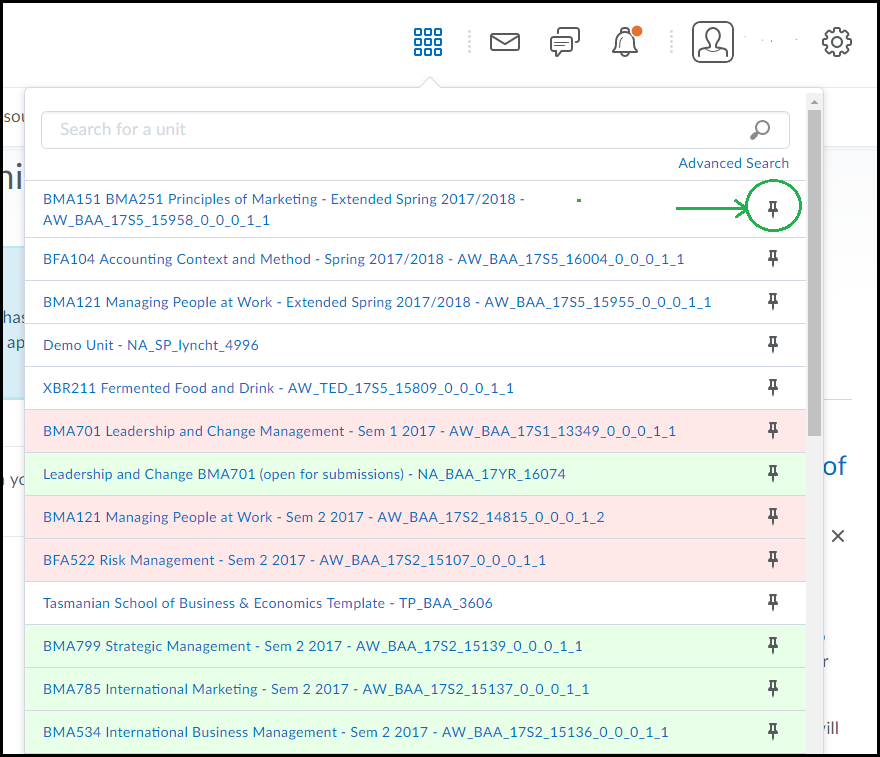
You should now see a list of units. By default these are ordered by your last access date. The list below is an example only. You can access any of your units here, without pinning them – by clicking on the unit title. To pin a unit – click the small ‘Pin’ icon to the right of any unit you wish to ‘pin’ to your homepage as circled in the screenshot below. When selected, it might not appear on your Homepage right away – you may still have to refresh the homepage depending on your browser.
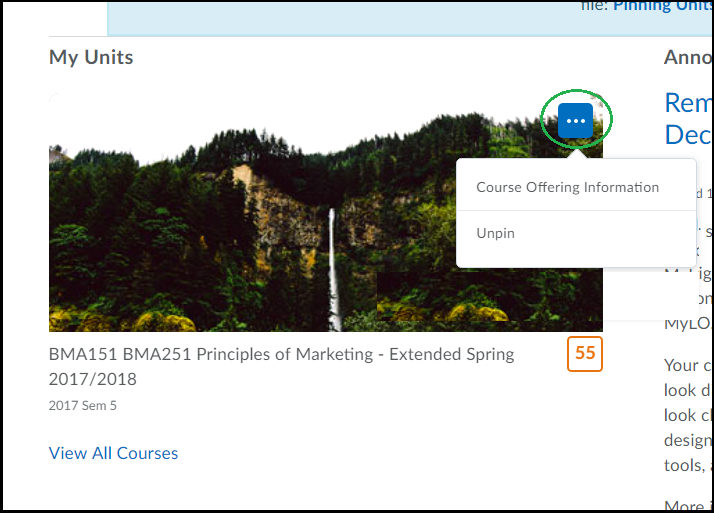
You will see the pinned units on your homepage displayed with an image and unit title like the example below. If you mouse-over or click on this icon you can access a small menu to the top right of the icon (as circled below) with further options, including ‘Un-pin’.
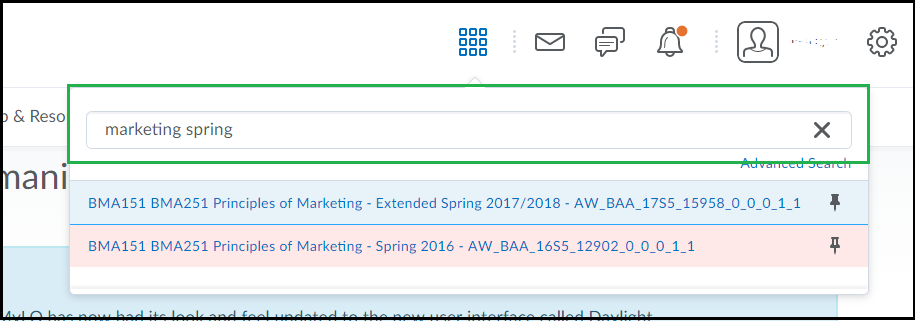
Can’t find your unit in the list? If you click the ‘Waffle’ Icon and don’t see your unit there, try searching for all or part of the unit title or unit code using the search bar as highlighted below. You can also search by semester (Sem 1 or Sem 2) and by year as all TSBE units have the Semester and Year included in the title.
If you still don’t see your unit, check your enrollment details and make sure you are correctly enrolled in the unit. For further help you may need to contact the Student Support staff in your college/faculty/school.
Hide (or reveal) an Assignment Submission Folder to students
Sometimes you may need to hide an Assignment Submission Folder from students. You may do this whilst editing elements of a folder, or to hide grades and feedback from students temporarily (e.g. if you need to publish results to Grades without students seeing them in the Assignments tool). Note that is is also advisable to hide the associated Grade Item and ensure that certain Progress Tool settings are switched off. Ask your local support team to help you with this before publishing results from Assignments.
Step 1
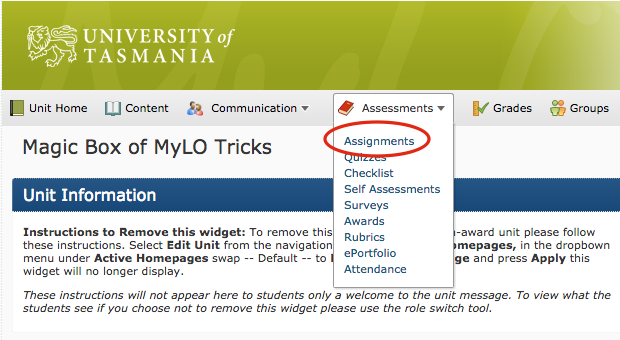
Go to the Assessments tab and select Assignments from the menu.
Step 2
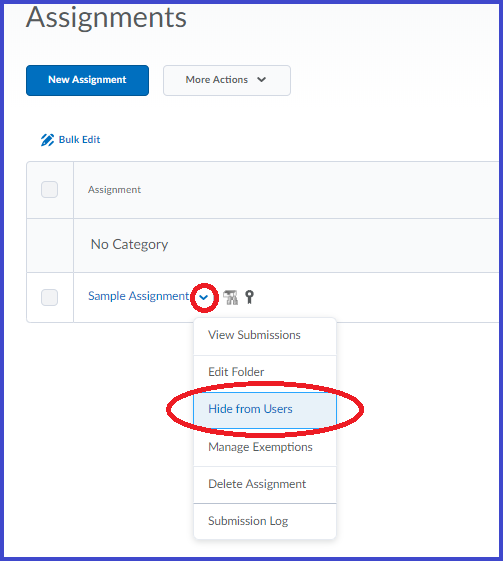
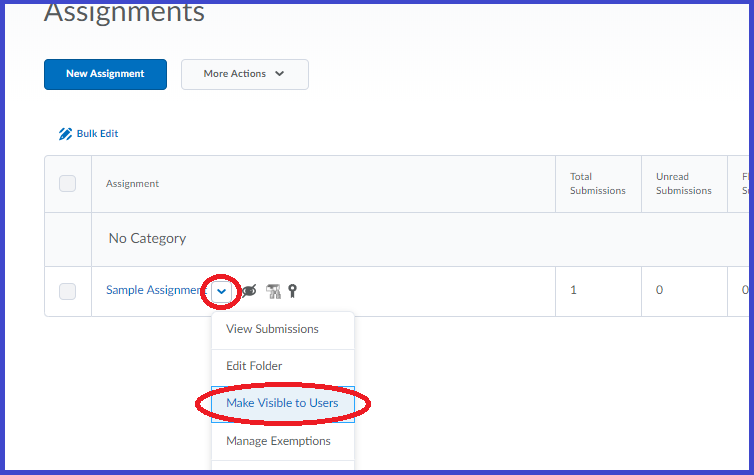
Locate the Submission Folder for editing. Select the small black arrowhead to the right of the folder name, then choose Hide from Users.
Your Assignment folder will now be hidden – you will see an icon shown circled below to indicate the status of the folder as ‘hidden from users’.

To Reveal the Folder simply click the same icon and choose ‘Make Visible To Users‘ from the options.
(Note that both options are also available in the ‘Restrictions’ tab that is available when editing or creating an assignment submission folder).
ADVANCED: How to force a space after the last element in an HTML page
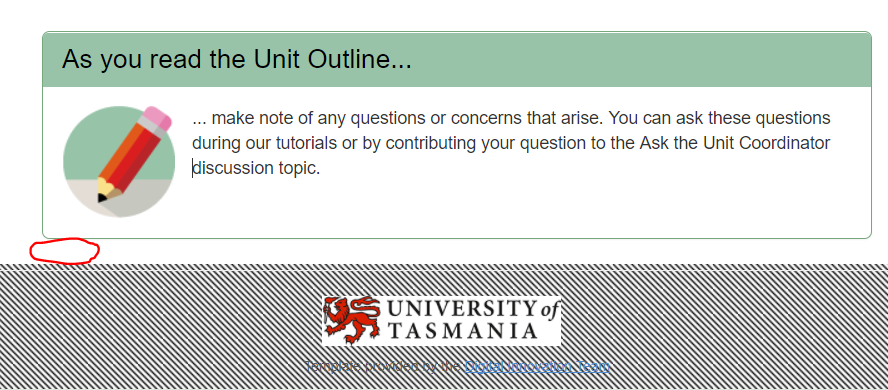
From time to time, your colleagues may ask for help because they cannot insert a new element at the bottom of an HTML page based on the ICB Template..
While this problem can be avoided through the use of spacer elements, it won’t always be avoidable.
Here’s how to insert a paragraph space after the last element on a page so that further elements can be added. This is an advanced technique, involving some basic editing of HTML Source Code! If you are not confident doing this yourself, ask your local support team for assistance.
Step 1
Ensure that your colleague has saved the page and is no longer editing it. Locate the page in the Content tool, select the little black arrowhead to the right of the page name, then choose Edit HTML from the menu.
Step 2
The WYSIWYG editor will open. Scroll to the bottom of the page.When you try to select this space/place your cursor in between the last element and the page footer, you will notice that you cannot select/get the cursor to appear. This means that there is no space remaining. You will need to code in a new space (essentially, a paragraph containing no characters).
Step 3
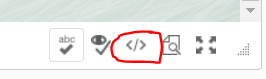
You should notice the HTML Source Editor symbol appears towards the bottom right corner of the page. It looks like this. – </>. Select the HTML Source Editor symbol.
Step 4
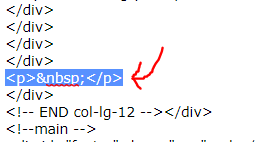
The HTML Source Editor will open. Ensure that the Word Wrap option is selected, then scroll down towards the very bottom of the source code. Around 18-20 lines up from the bottom, you should see the code shown in the image below. Look in particular for a line of code that says <!– END col-lg-12 –></div>. The next line of code should say <!–main –> . If you have trouble finding this snippet of code, press CTRL + F (PC) or Command + F on your keyboard, then type END col-lg-12 into the search field. Press Enter or Return on your keyboard. This should help you find the correct code snippet (it will usually highlight a matching result for you).
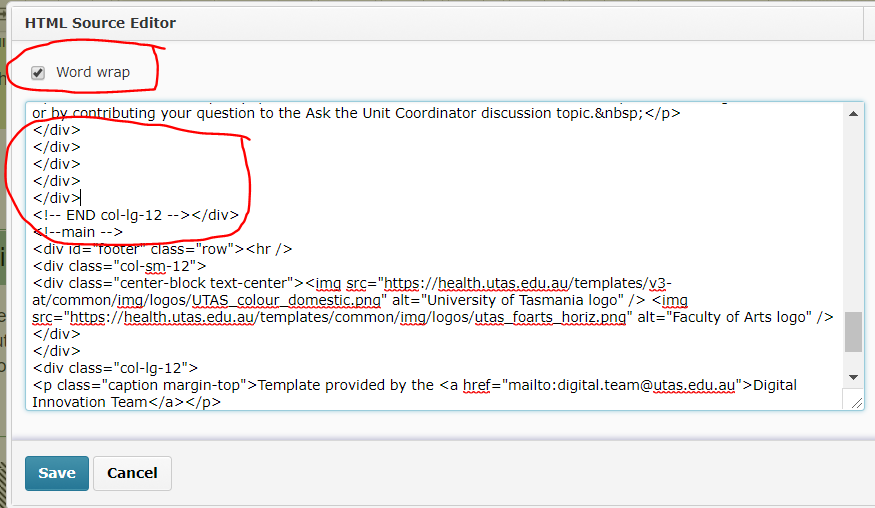
Step 5
Once you have found the <!– END col-lg-12 –></div> code snippet, look just above it. You should see about five lines of code, each with the identical tag, </div>. Place your cursor just behind the fourth </div> tag in the list, then press the Enter or Return key on your keyboard to create a new line. Type the following text into the new line – <p> </p> – as shown below.
IMPORTANT!: The new code must go after the fourth </div> tag in the list. If you place it higher in the list, or at the end of the list, you may accidentally alter the alignment of text on the page, or the properties of an existing template element.
Step 6
Press the Save button to return to the WYSIWYG view of the HTML page. A paragraph space should now appear at the bottom of the page. You should be able to place your cursor in this new space. You may wish to add some Spacer template elements to the area, so your colleague doesn’t ask you to repeat this process again for them in the near future. Don’t forget to save the changes you have made to the page!

Open a MyLO HTML page in editing mode
In MyLO, an HTML page is like a web page. It can contain different types of content, including formatted text, images and multimedia (like embedded videos). If a page is based on the Interactive Content Builder (ICB) template (open in new window), you can use a range of elements to improve general look and feel, as well as interactivity, of an HTML page.
To change the existing content of a page, remove existing content or add new content you will need to choose to edit the page.
Choose to edit a page
First, navigate to the page you wish to edit on your unit’s MyLO site. It can usually be found somewhere in the Content tool.
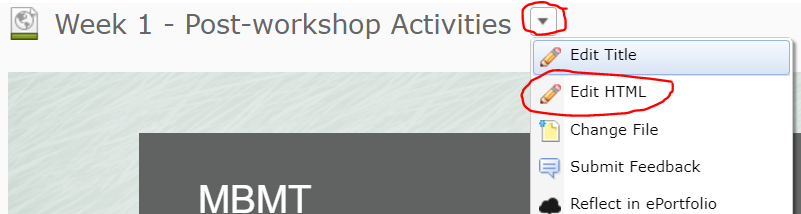
You can choose to edit the page BEFORE you open it, or AFTER you open it. Simply select the small black arrowhead that appears to the right of the page name. Select Edit HTML from the menu.
How will I know that a page is in editing mode?
When a page is in editing mode, you will notice that the editing toolbar appears towards the top of the page. These tools can be used to add media, insert hyperlinks (known as Quicklinks) and apply formatting to text.

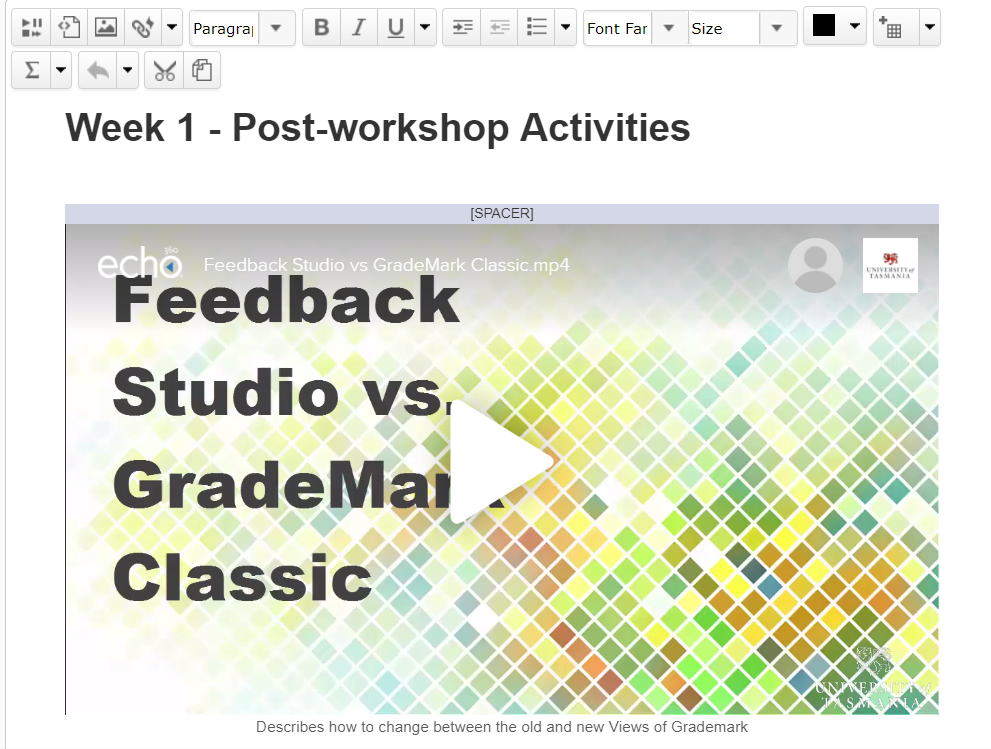
Embed an Echo360 video in an HTML page
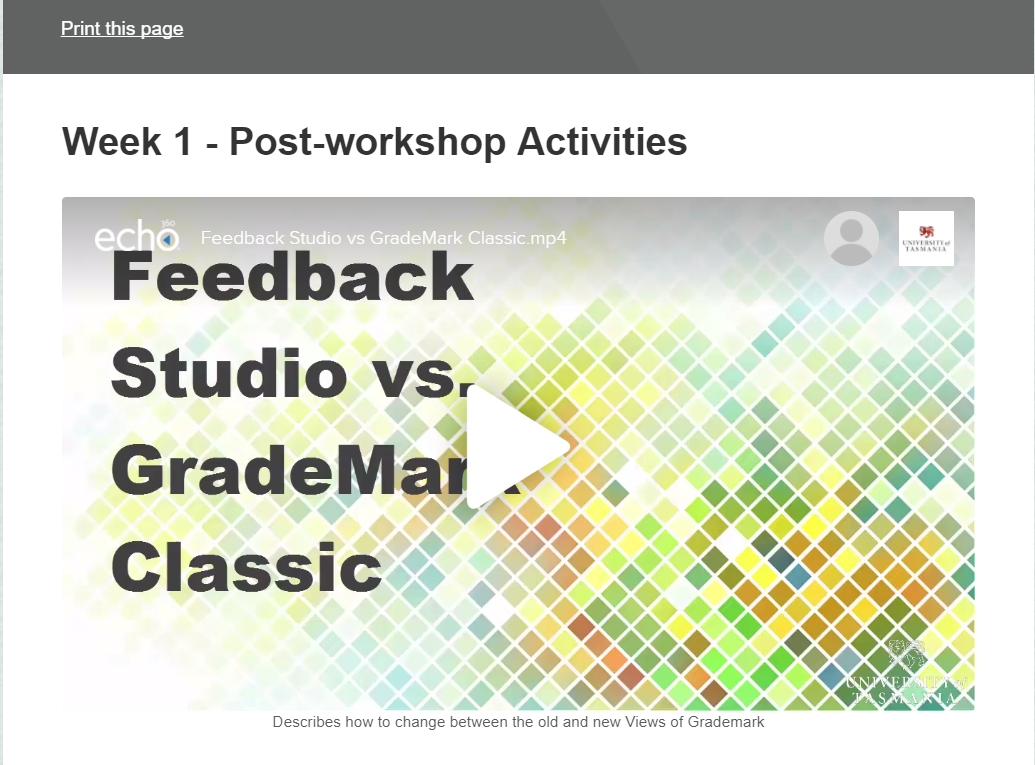
If you upload a video to your Echo360 Library, or to an Echo360 Section, you can embed the video in a page in your MyLO site using a feature called a Public Link. The resulting video may look something like this when inserted into an HTML page based on the ICB template.
If you embed an Echo360 video in an HTML page, you are using what is known as a Public Link. Public links will not allow you to track who has accessed the video. It is also possible for savvy students to obtain and share the link to the video with students outside your unit (and to the general public). If you would like to be able to track which students have accessed a video, and only allow access to UTAS users, we recommend that you upload your video to a unit Section and use a Quicklink to provide access to the video.
If you’re certain you want to use a Public Link, follow these instructions.
Before you start
Have the following open, each in a different browser tab.
- The HTML page in your MyLO site that you wish to add the video to, preferably already in editing mode.
- The ICB Template page. You may wish to select the Video menu, then choose the YouTube/MyMedia video option, in advance.
- Your Echo360 Library or a unit Section. You can usually access these from a link in your MyLO site OR by logging in (via institution) at www.echo360.org.au (opens in new window)
Step 1
Locate the video you wish to use, either from the Echo360 Section for your unit, or from your Echo360 Library.
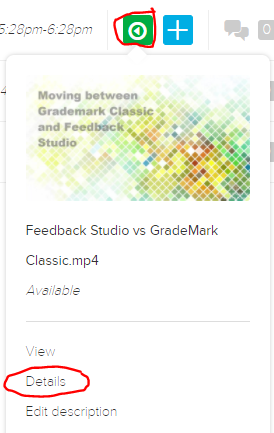
If you are using a video from an Echo360 Section, select the green icon to the right of the video name and choose Details from the menu.
If you are using a video from your Library, you will need to locate the video and click on the preview image.

Step 2
You will see three tabs appear beneath the video. Select the Sharing tab.

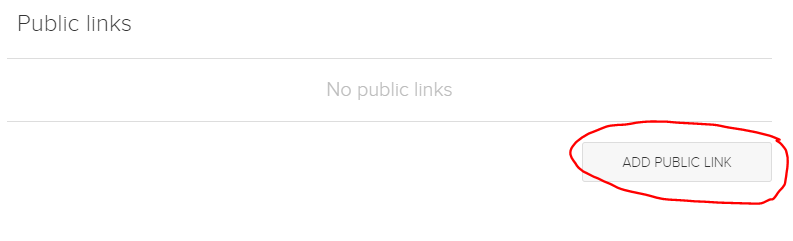
Step 3
Scroll down until you see the heading Public links. If you cannot see a link there already, select the Add Public Link button.
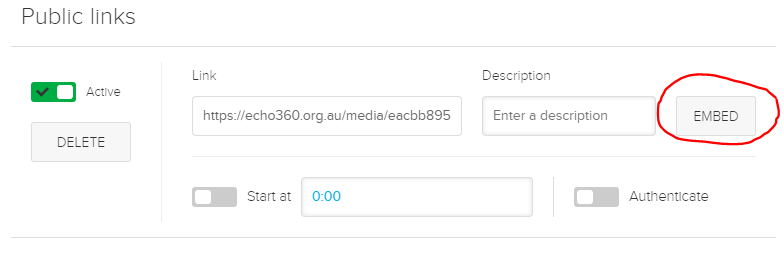
Step 4
A link will now appear. Select the Embed button to the right.
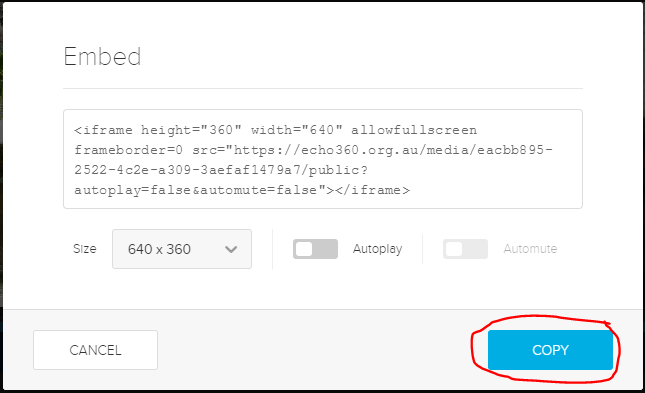
Step 5
A new window will pop up. This contains the embed code. Select the Copy button. This will copy the code to your computer’s temporary memory.
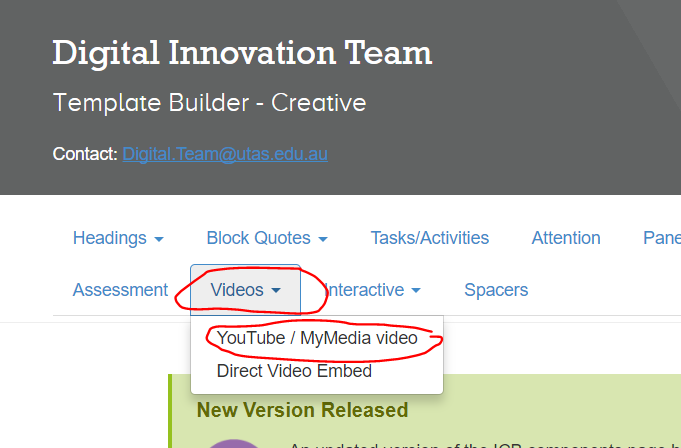
Step 6
Now jump to the browser tab containing the ICB template page. If you haven’t already done so, select the Video menu, then choose the YouTube/MyMedia video option.
Step 7
Scroll down under the video until you see the Embed Code field. Place your cursor in the field, use one of the following keyboard shortcuts to paste in the embed code you copied earlier:
- On a PC, CTRL + V; or
- On a Mac, Command + V.
This should copy the code into the field. Once the code appears in the field, press the Copy to Clipboard button. This copies some more code into your computer’s temporary memory, to make your video more responsive to different screen widths and devices.

Step 8
Now jump to the browser tab containing your MyLO site. Ensure that the page you wish to add the video to is in editing mode. Place your cursor where you would like the video to appear, then use one of these keyboard shortcuts:
- On a PC, CTRL + V; or
- On a Mac, Command + V.
Your video should then appear on the page. You can replace the caption beneath the video by selecting it and replacing it with your own text OR you can select it and delete it.
Step 9
Continue to work on your page. When you’re finished, don’t forget to save!
Generate a spreadsheet detailing the groups students belong to
If you use the Groups tool to organise groups of students in your MyLO site, you may find it helpful to download a spreadsheet listing the students and the Groups they are members of. Here’s how.
Step 1
Select the Grades tool from the MyLO Toolbar.
![]()
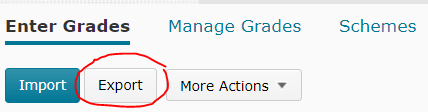
Step 2
Select the Export button. This appears towards the top left of the Grades tool when in Enter Grades view.
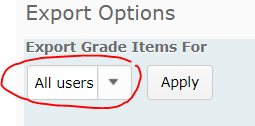
Step 3
Now select whether you wish to include All Users (students) enrolled in the MyLO site in your spreadsheet, or specify only a certain group of students to appear in the spreadsheet. For example, you may only want to see students in a particular study mode, studying at a particular campus or enrolled in a particular unit code. If you want all users included, skip to Step 4.
If you wish to select a specific Group of students:
- select Groups from the dropdown menu, then the Apply button;
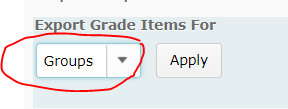
- select the Group you wish to view from the dropdown menu (only one can be selected), then select Apply again.

Step 4
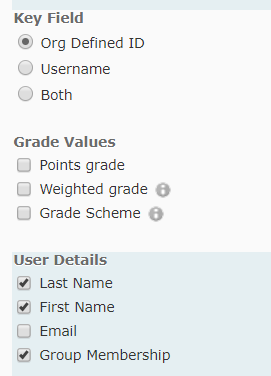
You can now choose the fields you wish to include in the export. Under Key field, leave the Org Defined ID option selected. Uncheck all the Grade Value options. Under User Details, check the Last Name, First Name and Group Membership fields checked.
Step 5
You won’t need any of the Choose Grades to Export options. The quickest way to deselect them all is to select the checkbox at the top of the list, then deselect it again (this selects all, then deselects all).

Step 6
Select the Export to Excel button that appears at the bottom of the screen.

A pop up window will appear as your spreadsheet is generated. The file will eventually appear. Select the file name to download it. The final name will normally include your unit code and name.

The resulting Excel spreadsheet will include your students on the left (one row per students), with each Group Category listed as a column header. An example is provided below.
![]()
Use Quiz statistics to improve teaching and learning
Quizzes can help students check their own learning, especially if useful feedback is provided in response to student responses. Quizzes can also help you adapt your teaching according to needs of your students. The statistics provided by the Quizzes tool can help you quickly determine areas students are strong in, and areas where they may benefit from further learning opportunities (e.g. further discussion or a review during a forthcoming class).
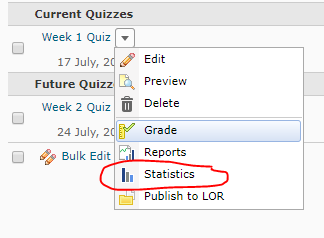
How to access the statistics for a Quiz
Select Assessments then Quizzes from the MyLO Toolbar. Select the little black arrowhead to the right of the quiz you wish to obtain statistics for, then select Statistics from the menu.
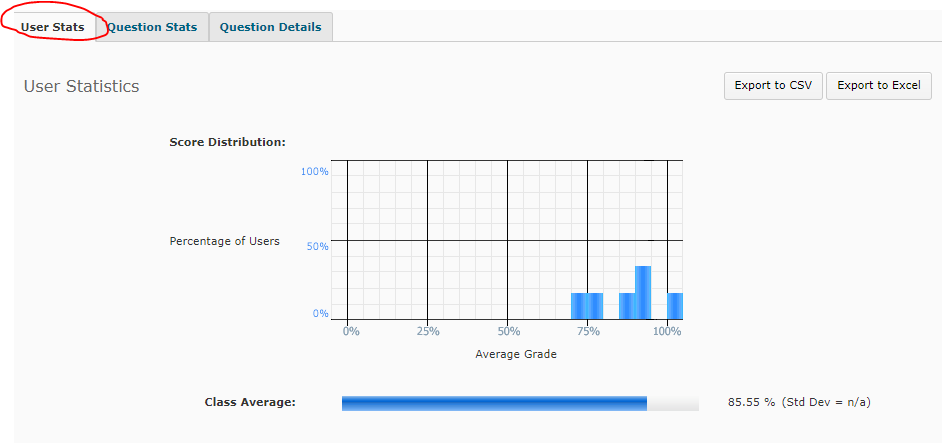
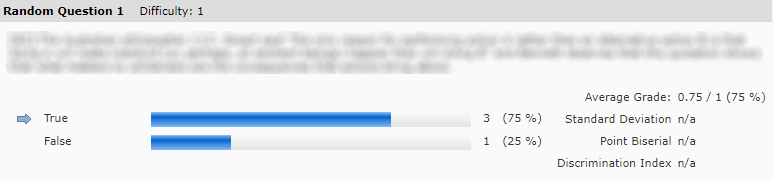
By default, you will be shown the User Stats for the Quiz. This shows you the overall score distribution, and class average, beneath which you will see the overall result for each student (not shown below).
You can navigate between the Question Stats and Question Details tabs to see more useful information.
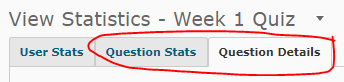
Question Details provides the most useful information. Here you will see each question (this has been blurred out in the sample image below), followed by the answer options provided to students. The percentage of students who selected each answer option is presented. The correct answer/s are marked by a small blue arrow.
Track whether students have accessed an Item in MyLO Content
If you need to keep track of student access to an Item in your MyLO unit’s Content tool, using the Reports tool will allow you to get a quick overview of who has, or hasn’t, accessed the Item.
Step 1
Navigate to your MyLO unit’s Home page (this is the first page you see when you access the unit). You should see a Reports widget to the right hand side of the screen. This contains links to a variety of reports. Select Content Access by Topic.

Step 2
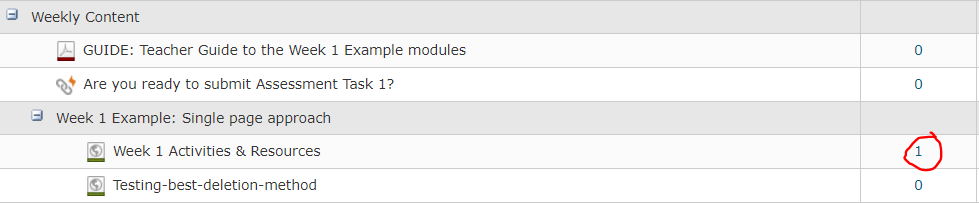
The report will open. You will see a list of all the Content items in your unit, presented in a table. As in the Content tool, the items are organised into Modules (folders) and Sub-modules. Locate the Item that you wish to see results for. You may need to scroll down to find it. Select the number recorded in the Users Visited column (second column from the right side). For example, here we will select Week 1 Activities & Resources page from the Week 1 Discussion: Single page approach Module.
Step 3
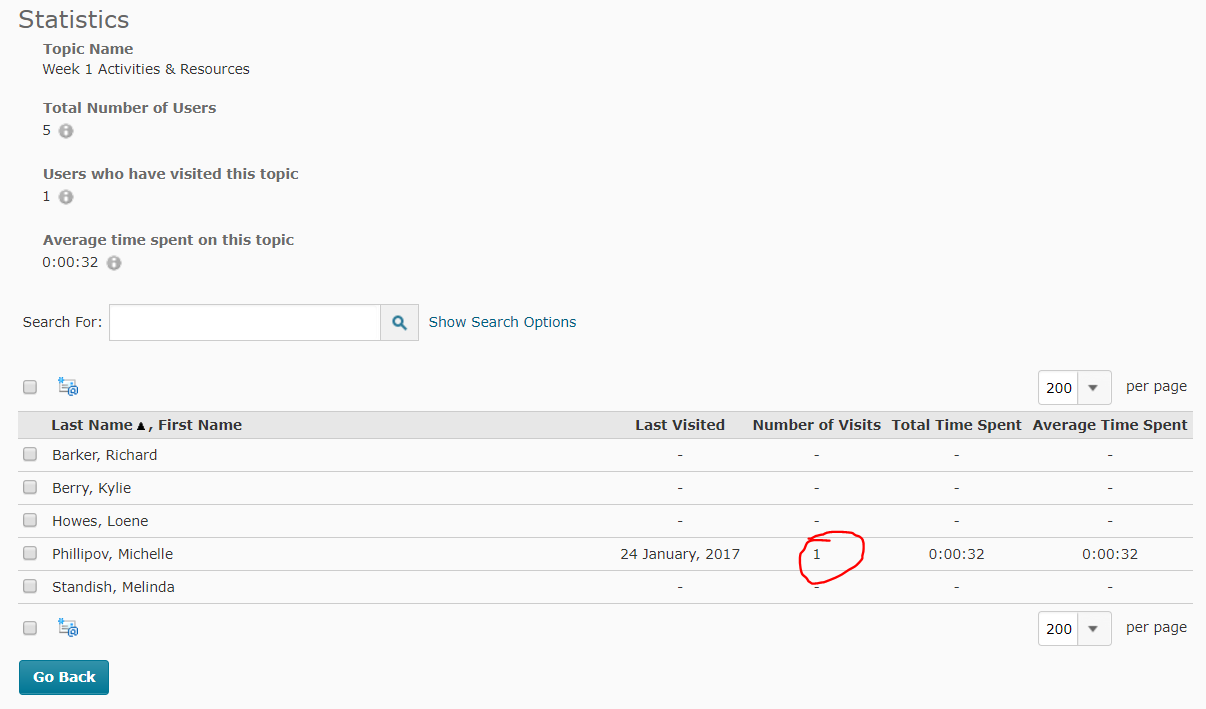
You should now see a list of students enrolled in your unit (to see more than 20 on a page, use the per page drop down menu to the top right of the table to select 200).
TIP: If you only wish to see a selection of students, you can filter by group, using the View by options seen above the table of results. For example, you could choose to see only off-campus students by selecting the group, Default Group Study Mode External. This post provides more information about how to filter results by group.
You should be able to see the Number of Visits students have made to the item. For example, in the example below, Michelle has made one visit to the item.
Step 4 (optional)
If you would prefer to have a printable version of the results, ensure that you have the window selected, then select CTRL + P on your keyboard (for a PC) or Command + Print (for a Mac). This should generate a printable version of the report page. If your students are spread out across several pages, you will need to repeat this process for each page.
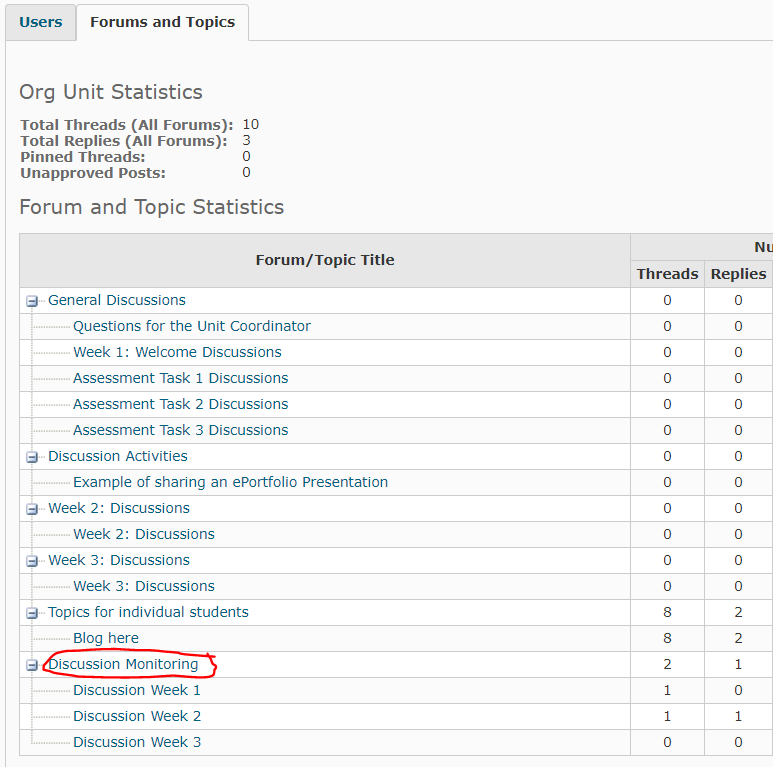
Track student participation in a Discussion Forum
If you need to keep track of student participation in MyLO Discussion Forum (which may contain several Topics), using the Reports tool will allow you to get a quick overview of who has, or hasn’t, made a contribution.
Step 1
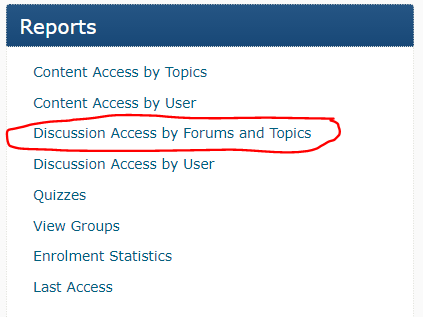
Navigate to your MyLO unit’s Home page (this is the first page you see when you access the unit). You should see a Reports widget to the right hand side of the screen. This contains links to a variety of reports. Select Discussion Access by Forums and Topics.
Step 2
The report will open. You should see a list of all the Discussion Forums and Topics in your unit, presented in a table. Select the Forum that you wish to see results for by clicking on its name (you may need to scroll down to see it). For example, here we will select Discussion Week 2 from the Discussion Monitoring forum.
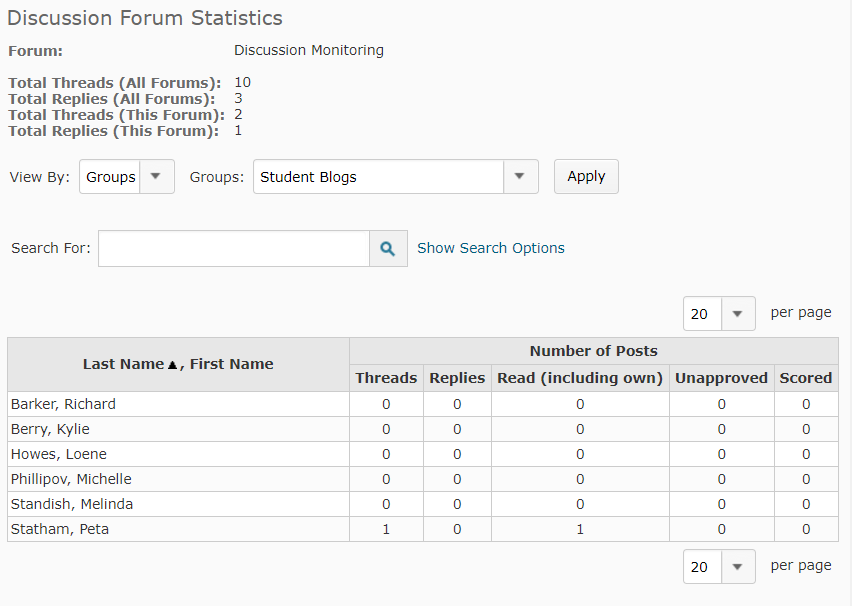
Step 3
The report you have requested will open in a new window or tab. If you only see some of your students on the page, select 200 from the per page drop down menu, seen to the top right of the table. This will allow you to see the maximum number of results on the one page.
TIP: If you only wish to see a selection of students, you can filter by group, using the View by options seen above the table of results. For example, you could choose to see only off-campus students by selecting the group, Default Group Study Mode External. This post provides more information about how to filter results by group.
You will be able to see how many Threads and how many Replies students have contributed to the Discussion Forum overall.
Step 4 (optional)
If you would prefer to have a printable version of the results, ensure that you have the report window selected, then select CTRL + P on your keyboard (for a PC) or Command + Print (for a Mac). This should generate a printable version of the report page. If your students are spread out across several pages, you will need to repeat this process for each page.
Allow students to see a Grade Item / Hide a grade item
Many staff hide Grade Items from students until they have finished marking and moderating results. When a Grade Item is made available to students, they will see the full name of the Grade Item, together with any results you have made available to them, in their view of the Grades tool.
Is my Grade Item hidden?
To determine whether a Grade Item is hidden, go to the Grades tool. Select the Manage Grades tab.

You should now see a list of all the Grade Items included in your unit’s Grades tool. If your Grade Item has a closed-eye symbol to the right of its name, as shown in the example below, it is hidden to students. If you cannot see the closed-eye icon, it means that students can see the Grade Item.

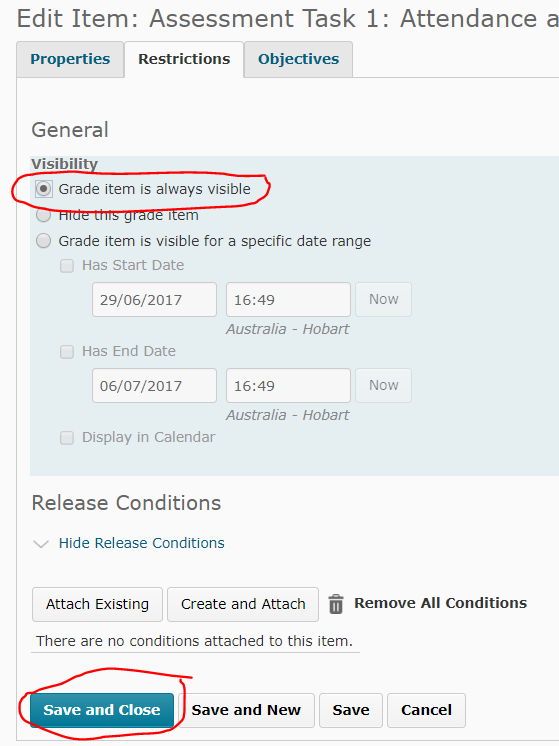
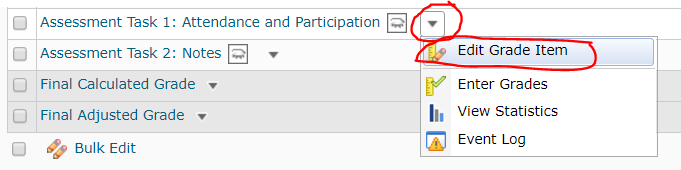
To Hide or ‘un-hide’ a Grade Item
From the Manage Grades view, select the small black arrowhead to the right of the Grade Item name, then select Edit Grade Item from the menu.
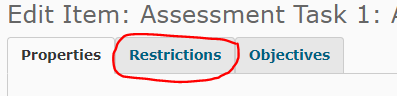
Select the Restrictions tab.
To Hide just choose the option for ‘Hide this grade item’
To unhide select the Grade Item is always visible option.
You can also select the third option to show the grade once a specific date has been reached.
When you’re done click Save and Close (towards the bottom of the screen) to save your change.