Link from a MyLO unit to a MyMedia Echo360 Section
A unit may have MyMedia Echo360 section associated with it. The section provides students with access to a list of all the recordings (known as classes) associated with the unit.
Many MyLO Units include a Recordings (or similar) folder in the Contents section, usually as part of generic Faculty Template. This folder may/may not already contain a link. You will need to ensure that the link will take students to the correct section. Here’s how.
Step 1
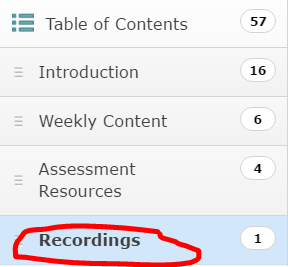
Navigate to the Content Module you wish to add the link to. In most College of Arts and Law units, there will be a Recordings (or equivalent) folder in the Content tool. Make sure the folder is selected in the Table of Contents (it will be highlighted in blue if selected).
You may/may not have a link in this folder. If you already have a link set up here, move to Step 4. If there is no link at all, move on to Step 2.
Step 2
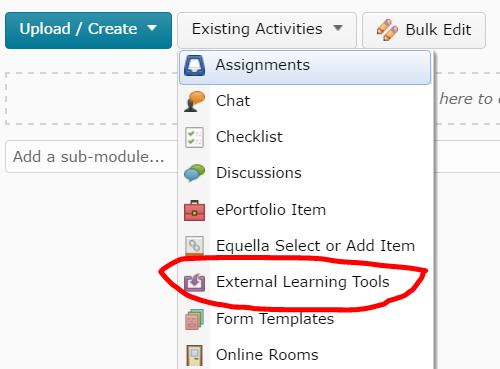
First, you need to create the link to MyMedia Echo360. To do this, select the Existing Activities button, then select the External Learning Tools option.
Step 3
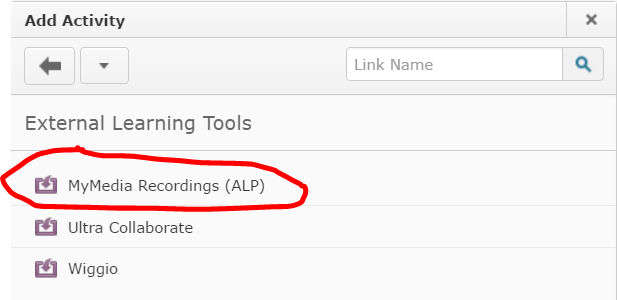
The Add Activity window will open. Select the MyMedia Recordings (ALP) option by clicking on it.
Step 4
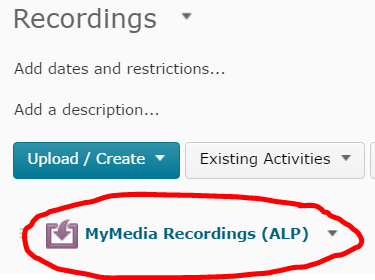
You will now see a link appear in the Recordings folder. By default it will be named MyMedia Recordings (ALP).
Step 5
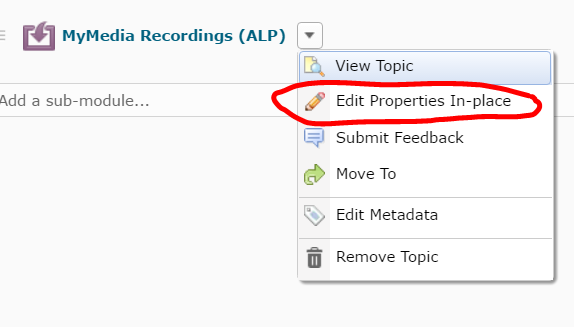
It is important to ensure that the link opens in a new window. To do this, select the black arrowhead that appears on the right side of the link, then select Edit Properties in Place from the menu.
Step 6
Check the box next to the Open as External Resource option. If you would like to change the name of the link, you can also do that in this view by clicking on the link and replacing the link text. Finally, click away (e.g. by selecting the Recordings folder from the Table of Contents again) to save your changes.
Step 7
The link will now need to be set up to send students to the correct section. Click on the link to open it (the page will open in a new window). You will need to select a Course, Term and Section. You can search for a course using a unit code. The term refers to the semester offering. The section repeats the semester and year offering (e.g 2016_S5_ALL refers to Semester 5, 2016). If you cannot see the section you want, you may need to request the creation of a MyMedia Echo360 section for your unit (requires UTAS username and password).
Step 8
Once you have selected a section, you will see some options below. Select the Link to the Section Home button, then select the Link Content button. That’s it! You’re done.
Export a Grademark Set (Classic View) for use in other units
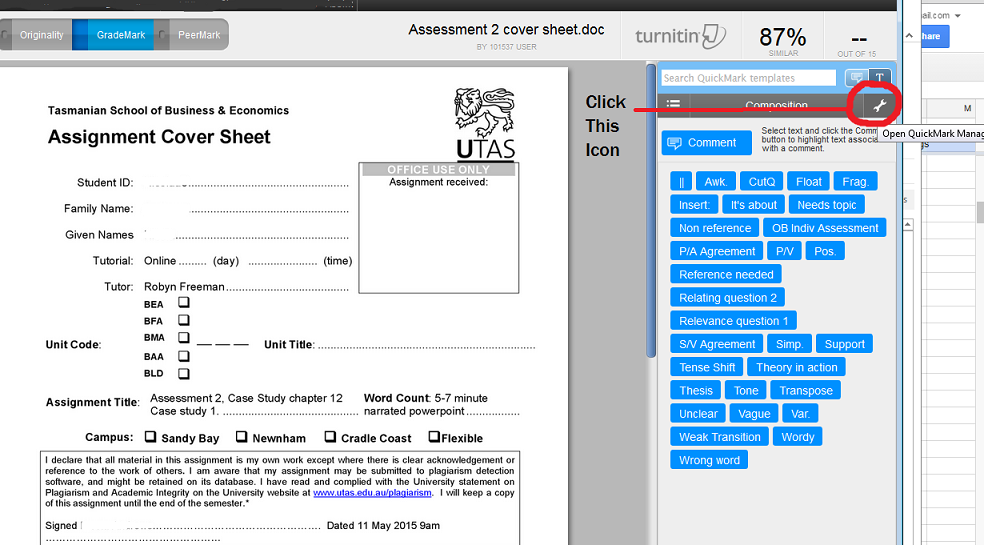
Go to Grademark and click on the Quickmark Editor button located at the top right of the Grademark window.
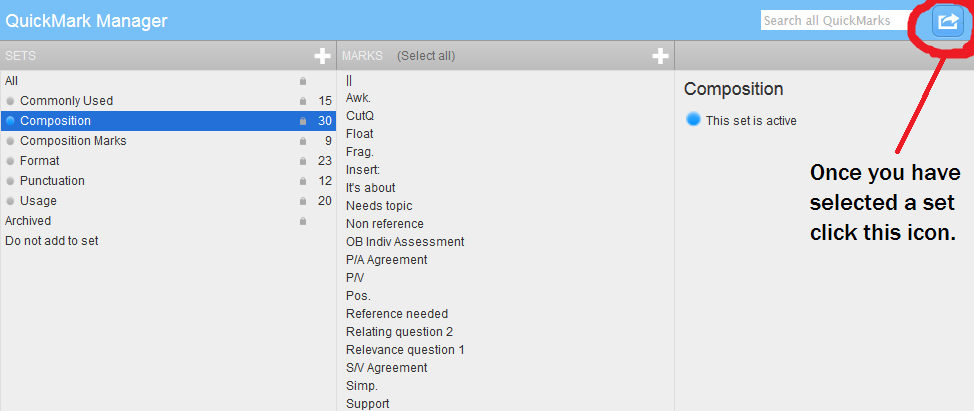
The Quickmark Manager window will load. The left column shows Grademark sets. The middle column lists individual comments (Quickmarks) included in the selected set. The right column shows options for the selected set.
Click on the name of the set you wish to export (in the left column) so that it becomes highlighted. The individual comments for that set will load into the middle column for you to review/revise if necessary.
Click the small Export icon (looks like a square with an arrow) seen towards the top right of the Quickmark Manager window, then choose Export.
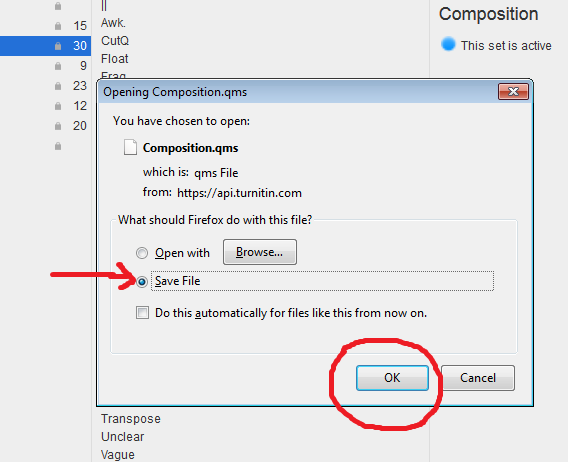
Choose to save the file. Save it somewhere that you can easily find again.
Click the Done button at the bottom-right to close the QuickMark Editor window and return to Grademark.
Import an exported Quickmark Set
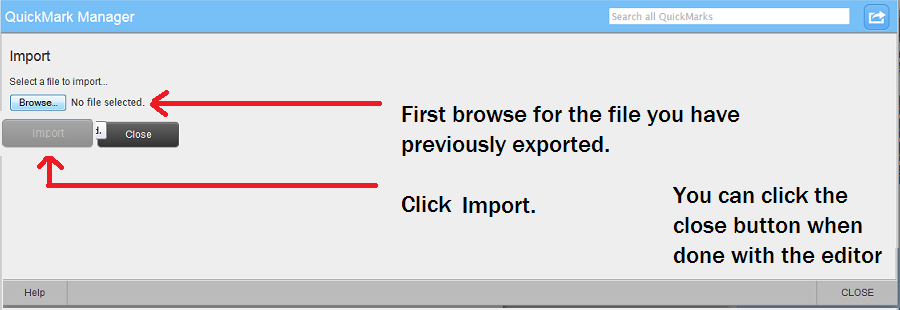
Go to Grademark in your chosen unit and Assignment Submission Folder. Choose the Quickmark Editor option (as shown for Export a Grademark Set towards the top of this page ), then choose the Export icon. Choose the Import option. A new window will open. Browse for your exported file by clicking on the Browser button. Select your file (it will upload), then click Import.
Click the Done button at the bottom-right when done to close the Quickmark Editor window and return to Grademark. You should now be able to mark with your imported set.
Using the ICB with MyLO: Work-around
During the most recent MyLO update (November 24, 2016), we (temporarily) lost the ability to copy items from the Interactive Content Builder (ICB) into a MyLO page. The text will copy over, but the formatting wrapped around the text is stripped out.
The MyLO team and ICB template developers are currently working on this issue. In the interim, the following method will allow you to continue to insert ICB elements into your pages in MyLO.
TIP: If a new page will contain the same or similar elements to pages that you have already created, it may be quicker to create a new page based on an existing page.
Step 1
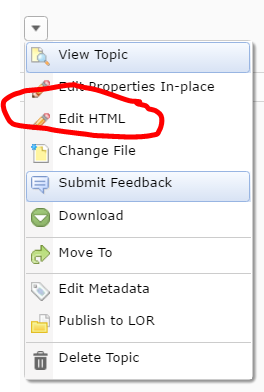
Locate the page in MyLO that you wish to edit. Click on the Edit HTML button (usually seen at the bottom of the page). Alternatively, click the small black arrow head next to the page’s name and select Edit HTML option from the menu.
Step 2
In a separate tab or window, go to the ICB template page (opens in new window), locate the element you wish to copy, and click on the Copy to Clipboard button that appears beneath the element.
Step 3
Return to the MyLO tab/window. Place your cursor where you want the ICB element to appear on your page. Towards the top left of the editing window, you should see a tool that looks like the one shown below. It should be the first button on the far left side. This is called the Insert Stuff button. Click on the Insert Stuff button.
Step 4
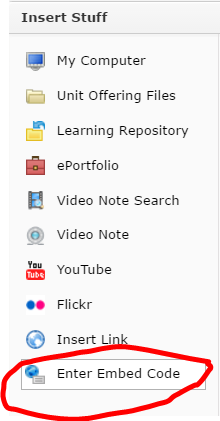
A window will open. Select the Enter Embed Code option from the menu on the left-hand side.
Step 5
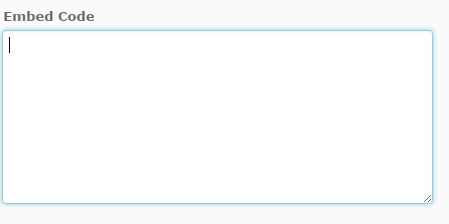
You will see a white space to the right-hand side. Place your cursor in the white space, then paste as you normally would. For example, press CTRL + V (PC) or Command + V (Mac) on your keyboard; or right click over the white space and select Paste; etc. You should then see some code appear in the white space.
Step 6
Now click the Next button (bottom left-hand corner). You will see a preview. This may not show you what you expect it to, but trust us, this will work! Finally, click the Insert button.
Done!
You should now see the ICB element in your page. Continue to edit as you normally would.
How to Access your Assignment Feedback
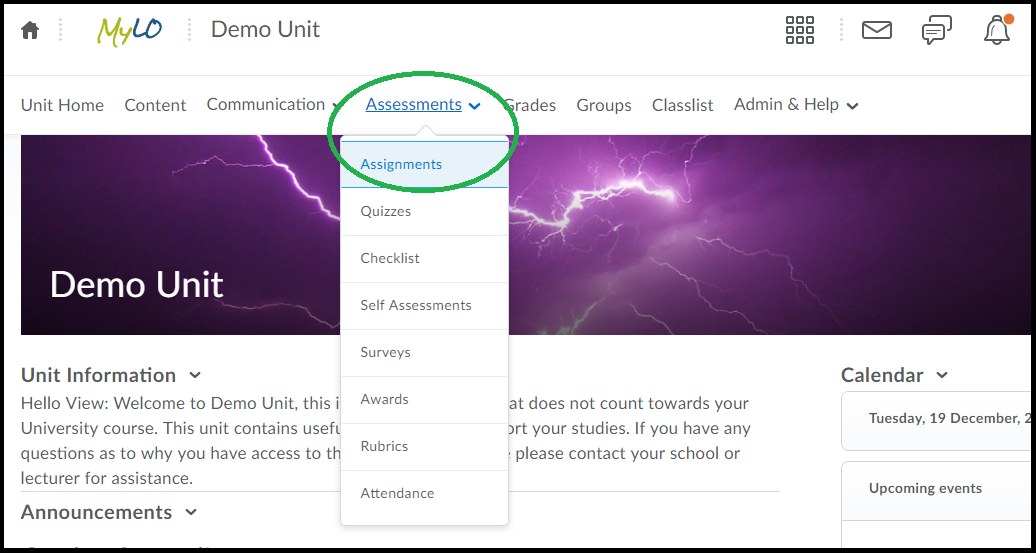
First you will need to click the “Assessments” item from the toolbar, then choose the option ‘Assignments’, as circled below.
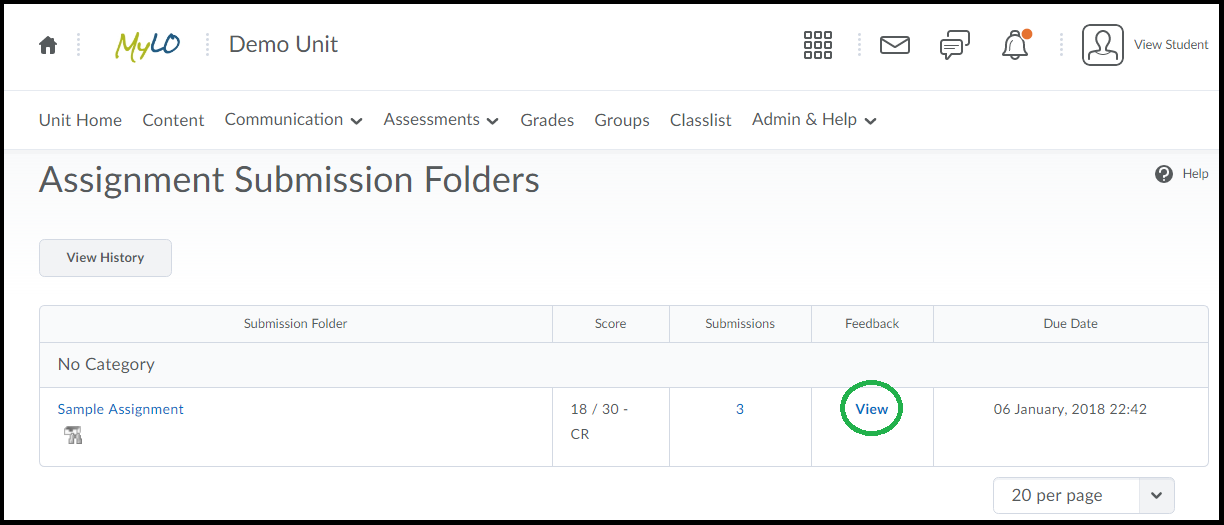
When you load up the Assignments area you should see a list of assignments, with a column titled “Feedback” to the right of each one. When Feedback is published to students a link called “View” will be visible in the Feedback column, as circled below.
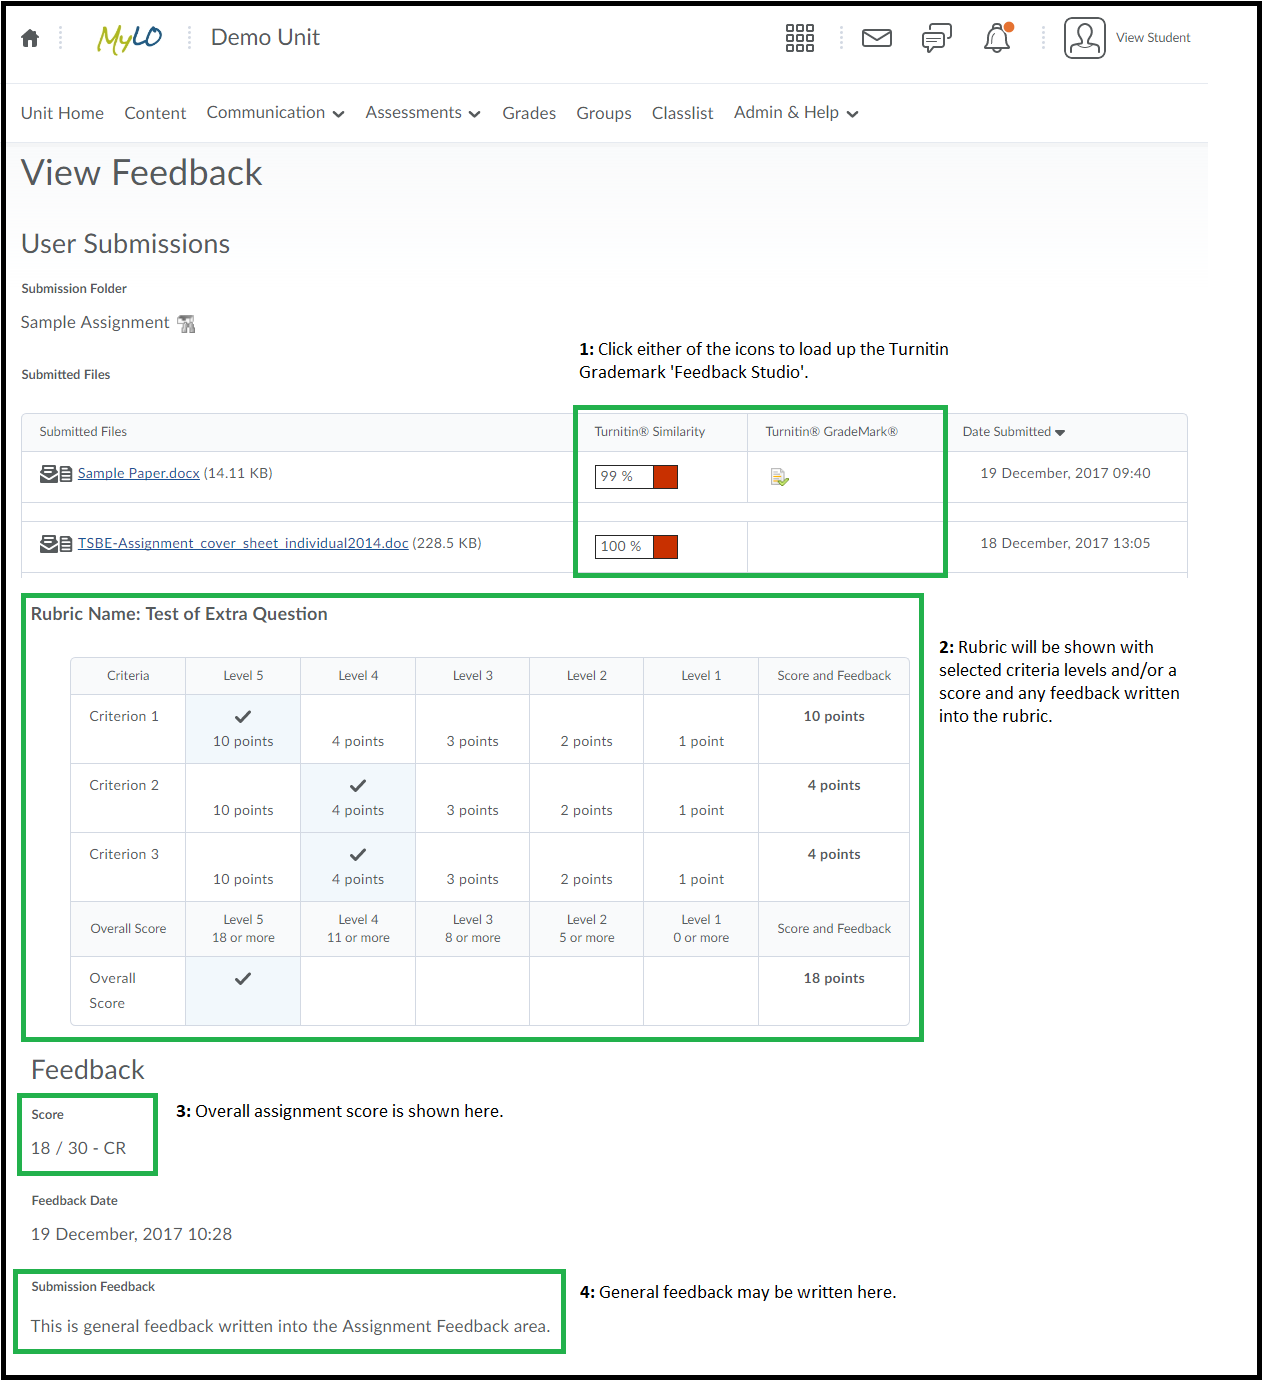
When you click the “View” link you will see one or more of the different kinds of feedback your instructor may have provided.
These are:
(1) Link to Turnitin/Grademark: IF Turnitin or Grademark were used you may see a link to the ‘Turnitin Feedback Studio’. It may be the Similarity Report icon AND/OR the Grademark icon – either will take you to Feedback Studio to view any further comments on your submitted file(s).
(2) Rubrics: If a rubric was used for marking you will see it displayed with the selected levels highlighted.
(3) Overall Score: You may see your overall assignment score.
(4) Submission Feedback: General feedback may be written here.
Grademark is the tool used to mark-up (make comments) your submitted documents. It is linked to Turntin, so you may see to the right of your ‘Submitted Documents’ a link to Turnitin or to Grademark if they have been used.
To access the feedback click either icon that appears. Either icon will load up an area called ‘Feedback Studio’ by default. This shows you your submitted document with the comments shown either as icons you click on, or as text on the page itself.
By default you are likely to see the Similarity Report and Grademark comments together. You may also only see one or the other, depending on what your lecturer/marker has set as visible to you.
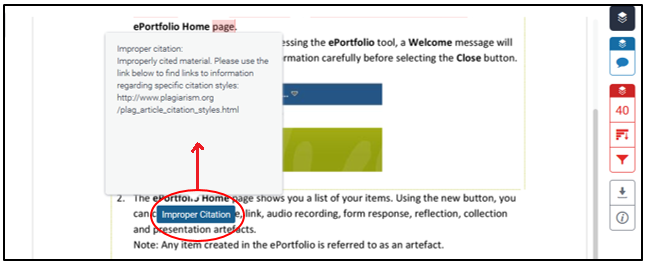
When viewing “bubble” comments (the ones that appear as white text in a blue box) you can click on the blue box to open the full text, an example is circled below.
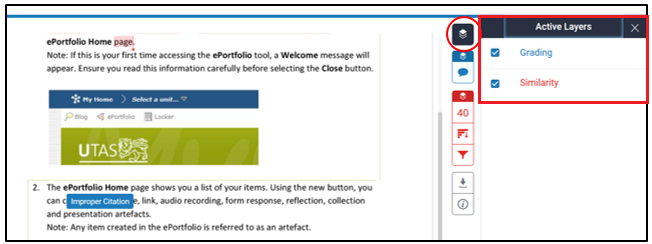
To control the visibility of the Similarity and/or Grademark comments you can click the black icon at the top-right of the page as circled below. It opens options to the left that allow you to turn them off or on.
How to Access Your Quiz Results and Feedback
To access feedback on your quiz follow the steps below:
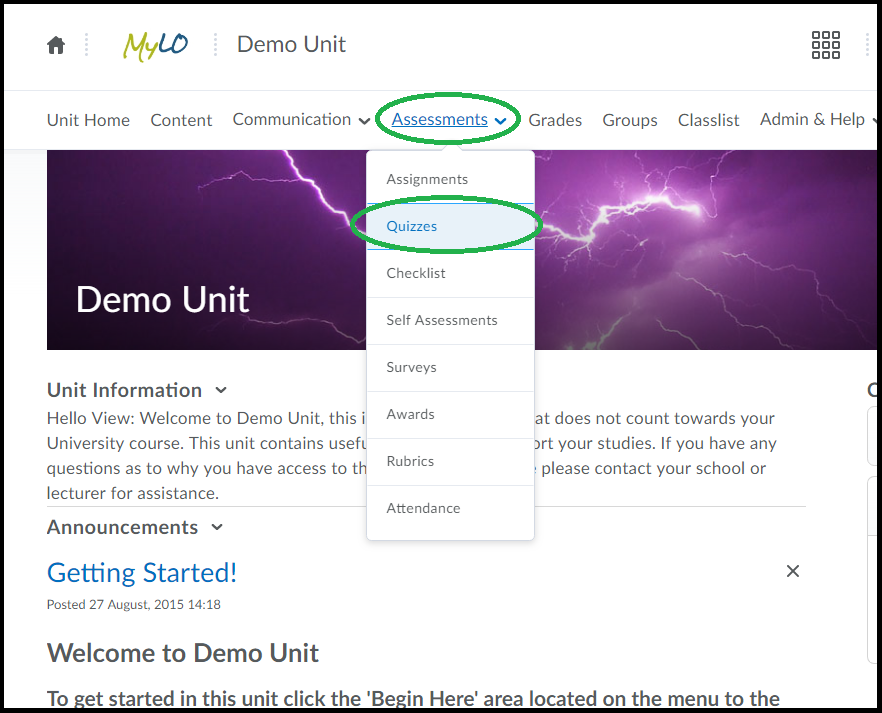
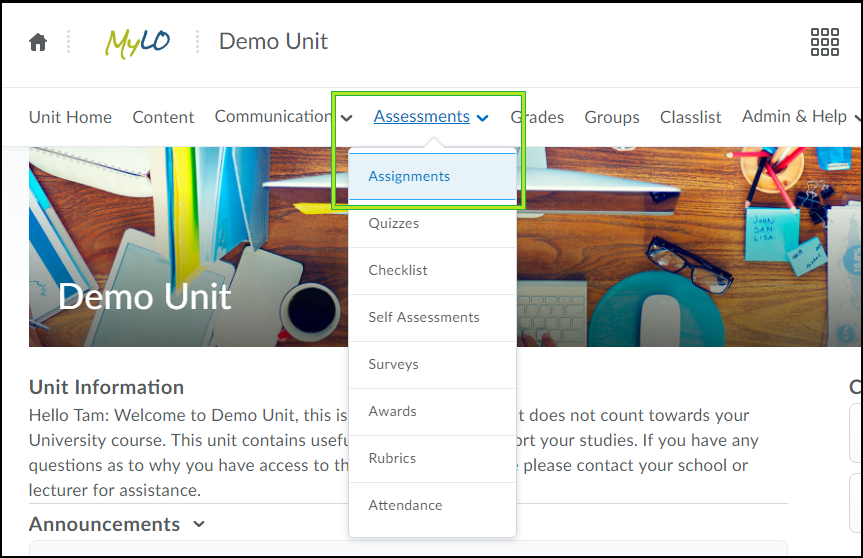
Step 1: Click the ‘Assessments’ item on the toolbar, then choose ‘Quizzes’ as circled below.
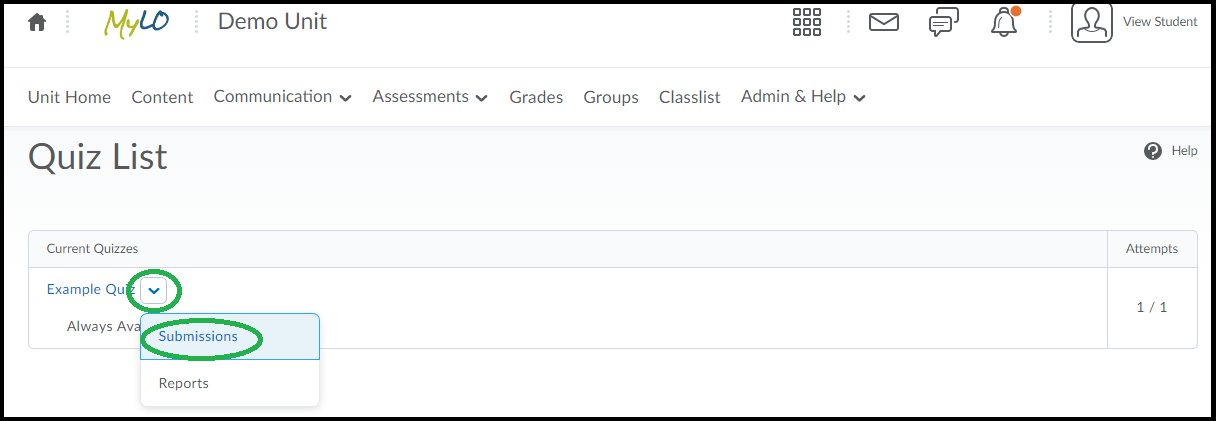
Step 2: You will see a list of quizzes for your unit, locate the quiz you want to view feedback for in the list and click the small icon to its immediate right – see the example below.
Step 3: Choose ‘submissions’ from the options as shown circled below.
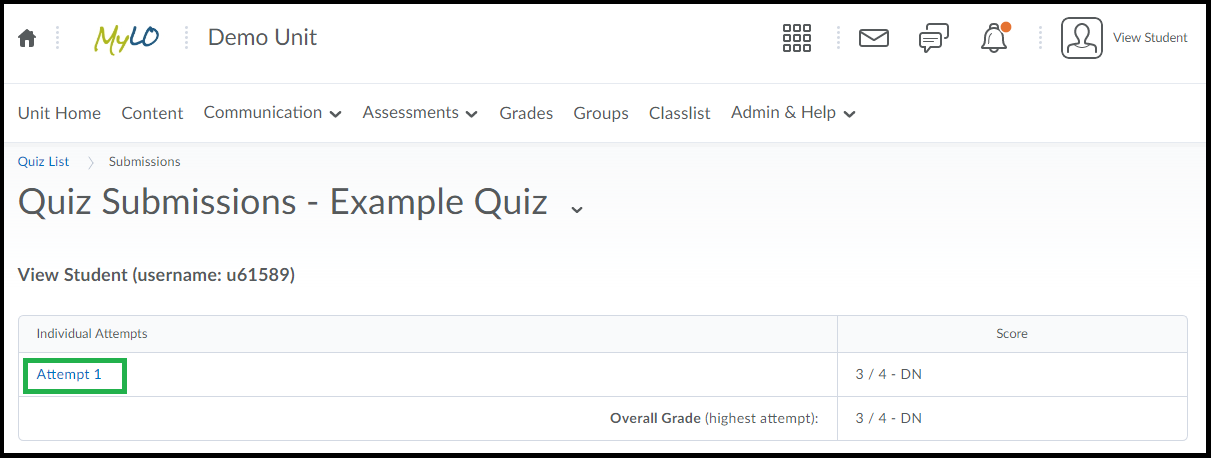
Step 4: You will see a list of attempts for your quiz, and to the right you will see your overall result. If your lecturer has made further feedback/results available you can click on the ‘Attempt’ to see more information. If you have more than one attempt recorded, click the one you wish to view – an example is circled below.
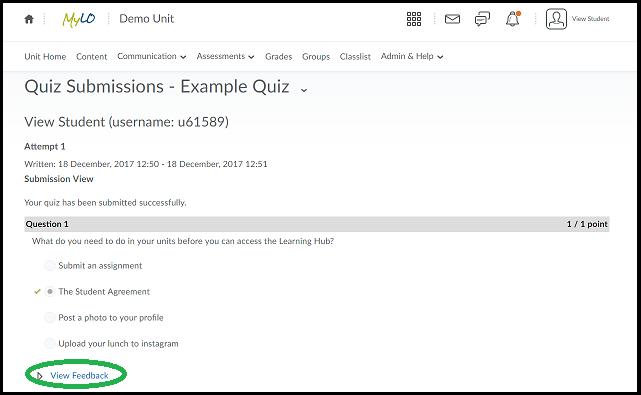
Step 5: You may see a list of questions, with your answer shown and it may also show you what the correct answer was (if enabled). To view any additional feedback click the ‘View Feedback’ link under each question, as circled in the example below.
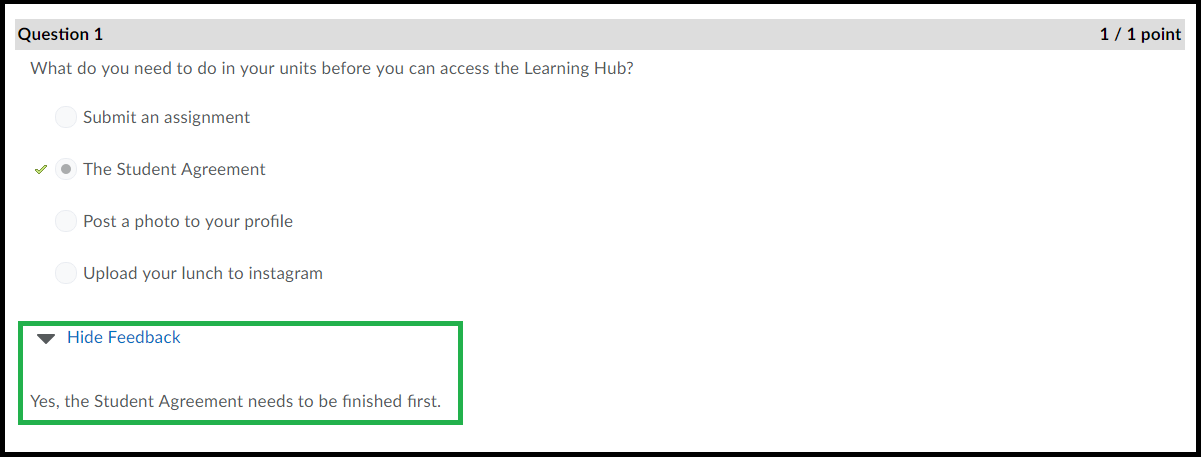
Additional feedback, if it has been provided, will then show beneath each question. You can click the link again (it now shows as ‘Hide Feedback’ to hide the feedback text.
Not all quizzes you do will allow you to view the questions and feedback, if your lecturer/tutor has indicated that the class will be given feedback for a quiz and you cannot see feedback please let them know, as they may need to alter some settings to make it visible.
Upload an Assignment to MyLO
To upload an assignment file to MyLO, follow the steps below.
Step 1: Check the assignment requirements to ensure that your file is in the correct format.
Step 2: Log into your MyLO unit and select the Assessments Menu on the toolbar. Then choose the option “Assignments” (as highlighted below).
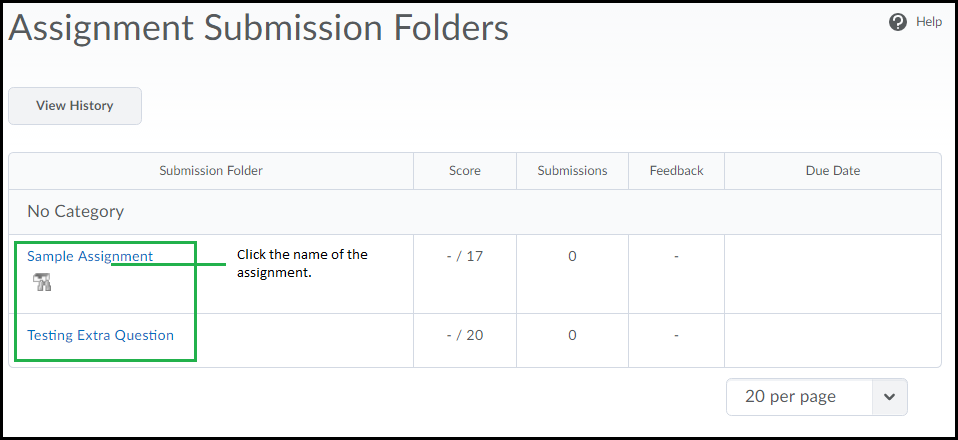
Step 3: You will see a list of Assignment Submission Folders (see example below). Ensure you select the correct folder, then click on the Folder name to open it. You are responsible for selecting the correct folder.
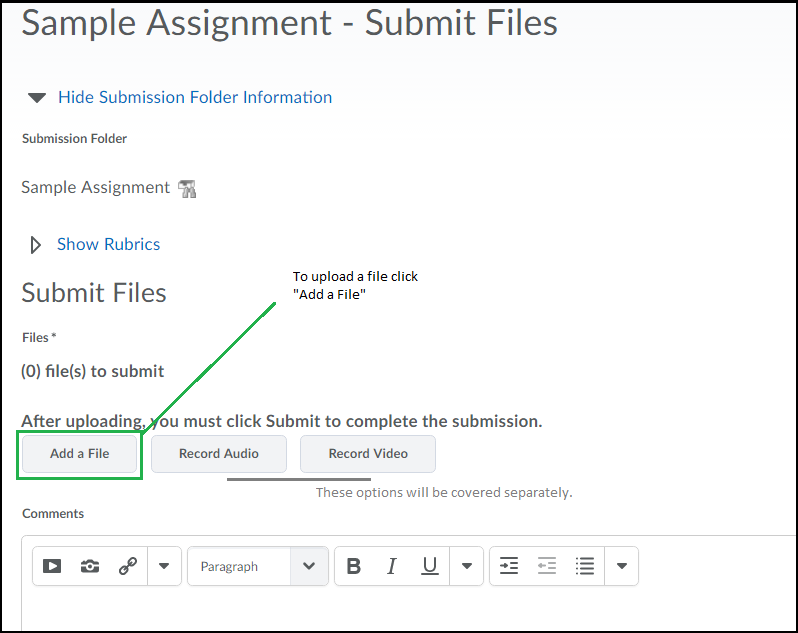
Step 4: Select the Add a File button. You may need to scroll down to see it, if a rubric is associated with the assignment you may need to scroll past the rubric also.
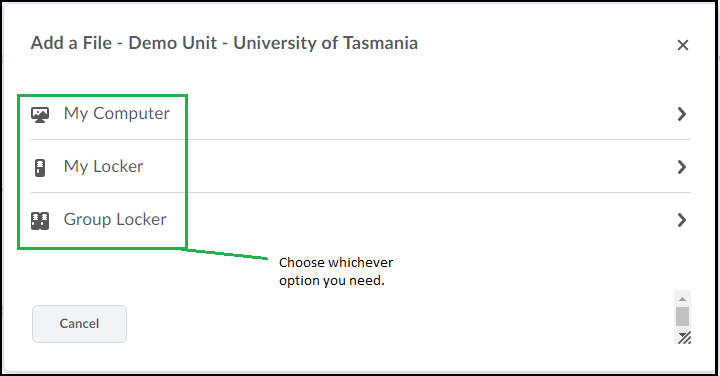
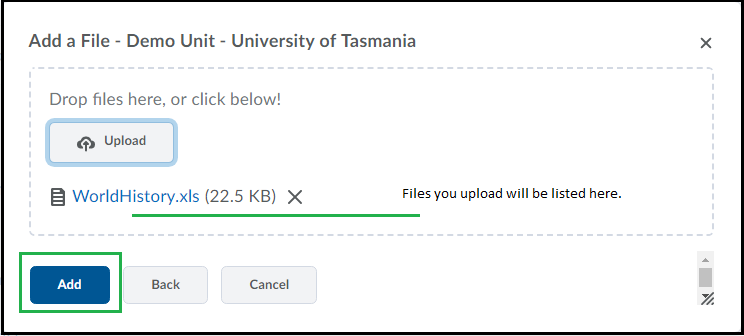
Step 5: A dialogue box, like the one below, will open. If your file is on MyLO in the locker (or a group locker) you can choose those options. Or you can choose to upload from your computer.
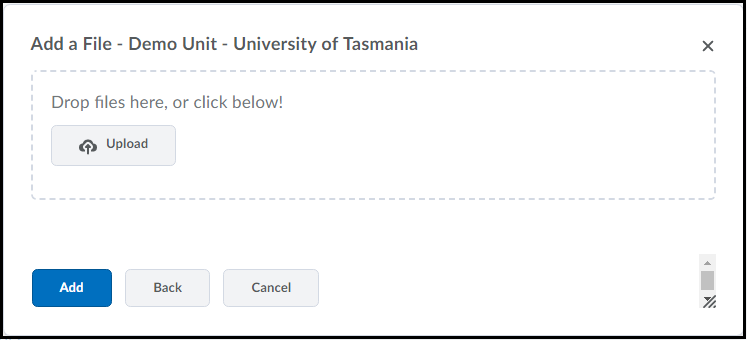
If you need to select a file from your computer you will see a dialog box where you can either drag/drop the file or click the “Upload” button to ‘Browse’ for a file.
Step 6: Once uploaded, the selected file will appear beneath the Upload button. You can continue to upload files into this area by repeating Step 5. Once you have uploaded all the relevant files, select the Add button, shown circled below. Please note: This is NOT the final step!
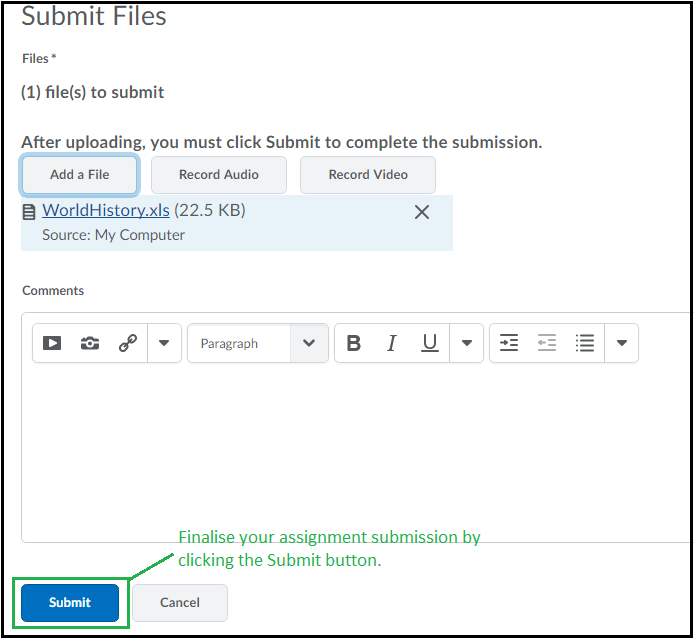
Step 7: You will return to the Assignment area, where you will a list of the files that you are about to submit. Check that they are the correct files. You can click on any file in the list to preview it. You may wish to enter a note to the marker into the Comments field. Finally, select the Submit button, as shown below.
Once you have submitted your assignment, you should receive a confirmation email at your UTAS email address.
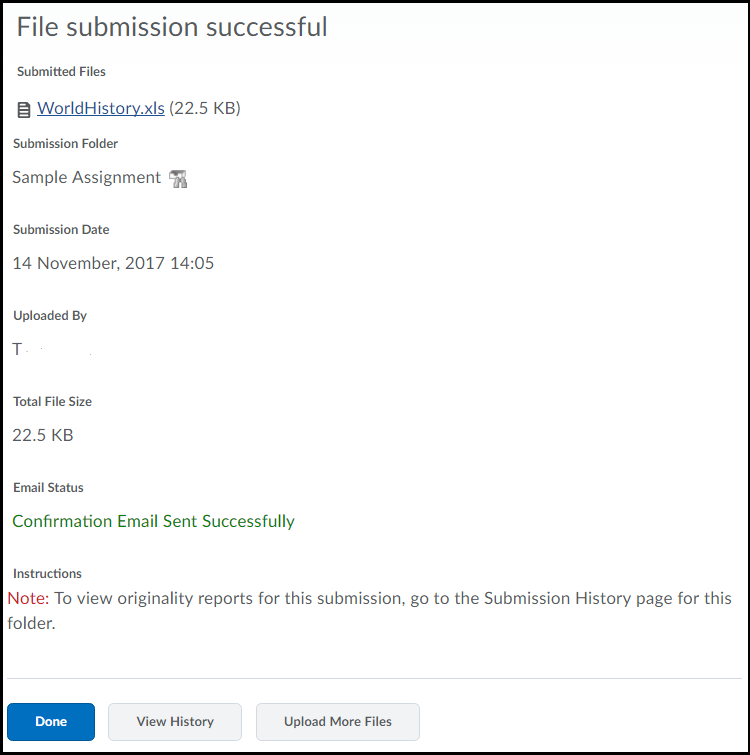
Step 8: You will see a confirmation area. Select the Done button, or you can upload more files if you need.
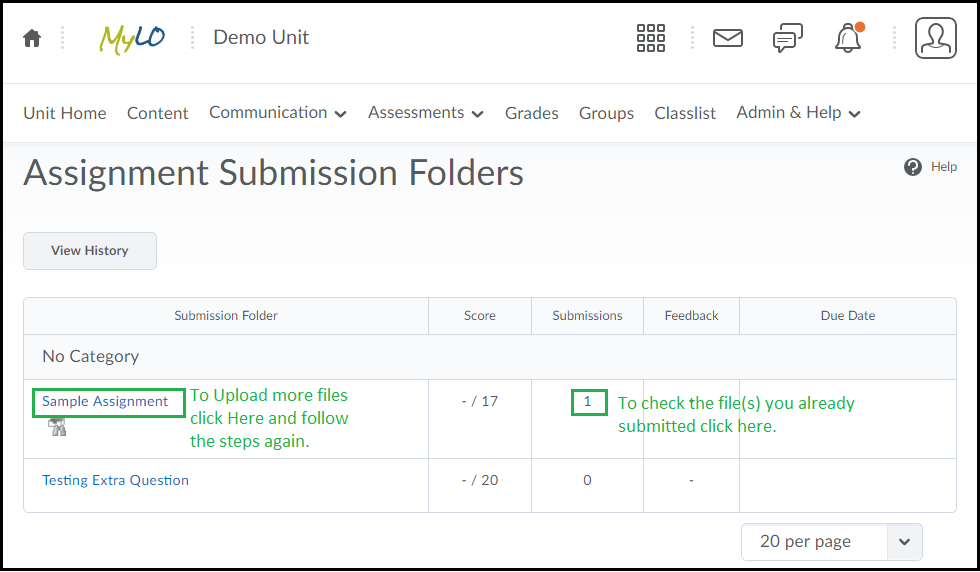
Back in the Assignments tool you will see a number in a column titled Submissions. To check what you have submitted, click on this number. If you cannot see any number listed, then it means that your submission was not successful and you will need to try again. If you need to upload more files, click the name of the Assignment and follow the above steps to upload further files if needed.
If you experience difficulty uploading files and/or receive error messages, you will need to contact the UTAS Service Desk (opens in new window) for assistance.
Help students find their way when they visit your MyLO site
Use our template to quickly and easily create an introductory Announcement, HTML page, or email (sent from MyLO). The template contains instructions, with matching images, to help students find the Content tool. You can edit the template to meet your needs.
To use the template, follow these steps:
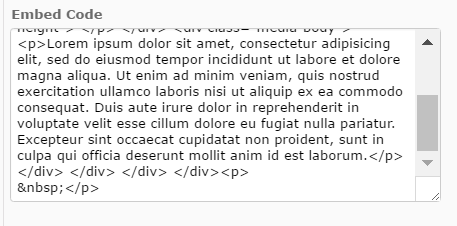
1 – Use your mouse to select all the text, then copy all the text seen inside the box below.
<p>Hello and welcome to UNIT NAME!</p> <p>My name is YOUR NAME and I will be your Unit Coordinator and Lecturer for this semester.</p> <p>To get started, please click on the <em><strong>Content</strong></em> button. You will see it towards the top left of the screen. It looks like this:</p> <p><img src="http://blogs.utas.edu.au/teaching-at-tsbe/files/2015/01/Content-button.gif" alt="Image of the MyLO Content button" title="Image" /></p> <p>The <strong><em>Content </em></strong><em></em>button is the place to go to access information, content and activities for this unit.</p> <p>Next, click on the <em><strong>Begin Here</strong></em> link in the <em><strong>Table of Contents</strong></em> (as seen below). Finally, click on the <em><strong>STEP 1: View this Introduction</strong></em> link to begin (this will appear to the right of the screen).</p> <p><img src="http://blogs.utas.edu.au/teaching-at-tsbe/files/2015/01/Table-of-Contents-and-Begin-Here-module.gif" alt="Image of the MyLO Table of Contents and Begin Here folder" title="Image of the MyLO Table of Contents and Begin Here folder" /></p> <p>I’m looking forward to meeting each of you, either in person or online.</p> <p>Kind regards,</p> <p>YOUR NAME.</p>
2 – In your MyLO unit, create a new Announcement, HTML page, email or a Checklist task. The example seen below is a new Announcement. Give the new item a title/headline, then move on to the next field (where you put the bulk of your message/content). By default, the WYSIWYG editor will open. Click on the source code symbol, seen at the bottom right of the WYSIWYG editor. It looks like this </>![]()
3 – A pop-up window will open. Place your cursor into the blank field, then paste in the code you copied earlier. The code will appear in the field. Click the Save button.
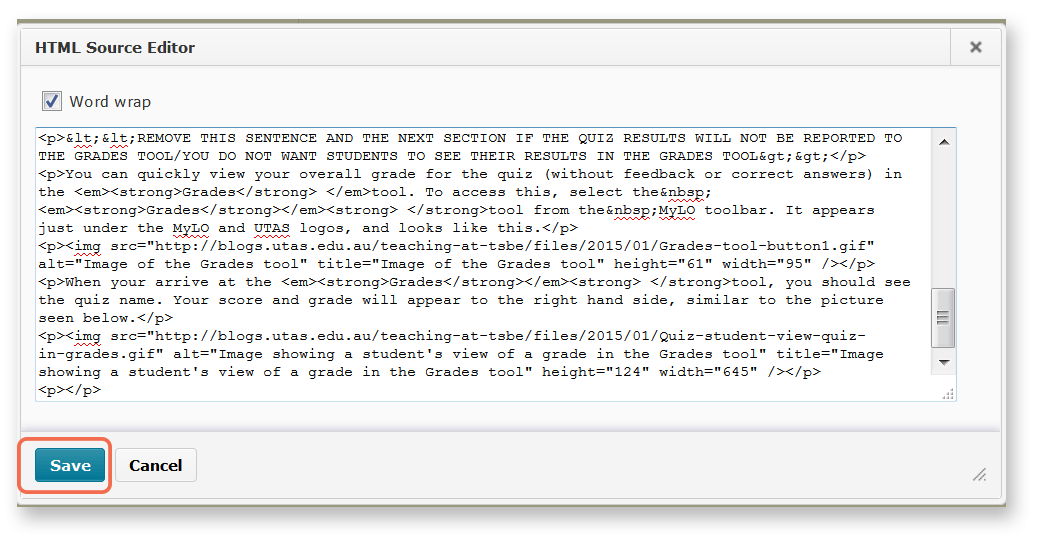
4 – The window will close. You will now notice that the text and image from the template appears in the WYSIWYG view. You can edit it as you would a Word document, by adding or removing text. We have indicated sections that you may want to edit or remove using brackets <<like this>>. Remember to press Publish or Save (this will depend on which tool you are using) to save your changes.
Assessment criteria for Discussion activities
The following sample rubrics may be useful when you’re:
- sharing your expectations about discussion participation with students;
- getting students to review the contributions made by other students; and
- developing a rubric to aid marking of discussions and provide students with useful feedback.
Palloff & Pratt (2007, p. 211)
This rubric focuses on the quality on the quality of contributions/participation. It does not specify a number of posts or the timeliness of posts.
| Criteria | Non-Performance | Basic | Proficient | Distinguished |
| Includes and applies relevant course concepts, theories, or materials correctly with citation of sources | Does not explain relevant course concepts, theories or materials. Does not provide citation of sources. | Summarises relevant course concepts, theories or materials. Provides citation some of the time. | Applies and analyses relevant course concepts, theories, or materials correctly. Provides citation most of the time. | Evaluates and synthesises core concepts, or materials correctly, using examples and supporting evidence. Consistently provides citation. |
| Responds to fellow learners, relating the discussion to relevant course concepts and providing substantive feedback | Does not respond to fellow learners. | Responds to fellow learners without relating discussion to the relevant course concepts. Provides feedback, but is not substantive. | Responds to fellow learners, relating discussion to relevant course concepts. Feedback is substantive most of the time. | Responds to fellow learners, relating the discussion to relevant course concepts and consistently extends the dialogue through provision of substantive feedback. |
| Applies relevant professional, personal, or other real-world experiences | Does not contribute professional, personal or other real-world experiences. | Contributes some professional, personal, or other real-world experiences that may or may not relate to course content. | Applies relevant professional, personal, or other real-world experiences. | Applies relevant professional, personal, or other real-world experiences and extends the dialogue by responding to the examples of peers. |
| Supports position with applicable resources beyond assigned reading | Does not establish relevant position. | Establishes relevant position but does minimal outside research. | Consistently supports position with additional resources. | Validates position with applicable resources and supports the learning of others through the contribution of additional resources. |
Source: Palloff, RM & Pratt, K 2002, Building Online Learning Communities: Effective strategies for the virtual classroom, Jossey-Bass, San Franciso.
Edelstein & Edwards (2002)
Promptness or ‘timeliness’ is included as a criteria in this rubric. This is useful, as it implies that students can’t wait until to last day of the task to post. Instead, it encourages students to post early and keep checking back, helping to ensure a more even flow of conversation.
| Category | 1 | 2 | 3 | 4 |
| Promptness and initiative | Does not respond to most postings; rarely participates freely |
Responds to most postings several days after initial discussion; limited initiative | Responds to most postings within a 24 hour period; requires occasional prompting to post | Consistently responds to postings in less than 24 hours; demonstrates good self-initiative |
| Delivery of post | Utilizes poor spelling and grammar in most posts; posts appear “hasty” | Errors in spelling and grammar evidenced in several posts | Few grammatical or spelling errors are noted in posts | Consistently uses grammatically correct posts with rare misspellings |
| Relevance of post | Posts topics which do not relate to the discussion content; makes short or irrelevant remarks | Occasionally posts off topic; most posts are short in length and offer no further insight into the topic | Frequently posts topics that are related to discussion content; prompts further discussion of topic | Consistently posts topics related to discussion topic; cites additional references related to topic |
| Expression within the post | Does not express opinions or ideas clearly; no connection to topic | Unclear connection to topic evidenced in minimal expression of opinions or ideas | Opinions and ideas are stately clearly with occasional lack of connection to topic | Expresses opinions and ideas in a clear and concise manner with obvious connection to topic |
| Contribution to the learning community | Does not make effort to participate in learning community as it develops; seems indifferent | Occasionally makes meaningful reflection on group’s efforts; marginal effort to become involved with group | Frequently attempts to direct the discussion and to present relevant viewpoints for consideration by group; interacts freely | Aware of needs of community; frequently attempts to motivate the group discussion; presents creative approaches to topic |
Source: Edelstein, S & Edwards, J 2002, ‘If you build it they will come: Building learning communities through threaded discussions’, Online Journal of Distance Learning Administration, vol. 5, no. 1, n.p., viewed 11 June 2009, <http://www.westga.edu/~distance/ojdla/spring51/edelstein51.html>
Lai (2012)
This is a set of criteria focuses on the demonstration of critical thinking skills in discussions. Levels are not described, with a general description of each criteria provided instead. The following levels are stated: Developing; Competent; Advanced; and Exemplary.
| Criteria | Description of criteria |
| Made relevant comments | Relevant comments are those that focus on significant issues that bear on the topic in question. You may use a range of reasoning strategies (e.g. analogies, examples) to shed light on a particular point. A student whose comments for the most part tends to focus on issues that are tangential to the topic in question and sidetrack from the debate is not likely to do well. |
| Articulated (your) ideas clearly | Use of clear, simple sentences to explain one’s ideas. This may involve taking some time to clarify your position where necessary. Statements such as ‘… this topic is just too complex, and I can’t say what I mean but I take that you know what I’m talking about.’, are unhelpful. |
| Presented well-structured arguments | Posts are coherent and systematically set out. This does not mean that you must express your ideas in formal sentences. However, you need to demonstrate how you have arrived at a particular view or a conclusion. |
| Posed questions to the group | Raising questions that are central to the topic. This involves not simply surveying others’ opinions but rather inviting them to investigate particular issues further. You may, for example, point out that a particular point made by an author may not be as cut-and-dried as s/he makes it out to be. |
| Sparked discussion and comments from others | Related to the previous criterion. Instigating debate rather than foreclosing on an issue that is debatable. Rhetorical questions such as ‘I simply cannot agree with the author’s conclusions, can you?’ without further elaboration do not invite comments. |
| Responded to criticisms as well as compliments | Replying to others who seek clarification or who have rebutted to one of your claims. If another student has demonstrated that your view is implausible, acknowledge it. If the student has misunderstood you, of has overlooked a particular issue, point that out clearly, explaining how or why they have not grasped your point. |
| Demonstrated consideration and respect of others | Consideration is the key here. If there are differences of opinion, try to explore why this might be so rather than put someone down. |
| Built on the ideas and contributions of others | Drawing on the comments and suggestions of others, exchanging ideas and working together to arrive at a more plausible/defensible view. |
| Contributed to the learning experiences of others | Summary of the first eight marking criteria, reflecting a capacity for engagement with others. Your engagement with other throughout the period of the discussion is considered here. |
Source: Lai, K 2012, ‘Assessing participation skills: Online discussions with peers’, Assessment and Evaluation in Higher Education, vol. 37, no. 18, 933 – 947, viewed 17 October 2016, <http://search.ebscohost.com/login.aspx?direct=true&db=anh&AN=83369751&site=ehost-live>
Creating a VideoNote video in MyLO
VideoNote is a tool included with MyLO. It allows you to capture short videos of up to three (3) minutes using a webcam and microphone*. The tool is available anywhere that you can see the WYSIWYG (What You See Is What You Get) editor in MyLO, including: HTML pages; Discussion descriptions and posts; Quiz questions answer options and feedback; the Announcements, Assignment Submission Folder General Feedback field; and more. To learn how to use VideoNote, refer to the How to section below or download this PDF from the MyLO Support Team. The PDF also includes instructions showing how to locate and embed an existing VideoNote.
FAQs
- What is VideoNote best used for?
VideoNote is best for one-take, short videos, such as module introductions, short explanations/stories to illustrate concepts, and provide video feedback to students. - Can I capture my screen activity with VideoNote?
No. VideoNote only captures webcam video. If you’d like to capture activity on your monitor (e.g. a PowerPoint presentation), use Echo360 ALP Personal Capture. - Can students download a VideoNote video?
No. VideoNote videos are streamed, meaning they must be viewed online. This is generally OK, as the videos are quite short. Videos uploaded to Echo360 ALP can be downloaded or viewed online. - Can I edit a VideoNote recording?
No. VideoNote is designed for short, one-take videos. If you wish to create videos that will need editing, use Echo360 ALP Personal Capture.
How to
NOTE: You must use a device with a recent version of Adobe Flash Player enabled in order to record VideoNotes at this time. This generally means that you will not be able to create a VideoNote
You can use VideoNote anywhere you see the WYSIWYG editor (usually when you are creating something for the first time or editing it). Specifically, you will need to see the Insert Stuff tool. It will be the first tool on the left hand side, and will look like this:
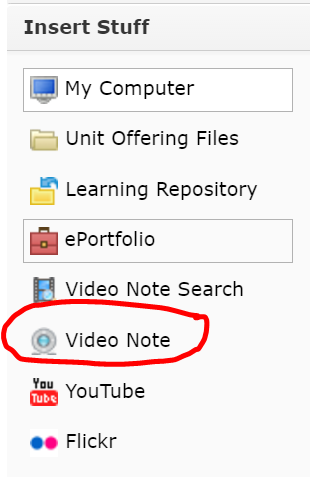
The Insert Stuff window will open. Choose the Video Note option from the side menu.
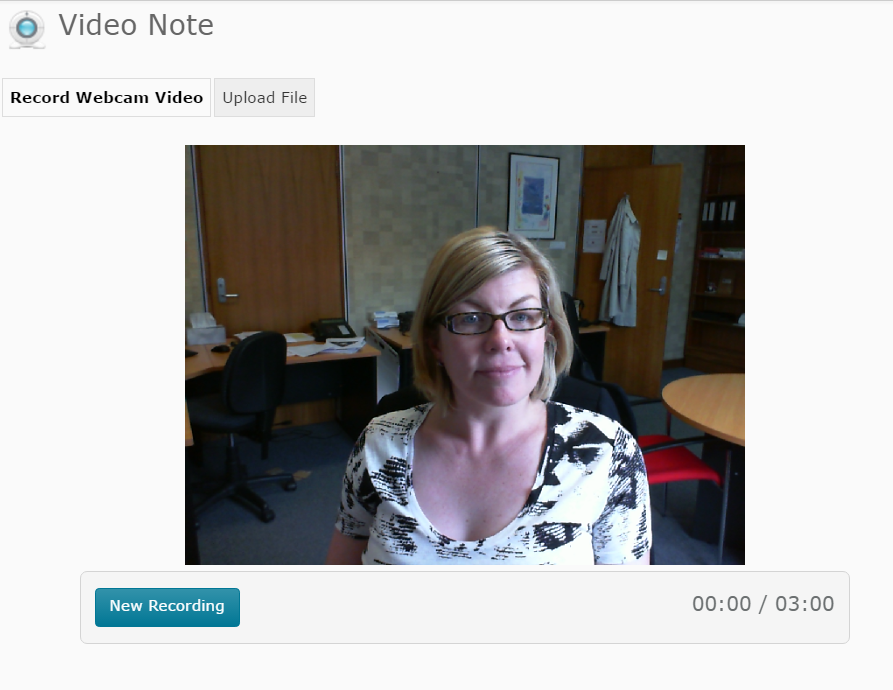
You will see a preview of your webcam video appear on screen. NOTE: You may be prompted to Allow something at this point. If so, check the Allow option. When you’re ready to record, click on the New Recording button to start recording. The recording will start straight away.
As you’re recording, you will see the time count down towards the bottom right of the window. When you’re ready to stop, click on the Stop Recording button. Note that the recording will end automatically at 3:00 duration.
As soon as you click Stop Recording, a preview of the video will play. If you’re not happy with it and would like to record again, click the New Recording button. If you’re happy with the video, click on the Next button that appears to the bottom left of the screen.
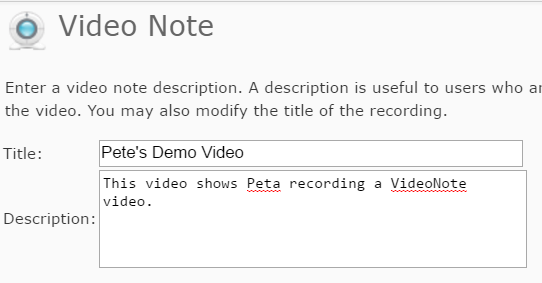
You will be prompted to add a Title and a Description. IMPORTANT: Make note of the title, as it can be very useful when searching for your existing VideoNotes in the future. The Description is shown to users who cannot see the video due to browser limitations.
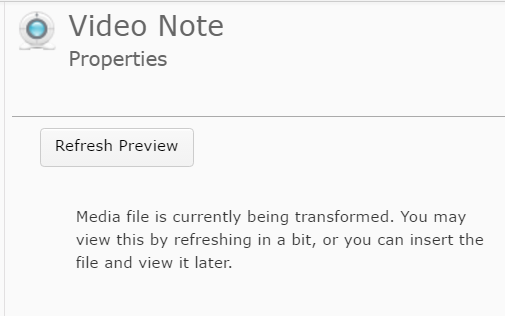
Click the Next button. You should now see a preview of your video. You may not see the preview immediately, as it can take a while for the video to process. If you see a screen like this…
and you want to see a preview, wait a few moments and click Refresh Preview. If you’re happy to continue, click the Insert button that appears towards the bottom left of the window.
Your video (or the ‘processing’ message) should now appear in the page/description/post/field that you are editing. Once you have finished editing, click Save/Save and Close/Publish.
*Most webcams include a microphone, however, these microphones are not very useful for recording in environments with a lot of background noise (e.g. a shared office). They also tend to have a limited range, so are not very good if you tend move away from your computer (e.g. where the web cam is positioned). Using a USB headset is a good alternative to a webcam microphone, and tends to capture higher quality audio without the background noise. Consult your local IT Hub to ask about acquiring a USB headset.
Flipping the classroom: Examples from other universities
Pondering how you might ‘flip’ or ‘blend’ your unit?
These excellent videos from the COFA Online program (based at the University of New South Wales) feature interesting examples and plenty of useful tips. Direct links to the videos (hosted on YouTube) are provided as well (for those whose browser does not show the expand to full screen option in the embedded videos).
Direct link to video: https://youtu.be/0-gQVgtNU4w
Direct link to video: https://youtu.be/zL4kwN3aAV4

