Using MyLO Notifications to keep track of Announcements in your units
Lecturers and tutors often use the MyLO Announcements feature to share important news and information about units. Using MyLO’s Notifications you can keep track of new Announcements via email alerts. Here’s how.
Log in to MyLO. Locate your name at the top right corner of the MyLO screen. Click on your name and select Notifications from the menu.

The Notifications screen will open. Scroll down until you see the Instant Notifications section. Check the Announcements – new announcement available option.

Scroll down and click on the Save button.
![]()
Create a new MyLO page based on the ICB template or an existing page
The Interactive Content Builder (ICB) template allows you to easily incorporate a variety of visual elements and basic interaction into HTML (web) pages on your unit’s MyLO site.
Once the template is installed on your MyLO site*, complete the following steps to create a new, fresh page based on the template OR create a new page based on an existing page.
Instructions
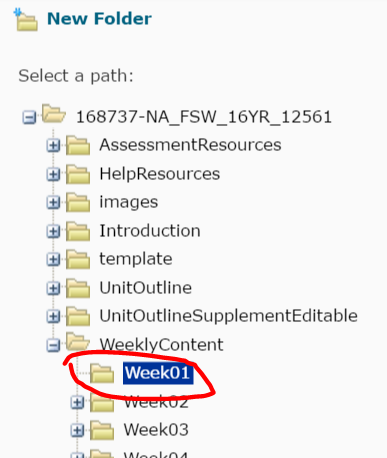
Go to Content and locate the folder where you would like your new page to appear. For example, here I have chosen Weekly Content. Make sure the folder is highlighted (usually in a darker colour) in the Table of Contents.
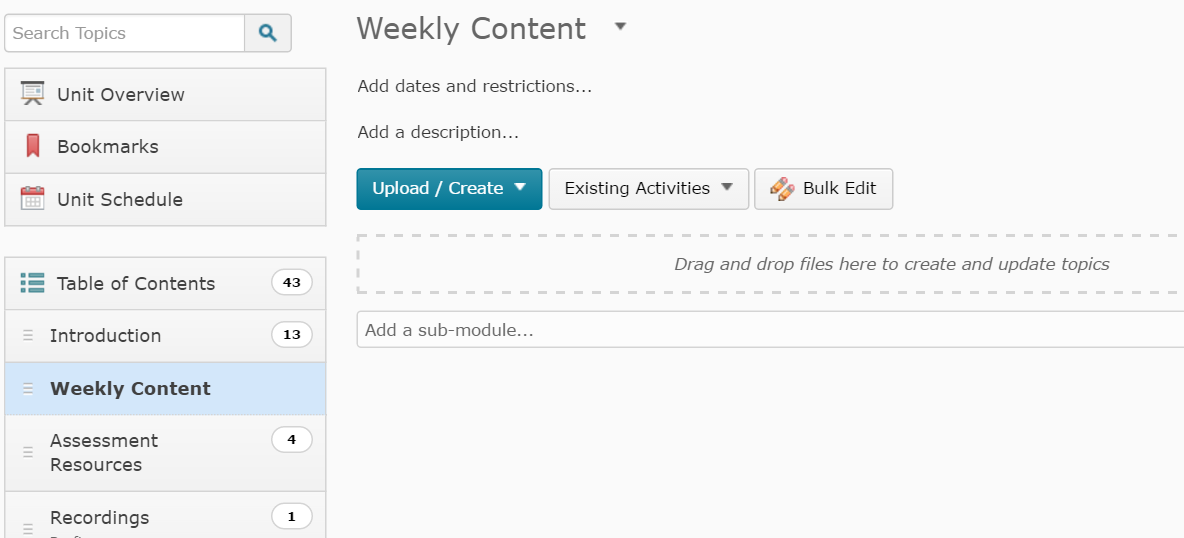
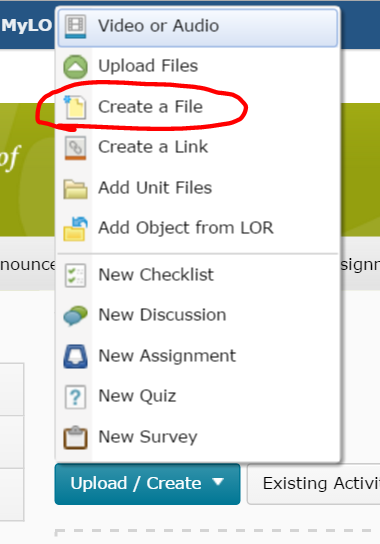
Click on the Upload/Create button, then select the Create a File option.
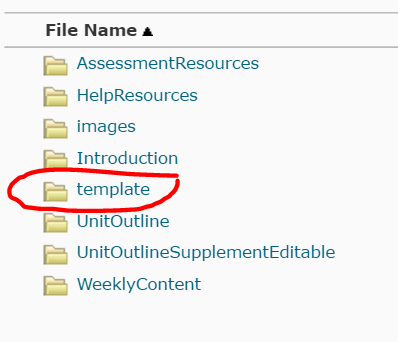
Click on the Browse for a template button.

If you’re basing a brand new file on the template, browse for a folder called template, and click on it once. NOTE: You will only see this folder if the template has been added to your unit*. If you’re basing your page on an existing file, choose the folder in which the original file lives. For example, Weekly Content > Week 1.
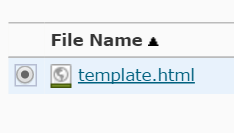
Now check the radio button next to the template.html file (for a blank template page), or the file you would like to base your new page on (e.g. Week_01.html). Click on the Add button.
The page contents will load. Before you start working on them, record a file name for the new file in name field (this will be the name of the file as seen in the File Manager).

It is good practice to save your newly created pages to a folder. It isn’t the end of the world if you forget to do this, but it is a good habit to get into! Before you start editing the page, scroll down to the bottom of the screen and click on the Change Path button.

Choose the folder where you would like the file to live in. If you’re using a sub folder, you may have to click the expand icon next to the parent folder (+) to see it. Make sure the folder you want the file to live in is selected (it will be highlighted in a darker colour), then click on the Select Path folder.
Click the Save as Draft button.
![]()
You can now edit your file. Change the title to something you would like students to see. Don’t forget to Save or Publish your changes.
*The ICB template files must be installed on your unit’s MyLO site before you can use them. Please contact your local team for assistance: the Blended Learning Unit can help staff members teaching Faculty of Arts units; TSBE staff can approach the Flexible Education Team.
Making your materials accessible
When designing and creating online learning materials, you should consider the accessibility of the materials.
This tip sheet from the University of New South Wales is a great summary of accessibility considerations surrounding resources like documents, images, audio and video and so on.
Creating content vs. using content
How original is the content you are teaching? Could students learn just as well from already existing content? If not, what is the ‘extra’ you are adding?
This question, from a post by eLearning blogger Tony Bates, may have got you thinking about the content you’re creating and using in your units. But do you always have to create your own content? In this post, Tony discusses how you can find and curate existing content, rather than constantly creating your own.
Writing essay questions
This useful Preparing Essay Questions workbook from Reiner, Bothwell, Sudweeks and Wood (2002) at Brigham Young University (United States) will help you write essay questions for use in examinations or assessment tasks.
Taking it online: A comparison of online assessment tools
There are a variety of online tools and software applications that you can use to help students create or perform items for assessment, and submit online. Here, we review some of the tools supported by UTAS.
| Tool | Suitable for… | Submission | Marking and feedback | Considerations |
| Microsoft Office | Creation of a range of documents, from Word Documents, to PowerPoints and Excel spreadsheets. Skype for Business (Lync) can be used to communicate with group members. | Files can be submitted to an Individual or Group Submission Folder. Alternatively, they can be shared with other via a Discussion Topic. | Word documents can be checked for plagiarism/collusion via Turnitin (e.g. Word Documents). Word documents can be ‘marked’ using GradeMark/Feedback Studio. |
|
| Assignment Submission Folder (individual) | Submission of files, including documents, images and videos. | Several files can be submitted at once. | Can be connected to Turnitin for detection of plagiarism/collusion, but only text documents will generate a report. Mark in the Evaluate Submission area. An electronic Rubric can be attached to the Folder and used for marking and feedback. GradeMark/Feedback Studio can be used to make comments on the students’ work. |
|
| Assignment Submission Folder (group) | Submission of files, including documents, images and videos. | Several files can be submitted at once. Only one member of the group needs to submit, but any member can submit if need be. | Can be connected to Turnitin for detection of plagiarism/collusion, but only text documents will generate a report. Mark in the Evaluate Submission area: the feedback and results will be made available to all students in the group. Individual marks can be altered in the Grades tool. An electronic Rubric can be attached to the Folder and used for marking and feedback. GradeMark/Feedback Studio can be used to make comments on the students’ work. |
|
| Quiz | Low-stakes quizzes/tests and Just In Time Teaching (JITT). Best used as a means of helping students check their progress, especially when feedback is integrated and responsive to students’ answers. Thus, best used during semester, not near the end (unless used to aid exams revision). Generally not suitable as a means of demonstrating higher order thinking. | Students must click Submit at the end of the Quiz. Otherwise, their Quiz will be flagged as ‘Attempt in Progress‘ (you can force submission afterwards if need be). Some questions can be automarked, whilst others require manual marking. Marks can easily be published to the Grades tool. Feedback can be delivered immediately, or released from a specific date and time. | It is possible to incorporate feedback according to answer choice OR general feedback related to a question. The feedback can be released immediately, or at a later date. You can mark individual questions if needed (e.g. long answer questions), and alter marks for questions manually if need be. Statistics from the Quiz can used when discussing the Quiz questions with students, and are especially useful for identifying areas of difficulty. |
|
| ePortfolio | Students can generate a Presentation (effectively a website) consisting of reflections, uploaded documents and so forth compiled over a semester. Best for assessments completed over a long period, for example, reflective journals and portfolios. | Submission must be made to an Assignment Submission Folder. Submission can take a while to process and tends to generate a fairly large file. | Mark in the Evaluate Submission area, however, does involve an extra click to open the submission (preferably in a new tab/window). Can be problematic in some browsers. An electronic Rubric can be attached to the Folder and used for marking and feedback. Cannot be procesed through Turnitin, and Grademark/Feedback Studio cannot be used. |
|
| Discussions | Suitable for tasks in which students are required to discuss an issue/come to a consensus and produce something concrete (e.g. a list, with choices justified). Also suitable as a means of supporting collaborative learning. Can be used to support peer review, question and answer, and feedback. For example, students could post a video of their presentation. Other students can view and post questions. | Encourage timely contributions by using staged deadlines. For example, first post due by x, responses due by y. You could also include timeliness of contributions as a criteria in a Rubric. Setting up a Checklist with due dates for each task could help facilitate this. | Provide general feedback and encouragement at a midpoint in the discussion, as well as towards the end and after deadline. We recommend providing feedback in the Discussion itself by posting to the group and weaving/summarising. For marking, use a standalone Grade Item (on a different window/tab). You can attach a Rubric to the Grade Item. |
|
| Blackboard Collaborate Ultra | Groups can meet live online to discuss projects, or to deliver and record a presentation or discussion for assessment. Alternatively, students can deliver a presentation live, online, to you and other students. You can record the presentation as evidence for assessment. Voice, as well as any objects presented on screen, are captured in the recording. | Student groups will need a room created for them. Once they have recorded their session/sessions, they can submit them (with supporting documentation) to a Group Assignment Submission Folder. Live presentations can be assessed live. You can return to the recordings any time. In all cases, we recommend getting students to submit some kind of support material to an Assignment Submission Folder (group or individual), and add the link to a recording to their Comments field. This allows you to use the full features of the Evaluate Submission area to grade and provide feedback. | We recommend using the Evaluate Submission area (associated with an Assignment Submission Folder to grade and provide feedback for groups or individuals. Students will need to submit some sort of supporting documentation, as well as link to a recorded session (if required) to support this. |
|
| Video | Students can capture video of themselves (e.g. talking head) for assessment using a range of tools, including MyLO’s VideoNote, their own smartphone or camera. Useful when you want to: assess students’ individual presentation skills; provide an alternative to written reflection. | Students will need to submit their video to an individual Assignment Submission Folder. If videos are shorter than 3 minutes duration, they can use the VideoNote tool included in the submission window. If you want students to share their videos in some way, it may be advisable to put them up to their Echo360 ALP Library and share a link to/embed the video in a post (rather than getting students to attach a large file to a Discussion post). | Mark and provide feedback using the Evaluate Submission feature. Note that you will not be able to utilise Turnitin or GradeMark/Feedback Studio (as you can’t mark up video files). |
|
Taking it online: Presentations
Presentations, delivered by individuals or small groups, are a common form of assessment in face-to-face classes.
What am I really assessing?
Presentations can be used to assess students’ ability to explain, justify (e.g. a particular pitch or strategy), structure and argument, represent their findings (analysis and evaluation) and/or synthesise ideas.
The success of a student’s presentation hinges on how well they can communicate orally, using visual aides, gestures, body positioning and eye contact to enhance communication. To justify using a presentation as an assessment piece, your learning outcomes/objectives and criteria must assess at least one of the skills required to deliver a successful presentation. If you’re not assessing these skills formally, then another form of assessment, like a report, persuasive letter or essay, could be just as appropriate.
Assessing presentation skills online
Presentation skills are becoming just as essential online as they are offline. Many of the presentation skills you assess in face to face environments can be assessed during live online presentations, or by reviewing recordings created by students. These include:
- organisational structure of the presentation;
- language use;
- quality and use of supporting materials; and
- quality and use of a central message.
Whether or not you can obtain enough data to assess aspects of delivery method will depend on whether you can see the student during the presentation.
- Posture – student must be visible on-screen (e.g. using webcam)
- Gesture – student must be visible on-screen (e.g. using webcam)
- Eye contact – student must be visible on-screen (e.g. using webcam)
- Vocal expressiveness – students voice must be audible
In online presentations, the quality of the supporting materials (e.g. what is seen on screen) often takes precedence over some of the more traditional forms of delivery method. Judging the visuals in a digital presentation against Mayer’s Multimedia Principles could be useful here.
Adapting for blended learning and electronic submission
- Individual presentations: presented live
- Get all students to submit their supporting materials (e.g. PowerPoint files or summaries) to an Assignment Submission Folder in MyLO. They can do this either shortly before or shortly after they are scheduled to present.
- Students can present live in class, or during an online session (e.g. using Blackboard Collaborate Ultra or Skype for Business/Lync) at an agreed time.
- Record feedback and marks for all students using the Evaluate Submission tool.
- Individual presentations: recorded
- All students should prepare their presentations in the same way. They could record in a Blackboard Collaborate room (they can record, then download the recording), using PowerPoint (all students have access to this software through Office 365), or using another form of recording software. Rather than the usual PowerPoint slide show, you may like to encourage students to record a digital story (examples here). It depends on the learning outcomes/objects.
- All students should submit in one of two ways. If you’d like students to be able to view each others’ presentations, ask questions and/or provide feedback, get the students to attach or link to their presentations from a post in a Discussion. Alternatively, get them to submit their recording to a Assignment Submission Folder in MyLO.
- Record feedback and marks for all students using the Evaluate Submission tool OR a Grade Item (if only Discussions are used).
- Group presentations: presented live
- Get student groups to submit their supporting materials (e.g. PowerPoint files or summaries) to an Group Assignment Submission Folder in MyLO. NOTE: Peer review is best completed via a Survey or by submitting a form to an Individual Assignment Submission Folder. They can do this either shortly before or shortly after they are scheduled to present.
- Students can present live in class, or during an online session (e.g. using Blackboard Collaborate Ultra or Skype for Business/Lync) at an agreed time.
- Record feedback and marks for all students in a group using the Evaluate Submission tool.
- Group presentations: recorded
- Student groups should prepare their presentations in the same way. They could record in a Blackboard Collaborate room (they can record, then download the recording), using PowerPoint (all students have access to this software through Office 365) and will need to share the file/have one member of the team stitch them all together, or use another form of recording software. Rather than the usual PowerPoint slide show, you may like to encourage students to record a digital story (examples here). It depends on the learning outcomes/objects.
- Student groups should submit in one of two ways. If you’d like students to be able to view each others’ presentations, ask questions and/or provide feedback, get one member of each group to attach or link to their presentations from a post in aDiscussion. Alternatively, get them to submit their recording to a Group Assignment Submission Folder in MyLO.
- Record feedback and marks for all students in a group using the Evaluate Submission tool OR a Grade Item (if only Discussions are used).
Taking it online: In-class tests
If used for formative assessment, in-class tests can be a useful means of helping students check their progress throughout the semester (as long as feedback is provided following the test). The tests can also provide you with rapid feedback about the class’ progress so that you can adapt your teaching focus accordingly. Getting all students – regardless of study mode – to use the same procedure will ensure equity and simplify marking and grades management procedures.
What am I really assessing?
Depending on the nature of the questions, in-class tests tend to assess whether students can remember, comprehend and/or apply what they have learned. As they tend to be fairly short, these tests generally don’t provide a valid assessment of students’ ability to analyse, synthesise or evaluate what they have learned.
Adapting for blended learning and electronic submission
- Online Quizzes
- Use randomised questions and answer options to make collusion difficult.
- Make the most of auto-marked questions (where questions have a definite answer). Long answer questions must be marked manually but can certainly help elicit evidence of higher order thinking from students. It is possible to combine different forms of questions.
- Scores can be transferred to the Grades tool easily.
- Get both cohorts to complete the Quiz online, and get feedback issued at the same time (either via the Quiz tool or via the instructor).
- Statistics for each question can be used as the basis for teaching points (e.g for discussion in online or face-to-face sessions, or in Announcements).
- Scan and submit
- Create an instruction document clearly indicating what students will do and when. This will need to be made available to students as far in advance as possible (preferably a minimum of one week prior).
- Make a ‘test’ document, containing the questions, available on MyLO at a specified date and time (you can use the Special Access feature to release the sheet to students at different times if need be).
- Students complete the test and must submit their work to an Assignment Submission Folder within a given time period (you can set an open and close time for the Folder, and use the Special Access feature to release at different times if need be). Students could submit a Word document or, where ‘workings’ need to be demonstrated, a clear scan of their written work (as a PDF or JPEG).
- If collusion is a concern, create three different papers with slightly different questions (e.g. different amounts, business names etc). Break students into three groups (this can be done automatically with the MyLO Groups tool). One of the three tests is released to each group.
- Mark and provide feedback using the Evaluate Submission area.
Copying Checklists
So you’ve created a checklist and it’s all perfect and got tonnes of good stuff in it and now you need like another 12 of them to cover all the weeks or whatever. You ‘officially‘ sort of can’t, but I have a handy dandy work-around. Sorry. No wait, don’t go!! It’s not too bad! I promise!
It’s not possible to copy a checklist from within the checklists tool itself – for whatever reason (probably “we can’t be bothered hiring a guy to program in a button”). Fortunately there IS a way to copy a checklist but it’s a few steps, however those will likely be far fewer steps than if you were to re-create the checklist from scratch if you have a super long complex checklist with lots of items in it.
How to Copy a Checklist!
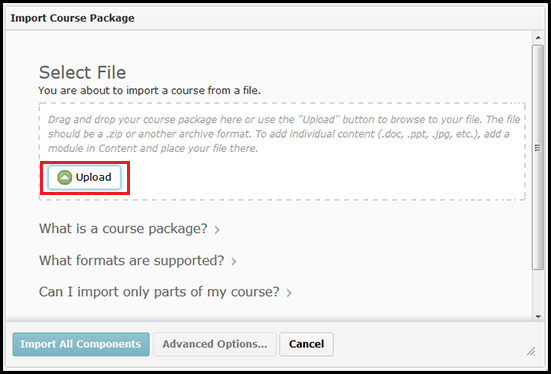
Click Unit Admin on the toolbar at the top of the page, then click Import/Export/Copy Components as shown in the screenshot below.
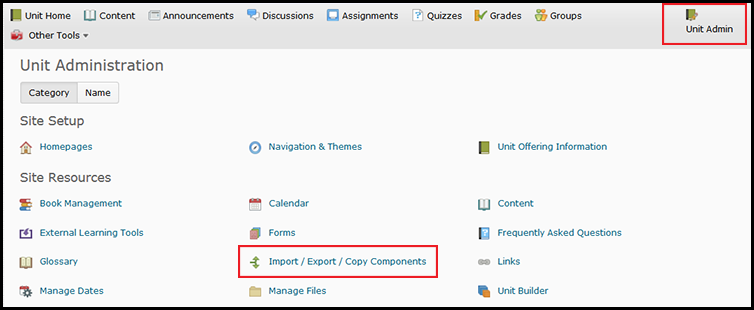
Choose Unit Admin in the toolbar, then Import/Export/Copy Components.
Click Export Components, as shown below, then click ‘Start’ also shown below.

Choose Export Components.
Choose Checklists from the list but also ensure you click the ‘Select individual items to export’ as shown below.

Choose ‘Checklists’ from the options, make SURE you click select individual items to export.
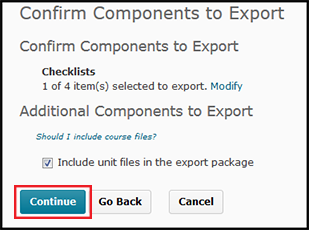
Click Continue at the bottom of the screen. It’s not in the screenshot because it’s quite a long list, the continue button is at the end of the list, in blue. When you click ‘Continue’ you will see a screen similar to the screenshot below that has a list of the checklists in your unit. Select the one you want to copy and click ‘Continue’. You can, of course, select more than one, if you need to copy a few at once.
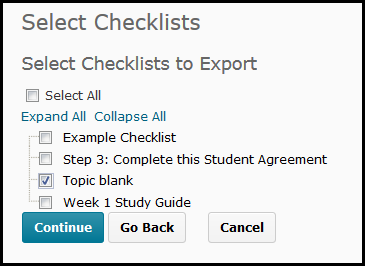
Now choose the checklist(s) you want to copy. In this example I am choosing one called “Topic Blank”.
When you click Continue you will get a screenshot similar to below:
Click continue again.
Make a quick sanity check that it shows the correct number of checklists and no other content in the list under ‘Confirm Components to Export’. Then click ‘Continue’.
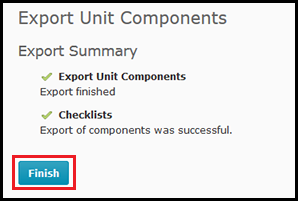
Click Finish but do NOT click away from the page yet!
Now you get this window – it serves no real purpose other than to make you click one more button. When you click ‘Finish’ it will load up your Zip file – so don’t exit this browser window or anything. Just click ‘Finish’.
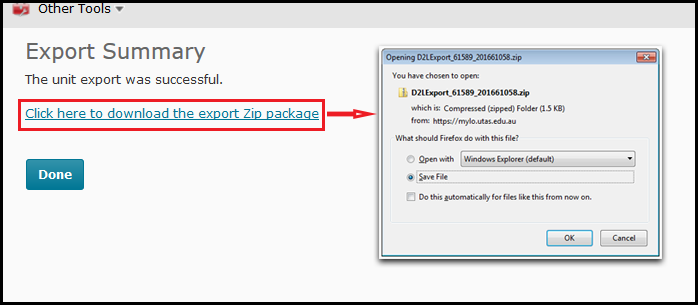
Now click the link for the Zip package and choose to save it to your computer.
NOW you can save the zip file, click on the link as shown above and save this Zip file somewhere where you can find it again easily. You can rename the file if you like. The process for saving the file will depend on your browser. The screenshot above shows how Firefox saves files, other browsers may differ. If you’re not sure how to save a downloaded file from your preferred browser please contact ITR or your Ed-Tech for a quick Browser lesson 🙂
When you’ve saved your file – go back to Unit Admin and choose ‘Export/Import/Copy’ again, same as your first step and this time choose to ‘Import Components’.
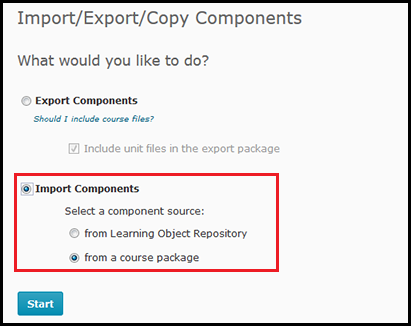
Choose to Import components (from a course package is the default, so leave this selected).
Then click ‘Start’. When you do the following window will pop-up.
You can drag and drop your package into the ‘Upload’ window – or click the button highlighted to choose the Zip file you previously exported.
Like the caption says, drag and drop the Zip file you previously saved onto the window that loads, or click and browse for it.

Click ‘Import all Components’.
Once you’ve uploaded a file click ‘Import All Components as shown above, we already know the Zip only contains what we need because we were so thorough before. That was good of us wasn’t it, let’s say a quick cheers to past us now.
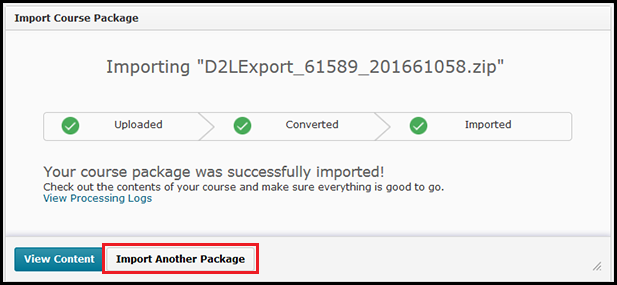
Once it’s imported you have the option to Import again. You can re-use the same zip file multiple times.
When it’s done Importing – it won’t take long – you then get the option to ‘Import another package’ as shown highlighted above. You can re-import the same exact zip file without having to export anything again. It won’t over-ride the one you just imported, you can re-import that same zip as often as you like!
When you’re done importing your checklist – click ‘View Content’ or close the import window, you’ll need to go back to the checklists tool to see your checklists.
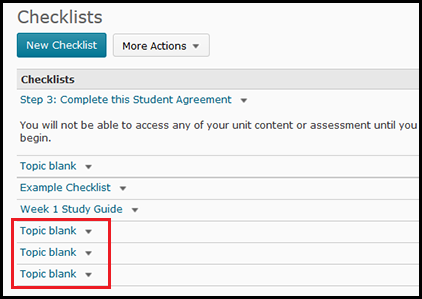
Multiple checklists will be listed at the end of the checklist tool list. Click to edit any one of them.
As you can see from the screenshot above, I’ve imported the zip file 3 times. Each one is listed at the bottom of the list. You can now click to edit (including renaming) them from the Checklist tool now or add them to your content and edit from there. All done!
Still annoyed? I would be, feel free to ask your Ed-Tech to sort it out instead because you have better things to do (not sarcasm, you honestly do and wrangling MyLO is more an Ed-Tech thing).
Edit a Checklist from Content
If your Ed-Tech has created a set of checklists for you and added them to your content area you may then need to go into each one and flesh out the details. You may also want to make a quick change to a checklist that you have previously edited or created.
Or you might have copied a unit from another semester and need to update your existing checklists.
The good news is, you can do it all from where they sit in the Content area with very little fuss!
First click the ‘Content’ button on the toolbar to load up the Content area.
Click the module/folder that contains your checklist, usually these will be in Learning Hub possibly in their own subfolder.
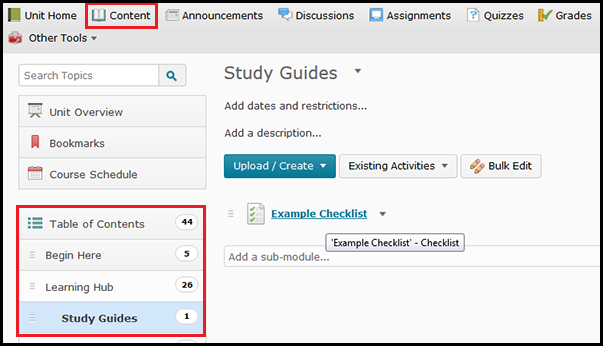
In this example I have clicked Content then Learning Hub and Study Guides to find the example checklist I will edit.
When you see a link to your checklist on the left part of the screen just click on it and it will load up in to the screen, similar to the example checklist in the screenshot below.
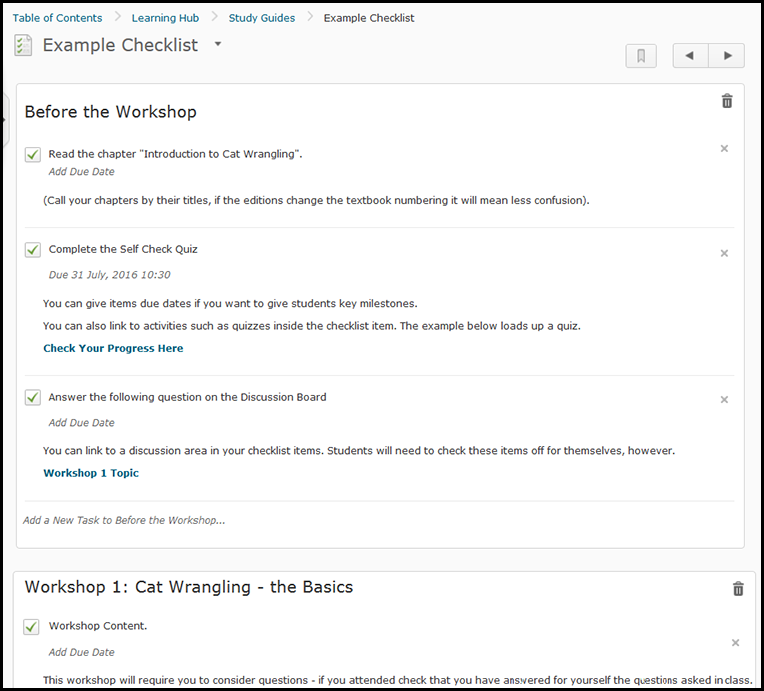
A checklist in the content area shows all of the text/content within.
Editing Checklist Items
Once you’ve clicked on your checklist you’ll see each item listed out – (ignore the little checkbox icon). The example below shows the category headings and checklist items for the checklist “Example Checklist”. When you move your mouse over any item it will highlight in grey, this grey indicates it is an item that you can click on to change.
To edit any item- click on the text that you need to edit.
Category or Task Names:
If you click on a title to change the text (as shown in the example below), you will see a text field to type into. Make any changes you need then click elsewhere on the page. This works for both Category names and Task names.
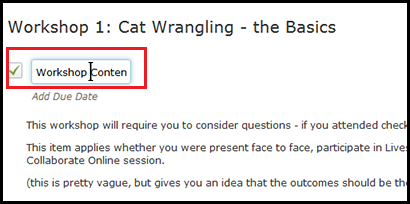
To edit any title, just click on it, type, then click somewhere else.
Descriptions:
If you click on one of the ‘description’ areas it will load a bigger more feature laden text field that allows you to do more advanced text editing, this tool is found throughout MyLO. There are further instructions for using this text editing tool listed below the screenshot. Click the “Update” button when you are done adding text to any area that loads up one of the Text Editor boxes.
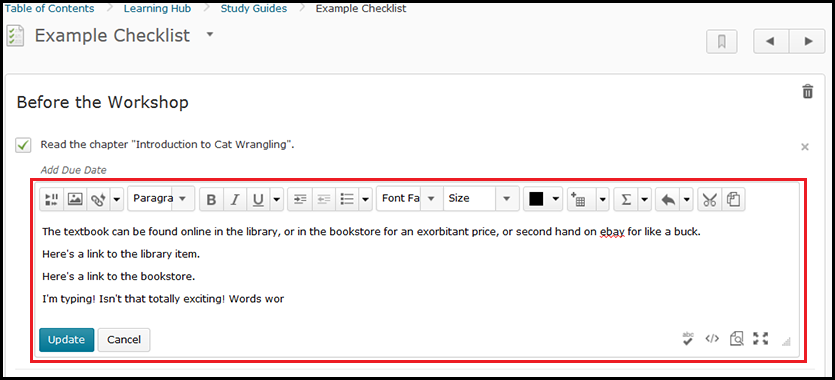
Most ‘description’ fields load up with the text editor tool. Don’t forget to click “Update” when you are done!
How to use the Text Editor (Page) Tool – list of resources (PDF | Video)
Deleting Items from the Checklist
To the right of any category is a bin icon – if you click the Bin icon you will delete the category and all of the items within this category.

Each category has a “Bin” icon to the right. Click to delete the entire category.
To the right of any checklist item is a small (x) – if you click the small (x) it will delete that checklist item.
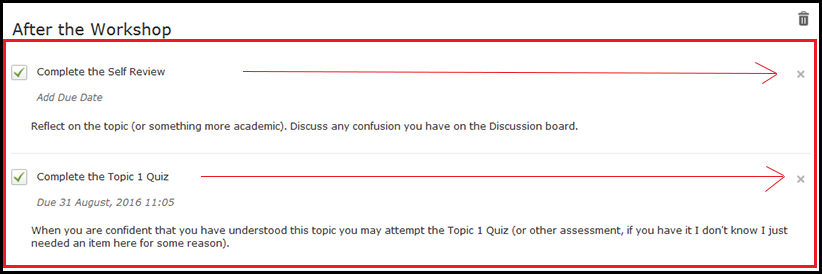
Each Checklist item also has a small (X) to the right, if you click this it will delete the item.
Adding Checklist Tasks and Categories to your checklist.
To the bottom of each category is a little area that has “Add a New Task to (category name)” – this will add a new checklist item to that category. It allows you to add checklist items on the fly to any category you have in your checklist. When you add it, click on the text to edit the title and description.
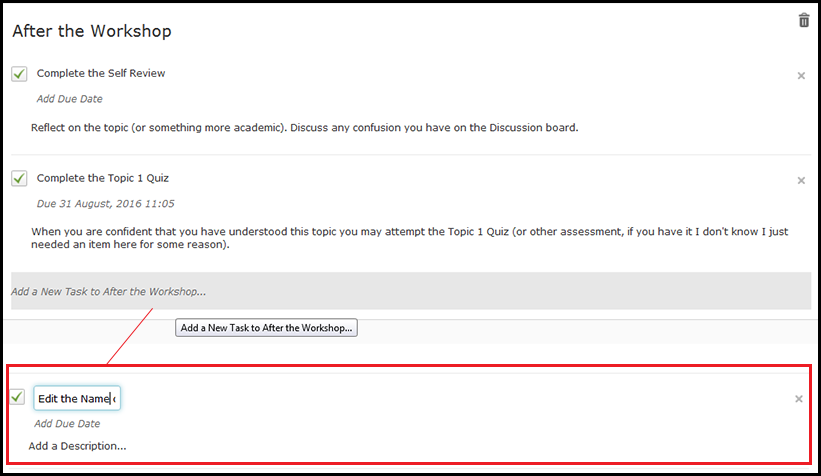
Click on the ‘Add a new task’ text as shown in grey above to add a new checklist item. Then you can click on the checklist item to edit it.
To the very bottom of the checklist is an item oddly named “Add a New List” – it should say ‘Add a new category’ because that’s what it does but, well, boosucks to logic. Click the “Add a new list” and you’ll get a new category just called “List (number)” but you can click on the title to edit the Category name, and add items as per ‘add new task’.
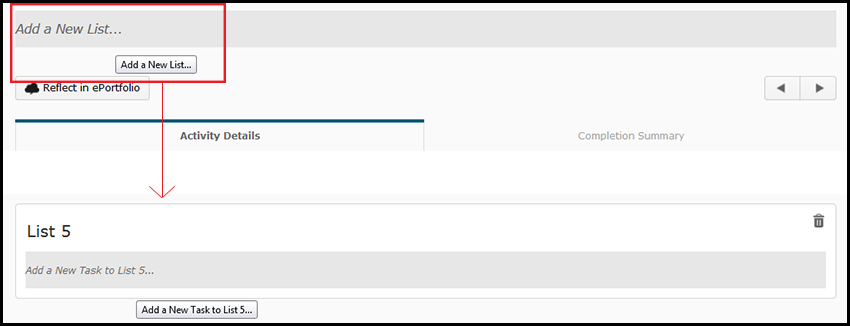
Click the Add a New List right at the very bottom of the checklist (just above the ‘activity details’ tab). Then you can edit the new Category that has appeared.
NOTE: If you do decide to add a new category here it will be added at the bottom of the checklist – however you can re-order items in your checklist from the Checklists tool itself. For further instruction on re-ordering items see the help sheet for Checklists: Reordering and Restrictions.