Tag
Feedback
Use Quiz statistics to improve teaching and learning
Quizzes can help students check their own learning, especially if useful feedback is provided in response to student responses. Quizzes can also help you adapt your teaching according to needs of your students. The statistics provided by the Quizzes tool can help you quickly determine areas students are strong in, and areas where they may benefit from further learning opportunities (e.g. further discussion or a review during a forthcoming class).
How to access the statistics for a Quiz
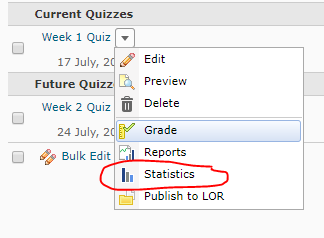
Select Assessments then Quizzes from the MyLO Toolbar. Select the little black arrowhead to the right of the quiz you wish to obtain statistics for, then select Statistics from the menu.
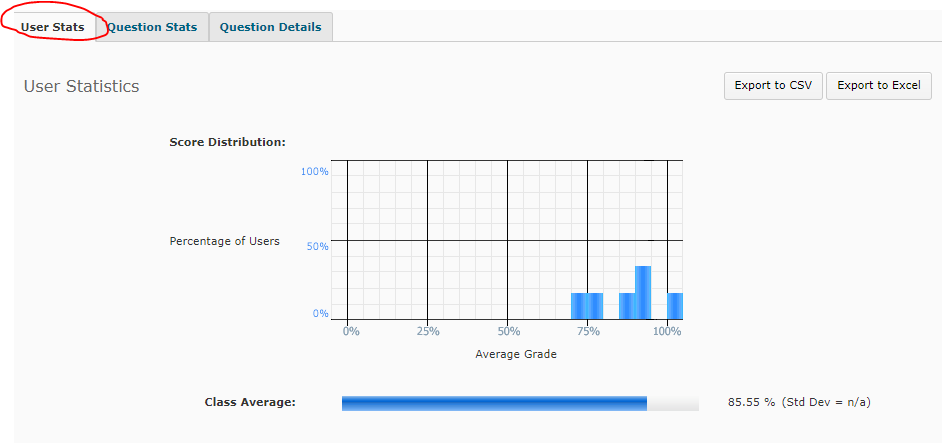
By default, you will be shown the User Stats for the Quiz. This shows you the overall score distribution, and class average, beneath which you will see the overall result for each student (not shown below).
You can navigate between the Question Stats and Question Details tabs to see more useful information.
Question Details provides the most useful information. Here you will see each question (this has been blurred out in the sample image below), followed by the answer options provided to students. The percentage of students who selected each answer option is presented. The correct answer/s are marked by a small blue arrow.
Writing multiple choice questions: Useful resources
To be effective learning and assessment tools, multiple choice questions must be well-considered and written.
These resources provide very useful tips, approaches and examples to help you write multiple choice questions:
- Writing Good Multiple Choice Test Questions, Center for Teaching, Vanderbilt University (opens in new window)
- Multiple Choice Questions – Some key principles, Center for Teaching and Learning, Johns Hopkins Bloomberg School of Public Health (opens in new window)
When writing multiple choice questions for assessment, also consider the University of Tasmania’s Guidelines for Good Assessment Practice (opens in new window).
Mark with a Text Only (feedback) Rubric
A Text Only Rubric has no points associated with criterion and levels. Unlike a Custom Points Rubric, this type of Rubric will NOT calculate a score or Overall Level for you. You must select a level of achievement against each criterion, then specify and Overall Level.
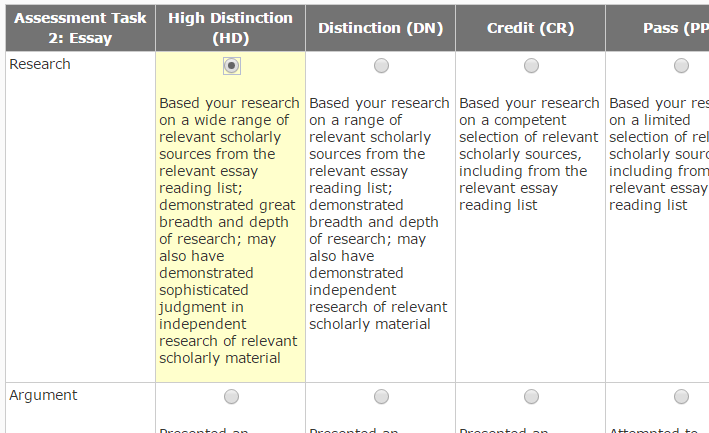
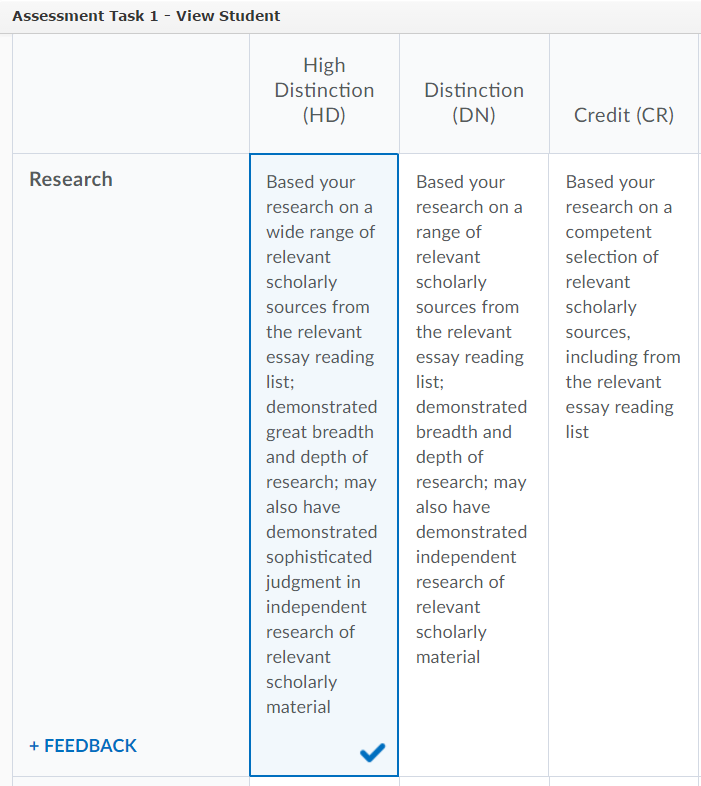
Please note that the ‘look’ of a Rubric may change depending on whether you are marking from an Assignment Submission Folder or from a Grade Item. We have represented this by providing two screen shots for each instruction: the view from an Assignment Submission Folder is always presented in the first image; the view from a Grade Item is always presented in the second image.
Please note that these instructions do not explain how to access a Rubric. You can see how to access a Rubric from an Assignment Submission Folder here, or from a Grade item here.
Choose a level for each criterion
Choose a level for each criterion by clicking on it. When marking a Rubric from an Assignment Submission Folder, you will notice that the selected level is highlighted by a selected radio button (see first image). When marking from a Grade Item the selected level will be highlighted, and a small check mark will appear in the bottom right corner (see second image). To change the level, simply click on a different level.
Edit the feedback associated with a level
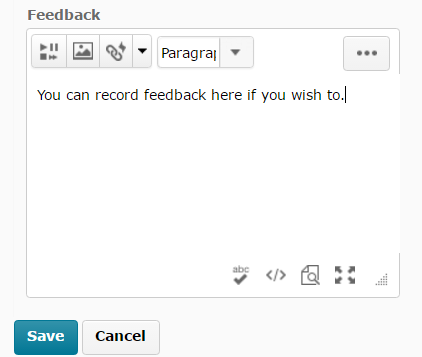
If you wish to provide a student with feedback in relation to a particular criterion, first select the level. You will notice that an editing icon appears. When marking from an Assignment Submission Folder, this icon will appear in the far right column (see top image). When marking from a Grade Item, you will need to select the + FEEDBACK link that appears in the far left column (see bottom image).
The editing views are slightly different. If you are marking from an Assignment Submission Folder, a new dialogue box will open. Here, you can record feedback if required (see top image). If you are marking from a Grade Item, you will see a Criterion Feedback field open at the bottom of the selected level. Type in your feedback, then select DONE to save it and keep marking.
From time to time, remember to click the Save button to save your work (appears underneath the Rubric).
Choose an Overall Level
Once you have chosen levels against each criteria, you will need to select an Overall Level. To do this, select one of the level fields in the bottom row of the Rubric.
Save the Rubric
- If you’re marking from an Assignment Submission Folder, uncheck the Transfer rubric feedback to general feedback for the assignment option (this option is not very useful).
- Finally, select the Save & Record button.
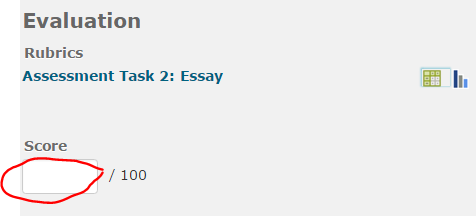
The overall score from the Rubric will not be reflected in the Evaluation Score field in an Assignment Submission Folder (see first image) or in the Grade field in a Grade Item (see second image). You will need to record the score manually. Remember to Save your work after recording the score.
Change your Dialog Setting to increase ease of marking with a Rubric
In the past, when marking a submission to an Assignment Submission Folder, a Rubric would open over the top of a student’s work. To get back to the student’s work, you would either have to save and close the Rubric, or open Grademark in a new browser tab so that you could view the student’s work in one tab and view the Rubric in another tab. Tedious! A personal Dialog setting in MyLO allows you to choose to open ‘dialogue boxes’ in a new window (or pop-up). This means that a Rubric will open in a new window so you can minimise it while looking at a student’s work, move it around your screen easily, or maximise the window so you can see the whole Rubric easily. Yay! To see a demonstration of the difference this setting makes, view this brief video (02:46, opens in new window).
Follow these instructions to change the setting.
Step 1
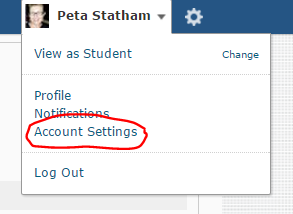
Towards the top right of your screen, you should see your name. Click the arrowhead to the left of your name, then select Account Settings.
Step 2
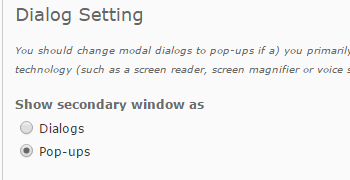
Scroll down until you see Dialog Setting heading. Choose the Pop-ups option from the Show secondary window as option, as seen below. Select the Save and Close button (bottom of the screen).
You’re done!
Export a Grademark Set (Classic View) for use in other units
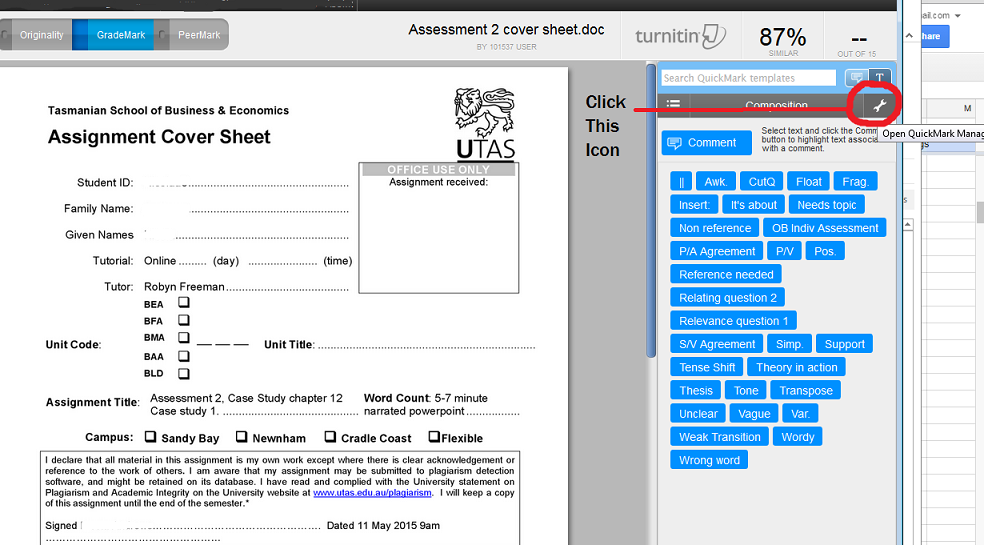
Go to Grademark and click on the Quickmark Editor button located at the top right of the Grademark window.
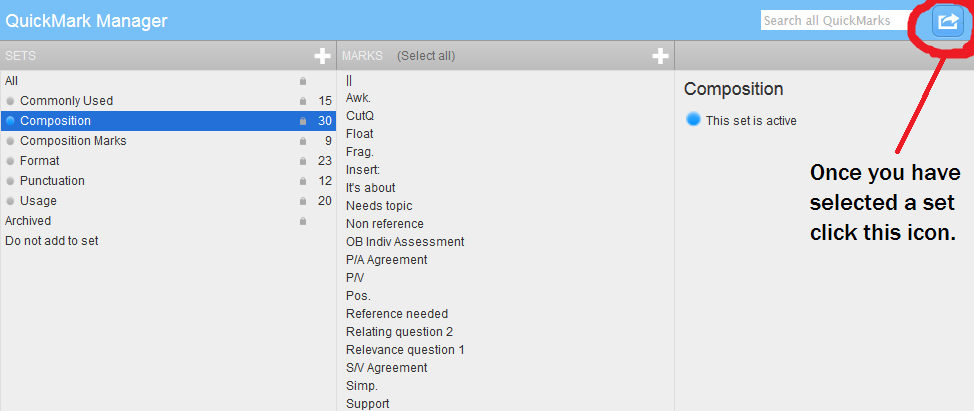
The Quickmark Manager window will load. The left column shows Grademark sets. The middle column lists individual comments (Quickmarks) included in the selected set. The right column shows options for the selected set.
Click on the name of the set you wish to export (in the left column) so that it becomes highlighted. The individual comments for that set will load into the middle column for you to review/revise if necessary.
Click the small Export icon (looks like a square with an arrow) seen towards the top right of the Quickmark Manager window, then choose Export.
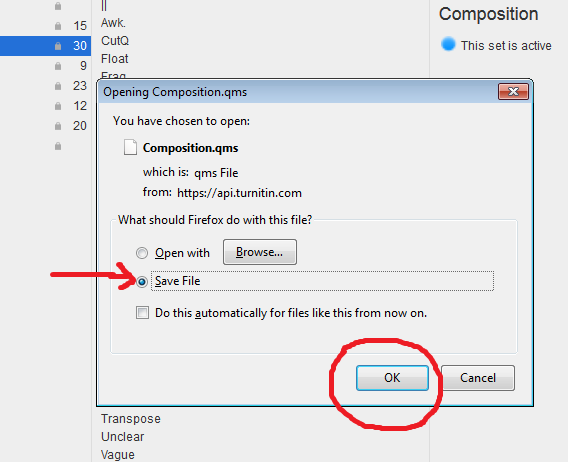
Choose to save the file. Save it somewhere that you can easily find again.
Click the Done button at the bottom-right to close the QuickMark Editor window and return to Grademark.
Import an exported Quickmark Set
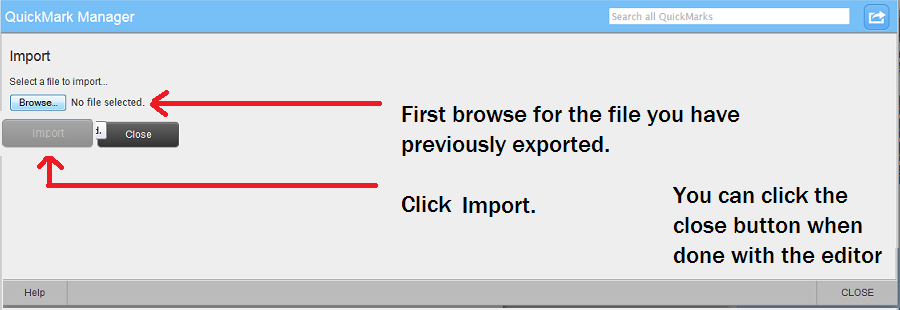
Go to Grademark in your chosen unit and Assignment Submission Folder. Choose the Quickmark Editor option (as shown for Export a Grademark Set towards the top of this page ), then choose the Export icon. Choose the Import option. A new window will open. Browse for your exported file by clicking on the Browser button. Select your file (it will upload), then click Import.
Click the Done button at the bottom-right when done to close the Quickmark Editor window and return to Grademark. You should now be able to mark with your imported set.
How to Access your Assignment Feedback
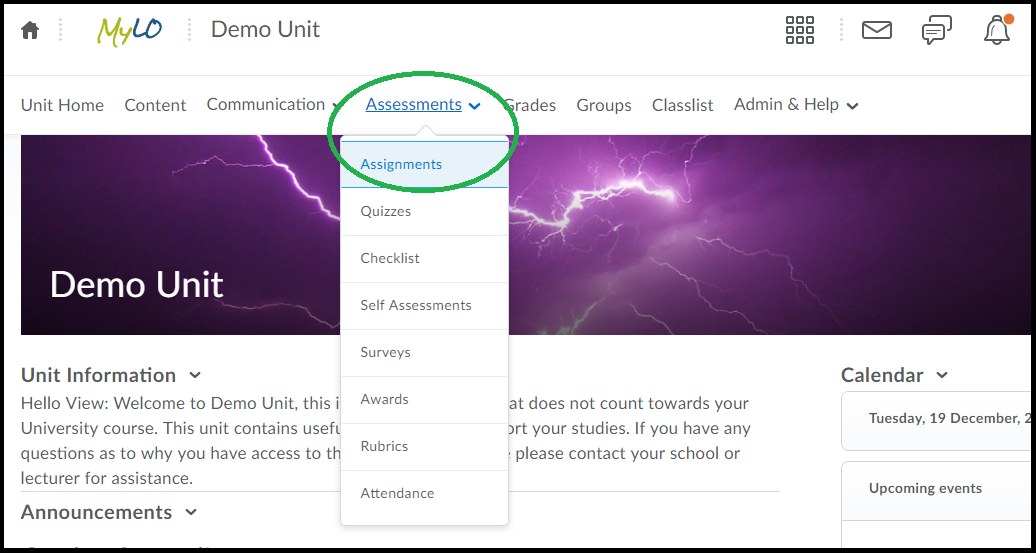
First you will need to click the “Assessments” item from the toolbar, then choose the option ‘Assignments’, as circled below.
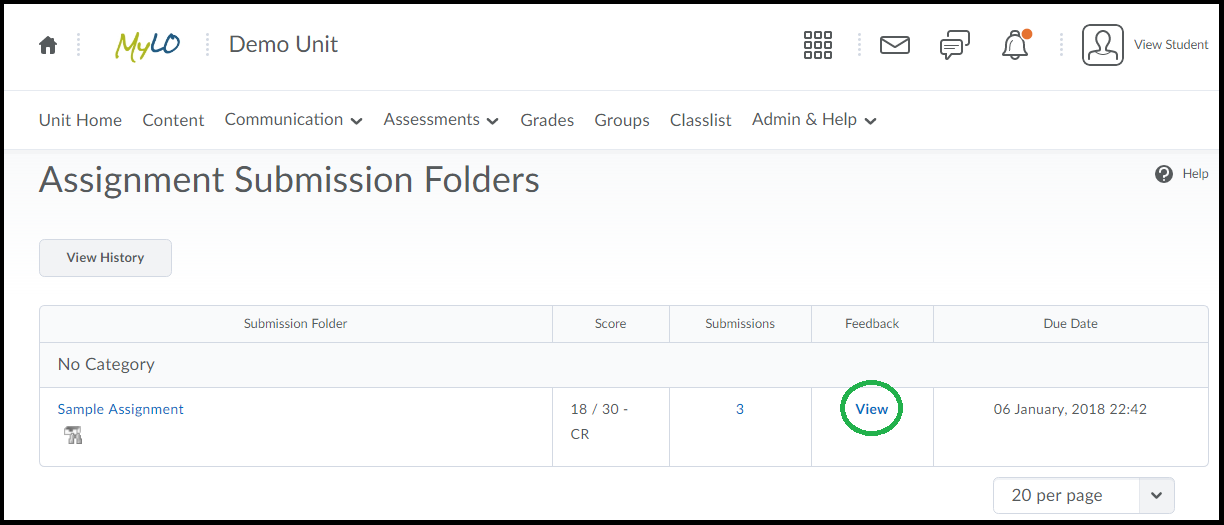
When you load up the Assignments area you should see a list of assignments, with a column titled “Feedback” to the right of each one. When Feedback is published to students a link called “View” will be visible in the Feedback column, as circled below.
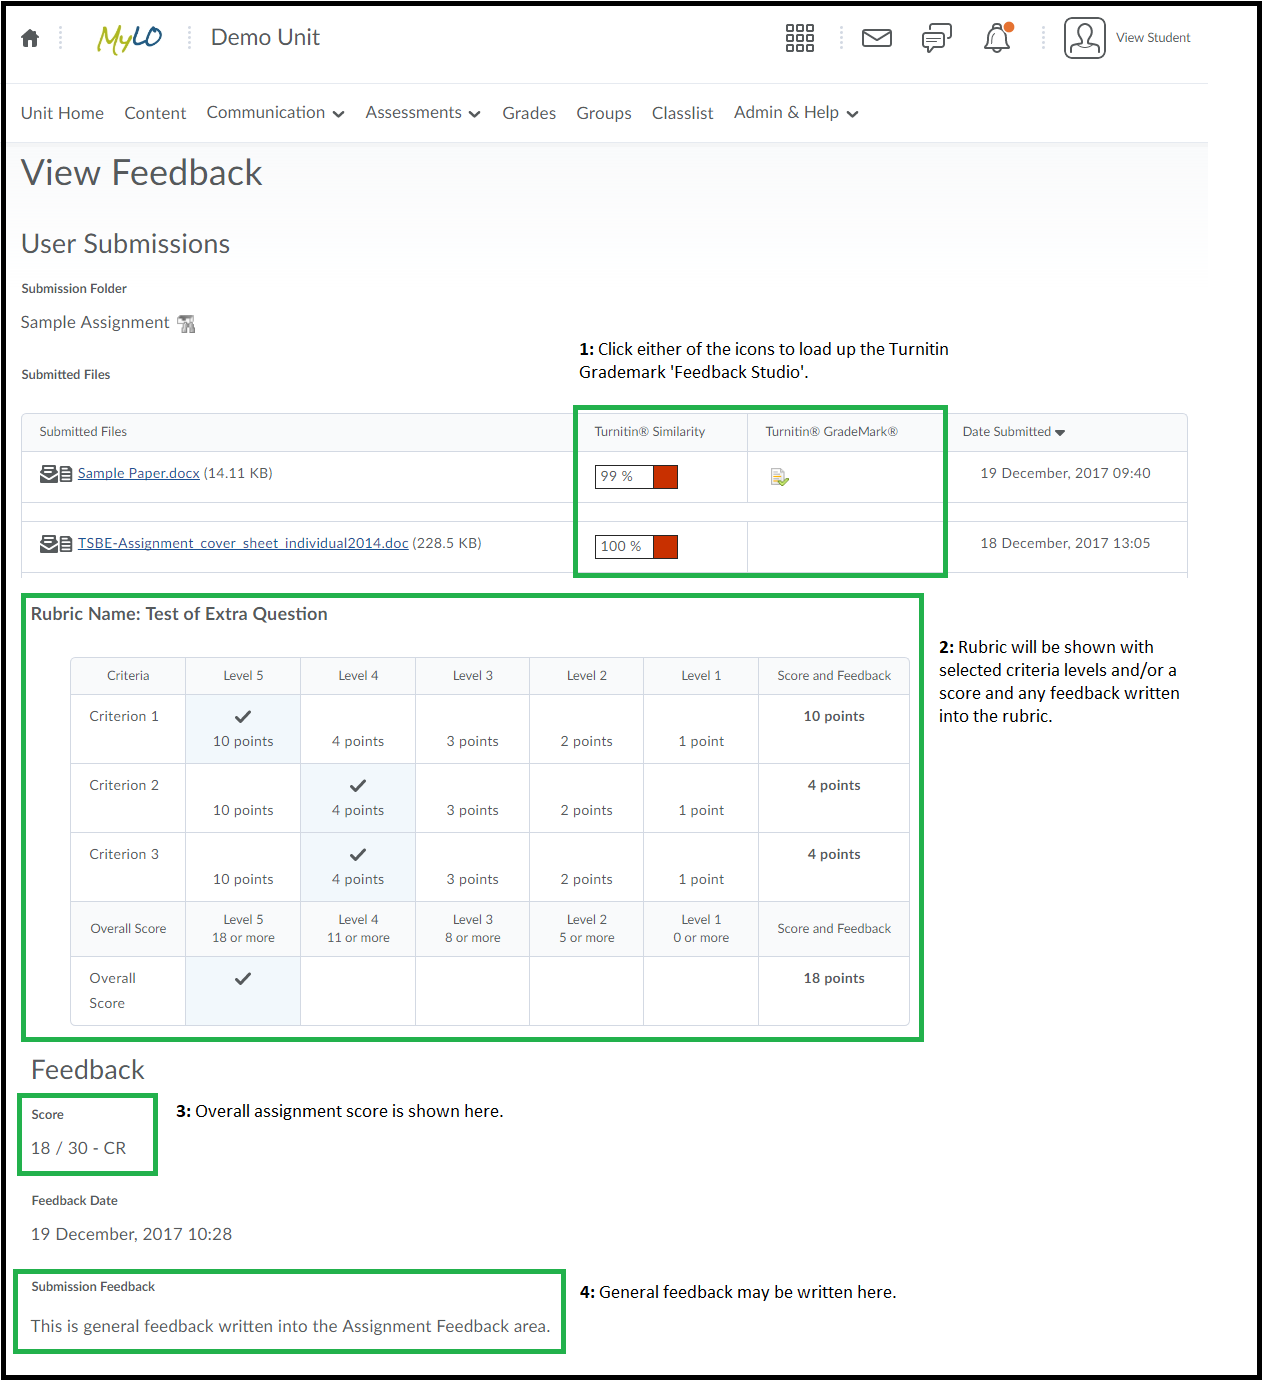
When you click the “View” link you will see one or more of the different kinds of feedback your instructor may have provided.
These are:
(1) Link to Turnitin/Grademark: IF Turnitin or Grademark were used you may see a link to the ‘Turnitin Feedback Studio’. It may be the Similarity Report icon AND/OR the Grademark icon – either will take you to Feedback Studio to view any further comments on your submitted file(s).
(2) Rubrics: If a rubric was used for marking you will see it displayed with the selected levels highlighted.
(3) Overall Score: You may see your overall assignment score.
(4) Submission Feedback: General feedback may be written here.
Grademark is the tool used to mark-up (make comments) your submitted documents. It is linked to Turntin, so you may see to the right of your ‘Submitted Documents’ a link to Turnitin or to Grademark if they have been used.
To access the feedback click either icon that appears. Either icon will load up an area called ‘Feedback Studio’ by default. This shows you your submitted document with the comments shown either as icons you click on, or as text on the page itself.
By default you are likely to see the Similarity Report and Grademark comments together. You may also only see one or the other, depending on what your lecturer/marker has set as visible to you.
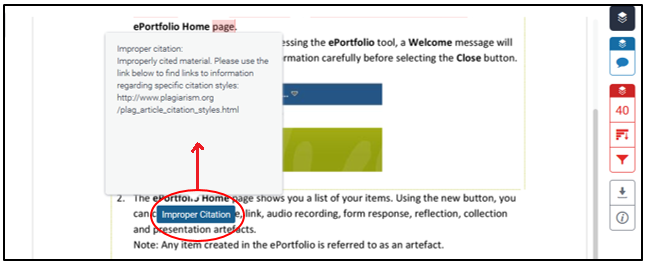
When viewing “bubble” comments (the ones that appear as white text in a blue box) you can click on the blue box to open the full text, an example is circled below.
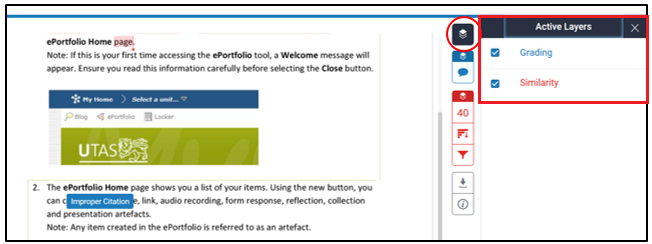
To control the visibility of the Similarity and/or Grademark comments you can click the black icon at the top-right of the page as circled below. It opens options to the left that allow you to turn them off or on.
Creating a VideoNote video in MyLO
VideoNote is a tool included with MyLO. It allows you to capture short videos of up to three (3) minutes using a webcam and microphone*. The tool is available anywhere that you can see the WYSIWYG (What You See Is What You Get) editor in MyLO, including: HTML pages; Discussion descriptions and posts; Quiz questions answer options and feedback; the Announcements, Assignment Submission Folder General Feedback field; and more. To learn how to use VideoNote, refer to the How to section below or download this PDF from the MyLO Support Team. The PDF also includes instructions showing how to locate and embed an existing VideoNote.
FAQs
- What is VideoNote best used for?
VideoNote is best for one-take, short videos, such as module introductions, short explanations/stories to illustrate concepts, and provide video feedback to students. - Can I capture my screen activity with VideoNote?
No. VideoNote only captures webcam video. If you’d like to capture activity on your monitor (e.g. a PowerPoint presentation), use Echo360 ALP Personal Capture. - Can students download a VideoNote video?
No. VideoNote videos are streamed, meaning they must be viewed online. This is generally OK, as the videos are quite short. Videos uploaded to Echo360 ALP can be downloaded or viewed online. - Can I edit a VideoNote recording?
No. VideoNote is designed for short, one-take videos. If you wish to create videos that will need editing, use Echo360 ALP Personal Capture.
How to
NOTE: You must use a device with a recent version of Adobe Flash Player enabled in order to record VideoNotes at this time. This generally means that you will not be able to create a VideoNote
You can use VideoNote anywhere you see the WYSIWYG editor (usually when you are creating something for the first time or editing it). Specifically, you will need to see the Insert Stuff tool. It will be the first tool on the left hand side, and will look like this:
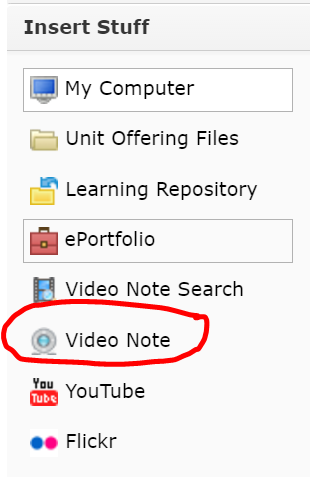
The Insert Stuff window will open. Choose the Video Note option from the side menu.
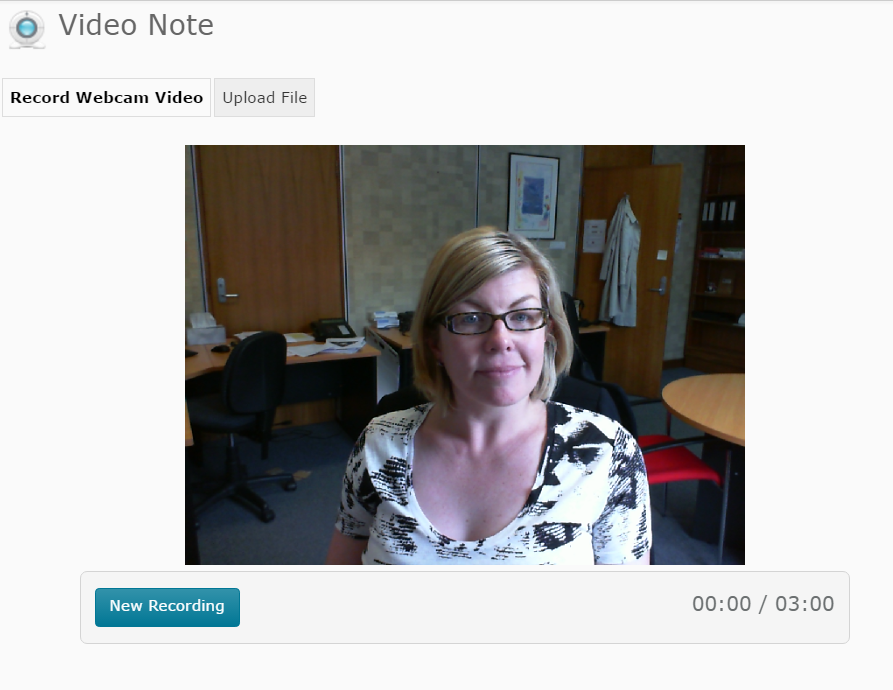
You will see a preview of your webcam video appear on screen. NOTE: You may be prompted to Allow something at this point. If so, check the Allow option. When you’re ready to record, click on the New Recording button to start recording. The recording will start straight away.
As you’re recording, you will see the time count down towards the bottom right of the window. When you’re ready to stop, click on the Stop Recording button. Note that the recording will end automatically at 3:00 duration.
As soon as you click Stop Recording, a preview of the video will play. If you’re not happy with it and would like to record again, click the New Recording button. If you’re happy with the video, click on the Next button that appears to the bottom left of the screen.
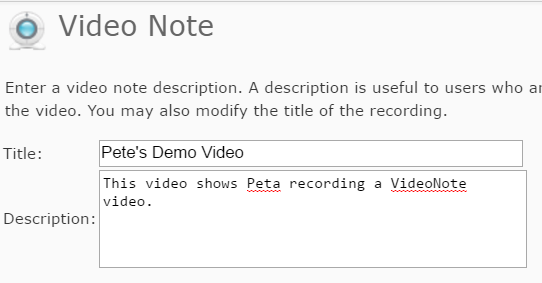
You will be prompted to add a Title and a Description. IMPORTANT: Make note of the title, as it can be very useful when searching for your existing VideoNotes in the future. The Description is shown to users who cannot see the video due to browser limitations.
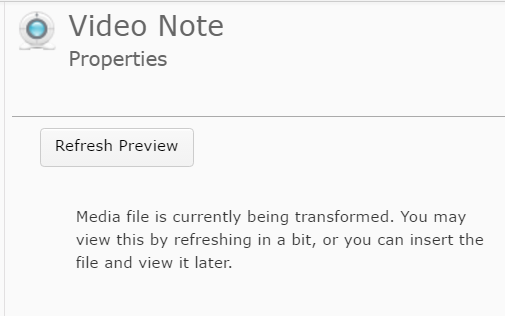
Click the Next button. You should now see a preview of your video. You may not see the preview immediately, as it can take a while for the video to process. If you see a screen like this…
and you want to see a preview, wait a few moments and click Refresh Preview. If you’re happy to continue, click the Insert button that appears towards the bottom left of the window.
Your video (or the ‘processing’ message) should now appear in the page/description/post/field that you are editing. Once you have finished editing, click Save/Save and Close/Publish.
*Most webcams include a microphone, however, these microphones are not very useful for recording in environments with a lot of background noise (e.g. a shared office). They also tend to have a limited range, so are not very good if you tend move away from your computer (e.g. where the web cam is positioned). Using a USB headset is a good alternative to a webcam microphone, and tends to capture higher quality audio without the background noise. Consult your local IT Hub to ask about acquiring a USB headset.
Taking it online: A comparison of online assessment tools
There are a variety of online tools and software applications that you can use to help students create or perform items for assessment, and submit online. Here, we review some of the tools supported by UTAS.
| Tool | Suitable for… | Submission | Marking and feedback | Considerations |
| Microsoft Office | Creation of a range of documents, from Word Documents, to PowerPoints and Excel spreadsheets. Skype for Business (Lync) can be used to communicate with group members. | Files can be submitted to an Individual or Group Submission Folder. Alternatively, they can be shared with other via a Discussion Topic. | Word documents can be checked for plagiarism/collusion via Turnitin (e.g. Word Documents). Word documents can be ‘marked’ using GradeMark/Feedback Studio. |
|
| Assignment Submission Folder (individual) | Submission of files, including documents, images and videos. | Several files can be submitted at once. | Can be connected to Turnitin for detection of plagiarism/collusion, but only text documents will generate a report. Mark in the Evaluate Submission area. An electronic Rubric can be attached to the Folder and used for marking and feedback. GradeMark/Feedback Studio can be used to make comments on the students’ work. |
|
| Assignment Submission Folder (group) | Submission of files, including documents, images and videos. | Several files can be submitted at once. Only one member of the group needs to submit, but any member can submit if need be. | Can be connected to Turnitin for detection of plagiarism/collusion, but only text documents will generate a report. Mark in the Evaluate Submission area: the feedback and results will be made available to all students in the group. Individual marks can be altered in the Grades tool. An electronic Rubric can be attached to the Folder and used for marking and feedback. GradeMark/Feedback Studio can be used to make comments on the students’ work. |
|
| Quiz | Low-stakes quizzes/tests and Just In Time Teaching (JITT). Best used as a means of helping students check their progress, especially when feedback is integrated and responsive to students’ answers. Thus, best used during semester, not near the end (unless used to aid exams revision). Generally not suitable as a means of demonstrating higher order thinking. | Students must click Submit at the end of the Quiz. Otherwise, their Quiz will be flagged as ‘Attempt in Progress‘ (you can force submission afterwards if need be). Some questions can be automarked, whilst others require manual marking. Marks can easily be published to the Grades tool. Feedback can be delivered immediately, or released from a specific date and time. | It is possible to incorporate feedback according to answer choice OR general feedback related to a question. The feedback can be released immediately, or at a later date. You can mark individual questions if needed (e.g. long answer questions), and alter marks for questions manually if need be. Statistics from the Quiz can used when discussing the Quiz questions with students, and are especially useful for identifying areas of difficulty. |
|
| ePortfolio | Students can generate a Presentation (effectively a website) consisting of reflections, uploaded documents and so forth compiled over a semester. Best for assessments completed over a long period, for example, reflective journals and portfolios. | Submission must be made to an Assignment Submission Folder. Submission can take a while to process and tends to generate a fairly large file. | Mark in the Evaluate Submission area, however, does involve an extra click to open the submission (preferably in a new tab/window). Can be problematic in some browsers. An electronic Rubric can be attached to the Folder and used for marking and feedback. Cannot be procesed through Turnitin, and Grademark/Feedback Studio cannot be used. |
|
| Discussions | Suitable for tasks in which students are required to discuss an issue/come to a consensus and produce something concrete (e.g. a list, with choices justified). Also suitable as a means of supporting collaborative learning. Can be used to support peer review, question and answer, and feedback. For example, students could post a video of their presentation. Other students can view and post questions. | Encourage timely contributions by using staged deadlines. For example, first post due by x, responses due by y. You could also include timeliness of contributions as a criteria in a Rubric. Setting up a Checklist with due dates for each task could help facilitate this. | Provide general feedback and encouragement at a midpoint in the discussion, as well as towards the end and after deadline. We recommend providing feedback in the Discussion itself by posting to the group and weaving/summarising. For marking, use a standalone Grade Item (on a different window/tab). You can attach a Rubric to the Grade Item. |
|
| Blackboard Collaborate Ultra | Groups can meet live online to discuss projects, or to deliver and record a presentation or discussion for assessment. Alternatively, students can deliver a presentation live, online, to you and other students. You can record the presentation as evidence for assessment. Voice, as well as any objects presented on screen, are captured in the recording. | Student groups will need a room created for them. Once they have recorded their session/sessions, they can submit them (with supporting documentation) to a Group Assignment Submission Folder. Live presentations can be assessed live. You can return to the recordings any time. In all cases, we recommend getting students to submit some kind of support material to an Assignment Submission Folder (group or individual), and add the link to a recording to their Comments field. This allows you to use the full features of the Evaluate Submission area to grade and provide feedback. | We recommend using the Evaluate Submission area (associated with an Assignment Submission Folder to grade and provide feedback for groups or individuals. Students will need to submit some sort of supporting documentation, as well as link to a recorded session (if required) to support this. |
|
| Video | Students can capture video of themselves (e.g. talking head) for assessment using a range of tools, including MyLO’s VideoNote, their own smartphone or camera. Useful when you want to: assess students’ individual presentation skills; provide an alternative to written reflection. | Students will need to submit their video to an individual Assignment Submission Folder. If videos are shorter than 3 minutes duration, they can use the VideoNote tool included in the submission window. If you want students to share their videos in some way, it may be advisable to put them up to their Echo360 ALP Library and share a link to/embed the video in a post (rather than getting students to attach a large file to a Discussion post). | Mark and provide feedback using the Evaluate Submission feature. Note that you will not be able to utilise Turnitin or GradeMark/Feedback Studio (as you can’t mark up video files). |
|
General principles to apply when responding to students online
Respond within a reasonable time-frame.
Respond to questions (in the Ask the Class Discussion) within two (2) business days and apply the same response time to emails. This avoids students defaulting to email thinking that they will get a faster response. Avoid responding immediately, as this feeds the assumption that you are always available. Only respond immediately if the request is urgent (e.g. a student has reported that a Quiz does not appear on MyLO.
Discussion activities for learning require less direct facilitator intervention. These activities usually proceed over a one to two week period. Check in and encourage, correct or re-direct if needed, ideally just before the midpoint of the activity (day 2/3/7), and again just before the end point of the activity (day 5/6/12).
Unless you have a small cohort, it is impossible to respond to every post.
Focus on answering each Q&A style question. Use techniques like weaving and summarising to give the impression of instructor presence in discussion activities for learning.
Include a salutation, preferably addressing the student, or students, directly.
Examples:
- Dear students,…
- Hello everyone,…
- Dear Peta,…
- Hello Peta,…
- Hello a{FirstName}/b{InitiatingUserFirstName} [This can be used to personalise a aMyLO Announcement or bIntelligent Agent email, as it pulls the user’s first name into the message according to their user details]
Thank the class/individuals for their question or comments.
Thank students by drawing attention to what they have done well, and illustrating this with some important or useful contributions. This will help them recognise that they are ‘on the right track’. Thanking an angry student will help reduce anger levels, as you are responding in a civil and polite manner.
Examples:
- Thank you for your question about…
- Thank you for sharing your concerns about…
- Thank you for alerting me to…
- Thank you for your comment/suggestion about…
- I wanted to extend a big thank you to Peta, who alerted me to a problem with…
- Thank you to Peta for her question about…
- It was great to see you all sharing your ideas. I particularly appreciated Peta’s comment about…
Add a touch of personality (warmth) from time to time.
This helps distance students feel more connected with you, and helps engender a sense of belonging to the class. A short sentence is inviting, but not too distracting from the task at hand.
Examples:
- I hope it is warmer where you are today. In Hobart we’re only expecting to reach a 6 degree maximum!
- Did you watch last night’s episode of Q&A? Some of the questions were directly related to the questions raised in last week’s module. It was really interesting.
Acknowledge errors or problems and apologise for them, even if it isn’t your fault.
Students want acknowledgement that there is a problem and that there may be a solution. While it is fine to tell them what went wrong, avoid lengthy descriptions, laying blame, or the use of emotive language.
Examples:
- You’re absolutely right – the Assessments in the Unit Outline currently add up to 80% and this is an error. I have now uploaded the correct version of the Unit Outline which you will find here. Apologies for the confusion.
- Thank you for spotting that typo for me. I must have looked at that page twenty times and not noticed the mistake! I have now corrected the page according to your suggestions.
- I’m sorry to hear that you had difficulty getting access to last night’s online tutorial. I have now added some additional help materials here, which may be useful. Also, I recommend that you…
- Unfortunately, MyLO was down for unforseen emergency maintenance last night, which is why you couldn’t access the lecture recording at that time. As I use MyLO to email students, I wasn’t able to email you all to let you know about the downtime. Please accept my apologies for the inconvenience. The system is back up now, and I have checked that the lecture recording is definitely available.
Provide hyperlinks to resources where possible.
This encourages students to act on your messages immediately and avoids the use of lengthy explanations. To learn how to add a hyperlink to a Announcement, Discussion post or MyLO email, click here.
Examples:
- To access the Unit Outline, click here.
- You’ll find more information about the process here: link goes here.
Summarise the most important message/s in the first few paragraphs.
The first few paragraphs tend to get the most attention from a reader. Supplementary information can be included in later paragraphs.
Use full sentences and an informal tone.
Model the kind of language that you want students to use. A very formal tone can be intimidating, while he use of slang and contractions can be confusing for students with English as a second language.
Use videos to keep your messages short and interesting.
Using MyLO’s Video Note feature you can easily record a video of up to 3 minutes duration straight into a Discussion post or News Item. For instructions, click here. Alternatively, you could link to a recording you have created with Echo 360 Personal Capture.
Create an FAQ resource to save time during future iterations.
Add common questions and your answers to a Word Document throughout the semester (avoiding references to specific dates, weeks or semesters). Next time you run the unit, upload the document (as a PDF) to your MyLO site, so you can direct students to it, or copy or paste from it to increase the speed of your responses.
Avoid correcting a student’s poor behaviour/breaches of etiquette publicly.
Copy the offending post to a ‘quarantine’ discussion (available to staff only) so that you have a record of it, then email the student to explain what has happened to their post, why you have quarantined it, and how they could post more appropriately in future.
Finish with an informal salutation.
Sign off with something like “Cheers”, “Thanks again”, “Talk soon”, “Kind regards”, “Looking forward to hearing from you”, or “See you soon”.
Setting up Turnitin and Grademark/Feedback Studio
Turnitin is a text matching service used to compare student-submitted work to the existing literature, as well as student work already stored on its database. Turnitin highlights text matches, allowing you to rapidly detect possible areas of plagiarism or collusion in a student’s writing.
Grademark/Feedback Studio, which is available when a student’s work is submitted through Turnitin, allows you to leave comments on a student’s work electronically. Click here for more information about providing feedback with Grademark/Feedback Studio.
To use Turnitin and/or Grademark/Feedback Studio, you must enable Turnitin when setting up a Assignment Submission Folder (to collect student submissions) in MyLO. Ensure that you do this BEFORE students start submitting their work. Here’s how.
PART 1: Set an End Date for your Assignment Submission Folder
To work effectively, Turnitin requires that you set an End Date in the Assignment Submission Folder’s Restrictions tab.
If you have already created an Assignment Submission Folder, you will need to choose to edit it. Do this by selecting the arrowhead to the right of the Folder name, then select the Edit Folder option. Alternatively, when viewing the Submission Folder, click on the Edit Submission Folder button. If you’re already in the midst of creating a Submission Folder, read on.
By default, the Properties tab will be open. Select the Restrictions tab.
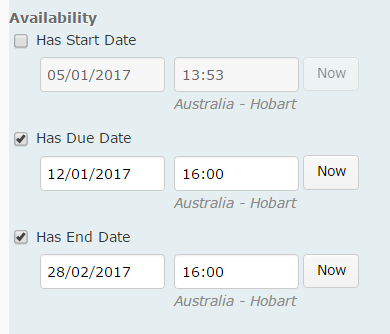
Scroll down until you see Has End Date. Check the Has End Date option then record a date and time. We recommend that you set the End Date to a few days after final results are released for the semester.
Scroll to the bottom of the page and select the Save button.
PART 2: Connect the Assignment Submission Folder to Turnitin
Click on the Turnitin tab (note that you will need to have given the Folder a name before you do this).
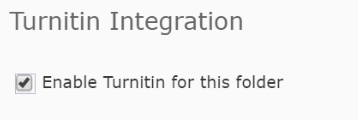
Check the box next to the Allow Turnitin for this folder option. Wait a moment while the connection is initiated.
PART 2: Choose the right settings – VERY IMPORTANT!
The following settings are the key to making Turnitin and Grademark/Feedback Studio work the way that you want it to. Do not skip these steps!!!
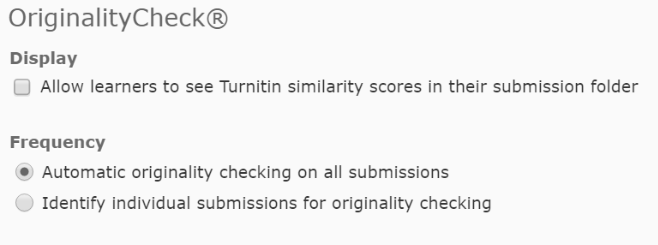
Leave the Allow learners to see Turnitin similarity scores in their submission folder setting (under Display) unchecked. Under Frequency ensure that you have the Automatic originality checking on all submissions options checked. If the Identify individual submissions option is checked instead, you will need to manually click on each file submitted by students to process them through Turnitin. Not fun!
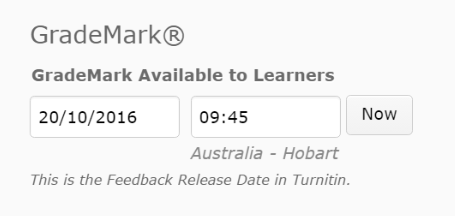
Scroll down and you should see the Grademark available to learners setting. The date recorded here is the date from which students can see the link to access their Grademark/Feedback Studio feedback. We recommend setting this date about one month following the Assignment Submission Folder due date, to avoid any students accidentally seeing their feedback as you’re marking. If you wish to release the feedback earlier, you can always come and alter this date accordingly.
Back to towards the top of the screen, you should see a More Options in Turnitin button. Click on it.

A new window will open. Locate the Allow submission of any file type option. We select you choose Yes. This is especially important if you want to mark files, such as PDFs or some image files, in Grademark/Feedback Studio, even if an Originality Report cannot be generated.
Now click on the Optional Settings option that appears towards the bottom of the screen.
You should now see more settings. Scroll down until you see the Originality Report generation and resubmissions button. Make sure that the Generate reports immediately (resubmissions are allowed until due date) option is selected. If you do not select this option, you may find that students who submit more than one file (very common) only have the first file processed through Turnitin.
Scroll down until you see the Submit button. If you can’t see it, expand the window to full screen. You should be able to see it then.

