Tag
Marking
Attach a Rubric to an Assignment Submission Folder so that you can mark with it
Once you have created an electronic Rubric in MyLO, you can attach it to an Assignment Submission Folder. This post will show you how. Once you have attached the Rubric, you can mark with it.
Step 1
Before you finalise your Rubric and attach it, you must ensure that the Rubric is correctly set up. You may wish to return to the Rubrics tool and check the text and settings before finalising it.
WARNING
Once you have started marking with a Rubric, you must not edit it. If you do, you will lose any marks/feedback you have recorded in the Rubric to date. Please check your Rubric carefully before marking with it.
Step 2
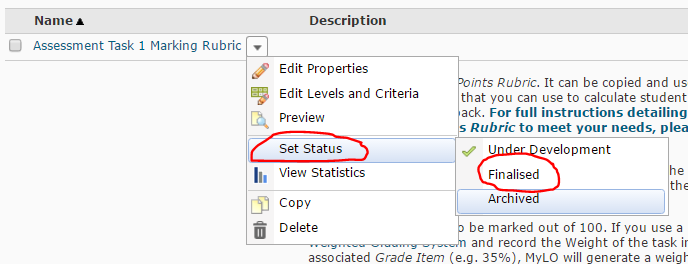
Select Rubrics from the MyLO toolbar, then locate your completed Rubric. Select the black arrowhead to the right of the rubric name. Select Set Status, then choose Finalised (a Rubric cannot be attached to another item unless finalised).
Step 3
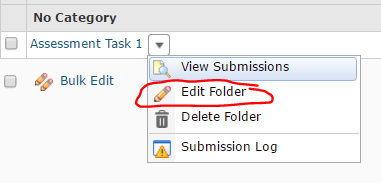
Select the Assignments tool from the MyLO toolbar. Locate the Assignment Submission Folder that you would like to attach the Rubric to. Select the black arrowhead next to the Submission Folder name, then choose Edit Folder from the menu.
Step 4
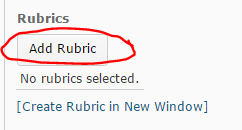
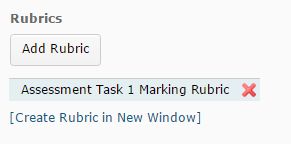
The Properties tab should open by default. Scroll down until you see the Rubrics heading. Select the Add Rubric button.
Step 5
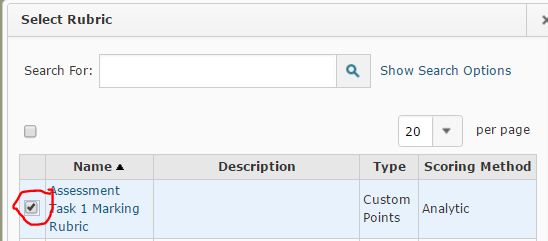
The Select Rubric window will open. Select a Rubric by checking the checkbox next to it, then select the Add Selected button (seen at the bottom of the window).
Step 6
You should now see the Rubric name appear under the Add Rubric button. Scroll down and select the Save and Close button. If you have selected the wrong Rubric, select the red cross (the Rubric name will now appear crossed out), then select the Add Rubric button to select a different Rubric.
You can now start marking Assignment Submissions with your Rubric.
Attach a Rubric to a Grade Item so that you can mark with it
Once you have created an electronic Rubric in MyLO, you can attach it to a Grade Item. We recommend attaching Rubrics to standalone Grade Items that will be used to grade Discussions, or to keep track of work that is performed in class, like participation or presentations. This page will show you how.
We recommend attaching Rubrics directly to an Assignment Submission Folder, rather than to the associated Grade Item. If you need to attach a Rubric to an Assignment Submission Folder instead, you will find these instructions more helpful.
NOTE: One of the down-sides of attaching a Rubric to a Grade Item, is that the Rubric Score will not articulate to the Grade Item (as it does when used with a Assignment Submission Folder) automatically. When you finish marking a Rubric, make note of the Rubric total score, then record this into the Grade Item Score field.
Step 1
Before you finalise your Rubric and attach it, you must ensure that the Rubric is correctly set up. You may wish to return to the Rubrics tool and check the text and settings before finalising it.
WARNING
Once you have started marking with a Rubric, you must not edit it. If you do, you will lose any marks/feedback you have recorded in the Rubric to date. Please check your Rubric carefully before marking with it.
Step 2
Select Rubrics from the MyLO toolbar, then locate your completed Rubric. Select the black arrowhead to the right of the rubric name. Select Set Status, then choose Finalised (a Rubric cannot be attached to another item unless finalised).
Step 3
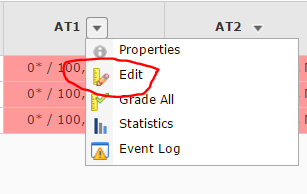
Select the Grades tool from the MyLO toolbar. Locate the Grade Item that you would like to attach the Rubric to. Select the black arrowhead next to the Grade Item name, then choose Edit from the menu.
Step 4
The Properties tab should open by default. Scroll down until you see the Rubrics heading. Select the Add Rubric button.
Step 5
The Select Rubric window will open. Select a Rubric by checking the checkbox next to it, then select the Add Selected button (seen at the bottom of the window).
Step 6
You should now see the Rubric name appear under the Add Rubric button. Scroll down and select the Save and Close button. If you have selected the wrong Rubric, select the red cross (the Rubric name will now appear crossed out), then select the Add Rubric button to select a different Rubric.
You can now start marking with your Rubric.
Change how you see the Grades tool
You can easily change how you see grades in the Grades tool. For example, you may wish to see only the Grade Scheme, or you can choose to see Points, Weighted and Grade Schemes presented. These instructions will show you how.
Note that these changes will apply only to YOUR view of the Grades tool. Tutors and other colleagues who wish to see the same view, will have to follow the procedure themselves. You will need to follow these instructions to change the way that students see their Grades.
Should I use a ‘weighted’ or ‘points’ grading system?
Before you start building your Grades tool, you should make a decision about the grading system that you’re going to use. This decision will impact on the options you will have available to you when setting up Categories and Grade Items. You can download a printable version of this explanation (complete with pictures) if you would prefer to read off screen.
Once you have made a decision, follow these instructions to check your current grade system and change it if necessary.
Points system
The points system is simple, but it does have limitations. It does not suit scenarios where multiple Grade Items contribute to the same assessment task. Furthermore, the Final Grade Calculation, which shows a student’s progress on marked assessments to date, will show only a percentage or UTAS Grade when this system is used. A points system suits scenarios in which you have only one Grade Item per assessment task for all students. The image below shows a Grades tool using a points system.
Weighted system
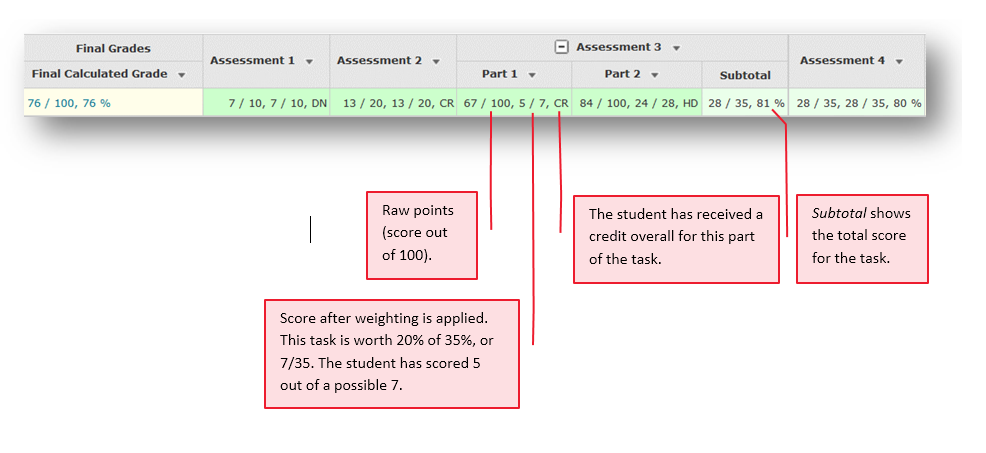
Using a weighted system provides you with more flexibility. Firstly it allows you to mark a Grade Item out of 100 points. MyLO can then calculate the overall grade according to the weight allocated to the Item. Weightings can also be used to determine the contribution that a particular Grade Item makes to a Category. For example, let’s say you have Part 1 and Part 2 of Assessment 3. Each part is marked separately, but you need an overall score for the assessment. Assessment 3 is worth 35% (35/100) of the unit. You can set up Part 1 to be worth 20% of the assessment task, and Part 2 to be worth 80%. The Category Subtotal will calculate the overall grade for Assessment 3.
Set a default Grade Scheme for your unit
MyLO has a series of Grade Schemes. These control how a score is interpreted to students. The two main Grade Schemes in use at UTAS are:
- UTAS Grades: students see their score represented as a NN, PP, CR, DN or HD.
- Percentage: students see their score represented as a percentage.
By default, MyLO uses the Percentage Grade Scheme. If you would prefer to use the UTAS Grade Scheme for most Grade Items, save yourself some time by setting it as the default for your Grades tool. Do this before you create your Grade Items for maximum efficiency. These instructions explain how to set your default Grade Scheme.
Publish final assessment marks to the Grades tool without releasing the marks and feedback to students
UTAS requires that academics do not release students’ final assessment task marks on MyLO until after the exam period and release of formal grades by the University. You can still mark students’ final assessment piece online and publish the marks to the Grades tool, but you will need to ensure that students cannot see the marks or feedback associated with their final assessment. This is achieved by:
- hiding the Assignment Submission Folder/Quiz Submission View and associated Grade Item from students; and
- ensuring that students cannot see Grades or Assignment Submission Folders in the My/User Progress tool.
These items must be hidden from students before you publish and grades or feedback. The instructions from page 3 of this [PDF] will show you how.
Mark and provide feedback using a MyLO Rubric
MyLO Rubrics can be used to mark submissions made to Assignment Submission Folders. They are also useful as a means of providing feedback to students about their performance on a task.
If you plan to mark with Rubrics, or your Unit Coordinator has asked you to mark with Rubrics, you will find the following guides helpful.
- RECOMMENDED: Change your Dialog Setting to increase ease of marking with a Rubric.
- Access the Rubric: from an Assignment Submission Folder or; from a Grade Item.
- Marking with a Custom Points Rubric (generates a score).
- Marking with a Text Only Rubric (no associated points).
Create a MyLO Rubric that will calculate a grade (Custom Points Rubric)
You can grade student assignments using MyLO Rubrics. Creating an Analytic > Custom Points type Rubric will allow you to generate a score for each student, based on the weighting of each criteria, and the levels (e.g. HD, DN, etc.) selected for each criteria. The score does not need to be made visible to the student. You can also record feedback against each criteria if you wish to.
Creating Custom Points Rubrics is somewhat complicated. In some faculties, your local blended learning/distance learning support team may be able to create a Custom Points Rubric on your behalf. You will need to provide them with:
- A word document containing the criteria and level descriptions;
- Weighting or Points values for each criteria, totalling either 100% or up to the points value of the assignment.
- Details of the Assignment Submission Folder or Grade Item that you want the Rubric attached to.
You may be asked to check the Rubric before it is Finalised and attached to an Assignment Submission Folder/Grade Item, as Rubrics cannot be altered once marking commences.
Create a Custom Points Rubric from scratch
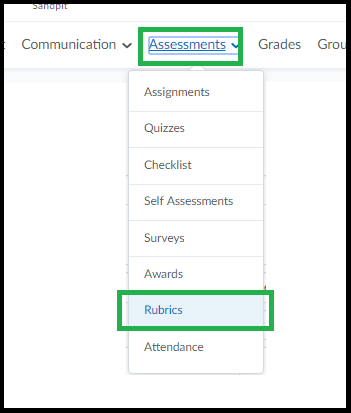
First go to the unit & choose Assessment – Rubrics from the toolbar.
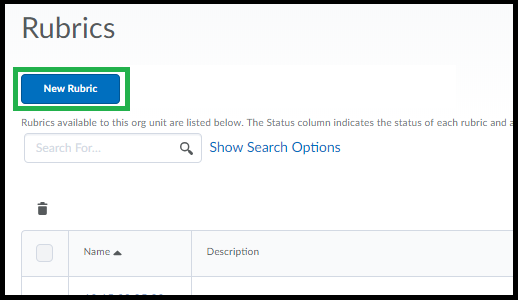
If you don’t already have a rubric to edit just click “New Rubric”.
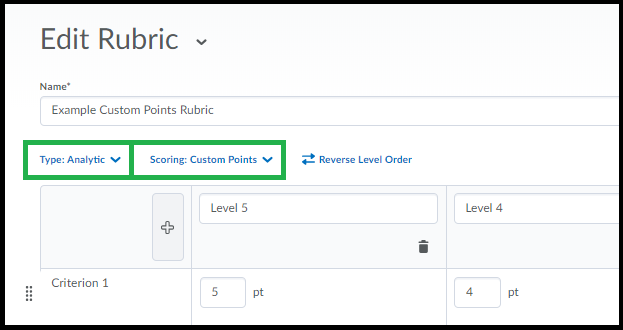
It may take a minute for the page to load, give it a name & check the first set of settings across the top.
Analytic rubric setting means it will calculate a score from multiple criteria. Holistic is one criteria only.
Points vs Custom Points – if your criteria are weighted differently to each other (have different points values to each other) choose ‘Custom Points’. If all of your criteria are worth the same each, you can leave it as “points”. In this help guide we will create ‘custom points’ rubric as this is the most complex.
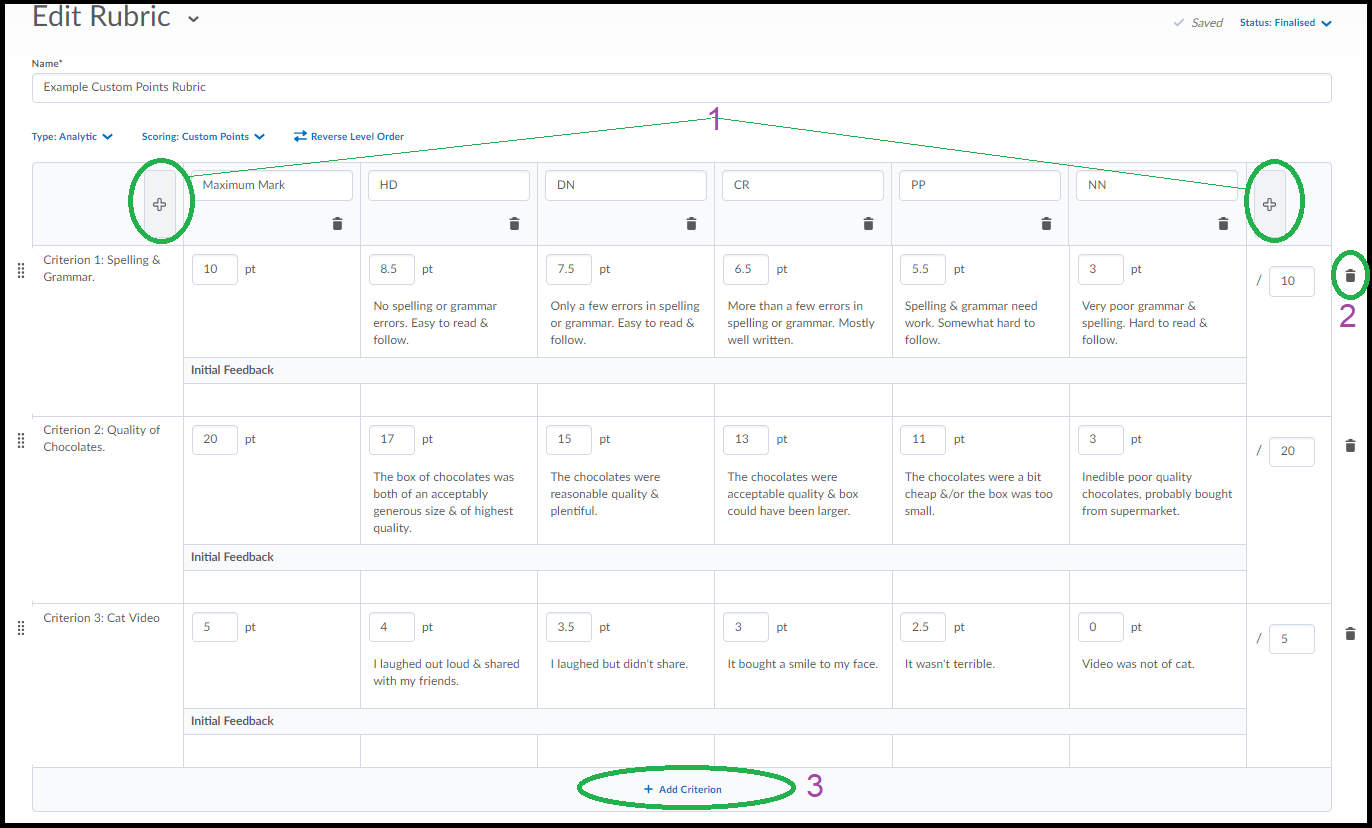
The table will be pre-populated with default values. You can edit any of these values just by clicking into the text & typing. You can also copy/paste text to the cells from Word. Note there is a limit on the number of characters you can use in the Criteria Name column. The rubric tool will SAVE as you go.
1. You can add another column either to the left or right of your columns by clicking either of the [+] buttons at the top.
2. You can remove a criteria by clicking the bin icon to the right of the criteria row.
3. You can add another criteria to the end of the list by clicking ‘Add Criterion’ at the end of the list.
NOTE: With either Points or Custom Points – one column (the default is the right-most) MUST have the maximum obtainable mark for each criteria in it, this is how MyLO Rubric knows how much the rubric is out of. You can , if you want to avoid having the HD column be set at the maximum, use a ‘maximum achievable’ column. Other columns can be set as something lower than the maximum if you prefer. For standard UTAS grades (ie HD, DN etc) the values you use for the DN, CR, PP columns will need to fall into the range defined by the criteria. (HD = 80% – 100%, DN = 70% – 79% etc).
To re-order the criteria just click & drag the criteria using the small icon to the left as circled below.
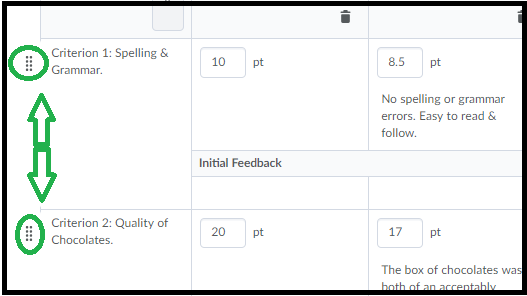
Once you are done setting up your criteria you can scroll down to check the “overall score” area that calculates an overall level. You can change the default values. You can add or delete extraneous levels entirely by clicking the Plus sign or the Garbage bins. You can delete all but 1 (so you could just have a ‘complete’ level based on any score out above 0 if you want).

Scroll down a wee bit further and click on “Options” to show important options.
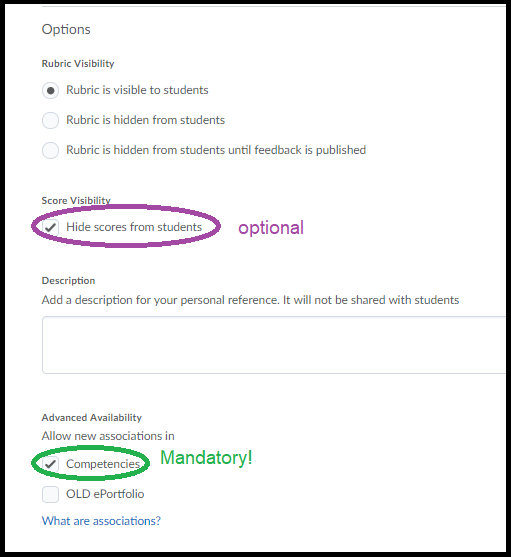
The first set of 3 options defines when the rubric is visible to students. Note that students do like to work “to the rubric” so keep in mind they may ask about it if you decide to turn it off here you might consider giving them a PDF rubric.
Score Visibility: this refers to the scores in individual criteria levels not the overall score. If you check this it just means they’ll see what level they got for each criteria but not the specific number associated with each. They will still see their overall grade. This option is useful to keep as ‘hide’ as it allows for discretion in marking & moderation.
The two options under the description are to “allow associations” which is a rather confusing way of saying “this rubric can be attached to things” – so leave at least the first one checked ON or you can’t then use the rubric anywhere in MyLO because if you un-check it the rubric can’t be added to assignments for … some reason.
You’re not quite done yet!
Scroll all the way back to the top-right to find the option to set the rubric as “Finalised” (why is it up here? why not both at the top & at the bottom?) To use the rubric anywhere it has to be set to “finalised”.

Once Finalised you can now attach this rubric to assignments, grades, or discussions. As you use it for marking it will also auto-save as you go.
Track participation in tutorials and workshops
Do you monitor or assess student participation in tutorials, workshops or online classes? Tracking participation in tutorials can be quite difficult and time-consuming, especially when multiple staff are involved.
Using the MyLO Grades tool
Dr Gemma Lewis coordinates a large first-year undergraduate unit with over 450 students. Tutorials are included in the unit, and a range of tutors are responsible for collecting data on student participation. In the past, tutors completed a form for each tutorial and returned it to Gemma. Gemma would manually enter the data from the forms into an Excel spreadsheet. However, this was time consuming and forms were nor always delivered to her in a reasonable timeframe.
Gemma decided to use MyLO to remove the need for double-handling of participation data. She created 12 Grade Items in her unit’s MyLO Grades tool, one for each week. She developed a marking schema for tutors to use: 0 for no-show; 1 for attended with minimal participation; 2 for attended and contributed; 3 for attended and made contributions supported by theory. A similar set-up is explained here.
Tutors received training in how to filter the Grades tool for their convenience, as well as how to enter marks. Though some continued to make paper notes during class, all recorded marks into the relevant Grade Item rather than sending through a handwritten note or spreadsheet. All the Grade Items were organised under a Category, which automatically calculated a cumulative overall result for the each student.
Using participation cards
Dr Gail Ridley (Tasmanian School of Business and Economics) uses this process in her classes.
- Gail prints participation cards on coloured card as per the image below. The same cards are used every week.
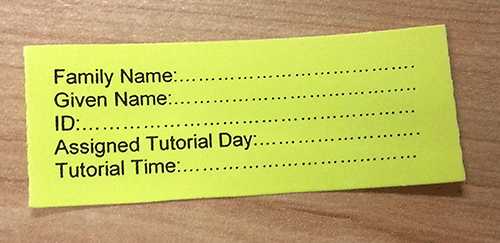
- Each card has room for a student’s name, student number and tutorial day and time.
- In the first tutorial for the semester, Gail hands one participation card to each student.
- The students are asked to complete the card with their details and to place their card on the edge of their desk.
- When a student shows a level of participation that satisfies Gail, she picks up the card from their desk (or asks them to hand it to her).
- Gail records a student’s participation mark in the MyLO Grades tool after the tutorial, then hands them back their card at the start of the next tutorial.
- Gail keeps the cards in an envelope between tutorials. In case some of the cards are not collected, Gail always keeps a few temporary cards on hand.
This method has an added benefit – the collection of the participation card is recognition of a student’s effort. In turn, quiet or shy students now have a role model that they can watch and listen to for ideas about how they might participate in future.
In addition, the participation card method allows the lecturer or tutor to focus on teaching, rather than distracting administrative tasks, during a tutorial.

