Category
Facilitation and Class Management
Generate a spreadsheet detailing the groups students belong to
If you use the Groups tool to organise groups of students in your MyLO site, you may find it helpful to download a spreadsheet listing the students and the Groups they are members of. Here’s how.
Step 1
Select the Grades tool from the MyLO Toolbar.
Step 2
Select the Export button. This appears towards the top left of the Grades tool when in Enter Grades view.
Step 3
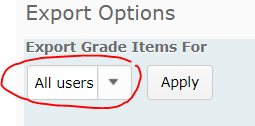
Now select whether you wish to include All Users (students) enrolled in the MyLO site in your spreadsheet, or specify only a certain group of students to appear in the spreadsheet. For example, you may only want to see students in a particular study mode, studying at a particular campus or enrolled in a particular unit code. If you want all users included, skip to Step 4.
If you wish to select a specific Group of students:
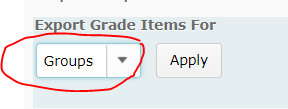
- select Groups from the dropdown menu, then the Apply button;
- select the Group you wish to view from the dropdown menu (only one can be selected), then select Apply again.

Step 4
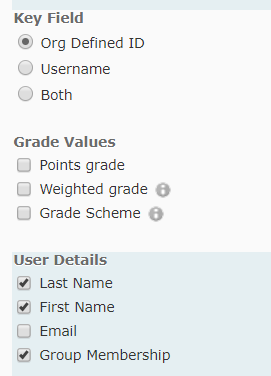
You can now choose the fields you wish to include in the export. Under Key field, leave the Org Defined ID option selected. Uncheck all the Grade Value options. Under User Details, check the Last Name, First Name and Group Membership fields checked.
Step 5
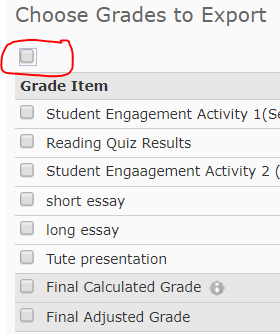
You won’t need any of the Choose Grades to Export options. The quickest way to deselect them all is to select the checkbox at the top of the list, then deselect it again (this selects all, then deselects all).
Step 6
Select the Export to Excel button that appears at the bottom of the screen.
A pop up window will appear as your spreadsheet is generated. The file will eventually appear. Select the file name to download it. The final name will normally include your unit code and name.
The resulting Excel spreadsheet will include your students on the left (one row per students), with each Group Category listed as a column header. An example is provided below.
Use Quiz statistics to improve teaching and learning
Quizzes can help students check their own learning, especially if useful feedback is provided in response to student responses. Quizzes can also help you adapt your teaching according to needs of your students. The statistics provided by the Quizzes tool can help you quickly determine areas students are strong in, and areas where they may benefit from further learning opportunities (e.g. further discussion or a review during a forthcoming class).
How to access the statistics for a Quiz
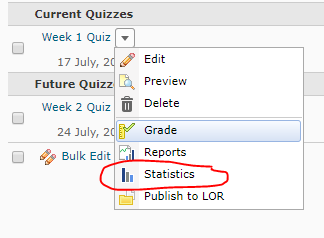
Select Assessments then Quizzes from the MyLO Toolbar. Select the little black arrowhead to the right of the quiz you wish to obtain statistics for, then select Statistics from the menu.
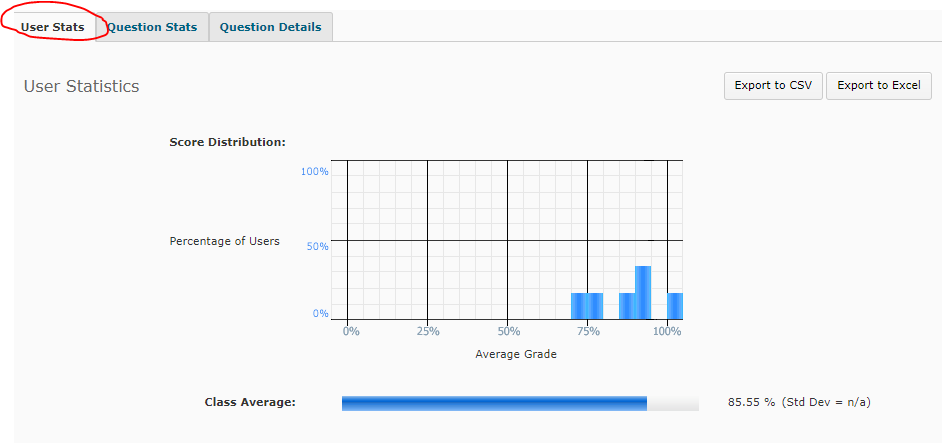
By default, you will be shown the User Stats for the Quiz. This shows you the overall score distribution, and class average, beneath which you will see the overall result for each student (not shown below).
You can navigate between the Question Stats and Question Details tabs to see more useful information.
Question Details provides the most useful information. Here you will see each question (this has been blurred out in the sample image below), followed by the answer options provided to students. The percentage of students who selected each answer option is presented. The correct answer/s are marked by a small blue arrow.
Track whether students have accessed an Item in MyLO Content
If you need to keep track of student access to an Item in your MyLO unit’s Content tool, using the Reports tool will allow you to get a quick overview of who has, or hasn’t, accessed the Item.
Step 1
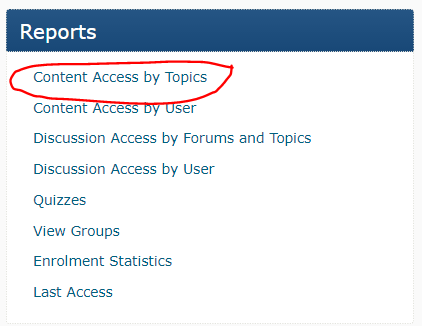
Navigate to your MyLO unit’s Home page (this is the first page you see when you access the unit). You should see a Reports widget to the right hand side of the screen. This contains links to a variety of reports. Select Content Access by Topic.
Step 2
The report will open. You will see a list of all the Content items in your unit, presented in a table. As in the Content tool, the items are organised into Modules (folders) and Sub-modules. Locate the Item that you wish to see results for. You may need to scroll down to find it. Select the number recorded in the Users Visited column (second column from the right side). For example, here we will select Week 1 Activities & Resources page from the Week 1 Discussion: Single page approach Module.
Step 3
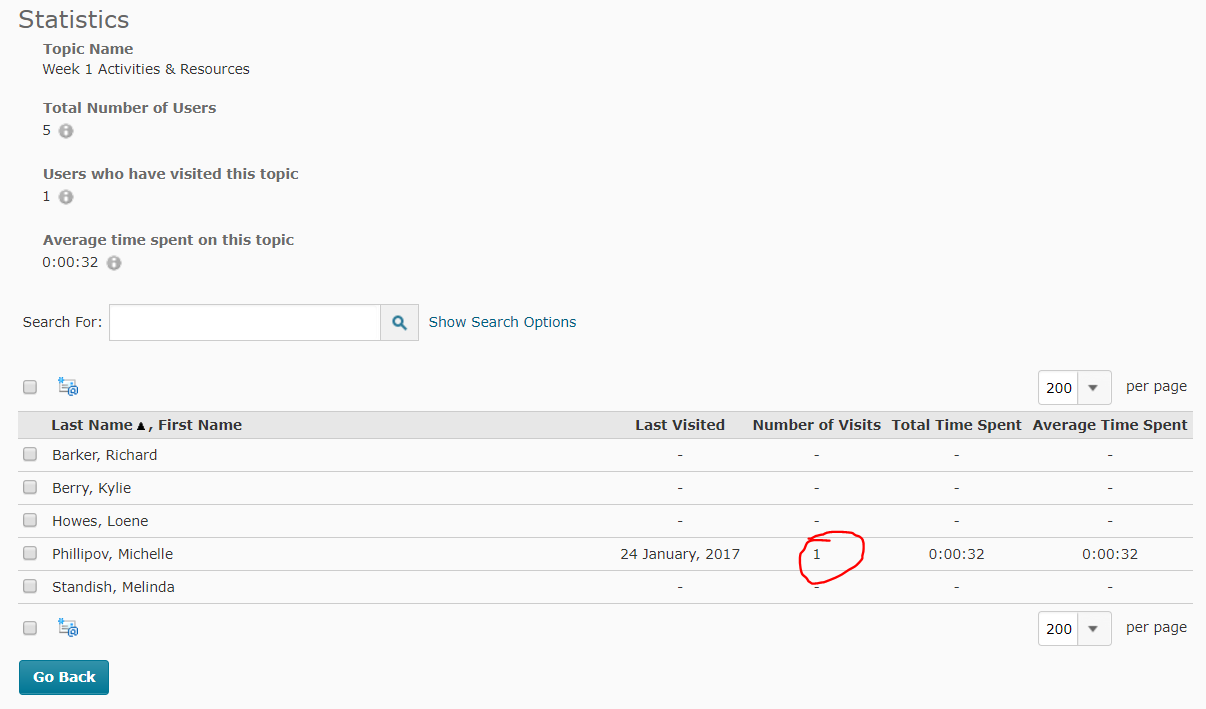
You should now see a list of students enrolled in your unit (to see more than 20 on a page, use the per page drop down menu to the top right of the table to select 200).
TIP: If you only wish to see a selection of students, you can filter by group, using the View by options seen above the table of results. For example, you could choose to see only off-campus students by selecting the group, Default Group Study Mode External. This post provides more information about how to filter results by group.
You should be able to see the Number of Visits students have made to the item. For example, in the example below, Michelle has made one visit to the item.
Step 4 (optional)
If you would prefer to have a printable version of the results, ensure that you have the window selected, then select CTRL + P on your keyboard (for a PC) or Command + Print (for a Mac). This should generate a printable version of the report page. If your students are spread out across several pages, you will need to repeat this process for each page.
Track student participation in a Discussion Forum
If you need to keep track of student participation in MyLO Discussion Forum (which may contain several Topics), using the Reports tool will allow you to get a quick overview of who has, or hasn’t, made a contribution.
Step 1
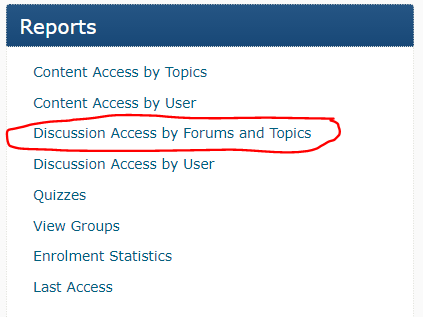
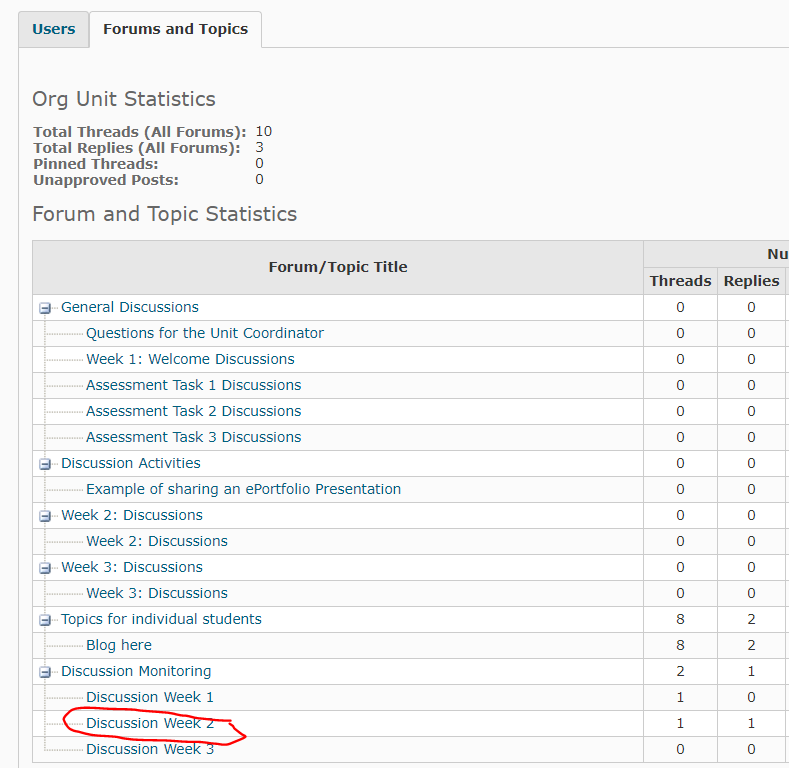
Navigate to your MyLO unit’s Home page (this is the first page you see when you access the unit). You should see a Reports widget to the right hand side of the screen. This contains links to a variety of reports. Select Discussion Access by Forums and Topics.
Step 2
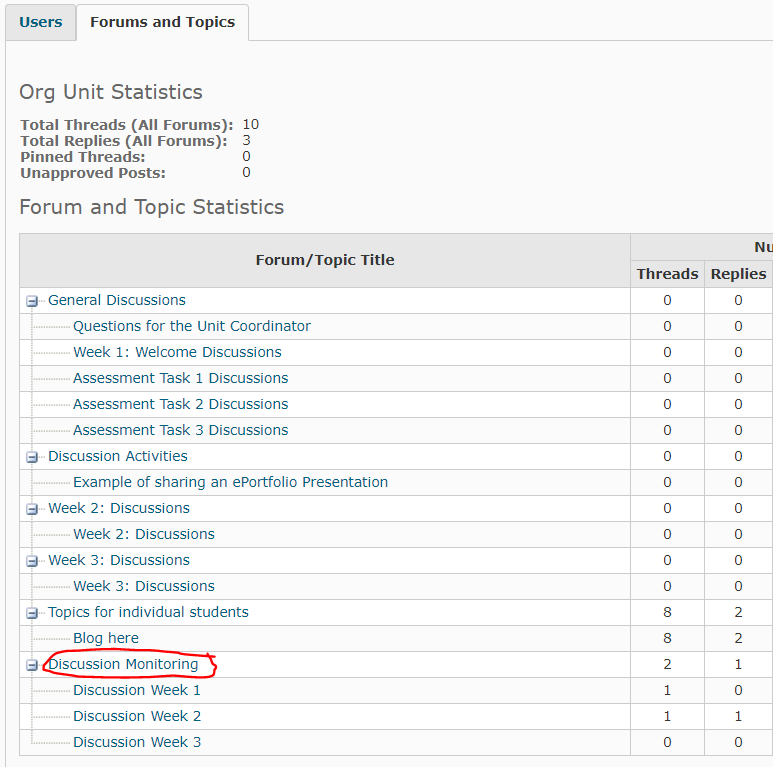
The report will open. You should see a list of all the Discussion Forums and Topics in your unit, presented in a table. Select the Forum that you wish to see results for by clicking on its name (you may need to scroll down to see it). For example, here we will select Discussion Week 2 from the Discussion Monitoring forum.
Step 3
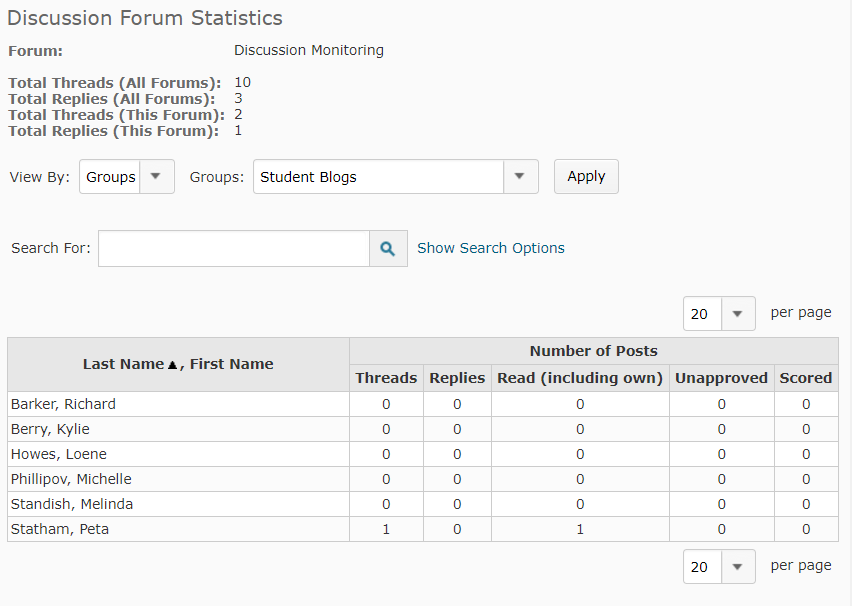
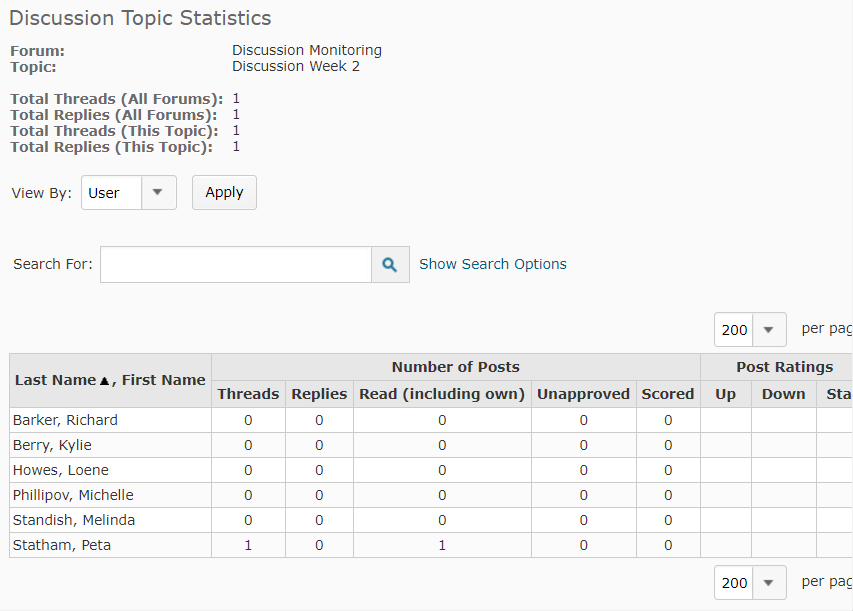
The report you have requested will open in a new window or tab. If you only see some of your students on the page, select 200 from the per page drop down menu, seen to the top right of the table. This will allow you to see the maximum number of results on the one page.
TIP: If you only wish to see a selection of students, you can filter by group, using the View by options seen above the table of results. For example, you could choose to see only off-campus students by selecting the group, Default Group Study Mode External. This post provides more information about how to filter results by group.
You will be able to see how many Threads and how many Replies students have contributed to the Discussion Forum overall.
Step 4 (optional)
If you would prefer to have a printable version of the results, ensure that you have the report window selected, then select CTRL + P on your keyboard (for a PC) or Command + Print (for a Mac). This should generate a printable version of the report page. If your students are spread out across several pages, you will need to repeat this process for each page.
Allow students to see a Grade Item / Hide a grade item
Many staff hide Grade Items from students until they have finished marking and moderating results. When a Grade Item is made available to students, they will see the full name of the Grade Item, together with any results you have made available to them, in their view of the Grades tool.
Is my Grade Item hidden?
To determine whether a Grade Item is hidden, go to the Grades tool. Select the Manage Grades tab.
You should now see a list of all the Grade Items included in your unit’s Grades tool. If your Grade Item has a closed-eye symbol to the right of its name, as shown in the example below, it is hidden to students. If you cannot see the closed-eye icon, it means that students can see the Grade Item.
To Hide or ‘un-hide’ a Grade Item
From the Manage Grades view, select the small black arrowhead to the right of the Grade Item name, then select Edit Grade Item from the menu.
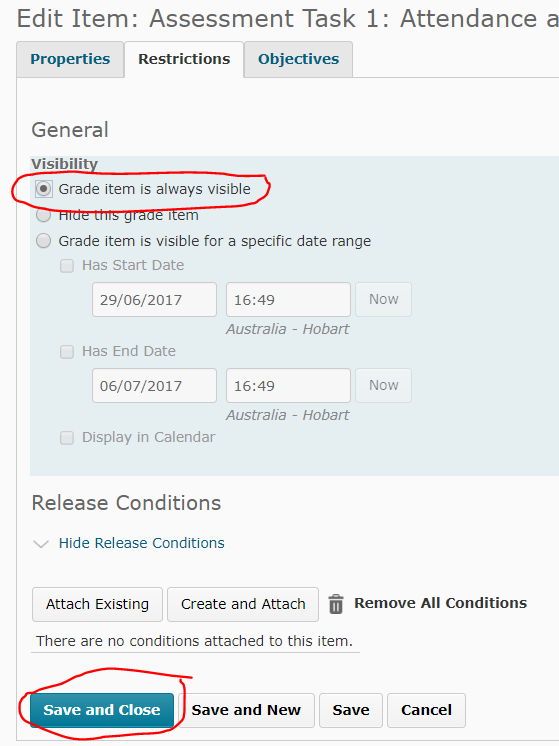
Select the Restrictions tab.
To Hide just choose the option for ‘Hide this grade item’
To unhide select the Grade Item is always visible option.
You can also select the third option to show the grade once a specific date has been reached.
When you’re done click Save and Close (towards the bottom of the screen) to save your change.
Track student access to your MyLO unit
It can be useful to gather information about student access to your unit’s MyLO site, especially if you are using MyLO access as a Student Engagement Activity.
Here’s how to quickly and easily gather data about student access to your MyLO site.
Step 1
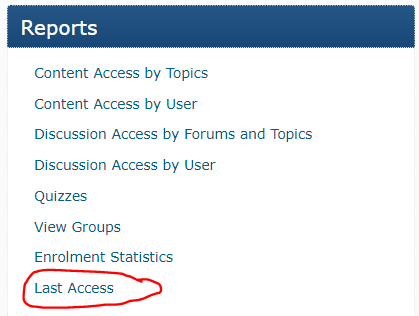
Go to your MyLO unit’s Home screen (the first page you see when you access your unit in MyLO). You should see the Reports widget to the right of the page. This contains links to a variety of reports. Select the Last Access report.
Step 2
Under Report Filters, select the Select Values button.
Step 3
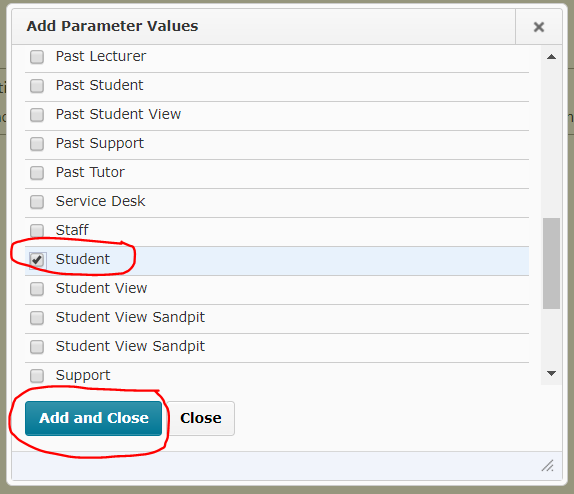
A dialogue box will open. Scroll down until you see the Student role. Click in the checkbox to the left of it to select Student (a check will appear in the box once you have done this). Select the Add and Close button.
Step 4
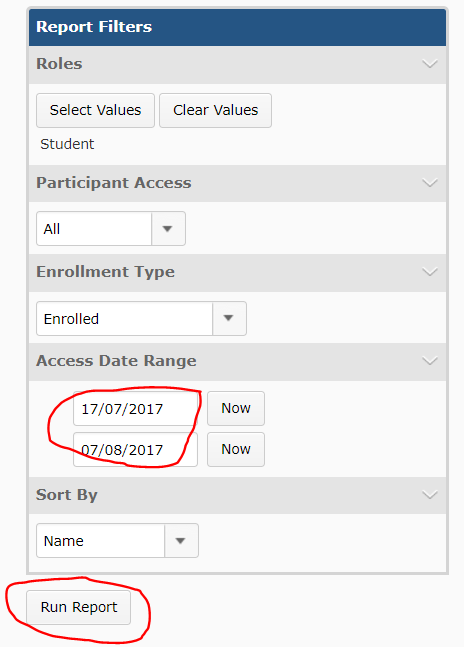
Keep the Participation Access option as All, and the Enrollment Type as Enrolled. Choose an access start date and end date, for example, the first day of semester and the final day of Week 4. Clicking on each date will allow you to choose a date from a calendar. Finally, select the Run Report button.
Step 5
The report will load. Select the PDF icon (far left) to download a PDF of the report.
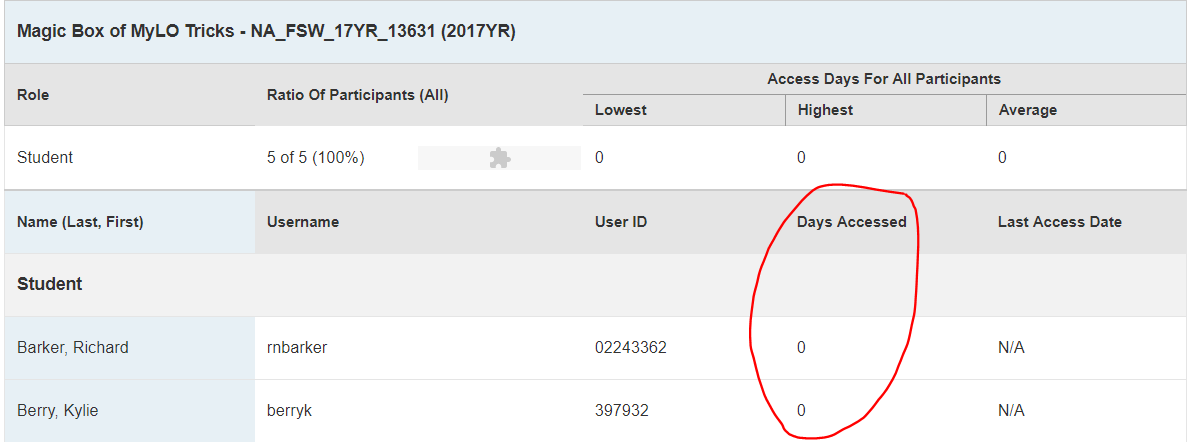
In the report, you should see that each student has a Date Accessed number recorded next to their name. If this number is greater than 0, the student has accessed your MyLO site within the dates you specified earlier.
Track student participation in a Discussion Topic
If you need to keep track of student participation in MyLO Discussion Topics, using the Reports tool will allow you to get a quick overview of who has, or hasn’t, made a contribution.
Step 1
Navigate to your MyLO unit’s Home page (this is the first page you see when you access the unit). You should see a Reports widget to the right hand side of the screen. This contains links to a variety of reports. Select Discussion Access by Forums and Topics.
Step 2
The report will open. You should see a list of all the Discussion Forums and Topics in your unit, presented in a table. Select the Topic that you wish to see results for by clicking on its name (you may need to scroll down to see it). For example, here we will select Discussion Week 2 from the Discussion Monitoring forum.
Step 3
The report you have requested will open in a new window or tab. If you only see some of your students on the page, select 200 from the per page drop down menu, seen to the top right of the table. This will allow you to see the maximum number of results on the one page.
TIP: If you only wish to see a selection of students, you can filter by group, using the View by options seen above the table of results. For example, you could choose to see only off-campus students by selecting the group, Default Group Study Mode External. This post provides more information about how to filter results by group.
You will be able to see how many Threads and how many Replies students have contributed to the Discussion Topic.
Step 4 (optional)
If you would prefer to have a printable version of the results, ensure that you have the report window selected, then select CTRL + P on your keyboard (for a PC) or Command + Print (for a Mac). This should generate a printable version of the report page. If your students are spread out across several pages, you will need to repeat this process for each page.
Manually add students to Groups
You may need to add students to a particular Group in your unit’s MyLO site. Here’s how.
Step 1:
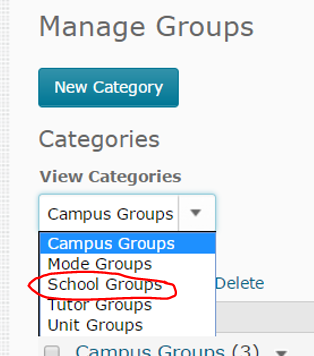
Select the Groups tool from the MyLO toolbar, then select a Group Category (the ‘container’ of the Group you wish to add students to) from the View Categories drop down menu.
Step 2:
Select the name of the Group that you would like to add students to.
Step 3:
Select the Enrol Users button.
Step 4:
You should see a table containing the names of the students. Generally, the users are arranged in alphabetical order by surname (in the image below, student names have been blurred to protect privacy). You may be shown only 20 students per page by default. It can be useful here to select 200 from the per page menu, so that you can see as many students on one page as possible.
Select one or more students by checking the checkbox seen to the right of their names. You will know that a student has been selected because a small symbol will appear next to their name. Alternative, to remove a student from the group, uncheck the box to the right of their name. Finally, select the Save button.
TIP: If you have hundreds of students enrolled in a unit, you may find the Advanced Search Options useful when enrolling students in a Group. A link to these options is located to the top left of the table of students.
If you wish to exclude students from the list based on Study Mode, Campus or Unit code choose the Add Demographic Criteria option. If you wish to exclude students who have already been enrolled in a Group in the same (or a different) Group Category, choose the Add Group Category Exclusion option.
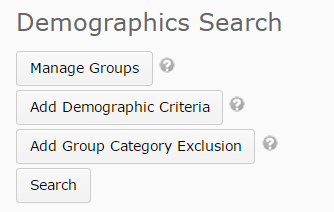
Once you have selected your preferred options, select the Search button. You should now see that the list of students available to enrol in the Group has now been filtered.
Rename Groups in MyLO
When you create Group Categories in MyLO, you need to set a Group Prefix, for example, ‘School Group’. When MyLO creates the Groups in the new Category, each Group is named using the Group Prefix followed by a number, for example ‘School Group 1′, ‘School Group 2‘ and so on. Once the Groups have been created, you can edit the names to make them more meaningful to your teaching team and students. Here’s how.
Step 1:
Select the Groups tool from the MyLO toolbar, then select a Group Category (the ‘container’ of the Groups you wish to edit) from the View Categories drop down menu.
Step 2:
Click on the name of the Group that you would like to edit.
Step 3:
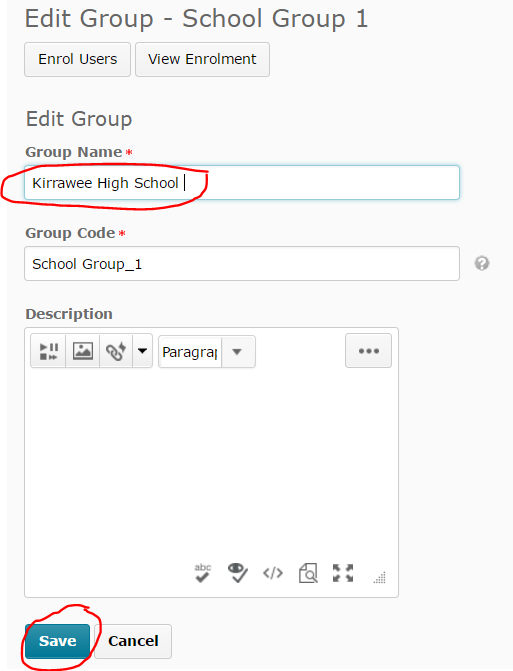
Alter the name of the Group by replacing the name in the Group Name field. If you are likely to download records of Group membership from MyLO, you may also wish to alter the text in the Group Code field. When you’re done, select the Save button.
Repeat Steps 2 and 3 for each Group that you wish to rename.
Record Student Engagement Activity results in the Grades tool
This post assumes that you already have two Grade Items set up in the MyLO Grades tool to record Student Engagement Activity results. If you do not have these Grade Items set up, you should contact your local support team. General information about Student Engagement Activity reporting requirements in available here.
We recommend having your MyLO unit open in two browser tabs. This way, you can view the data you need in one tab, and enter results into the Grades tool in the other tab.
Step 1:
Select the Grades tool from the MyLO toolbar.
Step 2:
Locate the Grade Item column where you will record the results for the Student Engagement Activity. The column header will most likely SEA in the name. In most cases, you will need to input a score of 1 (for ‘engaged’) or 0 (for ‘not engaged’). If unsure about the name of your Student Engagement Activity Grade Items, or the marking scheme to use, contact your local support team.
There are two ways in which you can record the results. Either:
- Switch to Spreadsheet View: input results directly into the ‘spreadsheet-like’ view of the Grades tool; or
- Grade All: focus on recording results in one Grade Item at a time. Using this method also allows you to add comments/feedback, if you need to.
Option 1: Switch to Spreadsheet View
If you cannot already see fields to enter data into, select the Switch to Spreadsheet View button that appears towards the top right of the spreadsheet.
You should now see fields that you can enter records into, for example 0 or 1. Remember to select the Save button (bottom of the screen) to save your work. Unfortunately, there is no way to tab between fields – you will have to click inside each field to enter a mark.
Option 2: Grade All
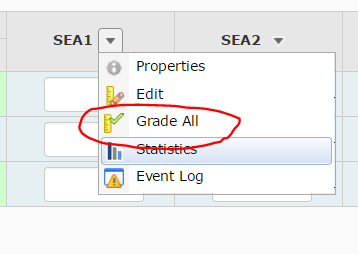
Select the black arrowhead to the right of the Grade Item, then select Grade All from the menu.
Scroll down until you see a table containing student names. Record grades for each student in the Grade column. You can add feedback/comments by clicking on the speech bubble symbol seen in the Feedback column. If feedback has already been recorded, the symbol will look slightly different. In the image below, Richard has received feedback and Melinda has no feedback.
Select the Save button (bottom of the screen) to save your work as you go. Select the Save and Close button to finish and return to the spreadsheet view of the Grades tool.
Useful tips and tricks
- Remember to select the Save button (bottom of the screen) regularly as there is no auto-save function in the Grades tool. If you are interrupted during marking, or you wish to take a break, press the Save button. That way, if your connection to MyLO times out due to inactivity, you won’t lose your work.
- You can filter your view so you only see students in a particular group, such as a study mode, tutorial group or unit group. This post will show you how.


