Category
MyLO Content
How to Create a Checklist
This document covers creation of a basic checklist.
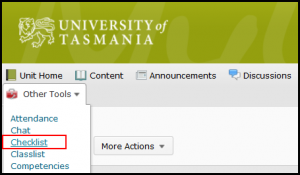
First go to ‘Other Tools’ and then click “Checklist” from the menu.
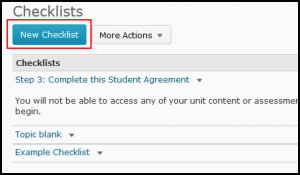
There may well be a checklist or two loaded into your unit. TSBE units will have the Step 3 agreement in the checklist items.
To create a new checklist click the “New Checklist” button at the top of the checklists page as shown below.
When you create a new checklist a window will load that asks you to type in a name and description.
When you type your name, as noted above, be sure to make it one that will make sense in the context of the content it is being created for. For example – if this is a checklist for your Week 1 Study Guide, then this is the name you would give it. Whatever you type into the Name field becomes the link that students see and click on to access the checklist.
Click ‘Save’.
When you first save your checklist new options appear as outlined above in red. This is also the screen you will see if you click on an existing checklist inside of the checklist tool. The example above hasn’t got any items or categories yet so let’s talk about what these are and how to add them.
Categories.
A category is simply a way to ‘group’ a list of items together visually. It adds a sub-heading to your checklist and is useful for breaking up content into logical chunks inside of a checklist. A category does not have an associated ‘checkbox’ and is only there for visual clarification. Your checklist does need to have at least 1 category, so to start with add a new category to your checklist.
To add a category just click the “New Category” button and fill in the name and description.
Remember to give your category a descriptive name, this text will be shown as a sub-heading inside of your checklist. When you click Save you will be taken back to the main Checklist page and you’ll see your category listed just under the buttons.
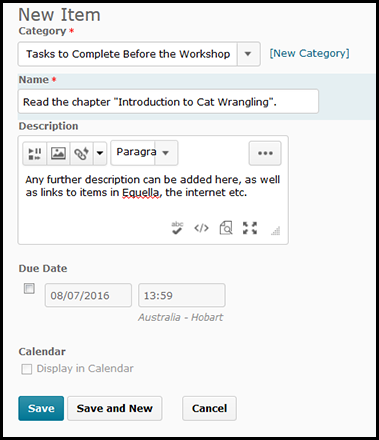
To add individual item to your checklist click the “New Item” button. It will load up a window similar to the one we just saw for a category with some extra options.

New Checklist Item page, again type a descriptive name and add some useful instruction in the ‘description’ field.
The first extra option to be aware of is the “Category” option. Make sure this item is in the correct category – choose from the dropbox at the top.
Give your item a descriptive name, this text will sit to the right of the checklist button that students click so make it an “actiony” name – ie something that they need to do that they can then check as “done”.
The Description field is optional but important too – here you can add instructions and even links, images, media and so forth. This is the standard “text editor” that appears elsewhere in MyLO too and there is a list of instructional videos that cover how to use this tool for structuring your text.
Optionally you can add a “due date” to your checklist item – it doesn’t “block” a student from doing it late but it will flag the ones that do. It may be a handy way to add important milestones into the calendar as you can add this item to the calendar if you give it a due date.
Click save when you are done, or save and new to add another Checklist Item.
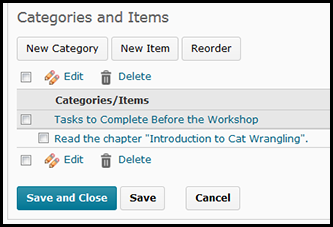
As you can see when the item is saved, it appears indented under the category it was linked to. Wrong category? Just click any item to re-open the ‘edit item’ screen to choose the correct category. You can also re-order categories with the “Reorder” button.
Below is a screenshot of a checklist that has a few categories and items in it:
Here’s a checklist that has many items in it, it’s not a perfect example it’s just for showing how it looks. The items that have a strange grey icon to the right are those that have a nominated ‘due date’ and the date is shown to the right. Any item can be edited by clicking on it.
To add this to your Learning Hub or other Content area you need to first save and close this checklist then navigate to your content area and choose “Existing Activity” then “Checklist”.
When you choose “Checklist” a list of the available checklists will appear, just click on one and it will be loaded to your content page.
From here you can further edit/refine your checklist – however there is an alternate set of instruction for this in another entry.
Four tips to improve your MyLO site this semester
Tell your students how to get started. |
||
| When students enter your MyLO unit, the latest Announcement is the first thing that they are likely to see. This Announcement should briefly explain how to get started. This post explains how to create a simple welcome Announcement based on a template. The template includes an image directing students to click on the Content tool to get started. | ||
Make your site reflect your unit. |
||
| Most MyLO sites are based on generic Faculty or School templates that often come with Modules in the Content tool. inside the Modules you will find a range of items such as HTML pages: you may need to replace some of the text in these items to reflect the details of your unit. Consult your local blended learning support team if you unsure what needs to be changed and/or how to make the changes. | ||
| If your unit is delivered to distance students, consider using short videos to address the students at the start or end of each week or module. Using videos not only allows your personality to shine through, but helps to grab students’ attention when so many other online learning experiences are text-based. If you’re interested in using videos in your unit, whether to welcome students or to give them a quick overview of each week, you may find this resource about creating videos helpful. | ||
Make it easy to find unit materials and activities. |
||
| Make it predictable – at least to some extent. | ||
| Using a Faculty or School template allows students to have a good idea of where to find information based on their past experiences, while still allowing you to customise your MyLO site. | ||
| Maintain a logical structure that suits your unit and your students. | ||
| Within Faculty or School templates, you will usually have some freedom to organise content and activities in the in a manner that suits your unit, for example by week or by module. We do not recommend organising resources by type, as students can quickly lose track of where they are up to. | ||
| Give links names that make sense. | ||
| When you upload a file, or create a new file or activity, in a Content Module, MyLO will generally use the title of the file as the title of the link. For example, if you upload the file LECT1_S1_2014_Slide.ppt, students will see a link that says LECT1_S1_2014_Slide. By renaming the link, you can easily communicate the following information: what students will see when they click on the link; what they should do with it; and, if necessary, the order in which they should open the links/complete activities. Peta shows you how to rename links and discusses different naming methods in this video. | ||
Out with the old, in with the new. |
||
If your MyLO unit has run in the past, it is possible to have the content copied over from the old unit to the new unit. While this can be convenient, it does come with a catch: almost everything is copied over, including old Announcements, Group names, date restrictions on items (e.g. due dates on Assignment Submission Folders) and so forth.
Here are some things to watch out for if you have content copied from an old unit to a new unit. You will need to edit, hide or remove these items. |
||
| Date-based restrictions | ||
| These are often applied to assessment items like Quizzes and Assignment Submission Folders, but may also apply to Content Modules, links (e.g. to PDF files) and activities like Discussions. | ||
| Old Announcements | ||
| If you wish to re-use old Announcements, you will need to change the Start Date associated with them. | ||
| Dates/week numbers referred to in link titles, HTML pages and so forth | ||
| These are often incorporated into the text of Announcements, HTML pages in Content or the names of links or the names of folders/modules in Content. You will need to edit or remove them. | ||
| Assignment Submission Folders & Turnitin | ||
| You will need to change the Due Date. You may need to edit them to account for changes to an assessment task (for example, the weighting or grade).Be aware that you should reconnect the Assignment Submission Folder to Turnitin. When you do this, you must ensure that the correct settings are in place. View this post for more information on Turnitin settings. | ||
| Grade Items | ||
| You may find that there are Grade Items that you no longer wish to use (e.g. because you have stopped using a particular assessment task), or that you need to revise due to a change in the weighting of an assessment task. Also check if there are any Grade Items you would like to hide for now (so students can’t see them). | ||
| Old exam or assignment tips, answers to assessment questions, marks or generic feedback | ||
| If results, answers to questions, generic feedback or assignment hints have been published in a News Item or in Content, you will need to either hide them for later use or delete them. | ||
| Groups | ||
| There may be Groups – other than cohort or study mode groups – that you no longer need, and you may wish to delete them. In some cases, you may wish to change the set-up of Groups (e.g. the number of students to be allocated to each group, or the number or groups in a particular category) due to student numbers. | ||
| Rubrics | ||
| Rubrics will be copied across. Are there any criteria you wish to change, or (if using scoring rubrics) do you need to change the value of any criteria and associated points? If so, this must be done before you start marking with the Rubrics. | ||
| Here are some items that will not copy across. These items may need to be set up again. | ||
| Discussion Posts | ||
| While Discussion Forums and Topics will copy over, the Posts contributed by staff and students in past units will not appear. Any groups attached to Discussion Topics will need to be reset. | ||
| Assignment Submission Folder submissions | ||
| Submissions from past students will no longer appear in the Assignment Submission Folders. | ||
| Grades | ||
| Grades of past students will no longer appear in the Grades tool. |


