Category
MyLO News
Help students find their way when they visit your MyLO site
Use our template to quickly and easily create an introductory Announcement, HTML page, or email (sent from MyLO). The template contains instructions, with matching images, to help students find the Content tool. You can edit the template to meet your needs.
To use the template, follow these steps:
1 – Use your mouse to select all the text, then copy all the text seen inside the box below.
<p>Hello and welcome to UNIT NAME!</p> <p>My name is YOUR NAME and I will be your Unit Coordinator and Lecturer for this semester.</p> <p>To get started, please click on the <em><strong>Content</strong></em> button. You will see it towards the top left of the screen. It looks like this:</p> <p><img src="http://blogs.utas.edu.au/teaching-at-tsbe/files/2015/01/Content-button.gif" alt="Image of the MyLO Content button" title="Image" /></p> <p>The <strong><em>Content </em></strong><em></em>button is the place to go to access information, content and activities for this unit.</p> <p>Next, click on the <em><strong>Begin Here</strong></em> link in the <em><strong>Table of Contents</strong></em> (as seen below). Finally, click on the <em><strong>STEP 1: View this Introduction</strong></em> link to begin (this will appear to the right of the screen).</p> <p><img src="http://blogs.utas.edu.au/teaching-at-tsbe/files/2015/01/Table-of-Contents-and-Begin-Here-module.gif" alt="Image of the MyLO Table of Contents and Begin Here folder" title="Image of the MyLO Table of Contents and Begin Here folder" /></p> <p>I’m looking forward to meeting each of you, either in person or online.</p> <p>Kind regards,</p> <p>YOUR NAME.</p>
2 – In your MyLO unit, create a new Announcement, HTML page, email or a Checklist task. The example seen below is a new Announcement. Give the new item a title/headline, then move on to the next field (where you put the bulk of your message/content). By default, the WYSIWYG editor will open. Click on the source code symbol, seen at the bottom right of the WYSIWYG editor. It looks like this </>![]()
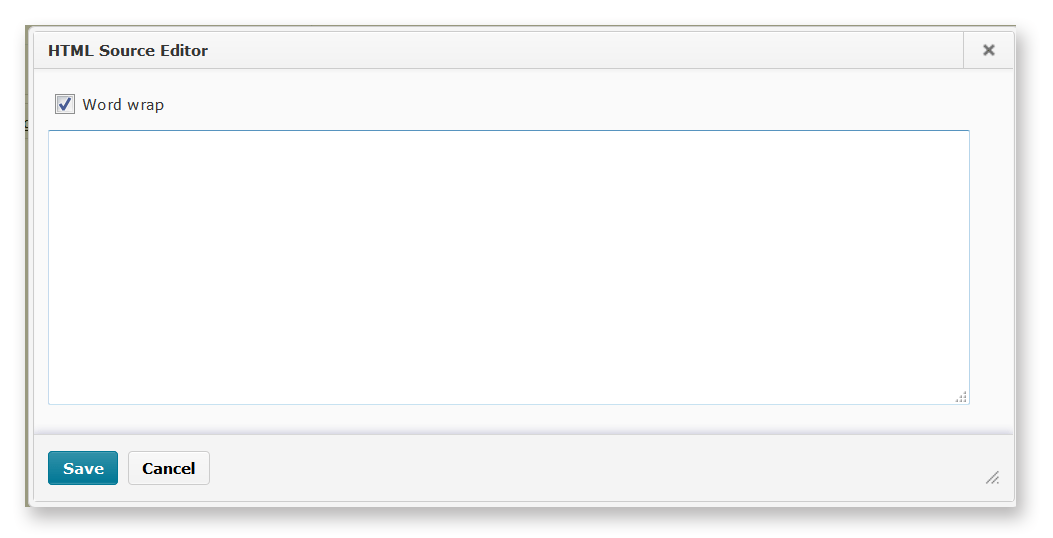
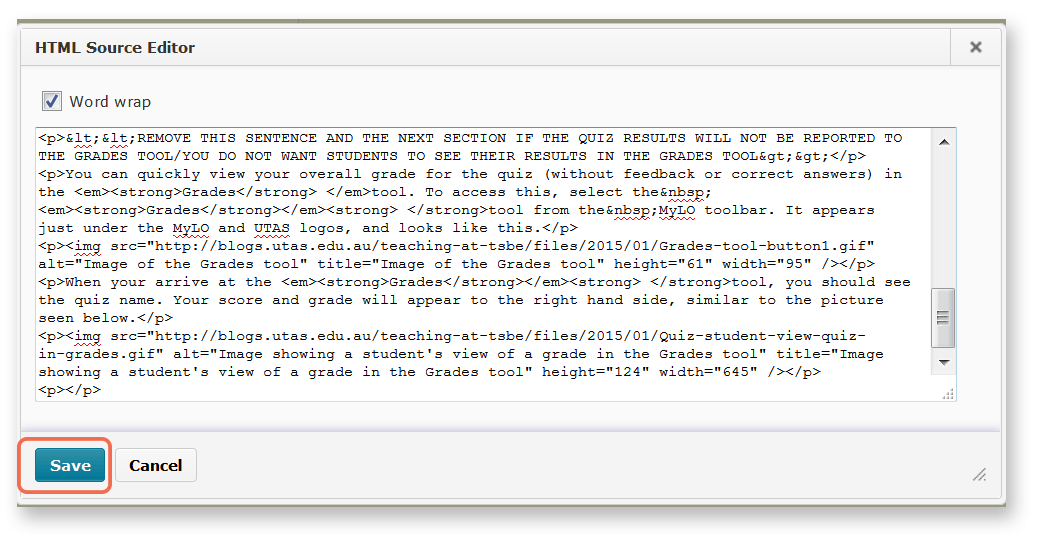
3 – A pop-up window will open. Place your cursor into the blank field, then paste in the code you copied earlier. The code will appear in the field. Click the Save button.
4 – The window will close. You will now notice that the text and image from the template appears in the WYSIWYG view. You can edit it as you would a Word document, by adding or removing text. We have indicated sections that you may want to edit or remove using brackets <<like this>>. Remember to press Publish or Save (this will depend on which tool you are using) to save your changes.
Using MyLO Notifications to keep track of Announcements in your units
Lecturers and tutors often use the MyLO Announcements feature to share important news and information about units. Using MyLO’s Notifications you can keep track of new Announcements via email alerts. Here’s how.
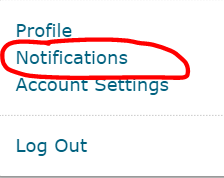
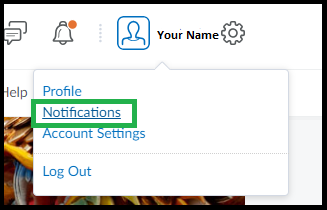
Log in to MyLO. Locate your name at the top right corner of the MyLO screen. Click on your name and select Notifications from the menu.
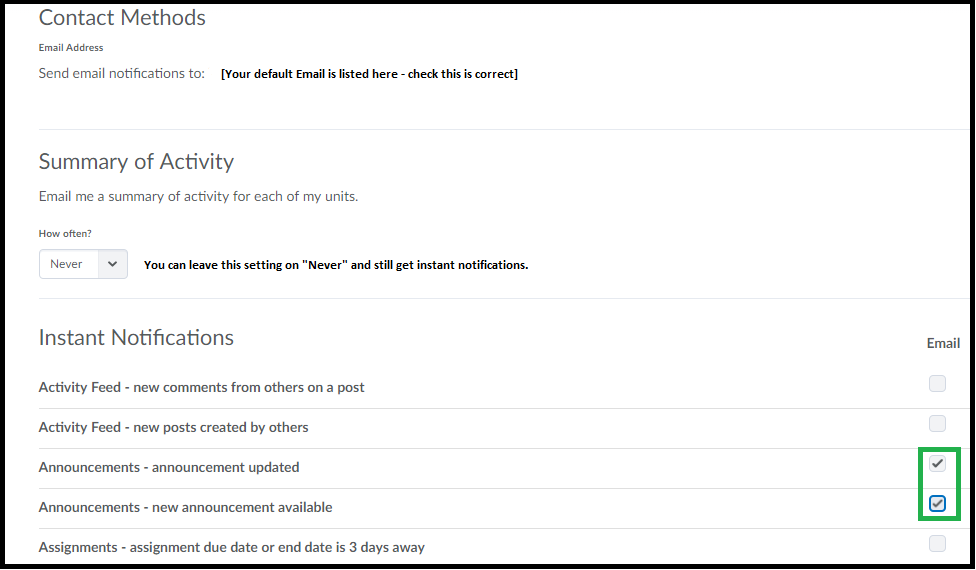
The Notifications screen will open. Scroll down until you see the Instant Notifications section. Check the Announcements – new announcement available option.
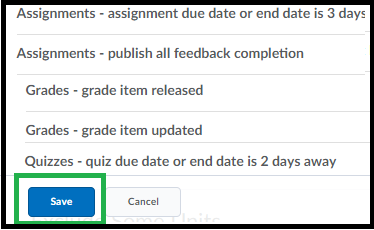
Scroll down and click on the Save button.
General principles to apply when responding to students online
Respond within a reasonable time-frame.
Respond to questions (in the Ask the Class Discussion) within two (2) business days and apply the same response time to emails. This avoids students defaulting to email thinking that they will get a faster response. Avoid responding immediately, as this feeds the assumption that you are always available. Only respond immediately if the request is urgent (e.g. a student has reported that a Quiz does not appear on MyLO.
Discussion activities for learning require less direct facilitator intervention. These activities usually proceed over a one to two week period. Check in and encourage, correct or re-direct if needed, ideally just before the midpoint of the activity (day 2/3/7), and again just before the end point of the activity (day 5/6/12).
Unless you have a small cohort, it is impossible to respond to every post.
Focus on answering each Q&A style question. Use techniques like weaving and summarising to give the impression of instructor presence in discussion activities for learning.
Include a salutation, preferably addressing the student, or students, directly.
Examples:
- Dear students,…
- Hello everyone,…
- Dear Peta,…
- Hello Peta,…
- Hello a{FirstName}/b{InitiatingUserFirstName} [This can be used to personalise a aMyLO Announcement or bIntelligent Agent email, as it pulls the user’s first name into the message according to their user details]
Thank the class/individuals for their question or comments.
Thank students by drawing attention to what they have done well, and illustrating this with some important or useful contributions. This will help them recognise that they are ‘on the right track’. Thanking an angry student will help reduce anger levels, as you are responding in a civil and polite manner.
Examples:
- Thank you for your question about…
- Thank you for sharing your concerns about…
- Thank you for alerting me to…
- Thank you for your comment/suggestion about…
- I wanted to extend a big thank you to Peta, who alerted me to a problem with…
- Thank you to Peta for her question about…
- It was great to see you all sharing your ideas. I particularly appreciated Peta’s comment about…
Add a touch of personality (warmth) from time to time.
This helps distance students feel more connected with you, and helps engender a sense of belonging to the class. A short sentence is inviting, but not too distracting from the task at hand.
Examples:
- I hope it is warmer where you are today. In Hobart we’re only expecting to reach a 6 degree maximum!
- Did you watch last night’s episode of Q&A? Some of the questions were directly related to the questions raised in last week’s module. It was really interesting.
Acknowledge errors or problems and apologise for them, even if it isn’t your fault.
Students want acknowledgement that there is a problem and that there may be a solution. While it is fine to tell them what went wrong, avoid lengthy descriptions, laying blame, or the use of emotive language.
Examples:
- You’re absolutely right – the Assessments in the Unit Outline currently add up to 80% and this is an error. I have now uploaded the correct version of the Unit Outline which you will find here. Apologies for the confusion.
- Thank you for spotting that typo for me. I must have looked at that page twenty times and not noticed the mistake! I have now corrected the page according to your suggestions.
- I’m sorry to hear that you had difficulty getting access to last night’s online tutorial. I have now added some additional help materials here, which may be useful. Also, I recommend that you…
- Unfortunately, MyLO was down for unforseen emergency maintenance last night, which is why you couldn’t access the lecture recording at that time. As I use MyLO to email students, I wasn’t able to email you all to let you know about the downtime. Please accept my apologies for the inconvenience. The system is back up now, and I have checked that the lecture recording is definitely available.
Provide hyperlinks to resources where possible.
This encourages students to act on your messages immediately and avoids the use of lengthy explanations. To learn how to add a hyperlink to a Announcement, Discussion post or MyLO email, click here.
Examples:
- To access the Unit Outline, click here.
- You’ll find more information about the process here: link goes here.
Summarise the most important message/s in the first few paragraphs.
The first few paragraphs tend to get the most attention from a reader. Supplementary information can be included in later paragraphs.
Use full sentences and an informal tone.
Model the kind of language that you want students to use. A very formal tone can be intimidating, while he use of slang and contractions can be confusing for students with English as a second language.
Use videos to keep your messages short and interesting.
Using MyLO’s Video Note feature you can easily record a video of up to 3 minutes duration straight into a Discussion post or News Item. For instructions, click here. Alternatively, you could link to a recording you have created with Echo 360 Personal Capture.
Create an FAQ resource to save time during future iterations.
Add common questions and your answers to a Word Document throughout the semester (avoiding references to specific dates, weeks or semesters). Next time you run the unit, upload the document (as a PDF) to your MyLO site, so you can direct students to it, or copy or paste from it to increase the speed of your responses.
Avoid correcting a student’s poor behaviour/breaches of etiquette publicly.
Copy the offending post to a ‘quarantine’ discussion (available to staff only) so that you have a record of it, then email the student to explain what has happened to their post, why you have quarantined it, and how they could post more appropriately in future.
Finish with an informal salutation.
Sign off with something like “Cheers”, “Thanks again”, “Talk soon”, “Kind regards”, “Looking forward to hearing from you”, or “See you soon”.
Help students locate Assignment Submission Folder results and feedback
Would you like your students to access grades and feedback in a Assignment Submission Folder, as well as feedback you have marked up on their submission using Grademark/Feedback Studio? Make sure your students know where to look to get the information they need!
Use our template to quickly and easily create an Announcement, an HTML page, an email (sent from MyLO) or a Checklist. The template contains instructions, with matching images, to help students find their results. You can edit the template to meet your needs.
To use the template, follow these steps:
1 – Use your mouse to select all the text, then copy all the text seen inside the box below.
<p>Dear {firstname},</p>
<p>I am writing to let you know that the results of <<INSERT ASSIGNMENT NAME HERE>> are now available. </p>
<p>Follow the instructions below to access your results and feedback.</p>
<p>To check your results, select the <b><em>Assessments</em>, then <em>Assignments</em></b> from the MyLO toolbar. </p>
<p>You will see a table listing all the <em><strong>Assignment Submission Folders</strong></em> available in the unit (similar to the table seen below). Find the relevant <em><strong>Submission Folder</strong> </em>(the name appears in the far left column). Your score will appear in the <em><strong>Score</strong> </em>column (second column from the left). The <em><strong>Feedback</strong></em><strong> </strong>column (2nd from the right) contains a <em><strong>View</strong></em><strong> </strong>link. Click on the <strong><em>View</em> </strong>link.</p>
<p><img src="http://blogs.utas.edu.au/teaching-at-tsbe/files/2015/01/Assignment-Submission-Folder-student-view-with-View-link-to-feedback.png" alt="Image showing an Assignment Submission and the View icon that can be clicked to view feedback" title="Image showing an Assignment Submission and the View icon that can be clicked to view feedback" width="603" height="74" border="2px" /><br /><br />You will then see a page that includes <<a marked-up rubric that shows the level you attained for each criteria followed by>> some general feedback and your grade. <<I have also provided you with additional feedback using the <em><strong>Grademark</strong></em> tool. I have used this tool to add comments to the document that you have submitted. You can access this feedback by clicking on the small document icon that appears in the <em><strong>Grademark</strong></em><strong> </strong>column. It should look similar to the example shown in the image below.</p>
<p><img src="http://blogs.utas.edu.au/teaching-at-tsbe/files/2015/01/Dropbox-View-Feedback-Grademark.gif" alt="Image showing where to click to access Grademark feedback" title="Image showing where to click to access Grademark feedback" height="184" width="615" border="2px" /></p>
<p>Note that, when Grademark (also known as Feedback Studio) opens, you'll see blue icons with a speech bubble inside them, like this.</p>
<p><img src="http://blogs.utas.edu.au/teaching-at-tsbe/files/2015/01/Comment-icon.png" alt="Bubble Comment in Grademark/Feedback Studio" title="Bubble Comment in Grademark/Feedback Studio" width="71" height="62" border="2px" /></p>
<p>Click on the icons to see the comments made on your work. Alternatively, you can choose to download your work and feedback as a PDF, which you can print out if you wish to. The full comments are shown in order at the end of the PDF. The way you do this will depend on whether the new (Feedback Studio) or 'classic' view of Grademark opens for you. </p>
<p>Look for either a download icon towards the right of the screen, like this<br /><br /><img src="http://blogs.utas.edu.au/teaching-at-tsbe/files/2015/01/Download-option.png" alt="Download link in Feedback Studio" title="Download link in Feedback Studio" border="2px" /></p>
<p>or a Print icon towards the bottom left of the screen, like this.</p>
<p><img src="http://blogs.utas.edu.au/teaching-at-tsbe/files/2015/01/Grademark-Classic-Print-icon.png" alt="Print icon in Grademark Classic" title="Print icon in Grademark Classic" border="2px" /></p>
<p>Choose one of the following options to download and/or print your feedback: <em>Current View; </em>or <em>Download PDF of current view for printing.>></em></p>
<p>Should you have any questions about the grade or feedback that I have provided you with, please don't hesitate to contact me.</p>
<p></p>
2 – In your MyLO unit, create a new Announcement, HTML page, email or a Checklist task. The example seen below is a new Announcement. Give the new item a title/headline, then move on to the next field (where you put the bulk of your message/content). By default, the WYSIWYG editor will open. Click on the source code symbol, seen at the bottom right of the WYSIWYG editor. It looks like this </>![]()
3 – A pop-up window will open. Place your cursor into the blank field, then paste in the code you copied earlier. The code will appear in the field. Click the Save button.

4 – The window will close. You will now notice that the template appears in the WYSIWYG view. You can edit it as you would a Word document, by adding or removing text. We have indicated sections that you may want to edit or remove using brackets <<like this>>. Remember to press Publish or Save (this will depend on which tool you are using) to save your changes.
Help students locate Quiz results and feedback
Would you like your students to see the results of a Quiz that you have published? Make sure your students know where to look to get the information they need.
Use our template to quickly and easily create a News item, an HTML page, an email (sent from MyLO) or a Checklist item. The template contains instructions, with matching images, to help students find their results. You can see what it looks like by downloading this PDF. And yes – you can edit it to meet your needs.
To use the template, follow these steps:
1 – Use your mouse to highlight all the text in the box below.
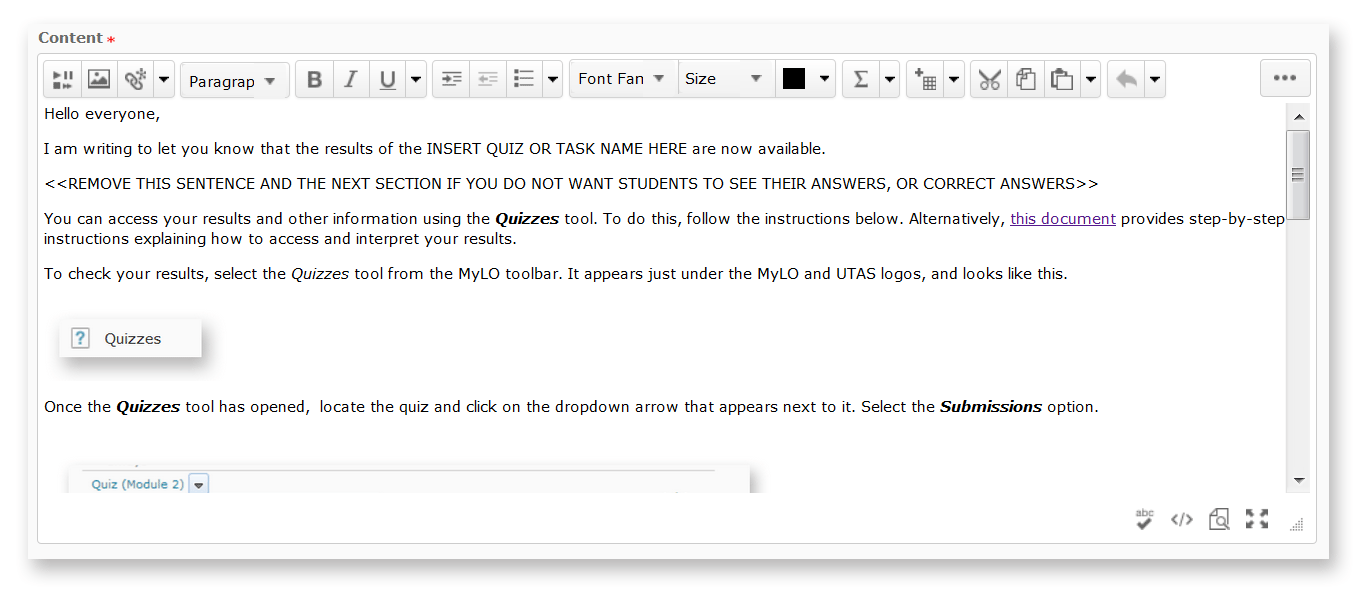
<p>Hello everyone,</p> <p>I am writing to let you know that the results of the INSERT QUIZ OR TASK NAME HERE are now available.</p> <p><<REMOVE THIS SENTENCE AND THE NEXT SECTION IF YOU DO NOT WANT STUDENTS TO SEE THEIR ANSWERS, OR CORRECT ANSWERS>></p> <p>You can access your results and other information using the <em><strong>Quizzes</strong></em> tool. To do this, follow the instructions below. Alternatively, <a rel="noopener" href="https://mylo.utas.edu.au/d2l/lor/viewer/view.d2l?ou=6607&loIdentId=63929" target="_blank">this document</a> provides step-by-step instructions explaining how to access and interpret your results.</p> <p>To check your results, select <em>Assessments</em> then <em>Quizzes</em> from the MyLO toolbar. It appears just under the MyLO and UTAS logos</p> <p>Once the <em><strong>Quizzes</strong></em> tool has opened, locate the quiz and click on the dropdown arrow that appears next to it. Select the <em><strong>Submissions</strong></em><strong> </strong>option. <br /><br /><img src="http://blogs.utas.edu.au/teaching-at-tsbe/files/2015/01/Quiz-student-access-quiz-for-marks.gif" alt="Locating a quiz and selecting Submissions option" title="Locating a quiz and selecting Submissions option" height="116" width="537" /><br />You will see the number of attempts you have completed, along with your score for the quiz to the right. To see <<REMOVE ANY OPTIONS THAT DO NOT APPLY>> your answers and the correct answers, click on the attempt number (this will generally be<em> Attempt 1</em>).<br /><br /><img src="http://blogs.utas.edu.au/teaching-at-tsbe/files/2015/01/Quiz-student-access-quiz-for-marks-attempt-link.gif" alt="Image showing how to access answers, correct answers and so forth by clicking on the Attempt link" title="Image showing how to access answers, correct answers and so forth by clicking on the Attempt link" height="149" width="543" /></p> <p></p>
2 – Once all the text has been selected, right-click (CTRL + mouse click on a Mac) and select the Copy option or press CTRL and C on your keyboard (Command + C on a Mac). This will copy the code onto your computer’s temporary memory.
3 – Create a new Announcement, an HTML page, an email (sent from MyLO) or a Checklist item. The example seen below is a new Announcement. Give the new item a title/headline, then move on to the next field (where you put the bulk of your message/content). By default, the WYSIWYG (What You See Is What You Get) editor will open. Click on the HTML Code symbol, seen at the bottom right of the WYSIWYG editor. It looks like this </>
4 – A pop-up window will open.
5 – Right-click (CTRL + click on a Mac) over the empty field and select Paste, or click your mouse on the empty field and press CTRL and V (Command + V on a Mac) your keyboard. The code will appear in the field. Click the Save button.
6 – The window will close. You will now notice that the template appears in the WYSIWYG view. You can edit it as you would a Word document, by adding or removing text. We have indicated sections that you may want to edit or remove using upper case text <<LIKE THIS>>. Remember to press Publish or Save (this will depend on which tool you are using) to save your changes.
Four tips to improve your MyLO site this semester
Tell your students how to get started. |
||
| When students enter your MyLO unit, the latest Announcement is the first thing that they are likely to see. This Announcement should briefly explain how to get started. This post explains how to create a simple welcome Announcement based on a template. The template includes an image directing students to click on the Content tool to get started. | ||
Make your site reflect your unit. |
||
| Most MyLO sites are based on generic Faculty or School templates that often come with Modules in the Content tool. inside the Modules you will find a range of items such as HTML pages: you may need to replace some of the text in these items to reflect the details of your unit. Consult your local blended learning support team if you unsure what needs to be changed and/or how to make the changes. | ||
| If your unit is delivered to distance students, consider using short videos to address the students at the start or end of each week or module. Using videos not only allows your personality to shine through, but helps to grab students’ attention when so many other online learning experiences are text-based. If you’re interested in using videos in your unit, whether to welcome students or to give them a quick overview of each week, you may find this resource about creating videos helpful. | ||
Make it easy to find unit materials and activities. |
||
| Make it predictable – at least to some extent. | ||
| Using a Faculty or School template allows students to have a good idea of where to find information based on their past experiences, while still allowing you to customise your MyLO site. | ||
| Maintain a logical structure that suits your unit and your students. | ||
| Within Faculty or School templates, you will usually have some freedom to organise content and activities in the in a manner that suits your unit, for example by week or by module. We do not recommend organising resources by type, as students can quickly lose track of where they are up to. | ||
| Give links names that make sense. | ||
| When you upload a file, or create a new file or activity, in a Content Module, MyLO will generally use the title of the file as the title of the link. For example, if you upload the file LECT1_S1_2014_Slide.ppt, students will see a link that says LECT1_S1_2014_Slide. By renaming the link, you can easily communicate the following information: what students will see when they click on the link; what they should do with it; and, if necessary, the order in which they should open the links/complete activities. Peta shows you how to rename links and discusses different naming methods in this video. | ||
Out with the old, in with the new. |
||
If your MyLO unit has run in the past, it is possible to have the content copied over from the old unit to the new unit. While this can be convenient, it does come with a catch: almost everything is copied over, including old Announcements, Group names, date restrictions on items (e.g. due dates on Assignment Submission Folders) and so forth.
Here are some things to watch out for if you have content copied from an old unit to a new unit. You will need to edit, hide or remove these items. |
||
| Date-based restrictions | ||
| These are often applied to assessment items like Quizzes and Assignment Submission Folders, but may also apply to Content Modules, links (e.g. to PDF files) and activities like Discussions. | ||
| Old Announcements | ||
| If you wish to re-use old Announcements, you will need to change the Start Date associated with them. | ||
| Dates/week numbers referred to in link titles, HTML pages and so forth | ||
| These are often incorporated into the text of Announcements, HTML pages in Content or the names of links or the names of folders/modules in Content. You will need to edit or remove them. | ||
| Assignment Submission Folders & Turnitin | ||
| You will need to change the Due Date. You may need to edit them to account for changes to an assessment task (for example, the weighting or grade).Be aware that you should reconnect the Assignment Submission Folder to Turnitin. When you do this, you must ensure that the correct settings are in place. View this post for more information on Turnitin settings. | ||
| Grade Items | ||
| You may find that there are Grade Items that you no longer wish to use (e.g. because you have stopped using a particular assessment task), or that you need to revise due to a change in the weighting of an assessment task. Also check if there are any Grade Items you would like to hide for now (so students can’t see them). | ||
| Old exam or assignment tips, answers to assessment questions, marks or generic feedback | ||
| If results, answers to questions, generic feedback or assignment hints have been published in a News Item or in Content, you will need to either hide them for later use or delete them. | ||
| Groups | ||
| There may be Groups – other than cohort or study mode groups – that you no longer need, and you may wish to delete them. In some cases, you may wish to change the set-up of Groups (e.g. the number of students to be allocated to each group, or the number or groups in a particular category) due to student numbers. | ||
| Rubrics | ||
| Rubrics will be copied across. Are there any criteria you wish to change, or (if using scoring rubrics) do you need to change the value of any criteria and associated points? If so, this must be done before you start marking with the Rubrics. | ||
| Here are some items that will not copy across. These items may need to be set up again. | ||
| Discussion Posts | ||
| While Discussion Forums and Topics will copy over, the Posts contributed by staff and students in past units will not appear. Any groups attached to Discussion Topics will need to be reset. | ||
| Assignment Submission Folder submissions | ||
| Submissions from past students will no longer appear in the Assignment Submission Folders. | ||
| Grades | ||
| Grades of past students will no longer appear in the Grades tool. |
Tool Overview: Announcements
What does it do?
Announcements appear on the Home page of each unit and can also be accessed via the Announcements tool. Using Announcements you can communicate important messages to students. Announcements can contain formatted text, images, links and embedded video (e.g. YouTube videos). You can plan in advance by setting a release date for an Announcement. You can also control who an Announcement is released to based on Group membership. Students cannot reply to, comment on or create Announcements.
How should I use Announcements?
- For communication from staff to all (or large groups of) students.
- To welcome students to a unit (as an Announcement is the first thing they’ll see in a unit).
- To forefront or summarise the major theme and/or activities of the week.
- To communicate important or urgent messages that need high visibility.
TIP: Avoid using Announcements more than twice a week to avoid information overload.
Tool capabilities
| Assessable? | |
|
| Turnitin? | |
|
| Peer review? | |
|
| Grademark? | |
|
| Rubric? | |
|
| Sychronous? | |
|
| Asynchronous? | |
|
| ITS Supported? | |
|
| Can student contributions be quarantined? | |
|
| Can versions of student contributions be reviewed? | |
Helpful resources and instructions
How to set up your MyLO News Notifications
To set up notifications of new announcements in your unit follow the steps below.
1. Locate your profile icon at the top-right of the page and click on it.

2. A small menu should show, click ‘Notifications’.
3. From the page that loads you can check the email address that notifications will be sent to. You can choose how often you’d like to be notified of general activity (this is a summary of activity you can choose ‘daily’ or ‘never’). To have Instant notification of announcements ensure the options for announcements are checked (shown below).
While you are on this page you can choose to be notified of other options as well – when you are done making selections click “Save” at the bottom of the screen to finish.
Help students master disciplinary vocabulary
A lack of disciplinary vocabulary can be a significant set-back for students as they listen to lectures, complete readings and construct assessment tasks. Here are some activities that could help students become familiar with the language of your discipline.
OPTION 1: Pop quiz
- Get students to complete a MyLO Quiz at the end of a recorded lecture or reading activity. Include automated feedback. While a quiz must be associated with a score, the score itself does not have to be recorded as a Grade Item, meaning that these sorts of tasks can be used for formative feedback.
- Quickly and easily create vocabulary lessons with Quizlet. It allows students to learn vocabulary in a variety of ways, including electronic flip cards, drag and drop matching games and more. You will need to provide students with a link to the Quizlet quiz.
OPTION 2: Flip cards, fill-in-the-blanks, crosswords and more
H5P is an opensource interactivity development tool. You can sign up for free and create a range of interactive activities, including dialog cards, drag-the-words, fill-in-the-blanks, mark-the-words and memory activities. Once you have created an activity, you can link to it or embed it within a MyLO HTML Page. Note that the results WILL NOT be recorded in MyLO Grades, nor will a record of completion. See the example below.
Hot Potatoes, developed by the University of Victoria (Canada) Humanities, Computing and Media Centre, is a free application that generates crosswords (see image on right), quizzes, cloze passages and more. Packages created with Hot Potatoes can be uploaded to MyLO for completion by students. The graphics are a little dated, but it still functions OK in Google Chrome browser. May not work on mobile devices. Note that the results WILL NOT be recorded in MyLO Grades, nor will a record of completion.
OPTION 3: Word of the week
Include a Word of the week in your weekly introduction (video or presentation), perhaps in an Announcement on MyLO.
OPTION 4: Glossary
You can create a glossary of discipline specific terms. Though MyLO has a Glassary tool, we do not feel that it contains sufficient functionality. Instead, we recommend creating an HTML page with a list of Glossary terms. You don’t have to make up all the definitions yourself. Instead, provide links to definitions on the web.
For more information about these options, contact your local blended learning/online learning team.
Help students keep track of Announcements
Do you use the Announcements tool to communicate with students on MyLO?
Here are two things you can do to help students keep track of the important announcements you add to the Announcements tool.
Tell students about the Announcements button
Students can now access Announcements from just about anywhere in a MyLO unit by clicking on the Communication menu option, then the Announcements option. It appears towards the top of the MyLO window.
Tell students to set up Notifications for Announcements.
Students can alter their Notifications settings in MyLO so that they receive email notifications whenever Announcements are added or updated. We have prepared some instructions explaining how students can do this. You can share these instructions by providing this link to your students: You can share these instructions with your students to help them complete this task.
If you would like to know how to set up Announcements on your MyLO site, you will find this information helpful.

