Category
Resources for students
Use Echo360 to convert/edit/compress video
Echo360 is used at UTAS to host video recorded in class but can also be used by staff/students to upload their own video. The video can then be edited (very basic editing, you can’t add captions or combine multiple video). Once upload all video is ‘processed’ by the system to compress file size & convert to MP4 format so you can also use the site to convert other formats to one standard format (mp4) & compress large video.
Whatever you do – DON’T leave it until the last minute to run video through the site – it can take HOURS to process!
You can upload the following formats to Echo360:
AVI, FLV, M4V, MP4, MOV, WMV, MP3 & WMA
(though depending on the codecs the video might not be compatible, if you’re not sure try it anyway).
Upload:
1. Go to Echo360, the easiest way is to find a unit that has a link to some recordings, this link will also log you in or head to https://echo360.org.au/ If it asks for username/password use the same ones you use for MyLO.
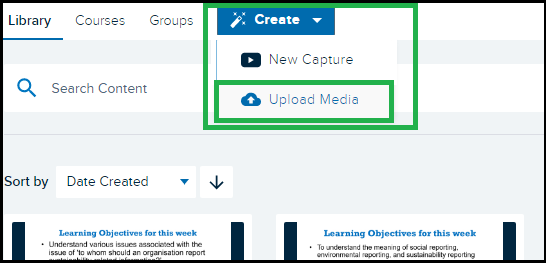
2. Click the ‘Create’ button top left.
3. Click ‘Upload Media’
4. A window will load that you can drag & drop a file into (or click on the icon in the middle of the window to select a file manually).
The file will be loaded to the area in “Library” – you can see a link on the top of the Echo360 page.
The video will process for a while. Depending on how long the video is & how busy the site is the processing time can be quite long, upwards of an hour or more. Once the video is finished processing you can then download or edit. To view the video just click on the video thumbnail in the ‘My Content’ area & use the play controls on the preview screen to play.
Edit:
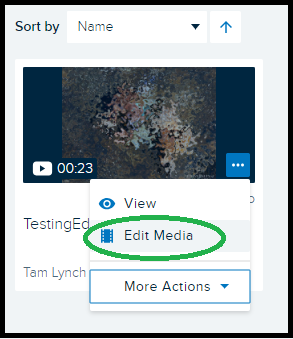
When viewing your video in ‘Thumbnail’ view (the default) you will see a small menu when your cursor is over the thumbnail.
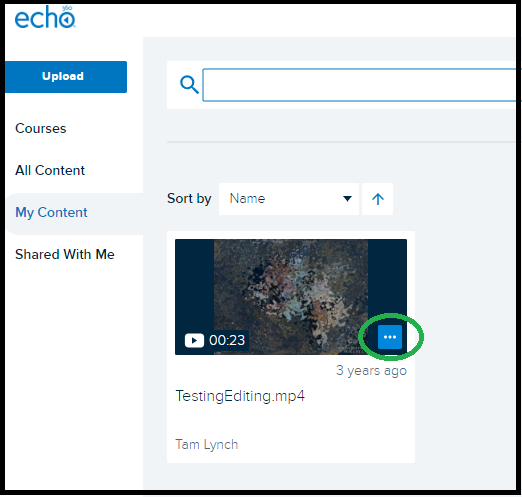
When you click this menu icon you can choose ‘Edit Media’ to edit the video.
The editor has changed recently, for now follow the instruction: https://learn.echo360.com/hc/en-us/articles/360035035812-Editing-Videos
Download:
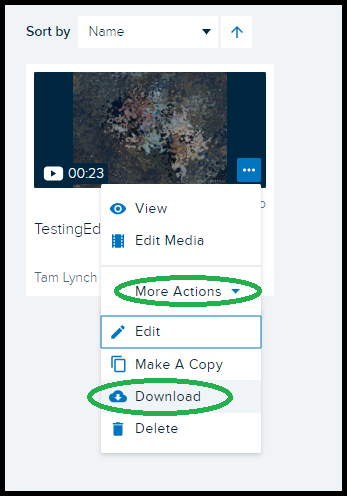
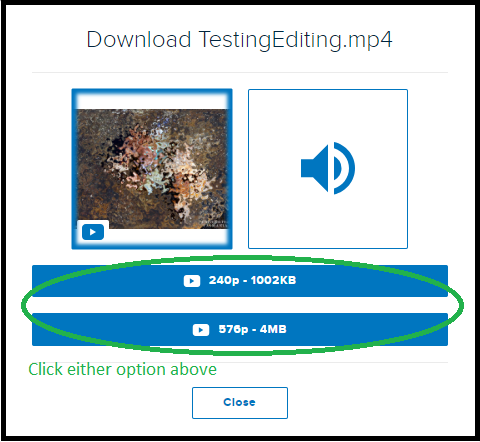
To download the processed file – choose ‘More Actions’ then ‘Download’. You can choose from a smaller or slightly larger file size once you click either it will download to your browsers default download folder (or you will be prompted to save – depending on your browser).
Don’t forget to give this video a watch to ensure the processing was successful & everything looks as it should.
Save Powerpoint Presentation as Video
It is possible to save out a video from a Powerpoint Presentation directly from within Powerpoint.
Before you do – here are some key things to check. It is always a good idea to play back the presentation by going to the Slide Show tab & then click Play, Start Presentation, or From Beginning (depending on your version). Check for any instances where mouse clicks are required – these will need to be changed to automatic.
1. Check that your slide progression is set correctly. The video will convert using whatever slide timings & animations currently set. To check and/or edit your slide timing – go to the Transitions tab & for each slide check the top-right part of the window to check that each slide is set to ‘automatic’ & that a suitable time is entered.
2. Check that any video & audio located on your slides are set to play automatically (or that the timing of their start time is set correctly). To do so click on the object & then view the ‘animations’ tab. The settings of the object is shown on the top-right.
3. Animations that require a mouse-click can also be changed to be timed/automatic using the ‘Animations’ tab. Click the ‘Animations Panel’ button on the Animations tab toolbar to show the side-panel containing a list of all timed objects for that slide. It will help you to locate & correct objects that need to happen at certain times (ie, if you want something to appear halfway through a narration – you can set the object to appear at a specific time using this panel).
4. Save the presentation as a powerpoint file (cntrl-s or File – Save) before you save out as a video – saving as a video will take a long time & you don’t want a sudden powercut or crash to wipe your hard work!
To save out a video version:
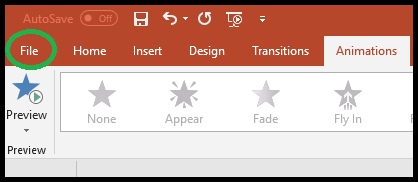
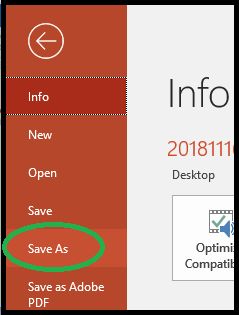
Go to the ‘File’ tab and click the ‘Save As’ option on the left-side of the window.
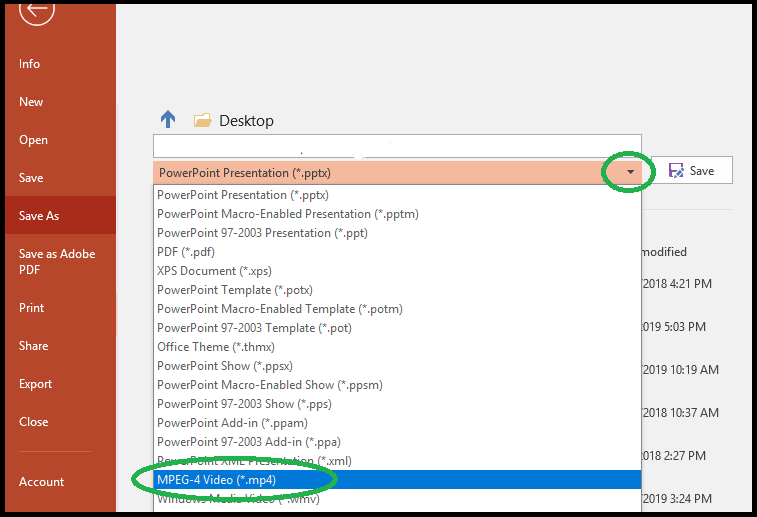
When you see the save options go to the file type dropdown menu & choose MPEG-4 or MP4 as the type.
Give the file a name & location then click ‘Save’.
It will take a long time to save – even for a short presentation. You may see a progress bar along the bottom of the screen. DON’T quit the program until you see the progress bar finish.
If there is any problem with the video you will see a popup notification to let you know, on success it will just finalise on its own without letting you know it was successful.
Remember – always watch the video it produces as there may still be residual issues with the timings/media objects. This MP4 can then be used in other editing software or uploaded to video sharing sites (it will also load fine into Echo360 or MyLO as is).
Live Lectures – How to Access and Participate!
If your lecturer has set up the lectures or workshops for ‘Live Streaming’ this means you may be able to access and watch the lecture/workshop live as it is presented, potentially able to also ask questions that the lecturer will see or participate in some of the activities if any are made available. Students can access the live stream from a desktop computer but there is currently only limited access from mobile devices (some further instruction below).
Accessing Live Lecture Streams
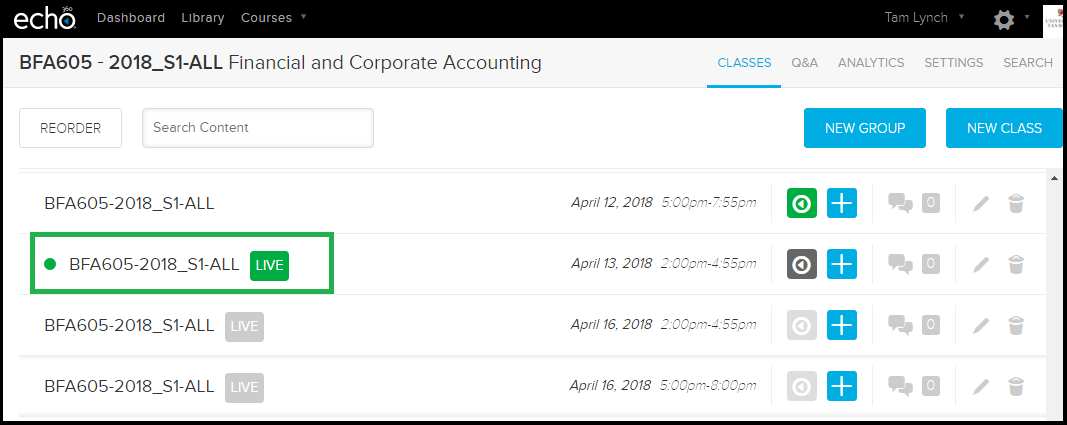
To access the Live Stream you will need to click on the link provided by your lecturer in MyLO -OR- go to the Echo360.org.au link and find your class. You will see an icon for [Live] next to any presentation that is to be made live. If you click on the link before it has started it will show a countdown until the live feed starts.
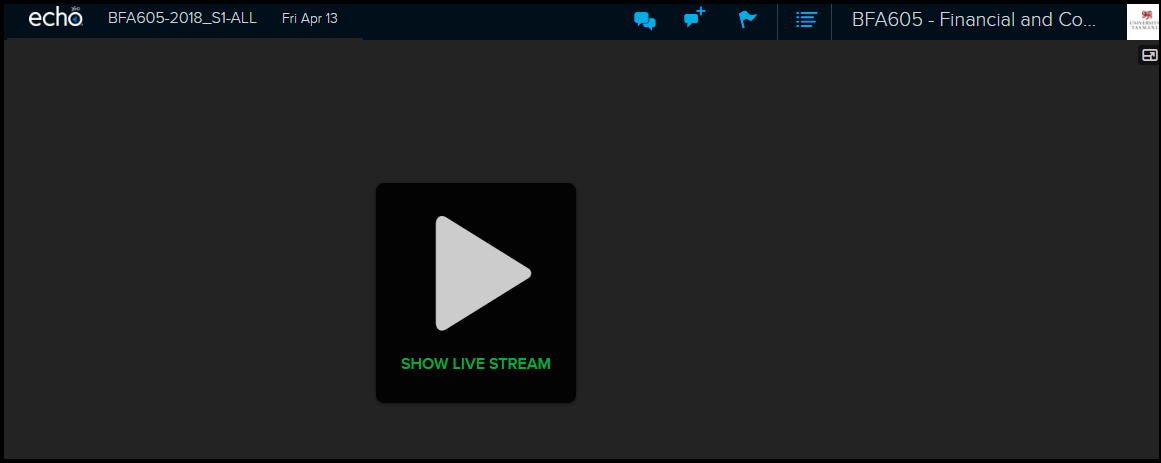
Once the start time has been reached, click “Show Live Stream” to start the live feed. Note it can take some time to start once you have clicked this button, depending on your internet connection speed and computer.
For the purposes of this help document you should know the difference between the Live Feed and the Presentation Slides.
Live Feed – This is a VIDEO delivered/streamed to your computer/device as it is being delivered in the classroom. It appears in a window area to the left of the Echo360 area when you click ‘Start Live Stream’.
Presentation Slides – If slides and/or activities are loaded to this class they will be available also – however they do not contain any audio (you need to start the video/live stream for audio) and will not follow along with the lecturer, you’ll need to navigate to the correct slides for any activity participation yourself. The slides will appear in a window to the left when you click the thumbnail for the presentation.
Participation in Chat/Questions
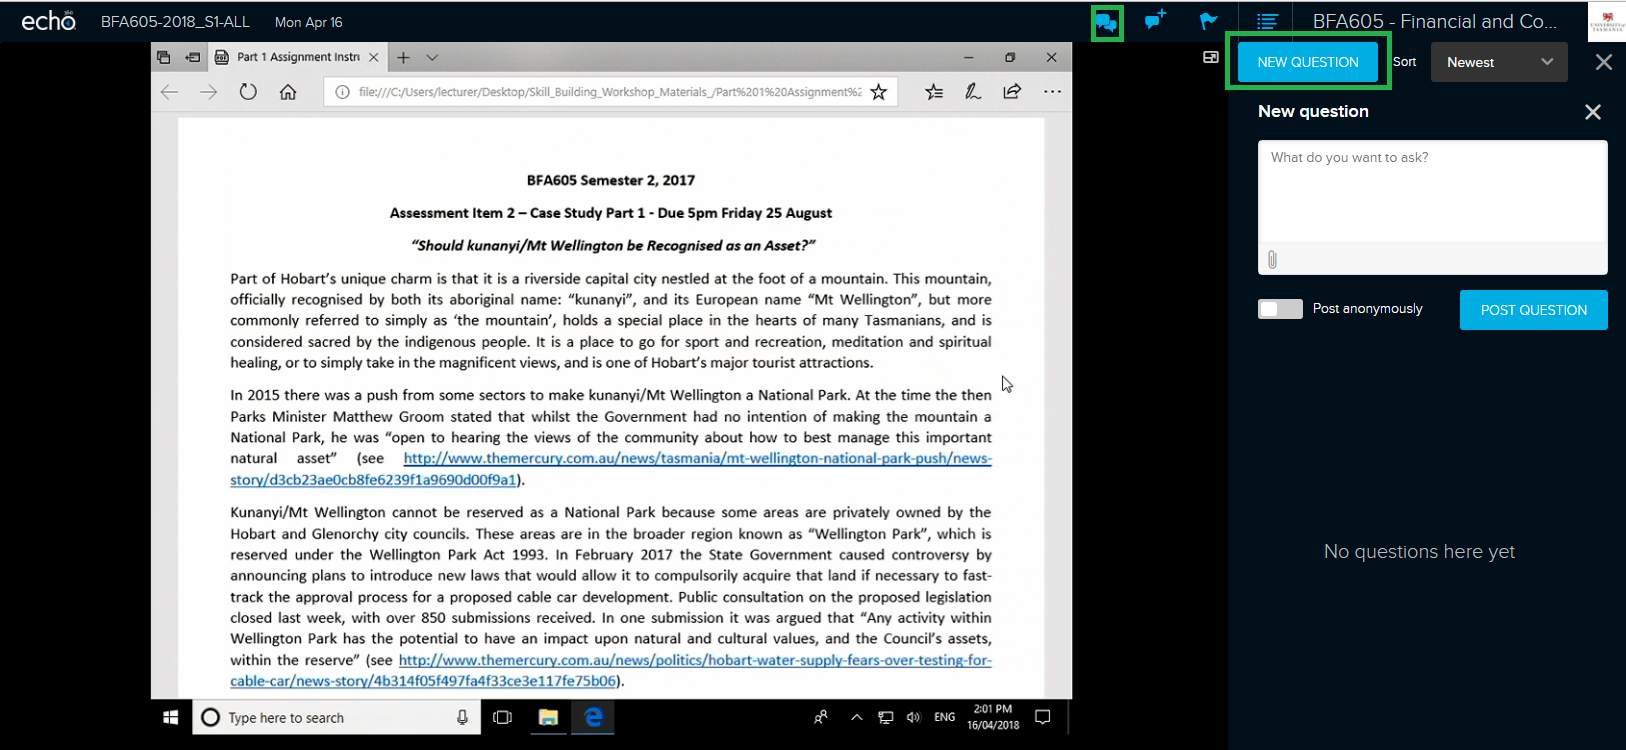
While the Live stream is running you can open a side-bar to see the ‘Q&A’ questions and answers area. The ‘chat’ icon is at the top of the window. To type a question click ‘new question’ and type your question then click ‘Post Question’. Your lecturer may or may not see this question right away, and you might be some seconds behind due to lag – so avoid typing the same question over and over if you’re not getting a response right away. The lecturer may have opted to answer questions in bulk during specific parts of the lecture, or they may have moved on already. If you see a question from another student you know the answer you can also answer it.
(Presentations with Slides and Interactive Activities will be covered in another document)
IMPORTANT: You must have entered your mobile phone number in your account profile to use the SMS option. Please note that you must have accessed the class’s Echo360 page prior to the class starting. If you are watching from the live stream you will already have done so, those watching live in class will also need to ensure they have clicked through to the Echo360 from the MyLO site at some point prior to the class. Otherwise you will receive an error message. Data/Text message rates will apply.
You can return to the Live Feed at any time by clicking on the thumbnail. If you’re having problems getting back from the slides page just go back to the classes page (by clicking on the unit name at the top right of the screen) and then load the stream again.
Access and Issues with Mobile Devices and Access
According to the Echo360 site, support for Live Feed on Android Devices currently unavailable.
Mobile devices may have limited ability to play the live feed. You will need to install the ‘Blackboard Classroom’ app available from the appstore. The instruction on using the app makes the point that to use the app you will need to have clicked through to the Echo360 Recordings from your MyLO unit FIRST for each unit. It will ask you to set up a password for Echo360, your username will be your MyLO username (that is: your entire email address).
Official Help for the App on Echo360.org site – Apple Store Link for App.
When Echo360 detects you are viewing a live stream from a mobile device, it automatically buffers 40 seconds of the stream to ensure smooth playback. This means you may experience a delay in the start of the stream, and that your view will lag anywhere from 30 seconds to a minute behind the real-time action.
Please note the app has very low reviews and many problems have been indicated by the users. If you are able to get to a desktop PC/Mac instead of mobile you will have better chance of it working well, however sending feedback to the app developers of issues you’ve had if any will help hopefully make the app more reliable in future. (wouldn’t hold your breath all the negative reviews are a few years old now and it doesn’t look like anything has changed).
How to sign up for a tutorial/workshop
To sign up for a tutorial or workshop (or to sign up into things like discussion groups, assignment groups etc) follow the steps below.
Step 1:
Click the link in the Announcements/Content area if you have been provided with a link.
OR
Click the ‘Groups’ tool on the toolbar if the tool is available.
Step 2:
Click the “View Available Groups” button.
You will then see lists of groups that you are able to join. You will need to ensure that you locate the section that relates to your specific campus. All campus specific tutorial signups will be located on this page, so be sure you are looking at the right groups for your campus.
Step 3:
Have a look at the choices for your campus and double-check your timetable so you can choose a time that does not clash with another class.
Step 4:
When you have located the tutorial time you desire click the ‘Join Group’ as circled in the example below. If the group is full you will not be able to join, so you will need to join another group. Make a note of the time and room of the time you have chosen.
Once you click ‘Join Group’ you will then be taken back to the ‘My Groups’ area and the group name will be listed along with the default groups.
To join more groups you will need to click the ‘View Available Groups’ button again.
If you wish to leave the group you can click ‘Leave Group’. You will be asked if you are sure you wish to leave the group.
You will then need to click the ‘Available Groups’ button highlighted in step 2, then click ‘Join Group’ on the desired group.
Note that if you do leave your chosen group and the other groups are full you may not be able to join a different group.
How to Pin Units to your MyLO Homepage
The new MyLO ‘Daylight’ interface allows you to pin your units to your MyLO Homepage. This guide will go through how to access your MyLO Homepage and how to pin a unit.
First access the MyLO Homepage by logging in with your Student Username and Password from http://www.utas.edu.au/mylo
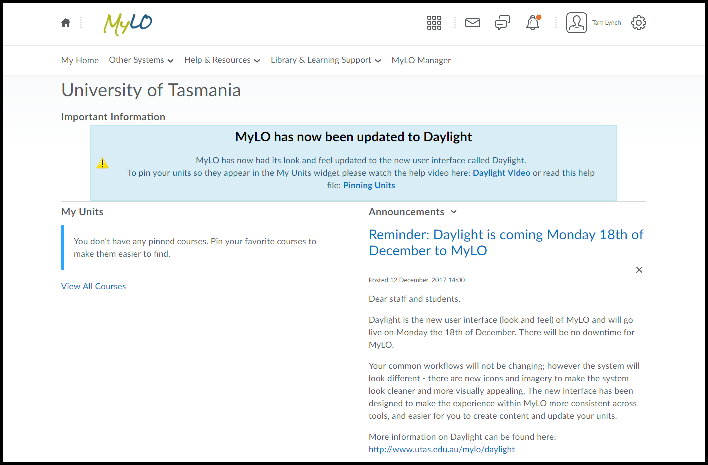
You will see a page similar to the screenshot below.
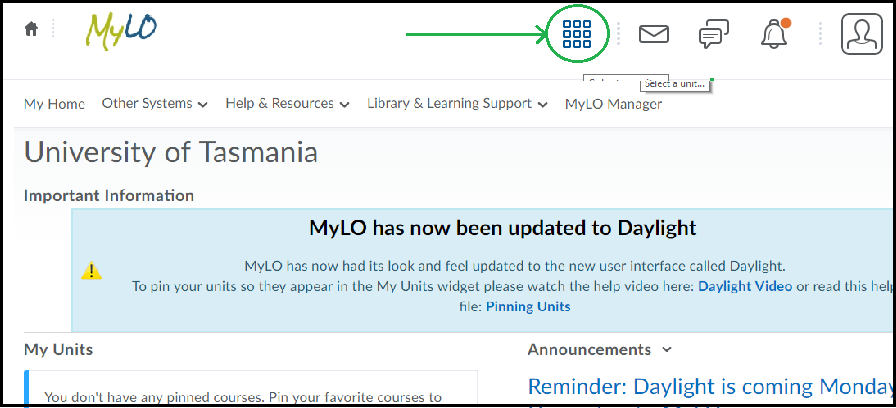
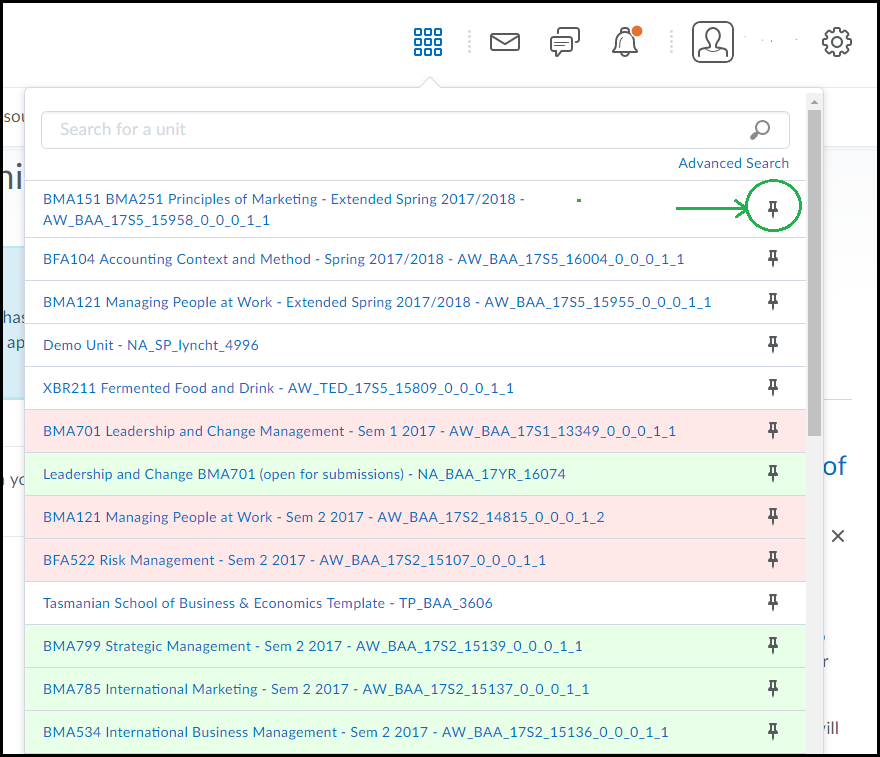
At first you may not see your units right away, to access the list of units click on the ‘Waffle’ icon at the top as circled in the screenshot below.
You should now see a list of units. By default these are ordered by your last access date. The list below is an example only. You can access any of your units here, without pinning them – by clicking on the unit title. To pin a unit – click the small ‘Pin’ icon to the right of any unit you wish to ‘pin’ to your homepage as circled in the screenshot below. When selected, it might not appear on your Homepage right away – you may still have to refresh the homepage depending on your browser.
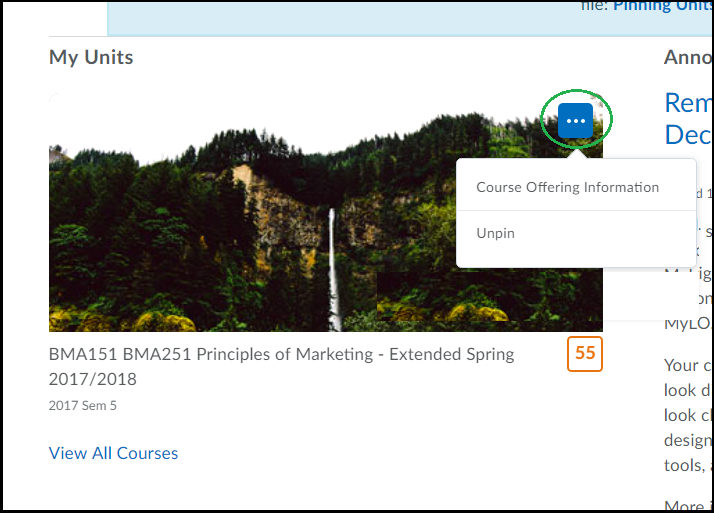
You will see the pinned units on your homepage displayed with an image and unit title like the example below. If you mouse-over or click on this icon you can access a small menu to the top right of the icon (as circled below) with further options, including ‘Un-pin’.
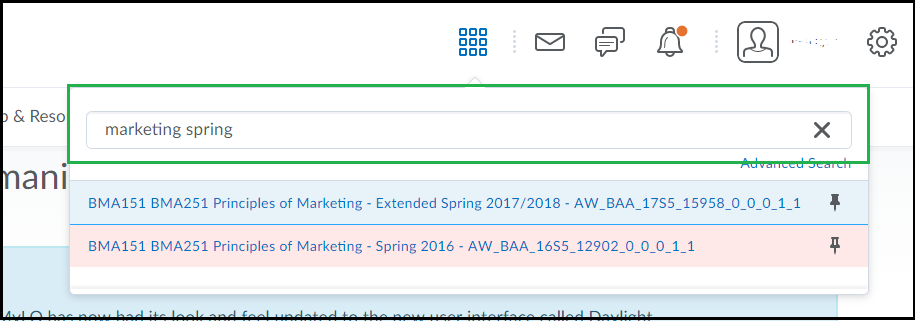
Can’t find your unit in the list? If you click the ‘Waffle’ Icon and don’t see your unit there, try searching for all or part of the unit title or unit code using the search bar as highlighted below. You can also search by semester (Sem 1 or Sem 2) and by year as all TSBE units have the Semester and Year included in the title.
If you still don’t see your unit, check your enrollment details and make sure you are correctly enrolled in the unit. For further help you may need to contact the Student Support staff in your college/faculty/school.
How to Access your Assignment Feedback
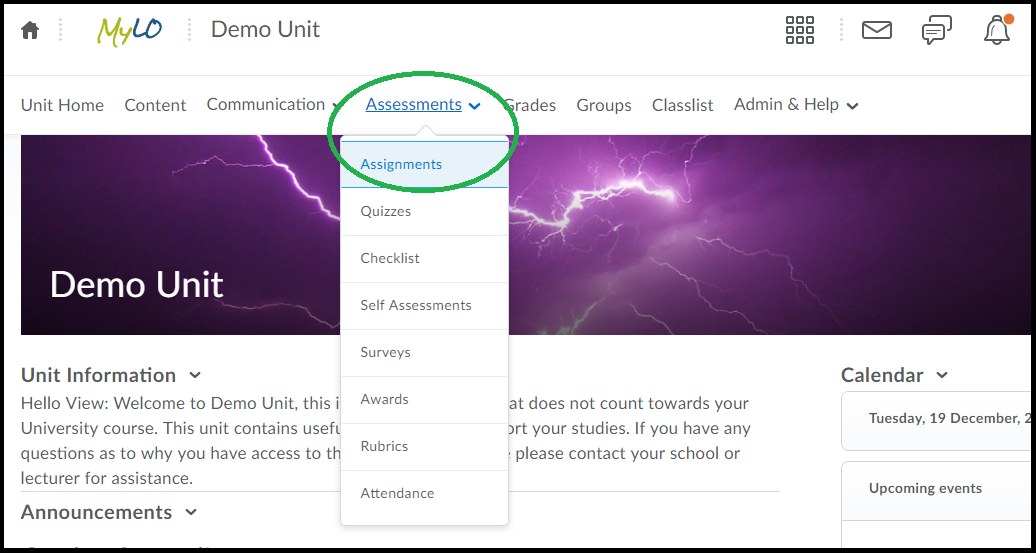
First you will need to click the “Assessments” item from the toolbar, then choose the option ‘Assignments’, as circled below.
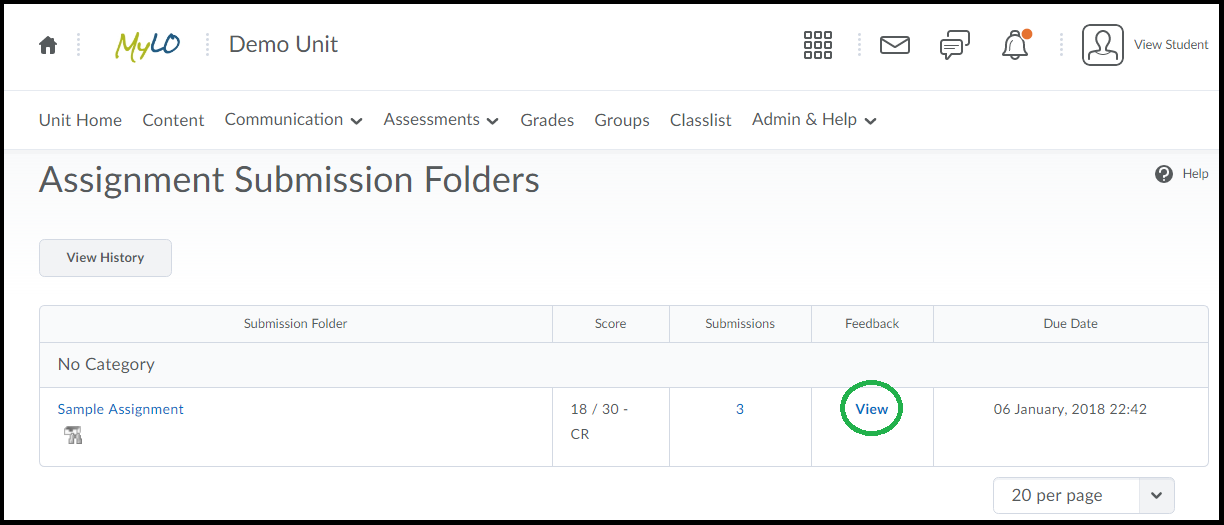
When you load up the Assignments area you should see a list of assignments, with a column titled “Feedback” to the right of each one. When Feedback is published to students a link called “View” will be visible in the Feedback column, as circled below.
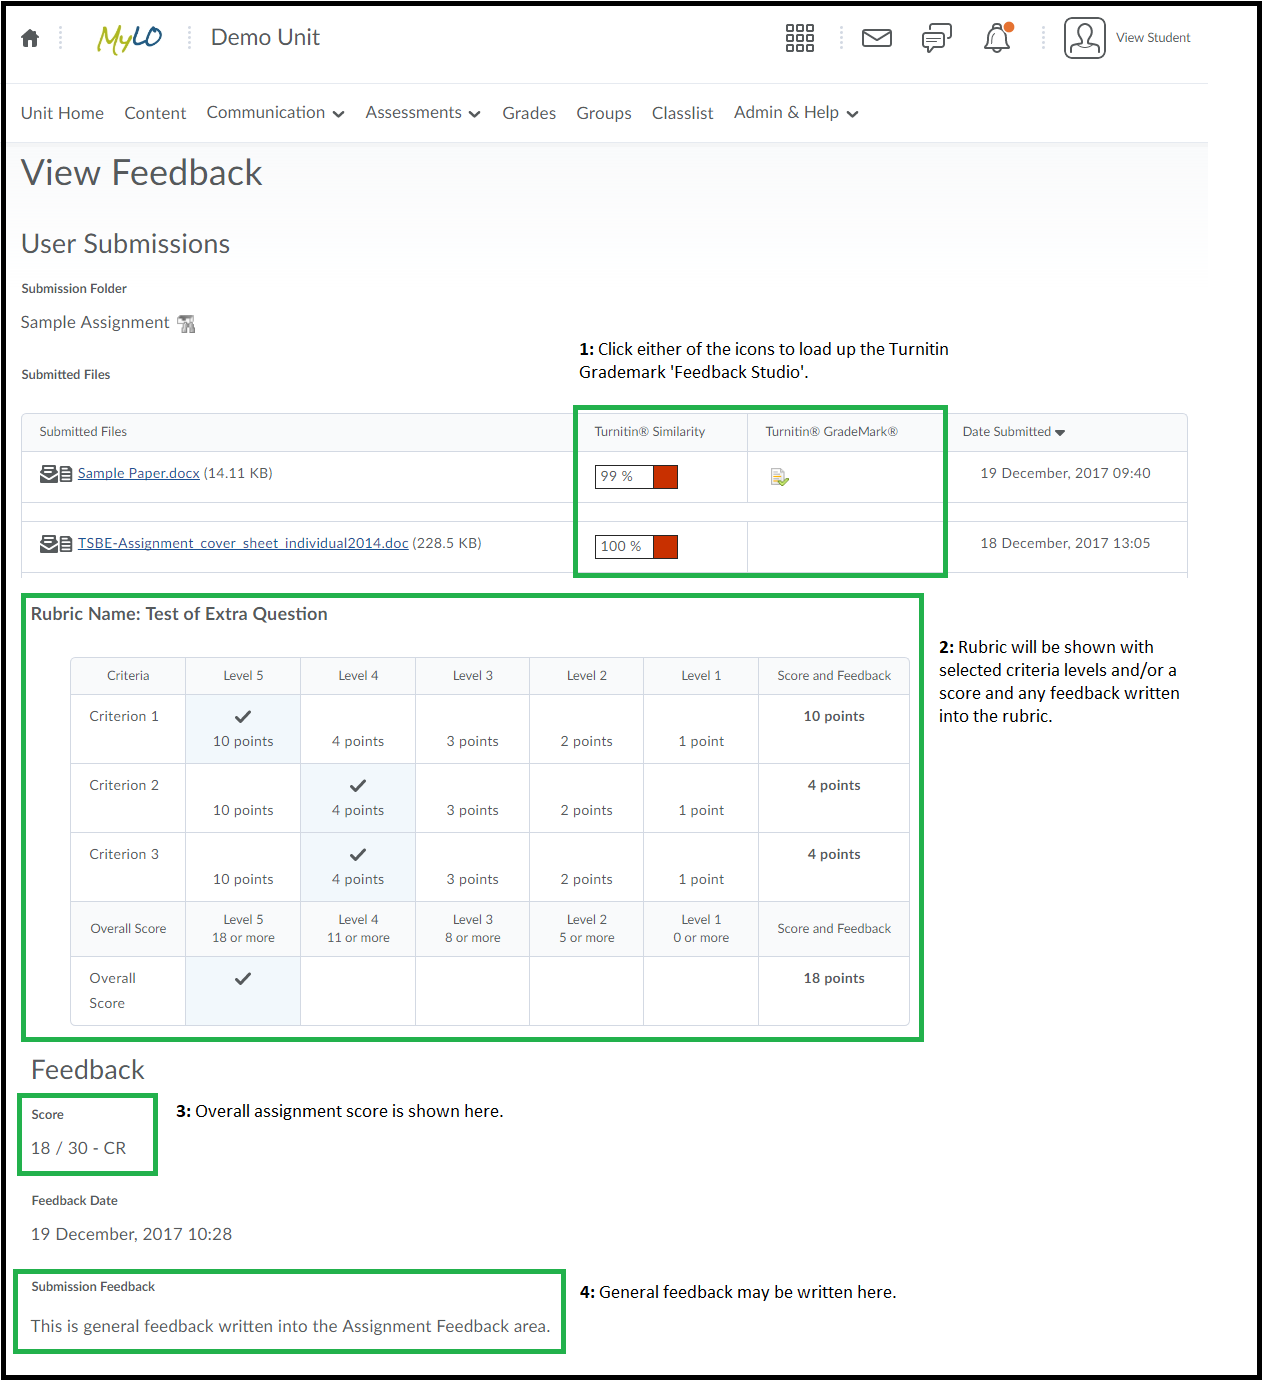
When you click the “View” link you will see one or more of the different kinds of feedback your instructor may have provided.
These are:
(1) Link to Turnitin/Grademark: IF Turnitin or Grademark were used you may see a link to the ‘Turnitin Feedback Studio’. It may be the Similarity Report icon AND/OR the Grademark icon – either will take you to Feedback Studio to view any further comments on your submitted file(s).
(2) Rubrics: If a rubric was used for marking you will see it displayed with the selected levels highlighted.
(3) Overall Score: You may see your overall assignment score.
(4) Submission Feedback: General feedback may be written here.
Grademark is the tool used to mark-up (make comments) your submitted documents. It is linked to Turntin, so you may see to the right of your ‘Submitted Documents’ a link to Turnitin or to Grademark if they have been used.
To access the feedback click either icon that appears. Either icon will load up an area called ‘Feedback Studio’ by default. This shows you your submitted document with the comments shown either as icons you click on, or as text on the page itself.
By default you are likely to see the Similarity Report and Grademark comments together. You may also only see one or the other, depending on what your lecturer/marker has set as visible to you.
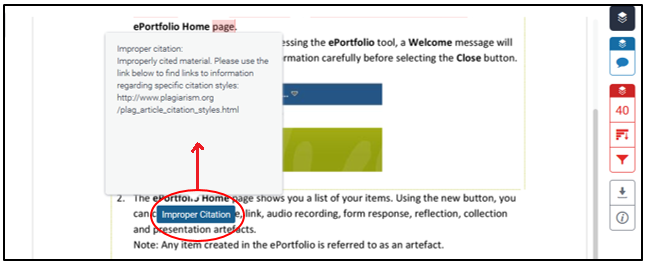
When viewing “bubble” comments (the ones that appear as white text in a blue box) you can click on the blue box to open the full text, an example is circled below.
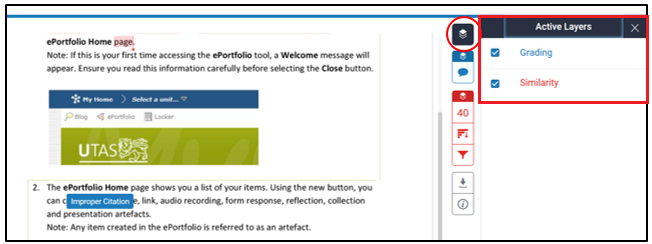
To control the visibility of the Similarity and/or Grademark comments you can click the black icon at the top-right of the page as circled below. It opens options to the left that allow you to turn them off or on.
How to Access Your Quiz Results and Feedback
To access feedback on your quiz follow the steps below:
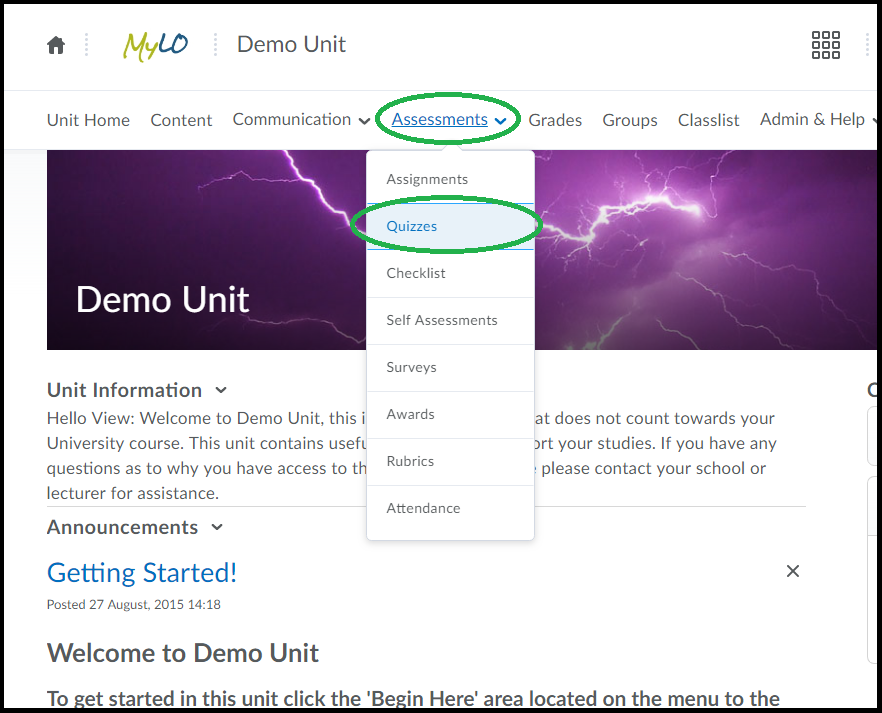
Step 1: Click the ‘Assessments’ item on the toolbar, then choose ‘Quizzes’ as circled below.
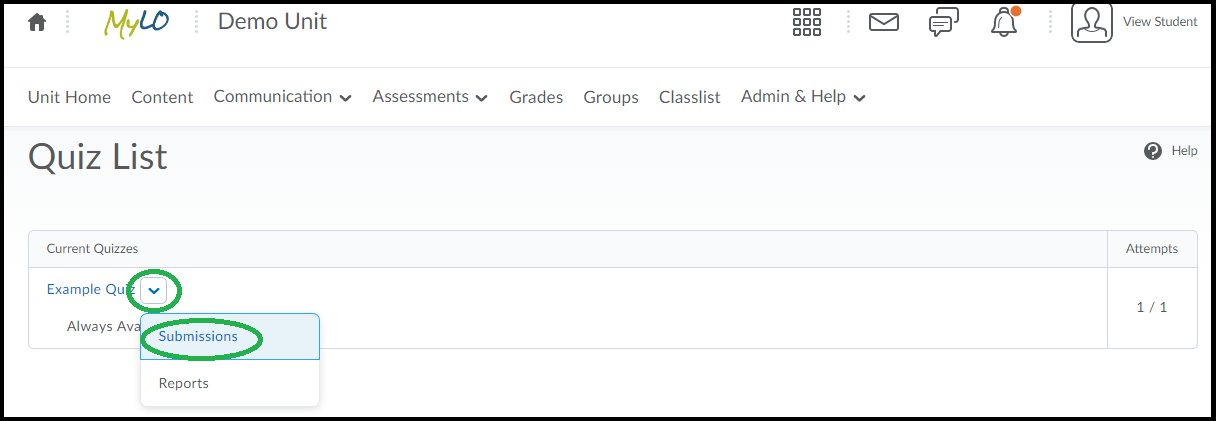
Step 2: You will see a list of quizzes for your unit, locate the quiz you want to view feedback for in the list and click the small icon to its immediate right – see the example below.
Step 3: Choose ‘submissions’ from the options as shown circled below.
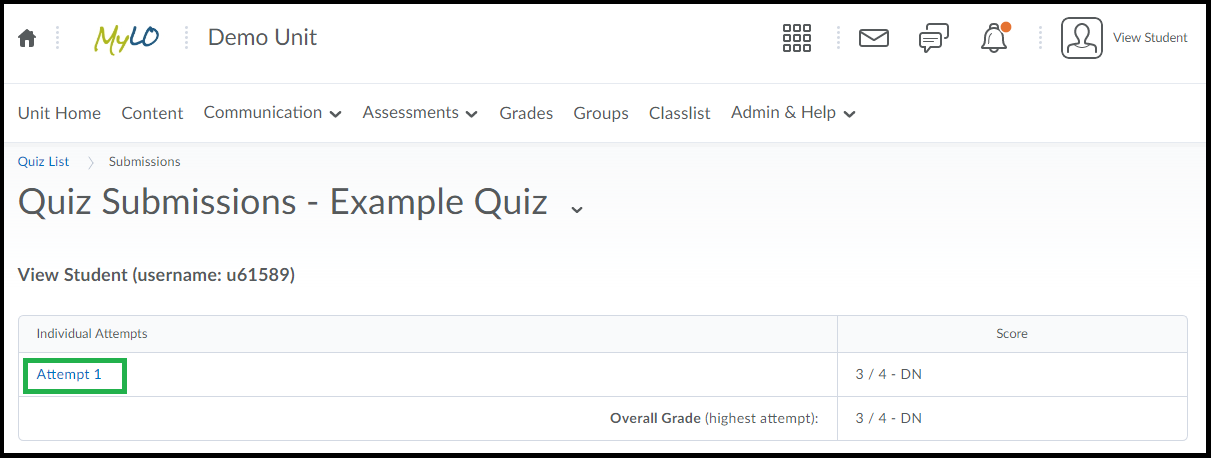
Step 4: You will see a list of attempts for your quiz, and to the right you will see your overall result. If your lecturer has made further feedback/results available you can click on the ‘Attempt’ to see more information. If you have more than one attempt recorded, click the one you wish to view – an example is circled below.
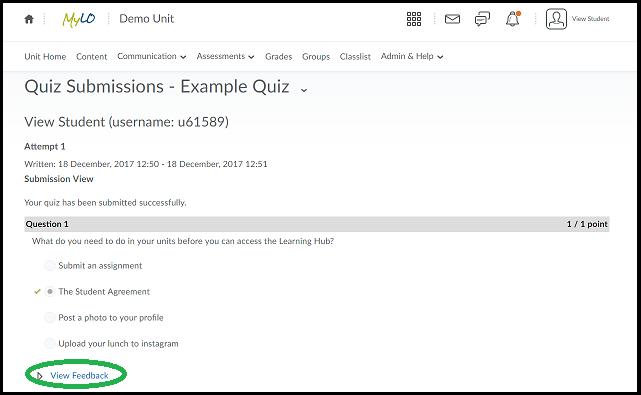
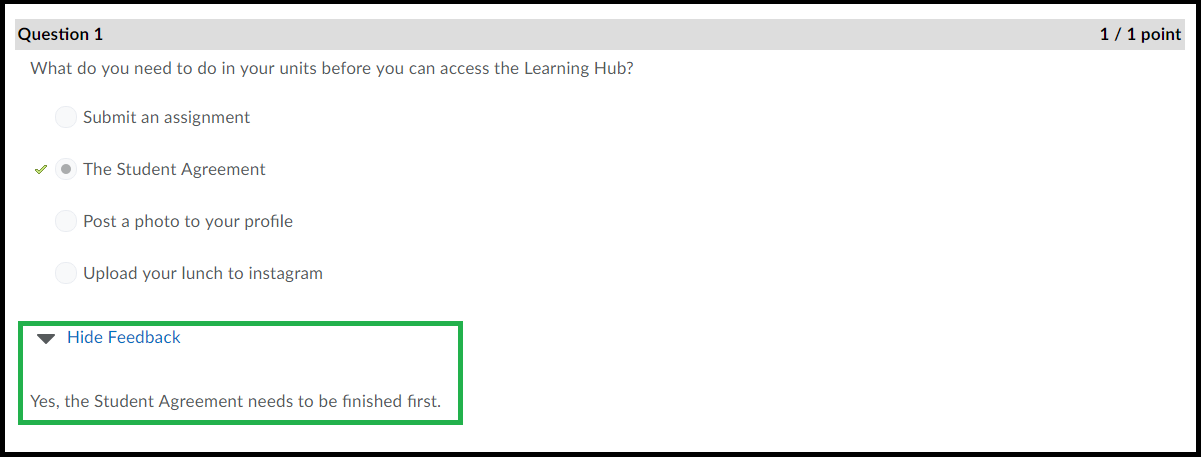
Step 5: You may see a list of questions, with your answer shown and it may also show you what the correct answer was (if enabled). To view any additional feedback click the ‘View Feedback’ link under each question, as circled in the example below.
Additional feedback, if it has been provided, will then show beneath each question. You can click the link again (it now shows as ‘Hide Feedback’ to hide the feedback text.
Not all quizzes you do will allow you to view the questions and feedback, if your lecturer/tutor has indicated that the class will be given feedback for a quiz and you cannot see feedback please let them know, as they may need to alter some settings to make it visible.
Upload an Assignment to MyLO
To upload an assignment file to MyLO, follow the steps below.
Step 1: Check the assignment requirements to ensure that your file is in the correct format.
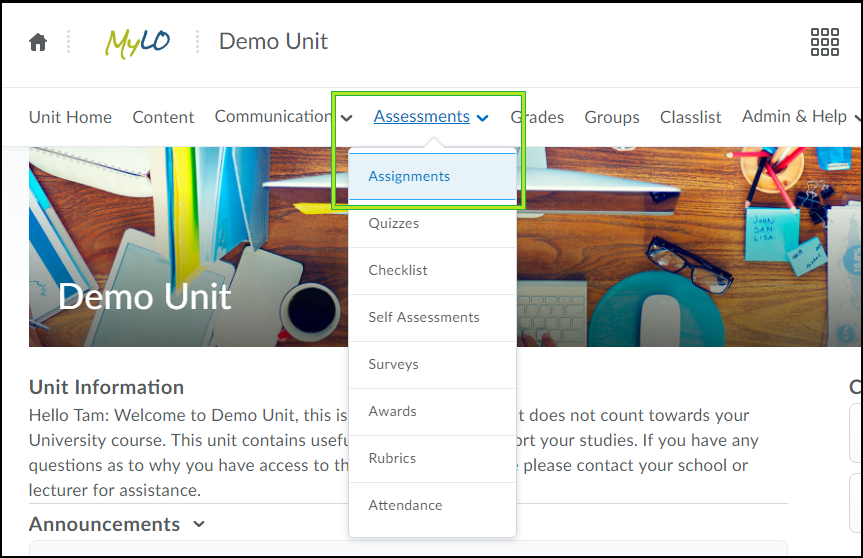
Step 2: Log into your MyLO unit and select the Assessments Menu on the toolbar. Then choose the option “Assignments” (as highlighted below).
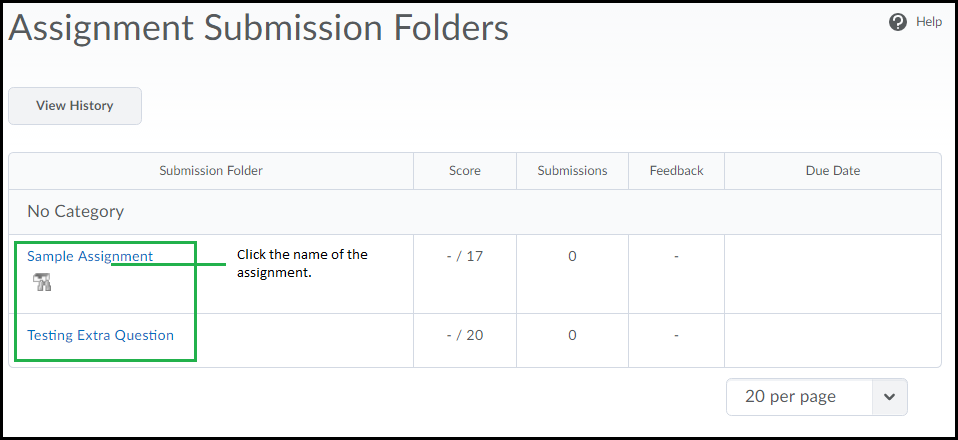
Step 3: You will see a list of Assignment Submission Folders (see example below). Ensure you select the correct folder, then click on the Folder name to open it. You are responsible for selecting the correct folder.
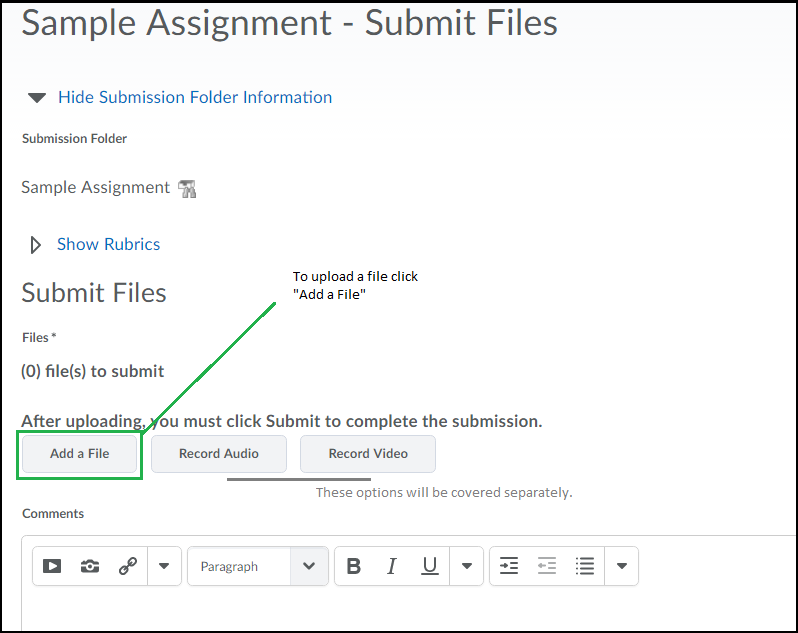
Step 4: Select the Add a File button. You may need to scroll down to see it, if a rubric is associated with the assignment you may need to scroll past the rubric also.
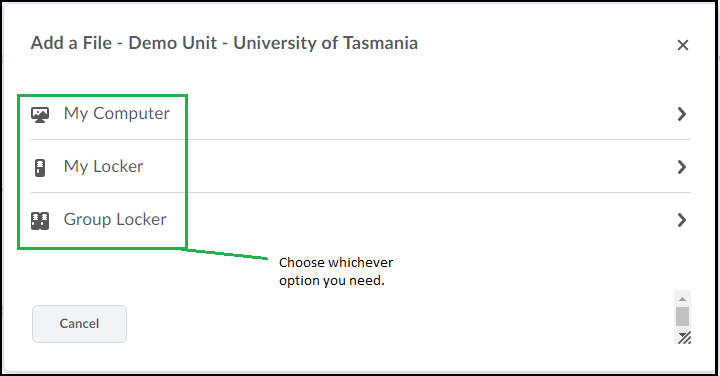
Step 5: A dialogue box, like the one below, will open. If your file is on MyLO in the locker (or a group locker) you can choose those options. Or you can choose to upload from your computer.
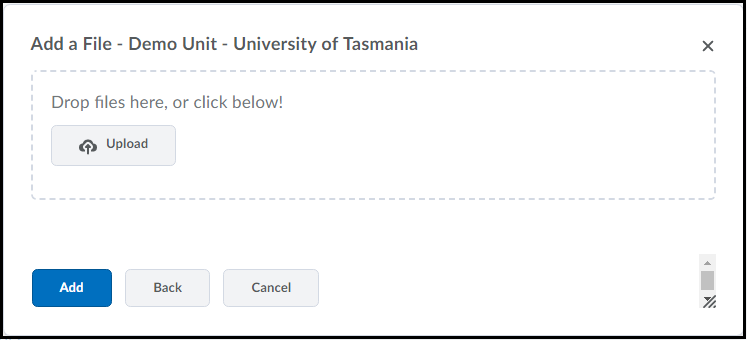
If you need to select a file from your computer you will see a dialog box where you can either drag/drop the file or click the “Upload” button to ‘Browse’ for a file.
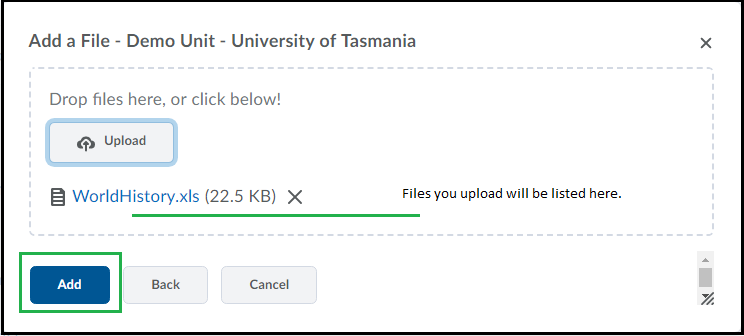
Step 6: Once uploaded, the selected file will appear beneath the Upload button. You can continue to upload files into this area by repeating Step 5. Once you have uploaded all the relevant files, select the Add button, shown circled below. Please note: This is NOT the final step!
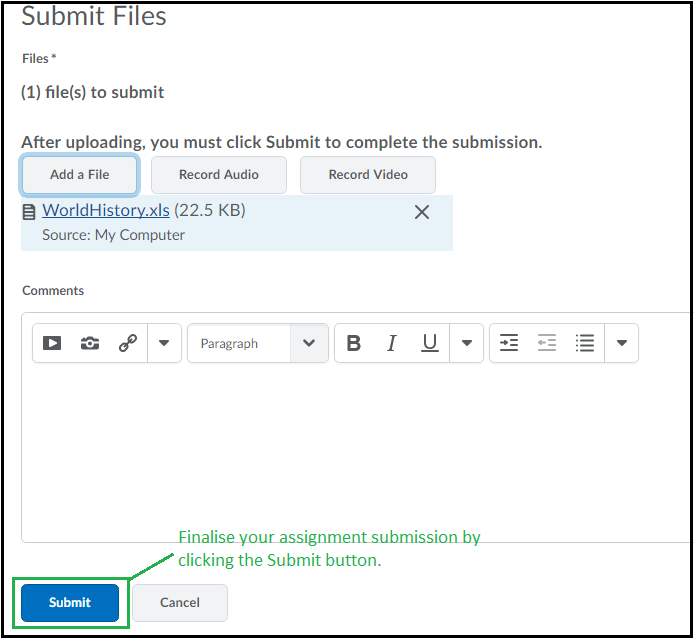
Step 7: You will return to the Assignment area, where you will a list of the files that you are about to submit. Check that they are the correct files. You can click on any file in the list to preview it. You may wish to enter a note to the marker into the Comments field. Finally, select the Submit button, as shown below.
Once you have submitted your assignment, you should receive a confirmation email at your UTAS email address.
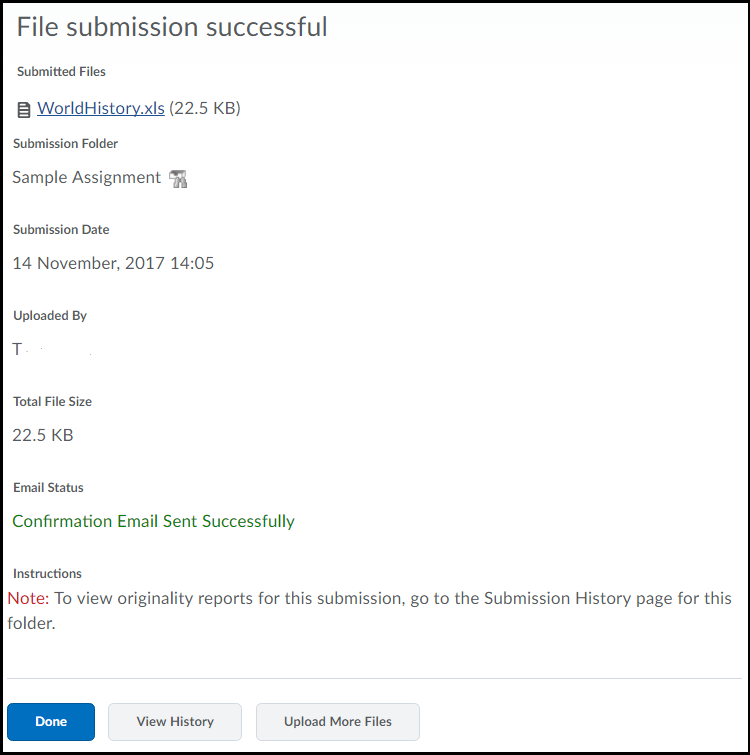
Step 8: You will see a confirmation area. Select the Done button, or you can upload more files if you need.
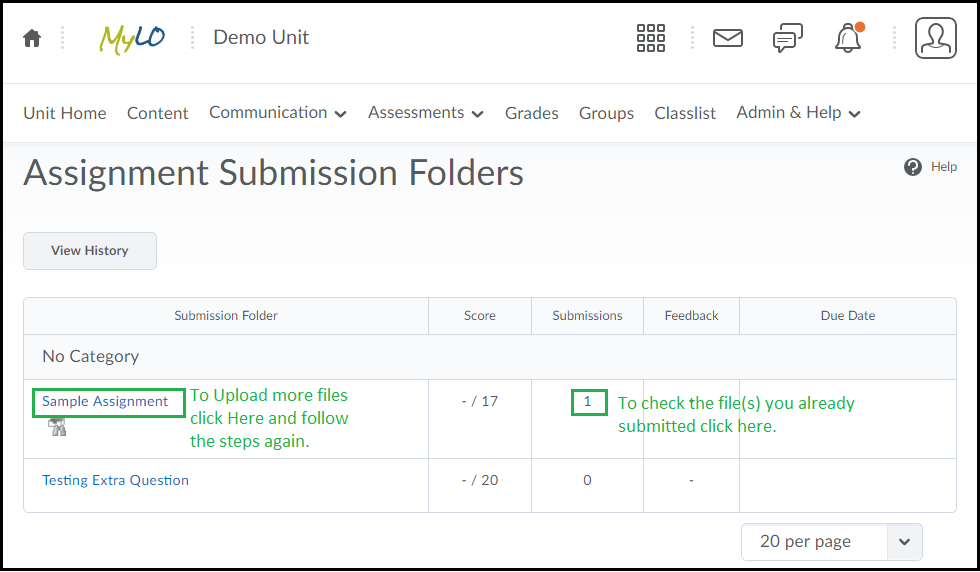
Back in the Assignments tool you will see a number in a column titled Submissions. To check what you have submitted, click on this number. If you cannot see any number listed, then it means that your submission was not successful and you will need to try again. If you need to upload more files, click the name of the Assignment and follow the above steps to upload further files if needed.
If you experience difficulty uploading files and/or receive error messages, you will need to contact the UTAS Service Desk (opens in new window) for assistance.
Using MyLO Notifications to keep track of Announcements in your units
Lecturers and tutors often use the MyLO Announcements feature to share important news and information about units. Using MyLO’s Notifications you can keep track of new Announcements via email alerts. Here’s how.
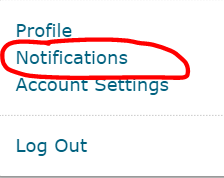
Log in to MyLO. Locate your name at the top right corner of the MyLO screen. Click on your name and select Notifications from the menu.
The Notifications screen will open. Scroll down until you see the Instant Notifications section. Check the Announcements – new announcement available option.
Scroll down and click on the Save button.
Downloading and printing Grademark feedback
If you use Grademark to provide comments on students’ work, you, or your students, may wish to download or print the feedback.
These instructions should work for both staff & student views in the Grademark interface (known as ‘Feedback Studio’).
First load up the assignment and go into the Feedback Studio area (either by clicking the Originality Report from the Assignment area or by clicking ‘View Feedback’ in grades).
Once Feedback Studio is loaded – locate the toolbar to the right and click on the top-most icon (shown below) – then choose which ‘layers’ you wish to download. You can choose download the grademarks, the originality report or both.
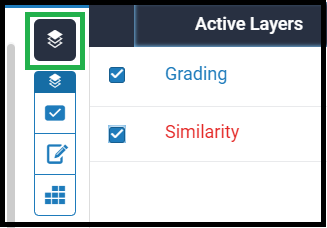
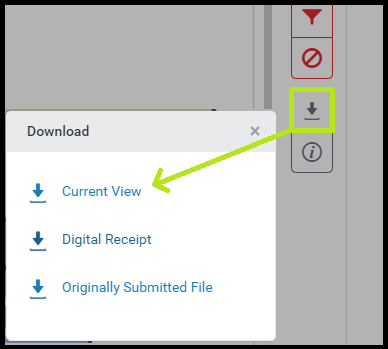
Then click the icon with a ‘down arrow’ on it, as shown below. This will give you the options for downloading. Click ‘current view’ to download the file with your current selections.
When you click an option, depending on your browser, the file with download into your default download directory or you’ll be asked where to save the file.
The PDF that is then created will contain the document with the inline comments shown, some small comments may be shown but larger quickmark comments will likely be shown annotated below the original document.

