Category
Uncategorized
Link to a Lecture Recording/Video
How to add a video to your unit that you’ve recorded via the Desktop Capture OR automatically recorded from your lecture.
Please Note: If you add a video this way it will not work the next time you run the unit. If you plan to re-use video there is a more convenient way to add links that is covered in the post “How to Add Public Links – Re-Usable Video Links“.
Step 1: Go to your MyLO Content area and navigate to the folder/module you want the video to be in.
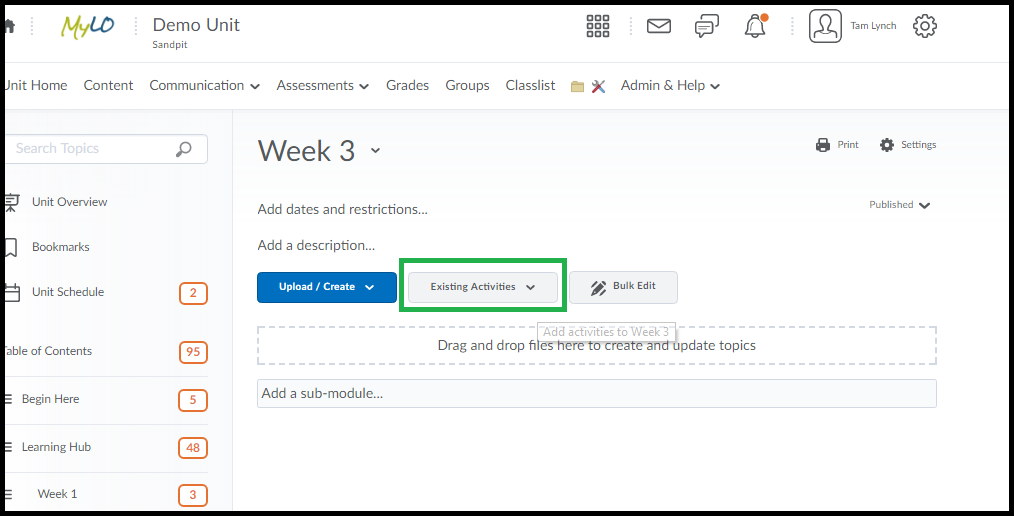
Step 2: Click ‘Existing Activities’ button.
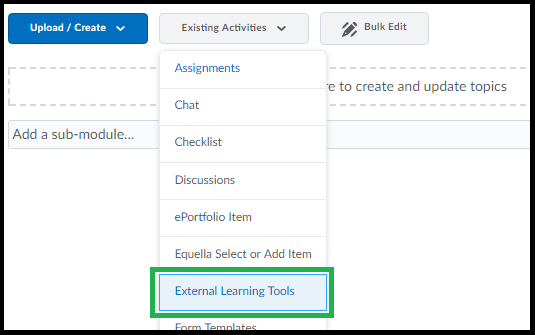
Step 3: Choose ‘External Learning Tools’
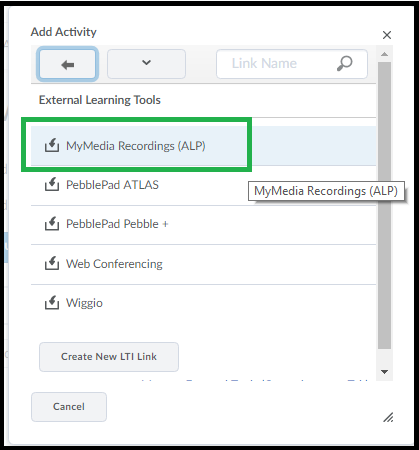
Step 4: Select ‘MyMedia Recordings’ (or Echo360 if the name ever gets changed).
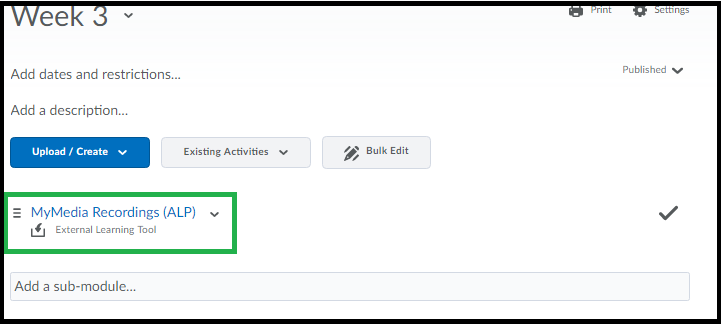
Step 5: The link gets dumped into your content live and with nothing in it – you need to now click on the link that was just created – just click the link text.
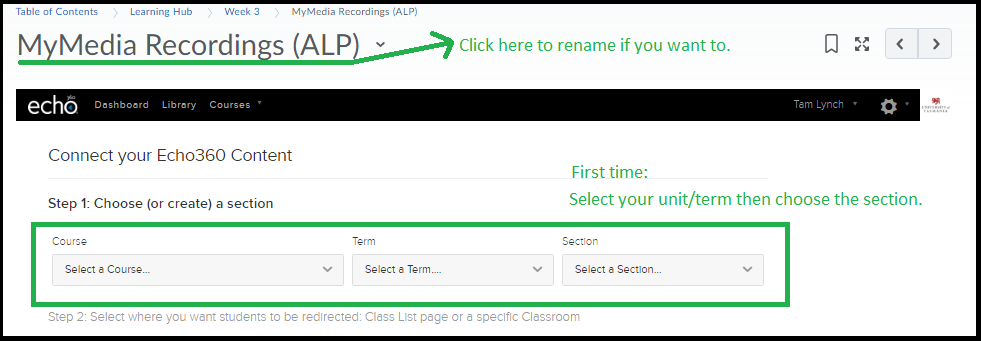
Step 6: If this is the first video you’re adding follow this step, otherwise skip to step 7 – click to choose your unit code, semester and then choose the one in the final drop down menu. There’s usually only 1 option for the last dropdown menu. Then proceed to Step 7.
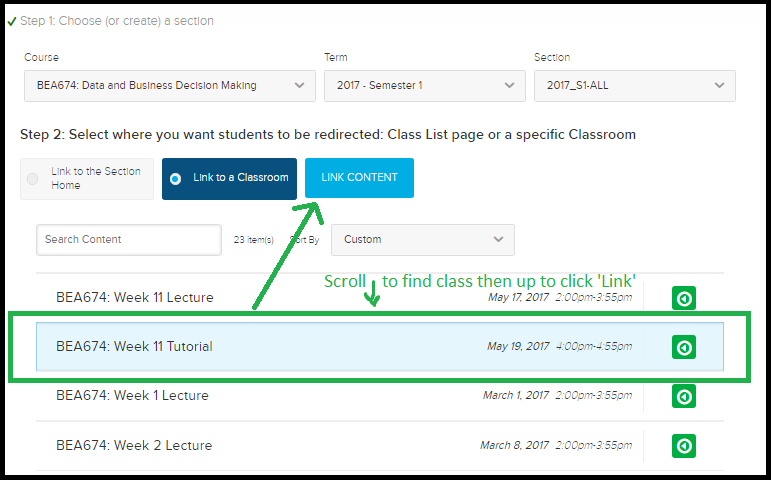
Step 7: You’ll see a mostly blank screen with three options, click the middle option that says “Link to a Classroom”. It is the one helpfully greyed out, but highlighted below. Important! Click it.
Step 8: List of all videos in the Echo area for your unit appears, click the one you want to link to and choose ‘Link Content’ back up the top. You might be doing some scrolling if you have a long list.
The link is connected and often you will be shown the video you just connected to. There is no way to change what video you just connected, if it’s the wrong one you’ll need to start again and delete this one. Sorry.
To add things like selective release you need to go back to where you can see the link in the list of your content and choose ‘edit properties’as shown below. It is recommended you choose the option to Open as External Resource – this means the video opens in a new Tab in the browser and the student doesn’t lose their place in the MyLO page they were on.
Hiding Content in MyLO
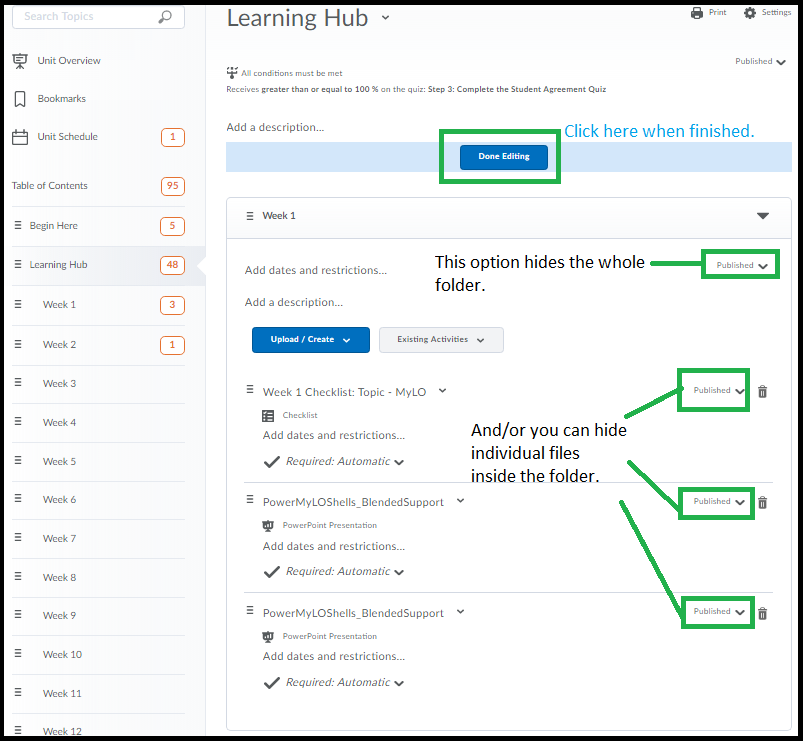
Have something you don’t want students to see just yet? There are ways to hide content from all students – the easiest is to set the content to ‘Draft’ mode. This document covers how to do this with modules/folders and individual files.
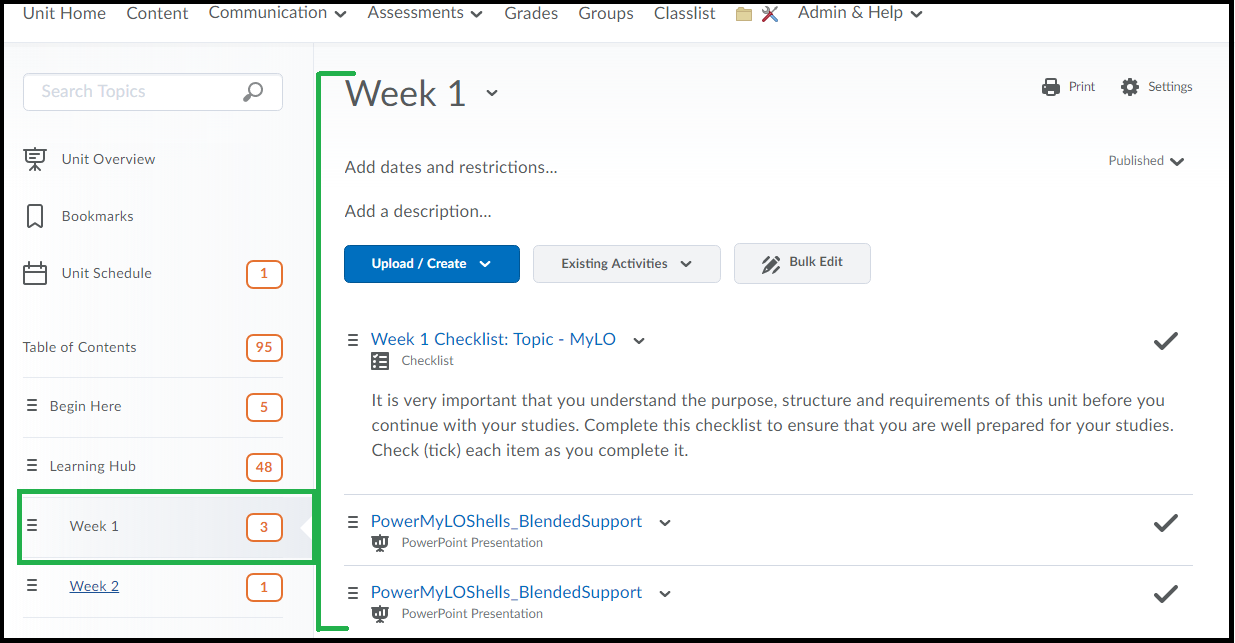
Head to the ‘Content’ area in MyLO where you can see the list of the folders/modules on the left, and their content on the right.
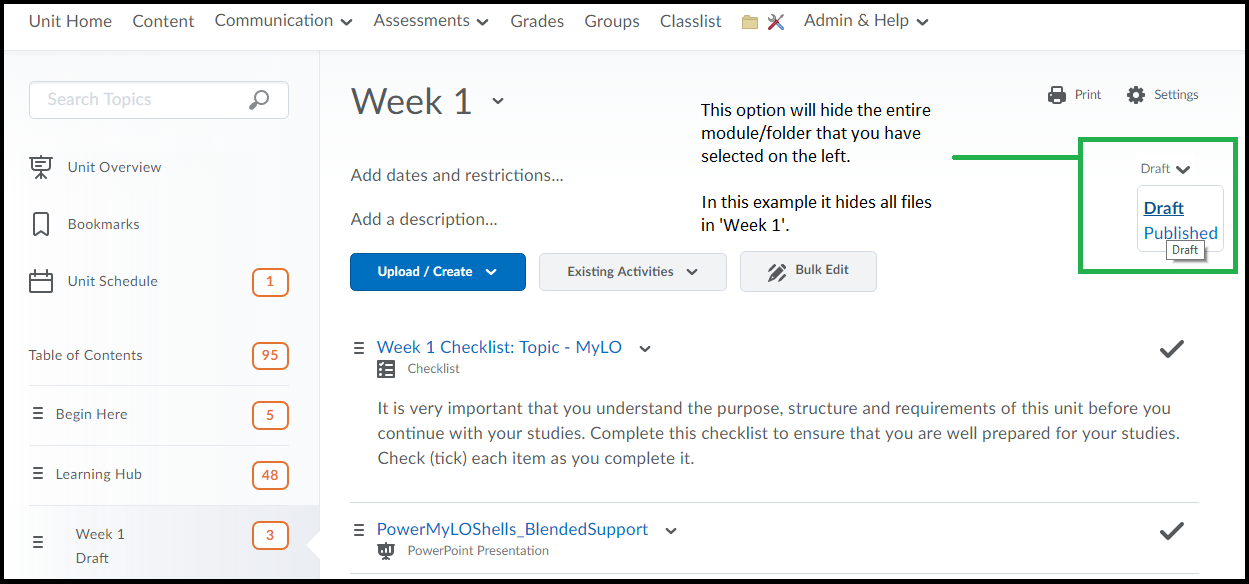
You can set a module (folder) to draft and hide all of the items within.
* Select the Module/Folder on the Left.
* On the right go to the top/right area and choose ‘Draft’ from the menu as circled in the screenshot.
You can set an individual item (like a file) to ‘draft’ also:
* Select the module/folder this item is contained within on the left, so that you can see the link to this item on the right.
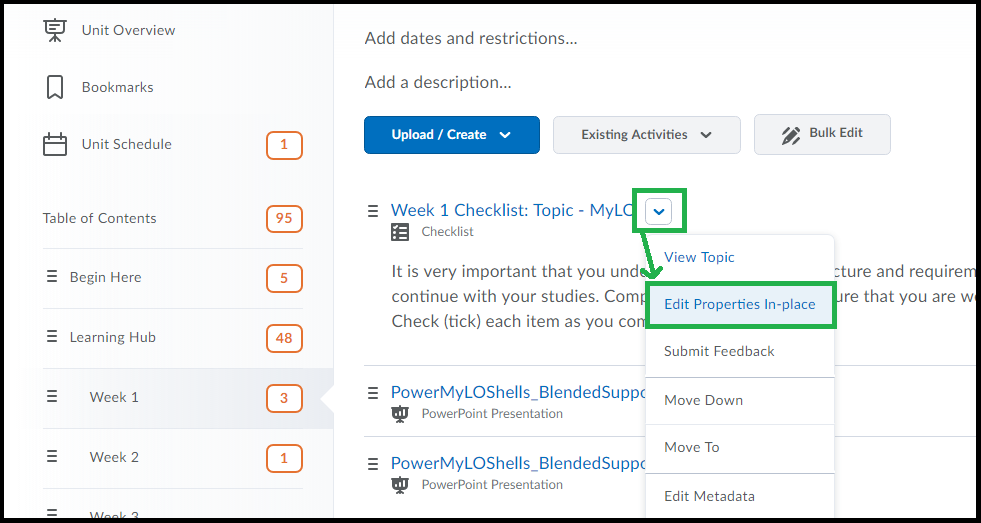
* Click the triangle menu to the right of the item and choose ‘Edit Properties in Place’.
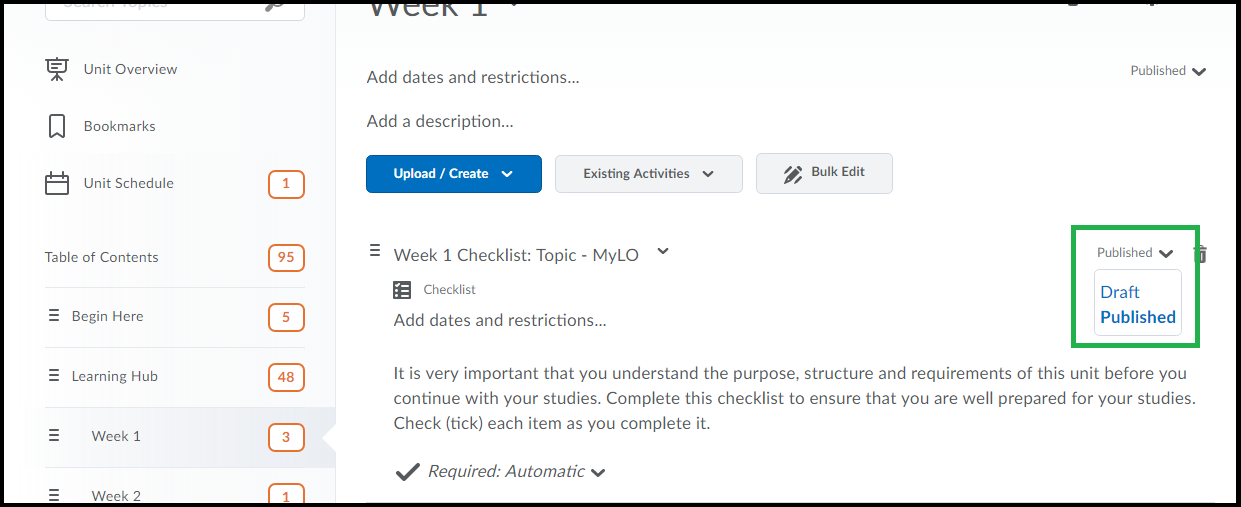
* Now you can select ‘Draft’ from the menu to the right of the item.
To make any item visible again click the ‘Draft’ option and choose ‘Published’.
Bulk Edit allows you to see the option for ‘draft/published’ for multiple files at once.
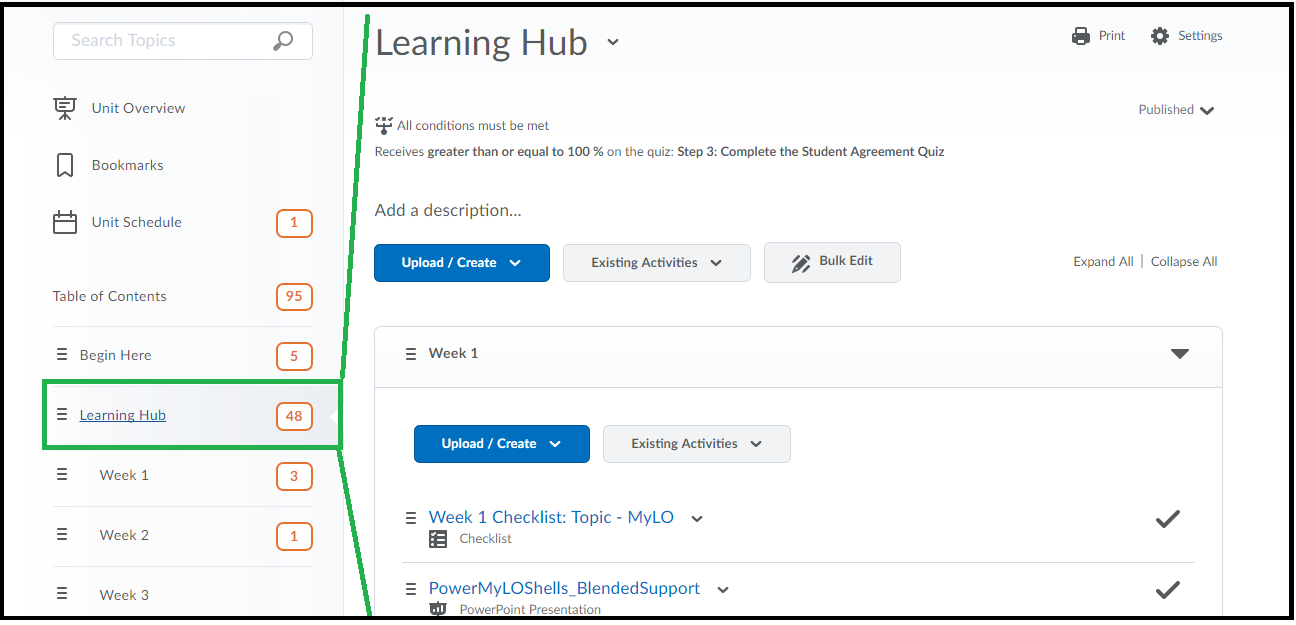
* Click the containing folder/module on the left (ie, the folder/module that contains all the items you wish to make draft/published). In this example I select the Learning Hub, although I want the folder ‘Learning Hub’ itself to still be visible but hide content within.
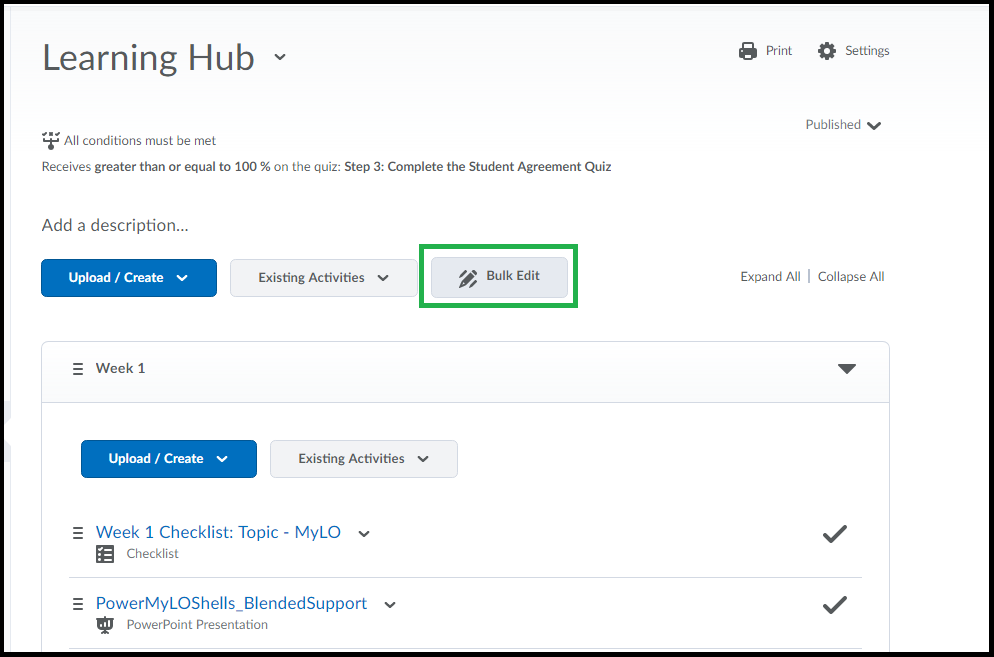
* On the right, at the top there should be a ‘Bulk Edit’ button. Click this button.
* Now option to make ‘Draft’ or ‘Published’ appears for each folder in the list. Select ‘Draft/Published’ as required for things you want hidden and then click ‘Done Editing’ back at the top of the page.
You can go back to ‘Bulk Edit’ to switch items to ‘Published’ as well, though once set to ‘draft’ the option stays visible on the page and you can click this option to switch to ‘Published’ at any time.
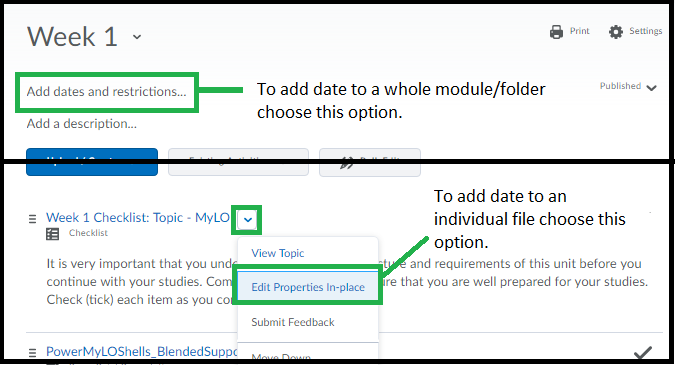
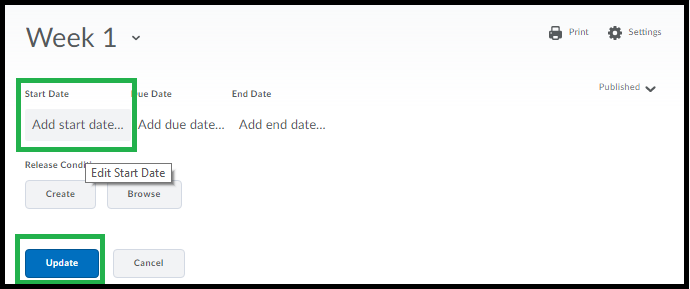
You can alternatively add a start date to folders/modules and files, if you do this you don’t need to also switch to ‘draft’ mode as the item will be hidden until that date is reached.
* Click the containing folder on the left.
* Click the ‘Add Dates and Restrictions’ option on the right OR choose ‘Edit Properties’ if it’s a file.
* Click ‘Add Start Date’ and choose a ‘Start’ date/time and click ‘Update’. You don’t need to set ‘due date’ or ‘end date’ unless you also want to use those options.
To edit any date you choose just click on it again, or click the [X] next to the date to remove it.
(Note: Other staff in your unit will always see items set to ‘draft’ or with dates and other restrictions set)
View your unit as a student – Impersonate the ‘Student View’.
You may have seen “View as Student” option in your unit and while it can give you some useful previews of your unit, it doesn’t allow you to complete quizzes or see results. It also doesn’t allow you to submit an assignment and you can’t also test group-based content because there’s no way to enroll in a group in this view.
A solution to this is to do something called “Impersonate the Student View”. This is – a fake student called ‘View Student’ loaded into MyLO units by default. To ‘Impersonate’ this fake student means you’re viewing your unit as a ‘real’ student would see and do such things as checklists, quizzes, assignments and then you will see these submissions as lecturer which means you can assign a fake grade and check how students see their grades, for example. This fake student can enroll in groups or be pre-loaded in groups so you can check group-based content.
How to!
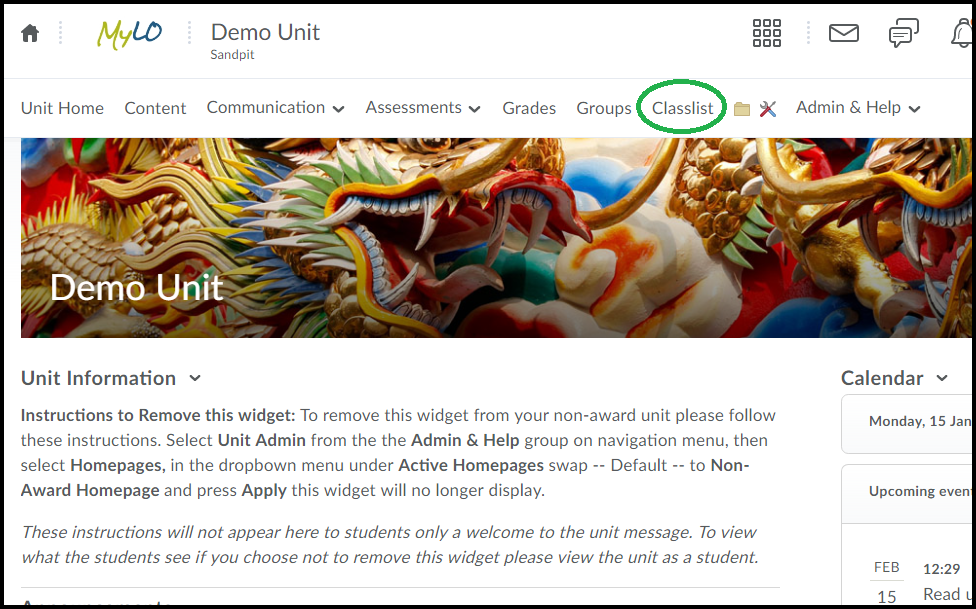
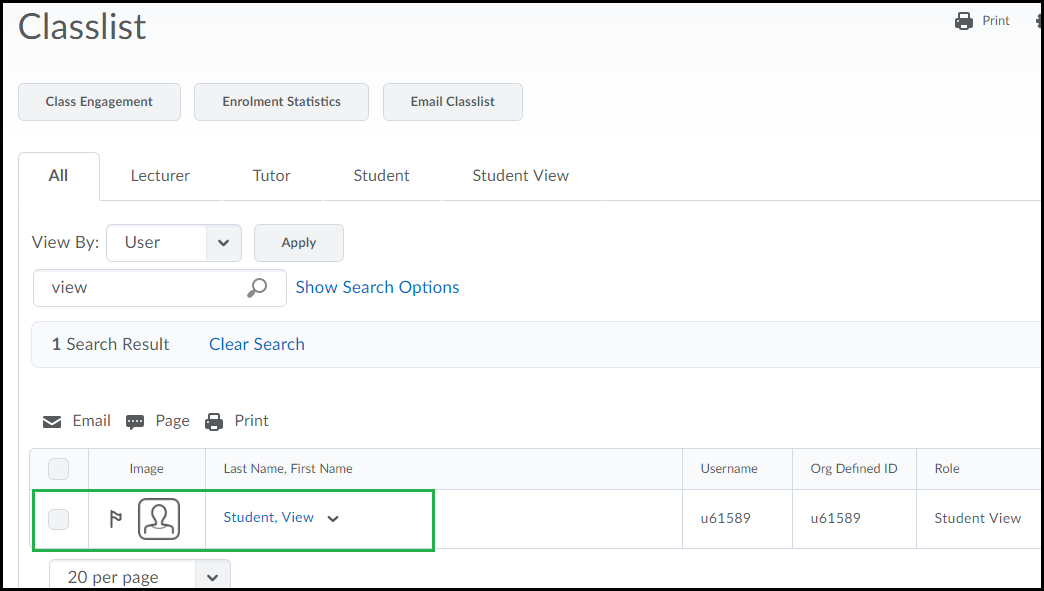
Go to Classlist – located on the toolbar as circled below.
Find ‘View Student’ in the list, you can just search for the word ‘Student’ or ‘View’.
Click the [v] and choose ‘Impersonate’.
You will see a confirmation box, click okay.
You will now be seeing your unit as this “student”. Note that if you have set restrictions on parts of your unit these will apply to this student (for example, View Student won’t see any items you’ve set as ‘draft’). If you want to test something restricted to a specific group, you’ll need to first add View Student to that group. You can also use ‘Student View’ to sign up to groups, but remember to go back in later and ‘leave group’ or remove that fake student from groups they shouldn’t be in (assignment groups, for example).
View Student can complete quizzes and assignments (though not guaranteed it will go through Turnitin correctly). You will then see their submissions in the submissions list.
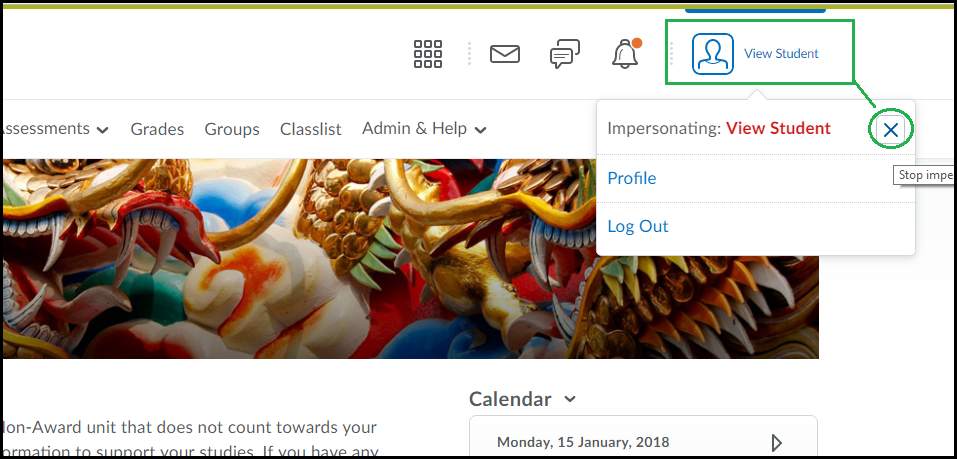
To exit this mode – click the name ‘View Student’ at the top right of any page, then click the ‘X’ as shown below.
How to Check the Quizzes Event Log – Diagnosing a Problem Quiz Attempt
Do you want to investigate a student quiz attempt? The quiz tool in MyLO records a student’s start time and times for all questions answered. This information can determine whether a quiz has crashed and help you decide whether a student should be given a further attempt.
To access the quiz log and see the student’s attempt at a quiz follow the steps below.
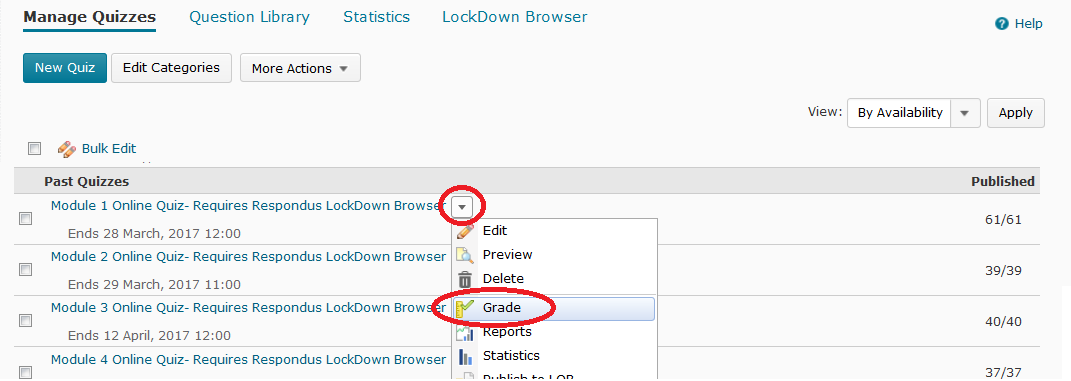
Click into the Quizzes tool from the toolbar, and from the triangle menu to the right of the quiz, choose ‘Grade’ as circled below.
By default you’ll see a list of students who have a successful quiz attempt.
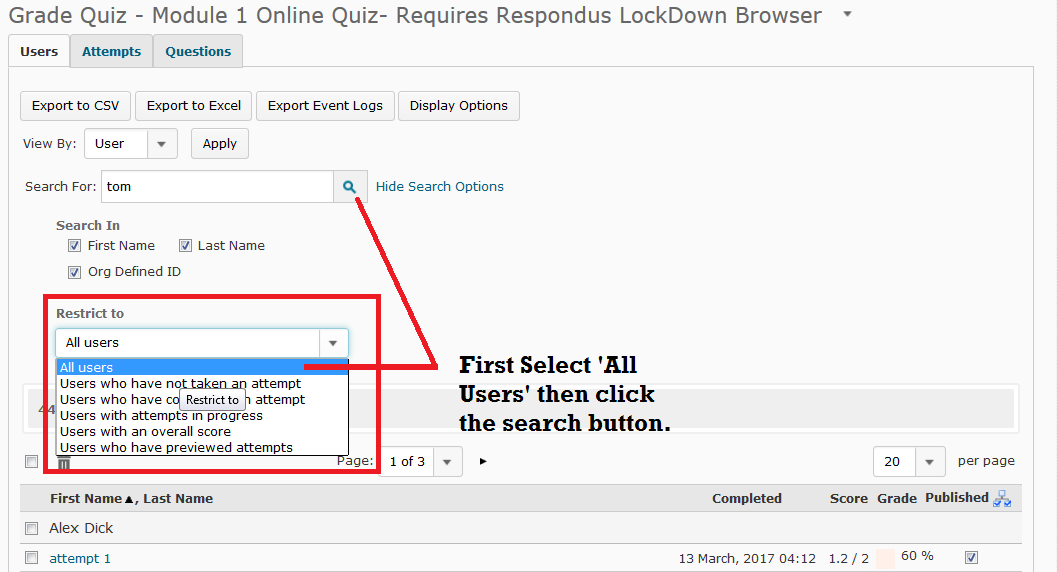
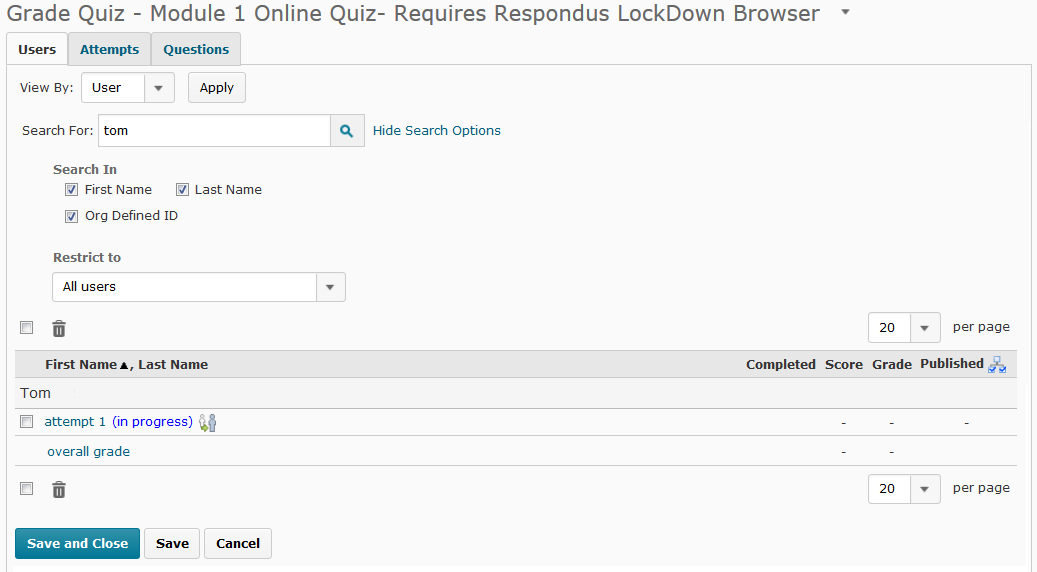
Set the ‘Restrict To’ dropbox to ‘all users’ as circled below, then enter the student’s name into ‘Search For’ (if known) or just leave the field blank to bring up a list of all users in the class. Click the search icon.
In the following example I’m searching for a specific user.
You will see the results of your search below. In this example one user appears – with the attempt listed as ‘in progress’. This means this user didn’t submit the quiz.
To view an attempt even if it has been stuck ‘in progress’, click the ‘attempt’ link as circled. (If your quiz has multiple attempts, each will be listed separately.)
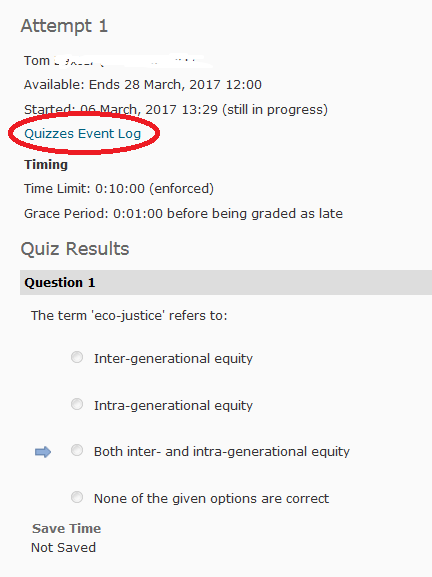
When you click on an attempt to view, the window that loads shows all of the questions they were given in that quiz attempt.
For questions that are marked by the system automatically (i.e. multiple choice questions) a blue arrow indicates the correct answer and you will also see if they have saved their own answer (either with a selected mcq choice or written text). Text under each question indicates whether the student has saved the answer.
A more detailed log is listed in the Quizzes Event Log. The link appears in every ‘attempt’ page at the top.
The link is circled in the example below.
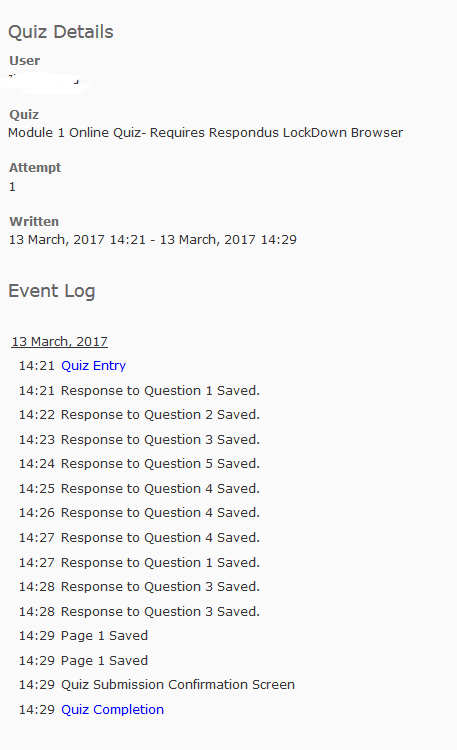
This log contains every event recorded for that quiz attempt.
The example below shows what a successful quiz attempt might look like, with quiz entry, questions saved, and quiz confirmation and completion all recorded.
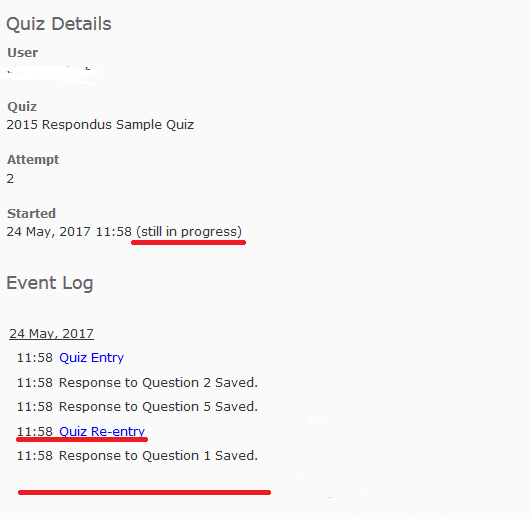
A log for a ‘problem’ attempt might end abruptly with no ‘Quiz Submission’ screen entry or a ‘Quiz exited’ entry. It might show a long pause/break between questions. Where you see ‘Quiz Re-Entry’ it indicates a quiz has been exited and then re-entered by the user.
The example below shows a quiz log for a quiz that was not exited correctly I have highlighted signs that the quiz attempt was problematic. The log shows the quiz was re-entered and exited without submitting as there is no entry for ‘quiz completion’.
Quizzes might also show entries about when the user has run out of time and where they have gone to new pages in the quiz (where the quiz is on multiple pages).
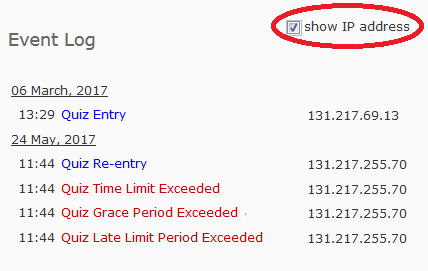
You can also opt to show the ‘IP Address’ of the log entries. If the numbers differ this indicates the user has switched to another computer.
In the example below the box has been checked to show the IP and the numbers below show where a new computer was used after the quiz was re-entered (usually the last 3-6 digits will be the ones that change, if the student switches computers). In the example below the entry shows where the user has switched to another computer. It also shows where the user has run out of time, as each ‘out of time’ event is also logged.
In summary the quiz attempt page and the quiz log don’t ‘prove or disprove’ a crash issue however they can indicate a possible problematic quiz attempt.
For example: A user claims to have crashed out of the quiz, then re-entered from a new computer and had problems saving their quiz.
- If the quiz log doesn’t have any ‘quiz re-entry’ event but instead shows the same IP and also that the user has answered questions throughout but run out of time, this indicates where the story does not match the evidence.
- If the log shows that the quiz was re-entered part way through and the IP address is different – this would support the users story.
With this information, you can decide how you want to deal with the issue. It is possible to ‘fake’ a crash, of course, but if your user’s information is very incongruent with the quiz log you may decide not to allow another attempt.
Solutions to Problem Quiz Attempt (choices below)
If the Quiz attempt shows ‘Still in Progress’ and your student has informed you that they can’t go back and submit the attempt, you can submit on their behalf. This choice is useful if they have the answers saved, as they may not need another attempt. Click here for PDF instructions.
If you’ve determined that the student can retake the quiz you can delete the problem attempt to allow them to try again. Click here for PDF instructions.
You can also give a student another attempt while keeping original attempt(s) intact. Click here for PDF instructions.
Handy Tips from Common Student Discussion Questions
This page details common student questions and details strategies you can use to alleviate the number of questions you receive via MyLO Discussion posts and emails.
QUESTION: Will lectures be recorded? Where are the recordings?
- Include the following information in your Unit Outline (perhaps under Details of Teaching Arrangements).
- whether or not lecture recordings will be captured;
- when recordings will be made available (usually within an hour of a face-to-face lecture ending);
- how recordings will be made available (e.g. via Echo360); and
- where students can access the recordings. Be specific about the location of recordings. ‘You can access recordings in MyLO’ is fairly vague. ‘You can access recordings from our unit MyLO site by selecting Content from the toolbar, then select Recordings from the Table of Contents‘ is far more specific.
- Ensure that your students can find the recordings easily in MyLO by placing the link/s in an obvious location and labelling the links/s clearly. Many templates include a specific folder in Content in which a link to the unit’s Echo360 section can be placed (for example, in a folder called Recordings). Alternatively, you might like to provide links to individual recordings when relevant, for example, in Module or Weekly pages in Content. Try to make the link names meaningful: by default, when you create a link to a Section or individual recording (Class), MyLO will use the link title, MyMedia Recordings (ALP). You may wish to change this to something like: Access recordings for this unit or Access this week’s lecture here.
- If you only intend to provide a link to a Section, instead of links to individual recordings, consider renaming your lecture recordings in your Echo360 Section, and placing them in a logical sequence.
- Many students request downloadable recordings: the setting to allow downloads is on by default but the option appears only if you give students access to the ‘list of all recordings’. Talk to your local support team for more information.
QUESTION: Why is there no sound in the lecture recording/why is there no recording this week?
- Get students in the classroom to remind you to take the microphone off mute and switch your radio microphone (if using)!
- Record with both the lectern microphone and radio microphone (where available). This is especially important if you tend to move around the room or away from the lectern.
- Have a back-up plan in place for recordings that lack quality (or any) sound, or for recordings that fail. For example, record the session with a small recording device. and let students know what the plan is — i.e. let them know that if a recording fails for some reason a backup will be made available within (X) days.
- Check for past recordings that are high quality. They could be used as a back-up for failed lecture recording. You can download these from an old unit Section or share them from you Library to your unit’s Section. Your local support team may be able to help you edit out extraneous content to make a succinct, reusable recording.
- Consider flipping your approach and pre-recording a sequence of short lectures that are used across several iterations of your unit.
- If something does go wrong, let the students know as soon as possible via Announcement or Email. Let them know your back-up plan and when they can expect to see the replacement materials online.
QUESTION: What is the format of Assignment X?/ What is included in the word count? / How many pages? (etcetera)
- The most common student questions relate to assessment.
- Look through Discussion posts (or old emails) from past units to see if there are FAQs that you can address in advance. Include answers to these FAQs with the details of an Assessment Task. Many MyLO sites include an Assessments or Assessment Resources folder in Content that you can add this sort of information in the form of a PDF or web (HTML) page.
- If you have taught a few iterations of the unit (or similar units) you may be able to identify common spelling, grammatical, formatting or referencing errors that students should avoid. You may wish to provide examples of these and how to avoid them.
- If your assignment has specific formatting requirements, it is handy to provide a student guide together with other assignment details. Some staff have provided Word Documents as templates (e.g. with margins, styles and headings already set up).
- There are frequent requests for ‘exemplar’ assignments. A good-quality example of the writing genre and the format required may be useful to those unfamiliar with a certain approach to writing. There are many great, free resources on the web that may find it useful to provide links to.
QUESTION: What is included in the word count? Is there a leeway on the word count?
- This is a very common question! Make it clear (in the Unit Outline and in any related Content folders in your MyLO site) exactly what is included in the word count, and the leeway (e.g. 10% under or over) that you may be willing to accept.
QUESTION: How do I submit my assignment? Where can I submit my assignment?
- Check that you have set up an Assignment Submission Folder for collection of the Assignment.
- Check that the Start, Due and End Dates for the Folder are correct: when folders are copied over from a past delivery of a unit, the old dates still apply.
- Though students can usually access the Assignments tool by selecting Assessments, then Assignments, from the MyLO toolbar, this may not be immediately obvious to them. You can easily include a direct link to an Assignment Submission Folder in a Module (folder) in Content, Announcement, Discussion post or HTML page using the Quicklinks tool.
QUESTION: Where is the grade/feedback for Assignment X? When will we get our grades?
- Provide an estimate of when students can expect to find their grades for each assignment and where they will find feedback in MyLO. If you don’t know in advance, tell students you will let them know as soon as possible. A good way of doing this is to send out an Announcement or Email shortly after the due date, thanking students for their submissions; advising them of when they can expect their feedback. Once you have completed marking and moderation, you may wish to alert students to the availability of their grades and feedback using the same method.
- Students may find it difficult to locate their Grades and Feedback, especially if they are new to online grading. The templates linked here include step-by-step instructions, including screenshots, to help your students locate their results: for assignments submitted to an Assignment Submission Folder; for a Quiz.
- It is useful to keep grade delivery consistent across units in a program. Students who are used to going, say, the Grades tool for most of their units will be surprised not to find them there in other units.
- Check that you have published (Assignment Submission Folders) and/or made visible the relevant Grade Item.
- Students often report problems accessing marked-up feedback in Grademark/Feedback Studio. This post details some common technical issues to look out for when releasing Feedback Studio feedback.
QUESTION: Who wants to join my group?
- For units that have group work, you may find lots of students requesting group members in your class Discussion area. Don’t let these sorts of posts clog up your Discussion!
- Consider creating a separate Discussion area for students searching for group members.
- Alternatively, you can create Groups for students to sign-up to. You may wish to ask your local support team for assistance with this.
QUESTION: I can’t see X content item/Where is the link to X?
- There are a range of potential triggers for this question: the name of a link may not be clear; the item may be restricted with a Start or End date; the item may only be available to a certain Group of students; the item may be in Draft mode; or the students need to complete an activity before they are given access to the item.
- Use the Descriptions attached to Content Modules (folders) or items to explain when or how students will be given access to content there. For example, ‘Remember: You will not see next week’s module until you have completed this week’s Quiz‘). If you use HTML Pages, place a warning (perhaps using one of the Attention objects included with the ICB Template) above a link that has restrictions applied.
- Keep filenames clear and logical, or rename the file once it is uploaded to a Module or HTML Page
- Keep your Content area well organised. Consider using Module (folder) names and Sub-modules (sub-folders) that make the structure and sequence of content clear. Many students appreciate content being organised by week or module.
QUESTION: When/where is the Online Tutorial/Web Conference?
- Online tutorials are not listed in the official UTAS timetable. Announcement advising when and how sessions times will be determined. Some staff like to run a survey inviting students to nominated their preferred time (from a selection of three or four possibilities). Your local support team may be able to assist with this.
- Set up a Web-Conferencing folder and include a link to the Web Conferencing tool there. Your local support team may have a suite resources that they can bring in to your MyLO unit, to help students set up their computer/device before your first session begins.
- Choose an access method and stick with it: get students to access the Web Conferencing tool and click the Join Room button every time there is a session (this takes students to your unit’s 24-7 room); or set up a Session (with time and date parameters) for each class.
Useful shortcuts when adding and editing text in MyLO
You may find that using keyboard shortcuts increases speed, and reduces the likelihood of accidentally de-selecting text, when copying text (e.g. from a Word document) and pasting it into HTML Pages, Discussion Posts, Announcements, Quizzes and Rubrics in MyLO.
With practice, these shortcuts will become second nature. Always ensure that you have the correct text selected, have your cursor in the correct position or have the correct field selected before using these shortcuts (does not apply to Undo shortcut).
PC |
Mac |
|||||
|---|---|---|---|---|---|---|
Copy |
CTRL | + | C | Command | + | C |
Paste |
CTRL | + | V | Command | + | V |
Undo |
CTRL | + | Z | Command | + | Z |
Select All Text(in the active window/cell) |
CTRL | + | A | Command | + | A |
Copying Checklists
So you’ve created a checklist and it’s all perfect and got tonnes of good stuff in it and now you need like another 12 of them to cover all the weeks or whatever. You ‘officially‘ sort of can’t, but I have a handy dandy work-around. Sorry. No wait, don’t go!! It’s not too bad! I promise!
It’s not possible to copy a checklist from within the checklists tool itself – for whatever reason (probably “we can’t be bothered hiring a guy to program in a button”). Fortunately there IS a way to copy a checklist but it’s a few steps, however those will likely be far fewer steps than if you were to re-create the checklist from scratch if you have a super long complex checklist with lots of items in it.
How to Copy a Checklist!
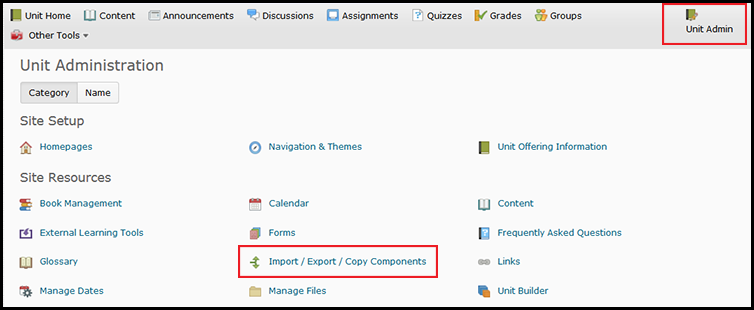
Click Unit Admin on the toolbar at the top of the page, then click Import/Export/Copy Components as shown in the screenshot below.
Click Export Components, as shown below, then click ‘Start’ also shown below.
Choose Checklists from the list but also ensure you click the ‘Select individual items to export’ as shown below.
Click Continue at the bottom of the screen. It’s not in the screenshot because it’s quite a long list, the continue button is at the end of the list, in blue. When you click ‘Continue’ you will see a screen similar to the screenshot below that has a list of the checklists in your unit. Select the one you want to copy and click ‘Continue’. You can, of course, select more than one, if you need to copy a few at once.
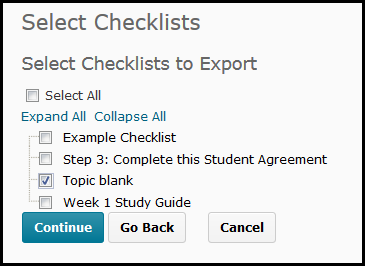
Now choose the checklist(s) you want to copy. In this example I am choosing one called “Topic Blank”.
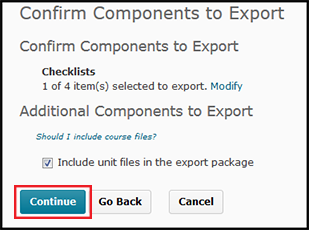
When you click Continue you will get a screenshot similar to below:
Make a quick sanity check that it shows the correct number of checklists and no other content in the list under ‘Confirm Components to Export’. Then click ‘Continue’.
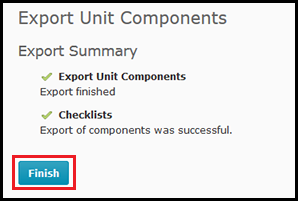
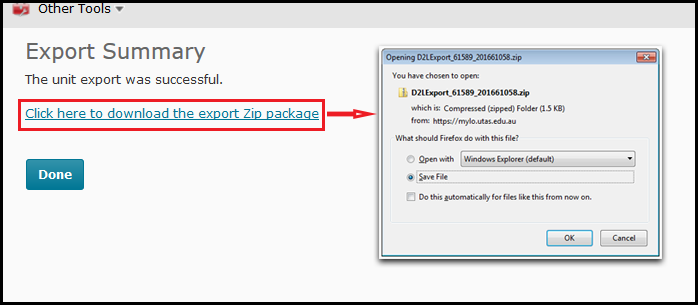
Now you get this window – it serves no real purpose other than to make you click one more button. When you click ‘Finish’ it will load up your Zip file – so don’t exit this browser window or anything. Just click ‘Finish’.
NOW you can save the zip file, click on the link as shown above and save this Zip file somewhere where you can find it again easily. You can rename the file if you like. The process for saving the file will depend on your browser. The screenshot above shows how Firefox saves files, other browsers may differ. If you’re not sure how to save a downloaded file from your preferred browser please contact ITR or your Ed-Tech for a quick Browser lesson 🙂
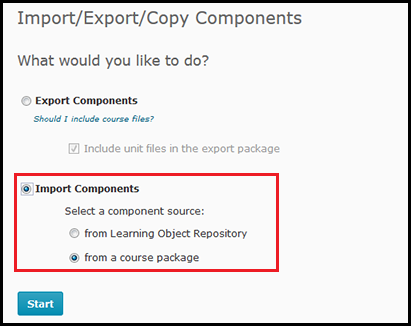
When you’ve saved your file – go back to Unit Admin and choose ‘Export/Import/Copy’ again, same as your first step and this time choose to ‘Import Components’.
Then click ‘Start’. When you do the following window will pop-up.
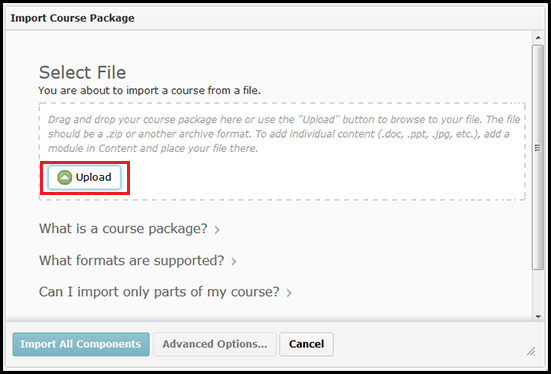
You can drag and drop your package into the ‘Upload’ window – or click the button highlighted to choose the Zip file you previously exported.
Like the caption says, drag and drop the Zip file you previously saved onto the window that loads, or click and browse for it.
Once you’ve uploaded a file click ‘Import All Components as shown above, we already know the Zip only contains what we need because we were so thorough before. That was good of us wasn’t it, let’s say a quick cheers to past us now.
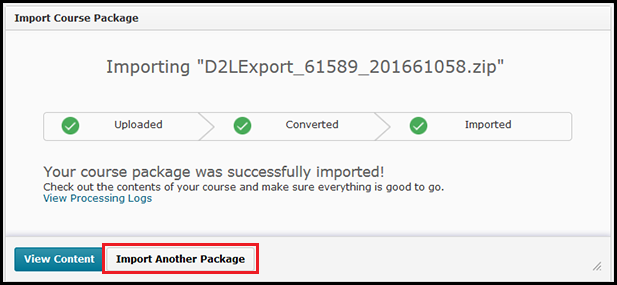
Once it’s imported you have the option to Import again. You can re-use the same zip file multiple times.
When it’s done Importing – it won’t take long – you then get the option to ‘Import another package’ as shown highlighted above. You can re-import the same exact zip file without having to export anything again. It won’t over-ride the one you just imported, you can re-import that same zip as often as you like!
When you’re done importing your checklist – click ‘View Content’ or close the import window, you’ll need to go back to the checklists tool to see your checklists.
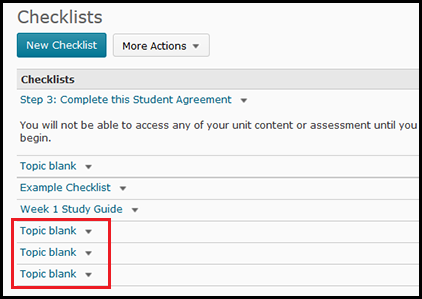
Multiple checklists will be listed at the end of the checklist tool list. Click to edit any one of them.
As you can see from the screenshot above, I’ve imported the zip file 3 times. Each one is listed at the bottom of the list. You can now click to edit (including renaming) them from the Checklist tool now or add them to your content and edit from there. All done!
Still annoyed? I would be, feel free to ask your Ed-Tech to sort it out instead because you have better things to do (not sarcasm, you honestly do and wrangling MyLO is more an Ed-Tech thing).
Using the technology in the lecture spaces
UTAS large teaching spaces feature a range of technologies, including projectors and screens, document cameras, and lectern and radio microphones.
Many of these technologies can be controlled from the control panel (a touch screen) on the lectern in the space. This visual guide shows you how to control the equipment using the control panel in many standard UTAS large teaching spaces.
The control panels used in the Harvard Teaching Spaces are different. You can access instructions showing how to use them here.
Using the technology in the Harvard spaces
The Harvard spaces feature a range of technologies, including front and rear projectors and screens, a document camera, numerous microphones (fixed and portable), and video conferencing functionality.
Most of these technologies can be controlled from the control panel (a touchscreen) on the lectern. There is also a clicker available to allow you to move through slides without returning to the lectern.
Encouraging tutorial attendance: A different approach
In their book, Learning in Groups: A handbook for face-to-face and online environments, Jacques and Salmon (2007) recount the story of a British business lecturer who faced decreasing attendance at weekly seminars. Seminar participation was not assessable or compulsory, but the lecturer felt that attendance was of benefit to his students..
The lecturer sent out a notification to all students stating that they would only be allowed into a seminar if they brought along a ‘passport’ (a half A4 page), containing notes from their recommended readings for that week. At the start of each tutorial, he would collect the cards, amass them over the teaching weeks, and then hand them back to the students when they sat for the exam.
Collecting the cards resulted in a higher attendance at tutorials – students clearly liked the idea of being able have their notes given to them as reference materials for their exam. The lecturer also noticed that students were far more engaged and interacted more frequently during tutorials.
If you wanted to use a similar technique at UTAS, we strongly advise consulting the Exams Office before agreeing to allow notes in an exam.
Reference
Jacques, D & Salmon, G 2007. Learning in Groups: A handbook for face-to-face and online environments, 4th edn, Routledge, New York. *This text is available at the UTAS Library.

