How to Create a Checklist
This document covers creation of a basic checklist.
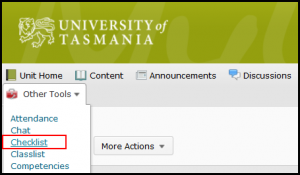
First go to ‘Other Tools’ and then click “Checklist” from the menu.
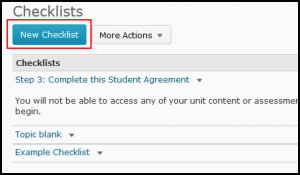
There may well be a checklist or two loaded into your unit. TSBE units will have the Step 3 agreement in the checklist items.
To create a new checklist click the “New Checklist” button at the top of the checklists page as shown below.
When you create a new checklist a window will load that asks you to type in a name and description.
When you type your name, as noted above, be sure to make it one that will make sense in the context of the content it is being created for. For example – if this is a checklist for your Week 1 Study Guide, then this is the name you would give it. Whatever you type into the Name field becomes the link that students see and click on to access the checklist.
Click ‘Save’.
When you first save your checklist new options appear as outlined above in red. This is also the screen you will see if you click on an existing checklist inside of the checklist tool. The example above hasn’t got any items or categories yet so let’s talk about what these are and how to add them.
Categories.
A category is simply a way to ‘group’ a list of items together visually. It adds a sub-heading to your checklist and is useful for breaking up content into logical chunks inside of a checklist. A category does not have an associated ‘checkbox’ and is only there for visual clarification. Your checklist does need to have at least 1 category, so to start with add a new category to your checklist.
To add a category just click the “New Category” button and fill in the name and description.
Remember to give your category a descriptive name, this text will be shown as a sub-heading inside of your checklist. When you click Save you will be taken back to the main Checklist page and you’ll see your category listed just under the buttons.
To add individual item to your checklist click the “New Item” button. It will load up a window similar to the one we just saw for a category with some extra options.
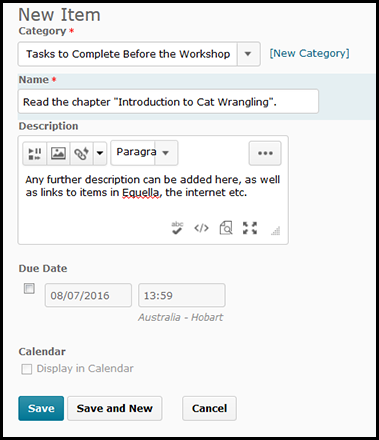
New Checklist Item page, again type a descriptive name and add some useful instruction in the ‘description’ field.
The first extra option to be aware of is the “Category” option. Make sure this item is in the correct category – choose from the dropbox at the top.
Give your item a descriptive name, this text will sit to the right of the checklist button that students click so make it an “actiony” name – ie something that they need to do that they can then check as “done”.
The Description field is optional but important too – here you can add instructions and even links, images, media and so forth. This is the standard “text editor” that appears elsewhere in MyLO too and there is a list of instructional videos that cover how to use this tool for structuring your text.
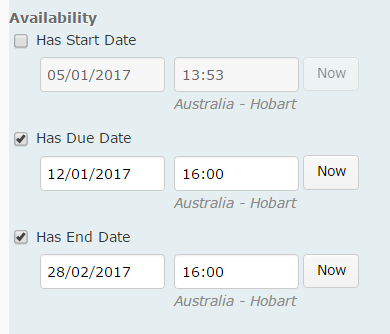
Optionally you can add a “due date” to your checklist item – it doesn’t “block” a student from doing it late but it will flag the ones that do. It may be a handy way to add important milestones into the calendar as you can add this item to the calendar if you give it a due date.
Click save when you are done, or save and new to add another Checklist Item.
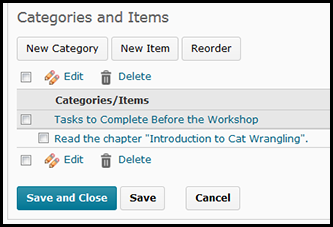
As you can see when the item is saved, it appears indented under the category it was linked to. Wrong category? Just click any item to re-open the ‘edit item’ screen to choose the correct category. You can also re-order categories with the “Reorder” button.
Below is a screenshot of a checklist that has a few categories and items in it:
Here’s a checklist that has many items in it, it’s not a perfect example it’s just for showing how it looks. The items that have a strange grey icon to the right are those that have a nominated ‘due date’ and the date is shown to the right. Any item can be edited by clicking on it.
To add this to your Learning Hub or other Content area you need to first save and close this checklist then navigate to your content area and choose “Existing Activity” then “Checklist”.
When you choose “Checklist” a list of the available checklists will appear, just click on one and it will be loaded to your content page.
From here you can further edit/refine your checklist – however there is an alternate set of instruction for this in another entry.
General principles to apply when responding to students online
Respond within a reasonable time-frame.
Respond to questions (in the Ask the Class Discussion) within two (2) business days and apply the same response time to emails. This avoids students defaulting to email thinking that they will get a faster response. Avoid responding immediately, as this feeds the assumption that you are always available. Only respond immediately if the request is urgent (e.g. a student has reported that a Quiz does not appear on MyLO.
Discussion activities for learning require less direct facilitator intervention. These activities usually proceed over a one to two week period. Check in and encourage, correct or re-direct if needed, ideally just before the midpoint of the activity (day 2/3/7), and again just before the end point of the activity (day 5/6/12).
Unless you have a small cohort, it is impossible to respond to every post.
Focus on answering each Q&A style question. Use techniques like weaving and summarising to give the impression of instructor presence in discussion activities for learning.
Include a salutation, preferably addressing the student, or students, directly.
Examples:
- Dear students,…
- Hello everyone,…
- Dear Peta,…
- Hello Peta,…
- Hello a{FirstName}/b{InitiatingUserFirstName} [This can be used to personalise a aMyLO Announcement or bIntelligent Agent email, as it pulls the user’s first name into the message according to their user details]
Thank the class/individuals for their question or comments.
Thank students by drawing attention to what they have done well, and illustrating this with some important or useful contributions. This will help them recognise that they are ‘on the right track’. Thanking an angry student will help reduce anger levels, as you are responding in a civil and polite manner.
Examples:
- Thank you for your question about…
- Thank you for sharing your concerns about…
- Thank you for alerting me to…
- Thank you for your comment/suggestion about…
- I wanted to extend a big thank you to Peta, who alerted me to a problem with…
- Thank you to Peta for her question about…
- It was great to see you all sharing your ideas. I particularly appreciated Peta’s comment about…
Add a touch of personality (warmth) from time to time.
This helps distance students feel more connected with you, and helps engender a sense of belonging to the class. A short sentence is inviting, but not too distracting from the task at hand.
Examples:
- I hope it is warmer where you are today. In Hobart we’re only expecting to reach a 6 degree maximum!
- Did you watch last night’s episode of Q&A? Some of the questions were directly related to the questions raised in last week’s module. It was really interesting.
Acknowledge errors or problems and apologise for them, even if it isn’t your fault.
Students want acknowledgement that there is a problem and that there may be a solution. While it is fine to tell them what went wrong, avoid lengthy descriptions, laying blame, or the use of emotive language.
Examples:
- You’re absolutely right – the Assessments in the Unit Outline currently add up to 80% and this is an error. I have now uploaded the correct version of the Unit Outline which you will find here. Apologies for the confusion.
- Thank you for spotting that typo for me. I must have looked at that page twenty times and not noticed the mistake! I have now corrected the page according to your suggestions.
- I’m sorry to hear that you had difficulty getting access to last night’s online tutorial. I have now added some additional help materials here, which may be useful. Also, I recommend that you…
- Unfortunately, MyLO was down for unforseen emergency maintenance last night, which is why you couldn’t access the lecture recording at that time. As I use MyLO to email students, I wasn’t able to email you all to let you know about the downtime. Please accept my apologies for the inconvenience. The system is back up now, and I have checked that the lecture recording is definitely available.
Provide hyperlinks to resources where possible.
This encourages students to act on your messages immediately and avoids the use of lengthy explanations. To learn how to add a hyperlink to a Announcement, Discussion post or MyLO email, click here.
Examples:
- To access the Unit Outline, click here.
- You’ll find more information about the process here: link goes here.
Summarise the most important message/s in the first few paragraphs.
The first few paragraphs tend to get the most attention from a reader. Supplementary information can be included in later paragraphs.
Use full sentences and an informal tone.
Model the kind of language that you want students to use. A very formal tone can be intimidating, while he use of slang and contractions can be confusing for students with English as a second language.
Use videos to keep your messages short and interesting.
Using MyLO’s Video Note feature you can easily record a video of up to 3 minutes duration straight into a Discussion post or News Item. For instructions, click here. Alternatively, you could link to a recording you have created with Echo 360 Personal Capture.
Create an FAQ resource to save time during future iterations.
Add common questions and your answers to a Word Document throughout the semester (avoiding references to specific dates, weeks or semesters). Next time you run the unit, upload the document (as a PDF) to your MyLO site, so you can direct students to it, or copy or paste from it to increase the speed of your responses.
Avoid correcting a student’s poor behaviour/breaches of etiquette publicly.
Copy the offending post to a ‘quarantine’ discussion (available to staff only) so that you have a record of it, then email the student to explain what has happened to their post, why you have quarantined it, and how they could post more appropriately in future.
Finish with an informal salutation.
Sign off with something like “Cheers”, “Thanks again”, “Talk soon”, “Kind regards”, “Looking forward to hearing from you”, or “See you soon”.
Looking for samples of Rubrics?
Our peers from Victoria University (VU) have put together some great sample rubrics for different assessment types, which you can see here. Just click on the thumbnail of a rubric to see it in detail.
Even better – these rubrics are actually designed to be imported into a D2L (MyLO) unit, as VU use the same learning management system as UTAS . Instructions explaining how to import the rubric are also provided here. You may need to adjust the scoring on the rubrics to fit with your assessment task. Once you have finalised the electronic Rubric in MyLO, you can attach it to a Dropbox Folder or Grade Item.
Providing students with access to Blackboard Ultra recordings
Are you using Blackboard Collaborate Ultra to run online classes (workshops, tutorials, webinars etc)?
The way you (and students) access the recordings of your sessions will depend on the way you set up the Online Room. If you ordered a room through the MyLO Support Team (usually via a form you fill out online), you would have received a Participant’s link to send through to your students. Once your recordings are processed, you should receive a further email containing a link to your recording. You can then make this link available to students on MyLO, via a link in a folder (module) in Content or a link in a News Item.
Most staff create their Online Rooms from inside of MyLO. You’ll know that your room was created inside of MyLO if the link to it is marked with a symbol like this:
If so, follow the instructions in the video below to obtain a recording link to share with your students. Alternatively, you can view the video on YouTube.
Students experiencing difficulty accessing Blackboard Collaborate Ultra via MyLO
We have had some reports of students experiencing difficulty accessing Blackboard Collaborate Ultra Online Rooms. When some students go to MyLO and try to click on the Join Room link, or a session link, they are prompted to enter a username and password (not their UTAS username and password), and thus have difficulty accessing the room.
This may happen because:
- the student did not wait for the room to load and clicked the back button on their browser to try to return to MyLO; or
- the student is using a mobile device and has not installed the free Bb Student app.
- the student is using the Safari browser (on an iOS device like a Mac computer, tablet or smart phone) and the browser is blocking cookies.
Student did not wait for the room to load and clicked the back button (resulting in a prompt for a username and password): Solution
If the student clicks the back button on their browser before a room loads, they should close the browser tab with the username and password prompt. This should return them to MyLO, where they can click the link to the room again and, this time, wait a few seconds for the room to load. This may mean watching a black screen for up to 20-30 seconds or so, depending on connection speed.
Student is using a mobile device and has not installed the Bb Student app: Solution
To use Blackboard Collaborate Ultra on a mobile device, the device must have the Bb Student app installed. The app can be downloaded for free from iTunes (iOS devices), Google Play (Android devices) or Microsoft stores.
Once installed, students should navigate to the link you have provided in MyLO. They be prompted to enter a school’s name. Instead of choosing a school, they should click on the link that says Join Collaborate without signing in. They should then be able to type their name and click Join to join the session.
Student is using Safari browser: Solution
Essentially, the default browser setting block communication between MyLO and Blackboard Collaborate. Thus, the student is not recognised and cannot get in. There are, however, work-a-rounds.
- The student should use Google Chrome browser (opens in new window) (which will work on Mac and iOS devices). This is the browser recommended by UTAS and it is free.
- If the student must use Safari, they can trying adjusting the security settings for their Safari browser by changing the security level under Block Cookies to Always allow.
- As a back up plan, you can provide a direct link to students that ‘bypasses’ the MyLO > Blackboard Collaborate communication process. Students will not have to log in, but they will need to enter their name when prompted. This name they enter is collected so that others can identify them when they enter the room. The video below will show you how to access this link (if you would like to view the video in full screen, view it on YouTube here). You can then email it to students experiencing difficulties or Quicklink to it in MyLO.
Setting up Turnitin and Grademark/Feedback Studio
Turnitin is a text matching service used to compare student-submitted work to the existing literature, as well as student work already stored on its database. Turnitin highlights text matches, allowing you to rapidly detect possible areas of plagiarism or collusion in a student’s writing.
Grademark/Feedback Studio, which is available when a student’s work is submitted through Turnitin, allows you to leave comments on a student’s work electronically. Click here for more information about providing feedback with Grademark/Feedback Studio.
To use Turnitin and/or Grademark/Feedback Studio, you must enable Turnitin when setting up a Assignment Submission Folder (to collect student submissions) in MyLO. Ensure that you do this BEFORE students start submitting their work. Here’s how.
PART 1: Set an End Date for your Assignment Submission Folder
To work effectively, Turnitin requires that you set an End Date in the Assignment Submission Folder’s Restrictions tab.
If you have already created an Assignment Submission Folder, you will need to choose to edit it. Do this by selecting the arrowhead to the right of the Folder name, then select the Edit Folder option. Alternatively, when viewing the Submission Folder, click on the Edit Submission Folder button. If you’re already in the midst of creating a Submission Folder, read on.
By default, the Properties tab will be open. Select the Restrictions tab.
Scroll down until you see Has End Date. Check the Has End Date option then record a date and time. We recommend that you set the End Date to a few days after final results are released for the semester.
Scroll to the bottom of the page and select the Save button.
PART 2: Connect the Assignment Submission Folder to Turnitin
Click on the Turnitin tab (note that you will need to have given the Folder a name before you do this).
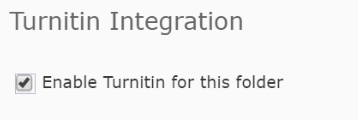
Check the box next to the Allow Turnitin for this folder option. Wait a moment while the connection is initiated.
PART 2: Choose the right settings – VERY IMPORTANT!
The following settings are the key to making Turnitin and Grademark/Feedback Studio work the way that you want it to. Do not skip these steps!!!
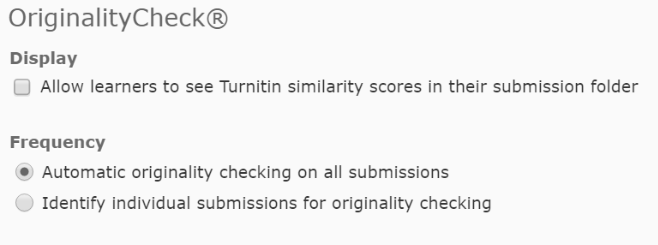
Leave the Allow learners to see Turnitin similarity scores in their submission folder setting (under Display) unchecked. Under Frequency ensure that you have the Automatic originality checking on all submissions options checked. If the Identify individual submissions option is checked instead, you will need to manually click on each file submitted by students to process them through Turnitin. Not fun!
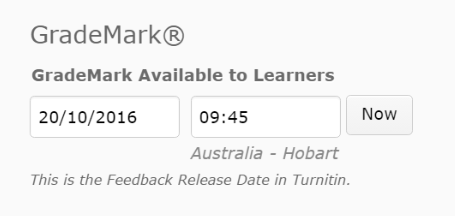
Scroll down and you should see the Grademark available to learners setting. The date recorded here is the date from which students can see the link to access their Grademark/Feedback Studio feedback. We recommend setting this date about one month following the Assignment Submission Folder due date, to avoid any students accidentally seeing their feedback as you’re marking. If you wish to release the feedback earlier, you can always come and alter this date accordingly.
Back to towards the top of the screen, you should see a More Options in Turnitin button. Click on it.

A new window will open. Locate the Allow submission of any file type option. We select you choose Yes. This is especially important if you want to mark files, such as PDFs or some image files, in Grademark/Feedback Studio, even if an Originality Report cannot be generated.
Now click on the Optional Settings option that appears towards the bottom of the screen.
You should now see more settings. Scroll down until you see the Originality Report generation and resubmissions button. Make sure that the Generate reports immediately (resubmissions are allowed until due date) option is selected. If you do not select this option, you may find that students who submit more than one file (very common) only have the first file processed through Turnitin.
Scroll down until you see the Submit button. If you can’t see it, expand the window to full screen. You should be able to see it then.
Higher-order thinking activity designs for face-to-face or online delivery
Anderson and Krathwohl’s (2001) taxonomy of educational objectives (see a useful summary here) classifies cognitive (thinking) tasks into six levels. Remembering and understanding, and to some extent, simpler forms of applying, are lower-order tasks that are less demanding. It is relatively easy to design activities that encourage these thinking levels, for example:
- Lectures or short videos;
- Readings;
- Quizzes;
- Application of procedures or formulas; and
- Finding and sharing resources.
Applying, analysing, evaluating and creating are higher-order tasks, which tend to be more difficult to design.
The following model activity designs may be applied to a range of disciplinary contexts, face-to-face or online, to encourage higher-order thinking. For further advice about adapting these activities to the context of your unit, or to discuss other possible designs, please contact the Flexible Education Team.
Analyse – Top 3-5-10
Objective: Students will break down a phenomenon, concept, topic or skill into its component parts (and potentially order the parts in terms of importance).
Evaluate – Pick or Mix
Objective: Students compare and contrast the value of given theories/strategies/solutions to a specific context.
Evaluate – Worth reading
Objective: Students compare and contrast the value of set readings/articles to their understanding of a specific context or topic.
Create – 25 words or less
Objective: Students represent the essence of a complex theory, concept or idea in 25 words or less.
Create – Generate a Hypothesis or Strategy
Objective: Students will create an original strategy/solution in response to a need/problem/client brief.
Create – Teach the novice
Objective: Students will create a method of explaining a specific concept/theory/idea to a novice.
*Do you have an idea for an activity encouraging higher-order thinking? Please share it with us, so we can share it with others.
Is it essential or nice to know?
When you’re planning learning objectives and activities, or rifling through a plethora of resources, it can be difficult to determine what is absolutely necessary and how much is enough. These generic questions will help you determine whether something is essential or nice-to-know, and the extent to which students need to be able to use it. Essentials should be included in the unit. If something is nice-to-know/do, consider including it as an optional activity or resource.
Questions to ask about knowledge and how it is used
- IMPORTANT: Does this go above and beyond the learning outcomes/objectives? For example, if a learning outcome asks students to apply the ’10 step process’ to a case study, do they need to analyse the process as well?
- Do students need to know this, before they can understand that?
- Do students need to understand the history of this, or just the most recent/relevant aspects?
- Do students need to know about every component, or just the basic idea?
- Are students likely to already know this? What happens if some of them don’t know it?
- Do students need YOUR examples, or should they offer their own? What happens if they have no experience of this phenomenon?
- Do students need to know about all the options, or some of the key options?
- Do students need to get it right the first time, or learn by trying it/making mistakes?
- Do students need to apply the process/solution? Do they also need to understand why they are applying the process, and how it works?
- Do students need to remember it, or know how to find it if (and when) they need it?
- Do students need to choose a solution/process, or develop a new solution/process?
Questions to ask about resources
- What does it offer that no other resource has offered so far?
- Can it replace another resource?
- How would it complement the other resources?
- Is it more re-usable than similar resources?
- Have you used the same type of resource several times in this module already? Would a different type of resource provide a welcome change?
- Does it cover things that may change in the near future? Will it become out-of-date/irrelevant quickly?
Template to assist with the planning of module/teaching weeks
This template takes you through the process of determine what needs to be covered during a module/week of semester for a unit. It then encourages you to determine how students will use this content according to Bloom’s Taxonomy. Using the template will also help you construct learning objectives for the module/week, before finalising a sequence of activities. You can access the template here.
Quarantine a Discussion post
From time to time, students may post something that you feel is inappropriate. An inappropriate post may contain a swear word, insensitive or offensive comment, or a put-down. Attempts to promote or sell a product or service, or push a certain idea, belief or agenda – especially when it is not related to the unit or topic – are also inappropriate. You may also feel that some posts are inappropriate given the nature of a discussion task, for example, extended ‘off-task’ social chit-chat is more appropriate in the Social Cafe Discussion.
While it is possible to delete Discussion posts, deleting them means that you will lose the record of the posts. You may prefer to quarantine a post so that you have a record of it, which can be useful should disciplinary action be required down the track. These instructions will show you how to quarantine a post.
Note that you should contact the owner of the post (the student) to inform them of the removal of the post, explain why it was removed, and provide suggestions as to how they can post in a more appropriate manner next time.

