Save Powerpoint Presentation as Video
It is possible to save out a video from a Powerpoint Presentation directly from within Powerpoint.
Before you do – here are some key things to check. It is always a good idea to play back the presentation by going to the Slide Show tab & then click Play, Start Presentation, or From Beginning (depending on your version). Check for any instances where mouse clicks are required – these will need to be changed to automatic.
1. Check that your slide progression is set correctly. The video will convert using whatever slide timings & animations currently set. To check and/or edit your slide timing – go to the Transitions tab & for each slide check the top-right part of the window to check that each slide is set to ‘automatic’ & that a suitable time is entered.
2. Check that any video & audio located on your slides are set to play automatically (or that the timing of their start time is set correctly). To do so click on the object & then view the ‘animations’ tab. The settings of the object is shown on the top-right.
3. Animations that require a mouse-click can also be changed to be timed/automatic using the ‘Animations’ tab. Click the ‘Animations Panel’ button on the Animations tab toolbar to show the side-panel containing a list of all timed objects for that slide. It will help you to locate & correct objects that need to happen at certain times (ie, if you want something to appear halfway through a narration – you can set the object to appear at a specific time using this panel).
4. Save the presentation as a powerpoint file (cntrl-s or File – Save) before you save out as a video – saving as a video will take a long time & you don’t want a sudden powercut or crash to wipe your hard work!
To save out a video version:
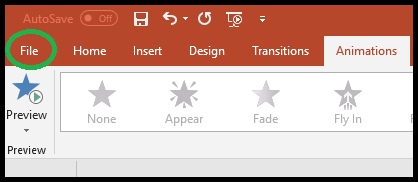
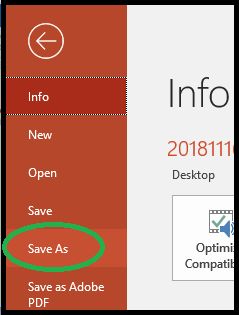
Go to the ‘File’ tab and click the ‘Save As’ option on the left-side of the window.
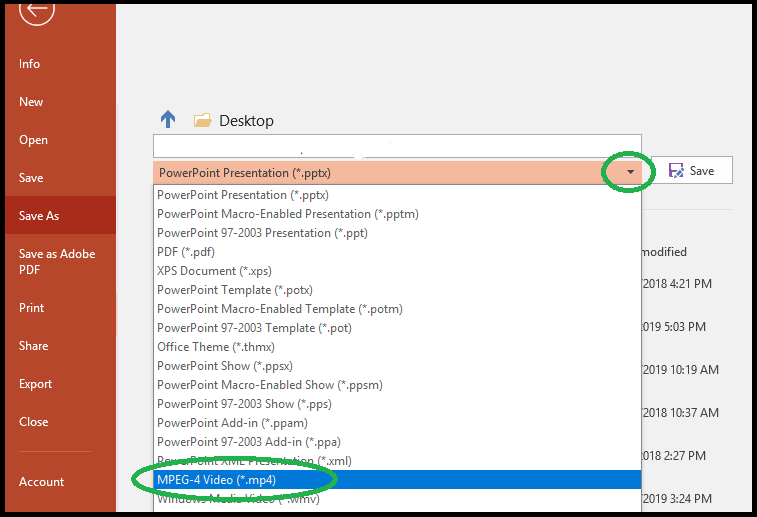
When you see the save options go to the file type dropdown menu & choose MPEG-4 or MP4 as the type.
Give the file a name & location then click ‘Save’.
It will take a long time to save – even for a short presentation. You may see a progress bar along the bottom of the screen. DON’T quit the program until you see the progress bar finish.
If there is any problem with the video you will see a popup notification to let you know, on success it will just finalise on its own without letting you know it was successful.
Remember – always watch the video it produces as there may still be residual issues with the timings/media objects. This MP4 can then be used in other editing software or uploaded to video sharing sites (it will also load fine into Echo360 or MyLO as is).
How to reduce narrated powerpoint file size
If you have created and narrated a Powerpoint file for your class and the size is very large (over 100mb) it is a good idea to reduce the file size before you upload to MyLO.
To do so follow the steps below.
FIRST! – Make a copy of the powerpoint file – this way the full quality version is always kept safe.
1. Open the copy of your Powerpoint file.
2. Click ‘File’ tab at the top-left.
3. Click the ‘Compress Media’ button.
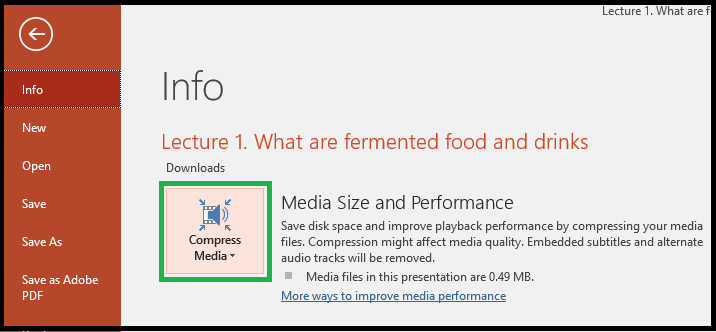
4. You will see some options – choose the option for 480 (standard) or (email) if you have that option. Depending on your version of powerpoint you may not get any options but it will start right away.
Once the process has finished you can save. In later versions (including office365) the file size is shown in the ‘File’ tab, but earlier versions you may need to close and check the file size via your OS.
IF this doesn’t work, or if you aren’t getting options to reduce the size try the following troubleshooting.
* If you aren’t seeing any options for ‘Compress’ or ‘Make Compatible’ your Powerpoint version might be older and not support these options. If you have an older version of powerpoint and aren’t able to download and use the Office365 version OR the online version via the website contact your unit coordinator or tutor for advice.
* If your powerpoint file is very large and the compress media isn’t helping check that you don’t have any large videos or images in your file that could be contributing to the size.
* Look out for large image files – if you’ve pasted in a huge image and then resized that original image’s data is still present in the file. Particularly an issue for older versions of powerpoint. Try resizing images outside of PPT before you paste them in. OR click the image, choose cut and then ‘Paste Special’ from the edit menu and choose ‘jpg’. This pastes the image in without the large file size.
Advanced users only!
* Newer versions of Powerpoint store their files in a format compatible with zip readers. If you change the file extension from .pptx to .zip you can open the file as a zip file and inspect the contents. Navigate to the ‘ppt’ folder then to the ‘media’ folder to see all images, video and audio that are loaded into the powerpoint. If any of these are erroneously large you can use a third party software to reduce and replace so long as the file name is the same OR you can simply restore the .pptx extension and find the problem file in powerpoint to deal with. Remember to restore the .pptx extension before loading into MyLO.
Working with the CBT Template (TSBE)
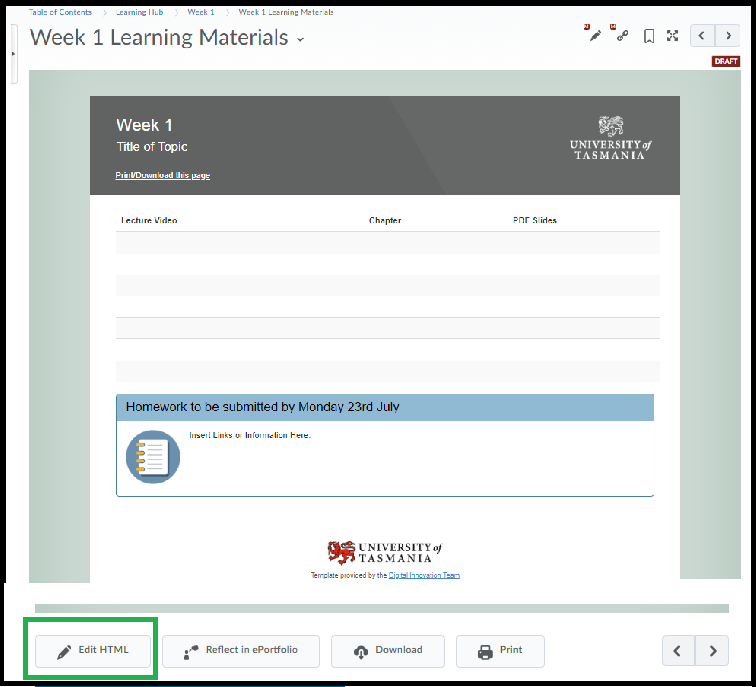
If you are working with the CBT Template you will find a blank page in your Content area for each Week that you can use to upload your video links, files, chapters and other information. This template – by default – uses the following layout:
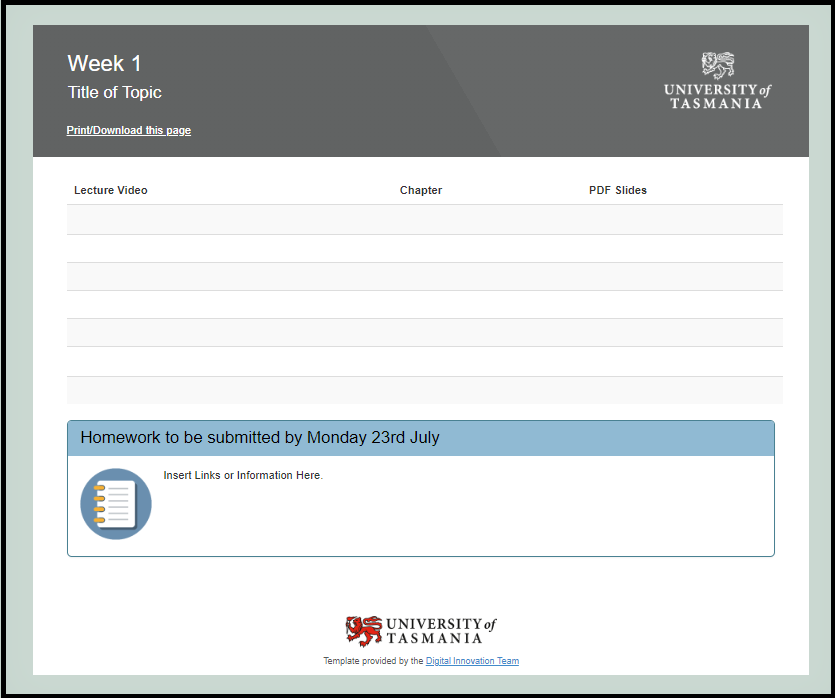
If you require more sections please chat to the Teaching.TSBE team who will be able to modify and extend the template to suit your needs.
To edit and add content click into Content – then click Learning Hub – then click through to the page you wish to edit and choose the ‘Edit HTML’ button at the end of that page. (If you’re new to MyLO and aren’t sure sure where to go – make a time to see someone in the flex team to show you in person – you can contact them via the Teaching.TSBE email.)
Adding Text: The editor is somewhat like a WYSIWYG editor in that you can click somewhere on the page to type text. You can also edit the title and subheadings by clicking into them and typing your text. Use the toolbar that appears at the top of the page to do things like add ‘bold’ etc. The tool bar is also where you’ll find the icons used to add links.
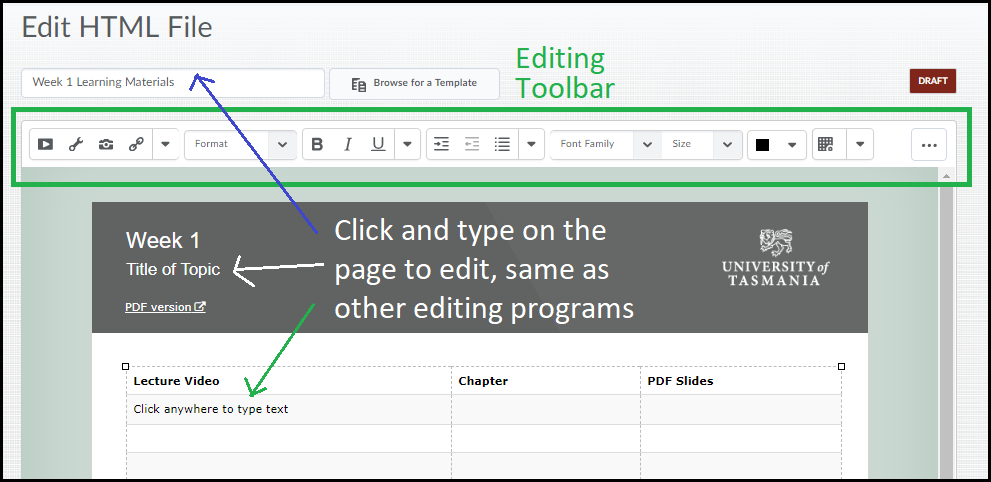
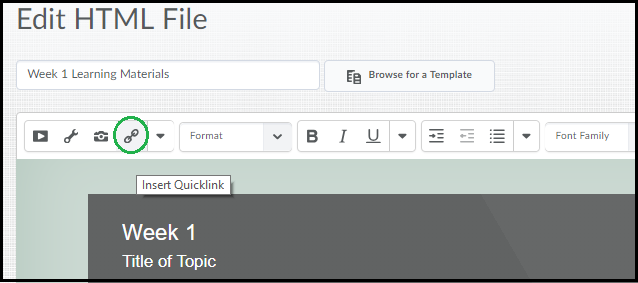
Adding Link to Files: To add a file to the page (ie a PDF of slides) click to where you need the link to go, then click the ‘Quicklinks’ icon as circled below. Please note readings protected by Copyright should be loaded via Equella (help to come).
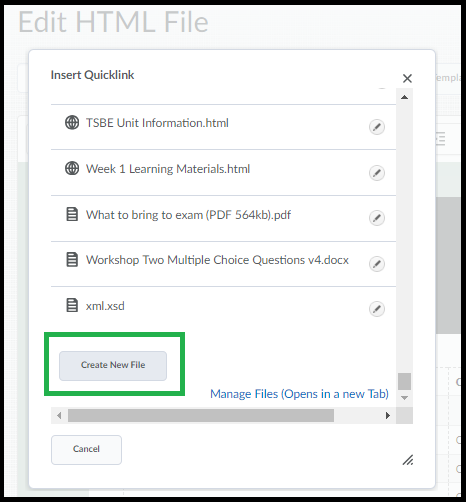
A small list will appear. From this list choose ‘Unit File’ – the window that loads will show all of the previously uploaded files. To upload a new file click on ‘Create New File’ at the very end of the list.
This will load a small window into which you can drag/drop a file, or choose from One Drive Business/Dropbox etc. Click ‘Create & Insert’ to add a link to the page. By default the text that shows is the name of the file, so ensure that your files are clearly named.
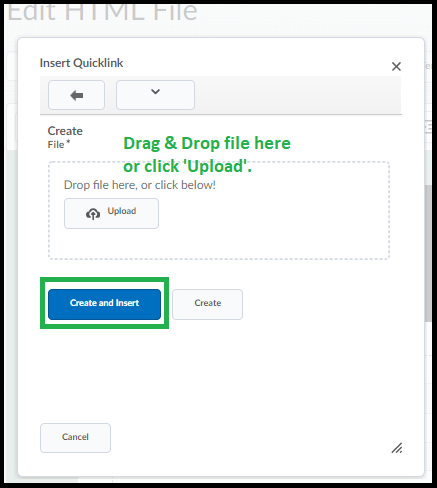
Adding Links to Video: To add a link to a video you will first need to ensure that you have your video uploaded to an Echo360 Class area – if you’re not sure if this is set up contact the Teaching.TSBE team for advice. They will also help you using the Capture software that can record video OR show you how to upload video that you have captured using any other software.
Once uploaded the steps to adding the link involve a few steps.
Step 1 – Go to your page, click ‘Edit HTML’ if you haven’t already and click the cursor where you need the link to go.
Step 2 – Click the ‘Add Quicklink’ button and choose the pencil icon to the right of the term ‘External Learning Tools’ as shown below.
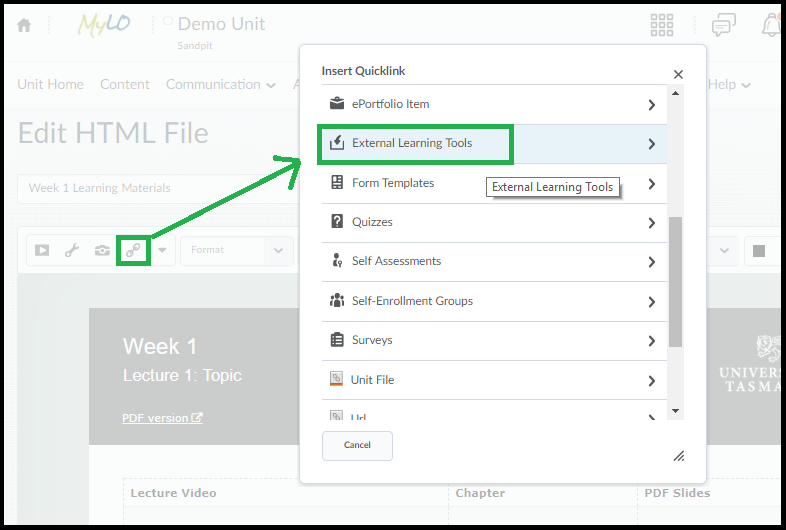
Step 3 – Click the ‘Pencil’ icon next to the option ‘MyMedia Recordings (ALP)’.
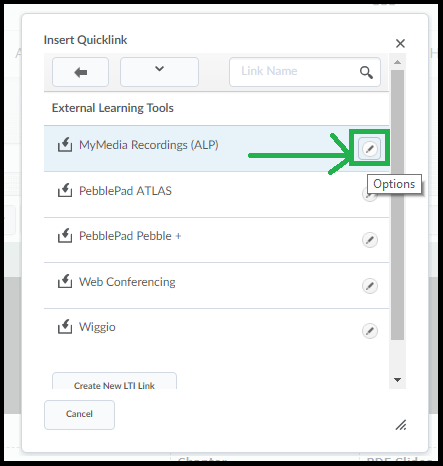
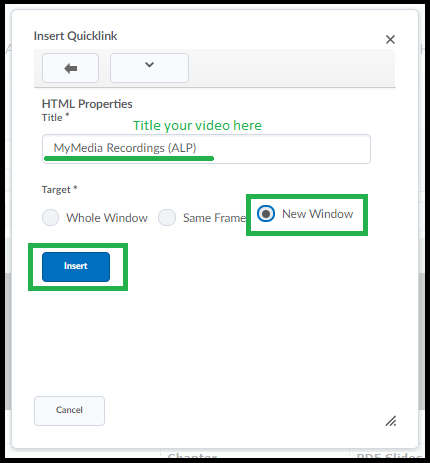
Step 4 – Choose a name for the video – and click the option to open in a new window – the advantage is that students aren’t losing their place in MyLO when watching a series of videos. When you’re done click ‘Insert’.
Step 5 – Now – click the ‘Save as Draft and Close’ OR ‘Save as Draft’ or ‘Update’ at the bottom of the HTML document. We haven’t chosen a video yet the next few steps will take us through choosing the video. Yes it’s backwards no I don’t know why. You have to exit the page, then re-enter first, so that you are in ‘viewing’ mode rather than ‘editing’ mode – so if you have clicked ‘Save’ or ‘Update’ you will now need to go back out of the page then back in. Don’t click ‘edit html’.
 as
as
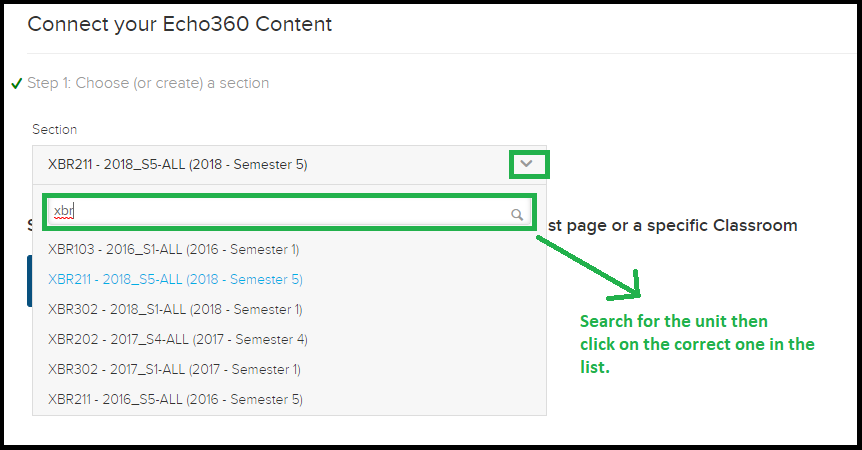
Step 6 – Nearly there! When you click on the link you just created – a window will load where we will choose the video you want to link to. There are a series of drop-down menus here to choose your unit (you can search for it by typing all or part of the title). Please note only Unit specific sections appear here – your personal library will not be listed.
Once your unit (called ‘Sections’ in Echo360) is selected there are 3 buttons – make sure you click the one that says “Link to a Classroom” (Echo360 uses the term ‘Classroom’ for uploaded videos).
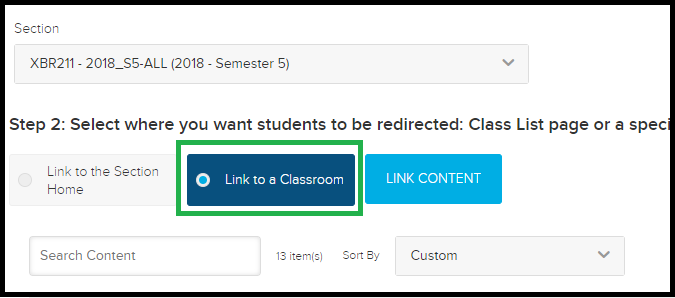
Step 7 – When you choose ‘Link to a Classroom’ you’ll see a list of the videos loaded to your section. Click the video you want to connect and then click the ‘Link Content’ button back at the top. Phew! Now your link will always go to that specific video.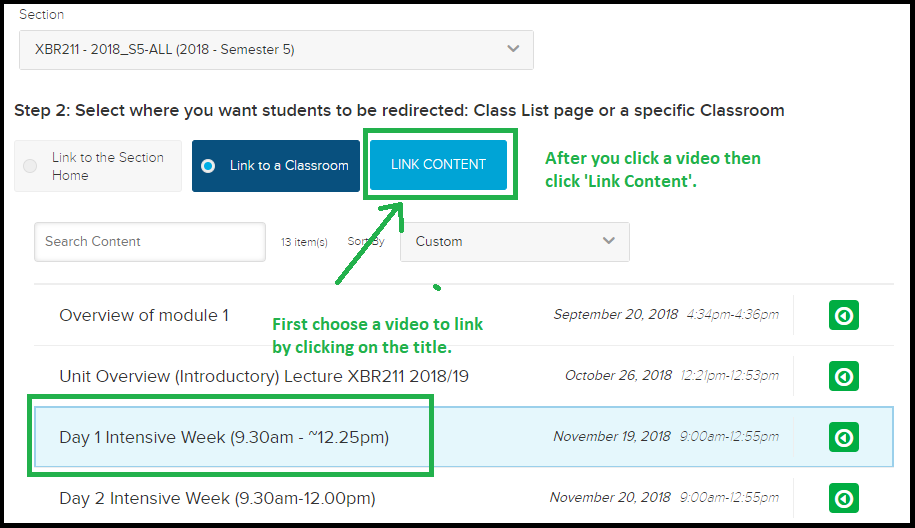
Video you want not there? You’ll need to ensure it has uploaded correctly to Echo360 or check you haven’t chosen the wrong ‘Section’ by mistake.
Section you want not there? Check with Teaching.TSBE that you have access to it.
To add assignments/quizzes (activities) to the page: To add activities it’s best to create them in those specific tools first (though you can create the assignments via the quicklinks tool it doesn’t give you any options for due dates or turnitin). Once you’ve created the activities (assignment, quiz, survey etc) you can add a link to these anywhere on your HTML page.
To do so, while editing, click your cursor where you need the link and click the ‘Add Quicklink’ button to bring up the menu. Choose the activity from the list – for example to add a quiz just click the ‘Quizzes’ tool and a list of the existing quizzes in your unit will appear. Just click on any of these to add to your page. Same for assignments, surveys, checklists etc.
Need to know more about Assignments/Quizzes and other MyLO functionality – check out the ‘Staff Resources’ area in your MyLO unit Content. There is a folder there with lots of links to help files. You can also contact the flex team on Teaching.TSBE email to organise a time for some training and/or advice.
Hide Grade from Assignment – While Showing Feedback!
Want to know how to show your Assignment Feedback while hiding the grade?
It can be done (to some extent, note that if you use a rubric they may still figure out their grade via the rubric even if they can’t see the total).
First you need to hide the grade item in the grades tool (so they can’t see it there).
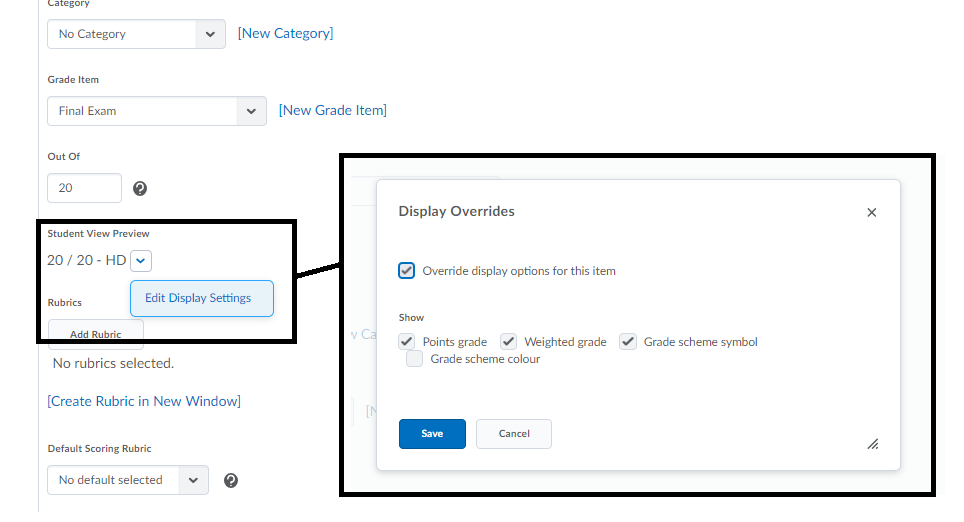
Then edit your assignment settings (click the assignment and choose ‘edit folder’) on the Properties tab go to the “student view preview” and click the icon to the right of it and choose ‘Edit Settings’.
Override the default settings to un-check the score fields. See screenshot below (you can leave on or turn off any option you want) note that ticked items are the ones that show to students.
Your students will now see their feedback but no score, though as noted above they will still see any rubric you’ve used so if you have a scoring rubric this technique may not work for you – even if the scores don’t show a total the rubric may allow them to ‘work out’ what they got (roughly).
Record Narrated Powerpoint
This document covers adding audio & narration to Powerpoint 2016.
Ensure your microphone is plugged in & working.
There are two ways to add audio to slides, you can record the entire slideshow at once while the slideshow is playing OR you can add an audio file to each slide one by one.
To add an audio file to a slide individually:
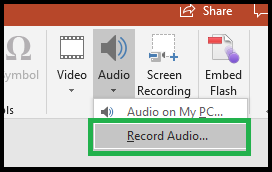
Go to the ‘Insert’ tab and then click ‘Audio’.
A small menu appears you can choose to add an existing audio file (if you have pre-recorded) or you can record directly to the slide.
To record audio directly choose ‘Record Audio’.
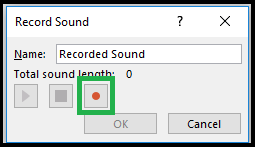
A small dialogue will open (as shown below). Click the small red icon (shown below highlighted with green) to start recording. Then click the blue square icon to stop. You can playback using the green triangle icon. If you click record again it will wipe what you’ve already recorded. Click ‘Ok’ when you are done recording to add the sound to the slide.
(Office 2016) To record the entire slideshow at once (including timings, animations etc):
In Powerpoint go to the Slideshow tab and locate the text that says “Record Slideshow”, click on the text and you get a choice to record the slideshow from the current slide or the beginning of the slideshow. Click whichever you require.
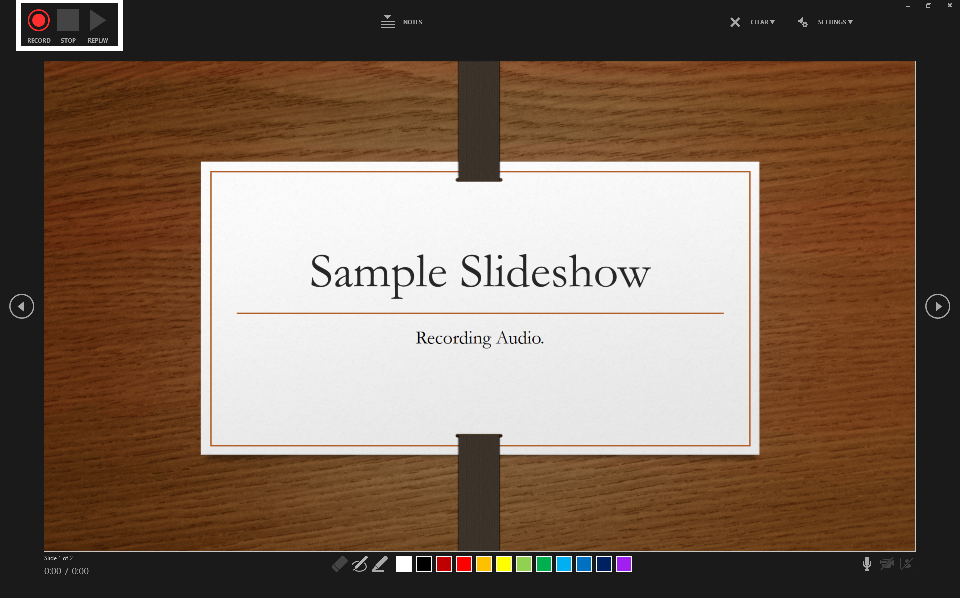
What loads is a new window that may have different options on it depending on your version of Powerpoint and/or settings you’ve altered. Somewhere you should see a red circle ‘record’ icon (shown below highlighted with white).
When you click record this time you will see a ‘countdown’ from 5, after which it will record your audio and (in some versions) any mouse-movement you do, as well as potentially other actions. To go to the next slide click the forward/back icons to the left and right of the screen (or use the directional arrows on the keyboard).
The slides will continue to play while it records your audio until you either press the Escape key on the keyboard or you reach the end of the slideshow at which point you will be prompted to stop. If the program asks to ‘save slide timings’ you can click ‘OK/Yes’, as slide timings are useful for playback.
For Both:
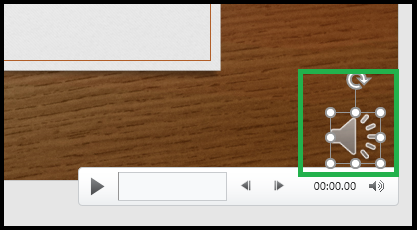
Regardless of which method you use the resultant audio files are shown with an icon – click on the icon to show the play controls. You can delete the audio from a slide by deleting this icon (click delete on keyboard while you have the icon selected)
Tips for Success!
Important – First Do A Test Slide! You should always test your volume levels first, does it sound okay? If you get crackles and pops you may be too close to the microphone. If the volume is too low scroll down to the Troubleshooting section and see if the instruction there is any help.
Remember to speak clearly and with a standard speaking volume for best results.
Before you go to the next slide – wait 1 second to ensure the computer doesn’t cut the end off your sound (older computers & older versions of powerpoint particularly).
Don’t continue to speak as you change slides – it might not record during any slide transitions.
Remember to save!
Before you re-record a slide remember to remove any existing audio from that slide first.
Troubleshooting
Volume bad? – Increase Mic Volume (windows 10) (mac)
Two audio’s playing at once? – Move the audio icon & make sure only 1 exists, if you’ve re-recorded a slide you might still have the old icon with its audio attached to the slide still there, if so you can delete it.
Audio not playing automatically? – Click the audio icon and look for tab called ‘Playback’ – click this tab and & look for an option next to ‘Start’ then ensure it’s set to ‘automatically’. This option might be listed in the ‘Animations’ tab on older powerpoint versions.
Slide advances too soon? – Check the ‘Transitions’ or ‘Animations’ tab and find the option for ‘Advance Slide’ – there may be a time listed, so ensure that time matches to the audio length. For more help on these topics go to the Powerpoint Help.
Recording Narration to Powerpoint, Adding Audio to Powerpoint.
Moving Content in MyLO
This document covers moving content like files, modules(folders) etc in the Content tool of MyLO.
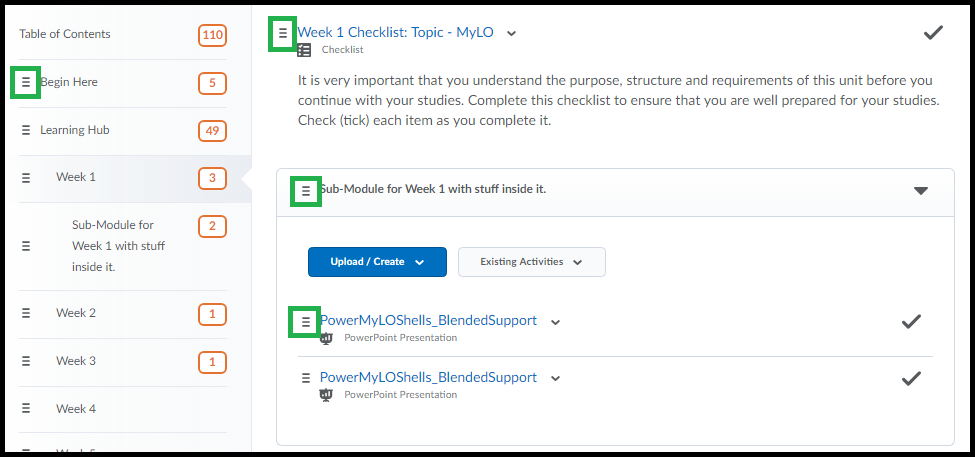
Each item in the content area, be it a single file, URL or a whole module – has an icon to the left of it that looks like this:
In the screenshot below I’ve highlighted some instances of this icon to show that it appears both in the Content Viewer (the right side of the content area) and the Left Side Menu.
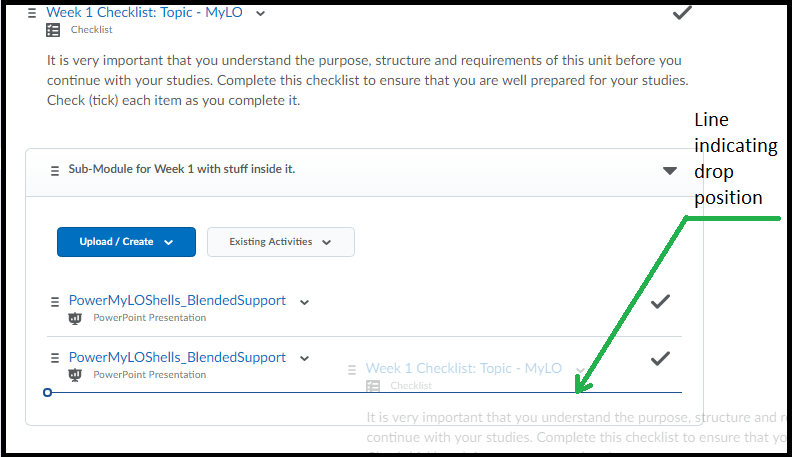
This icon indicated this item can be ‘dragged’ to somewhere else. To ‘drag’ any content item click the left mouse button and hold (or touch and hold if using a mobile device) until you see a ghosted version of the item appear as shown in the example below. You may also see your cursor change shape (example icon shown below is the default on my PC).
As you move your item you will see a line appear – this line indicates where the will end up if you release the mouse button/touch.
The exception to this is an empty folder – if you drag an item over an empty folder an area inside of it will turn ‘blue’ indicating the item will end up there.
You can Drag an item/module from somewhere in the Content area (on the right) to anywhere else in the content area. You can also Drag an item from anywhere in the Left Side Menu to somewhere else in the Left Side Menu. Keep an eye on where the ‘line’ is to ensure it is ‘dropped’ into the correct location.
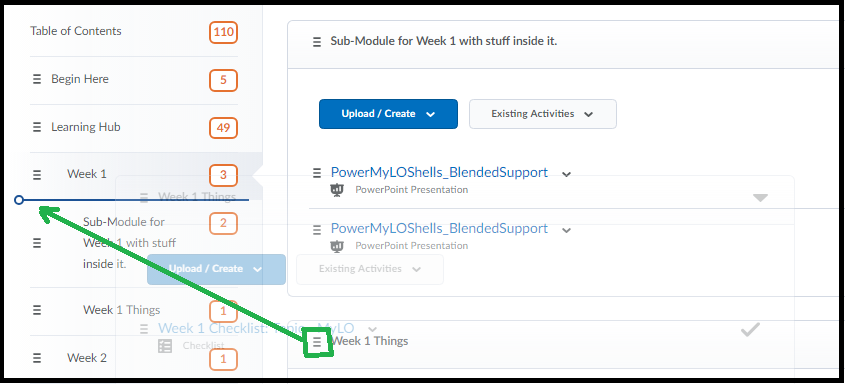
You can also drag an item from the Content Viewer (on the right) over to the Left Side Menu (on the left) by moving the icon over to the left. You will see either a Line that indicates where the item will be placed between modules as it’s own module [Shown Below]
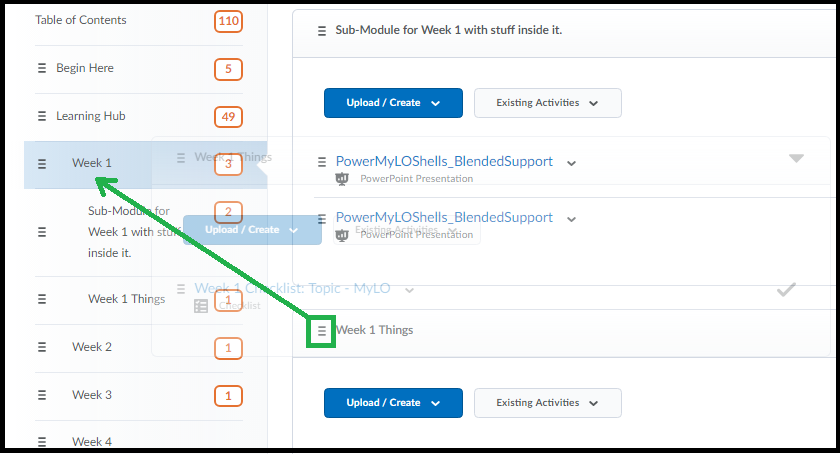
OR you will see a module(folder) highlighted indicating the item will end up Inside that module [Shown Below].
You can’t drag an item from the Left Side Menu over to the ‘content’ area. If you need to put one module INSIDE of another, you will need to do this by dragging it from somewhere in the Left Side Menu to somewhere else in the Left Side Menu then going into that module/folder to further move if necessary. Any item/module can be drag/dropped as many times as you need.
Lost something? Click each of the folders in your Left Side Menu and check the content viewer on the right – once you find your lost item, drag/drop to the correct location. Note some movements may require a couple of steps.
Echo360 Live Lectures: Activity Slides Participation Information
Want to know who participated in your Activity Slides? Follow these steps to see the responses from your class!
Step 1:
Go to the Echo360 site for your class. You can follow the link from MyLO if you have one, or login to echo360.org.au (use the login via institution link and choose UTAS – uses standard utas usual email + utas password).
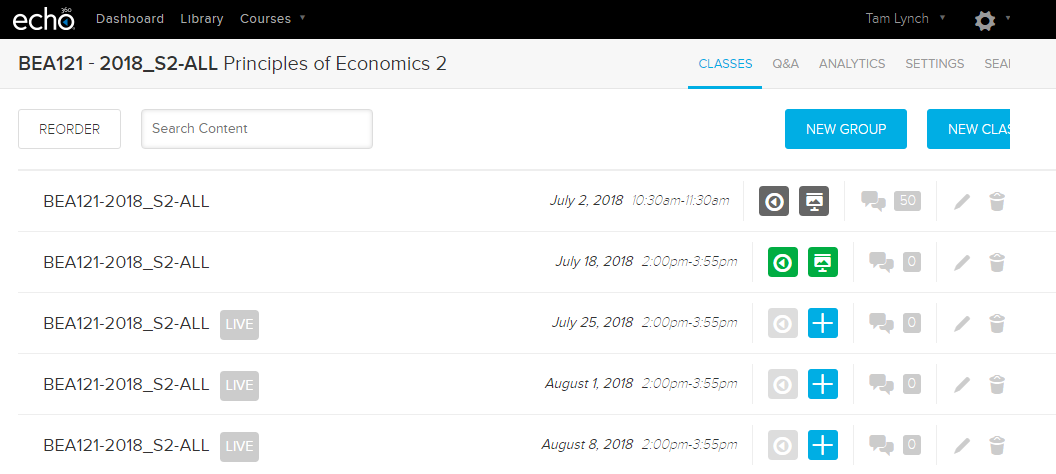
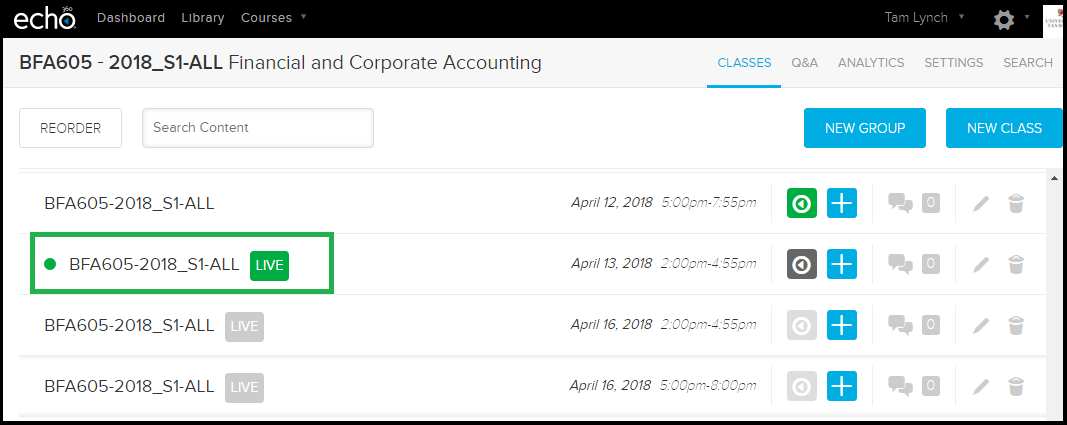
Navigate to where you can see your list of videos. (see the example below)
Step 2:
Click the “ANALYTICS” option on the top-right of the screen, as circled in the example below.
Step 3:
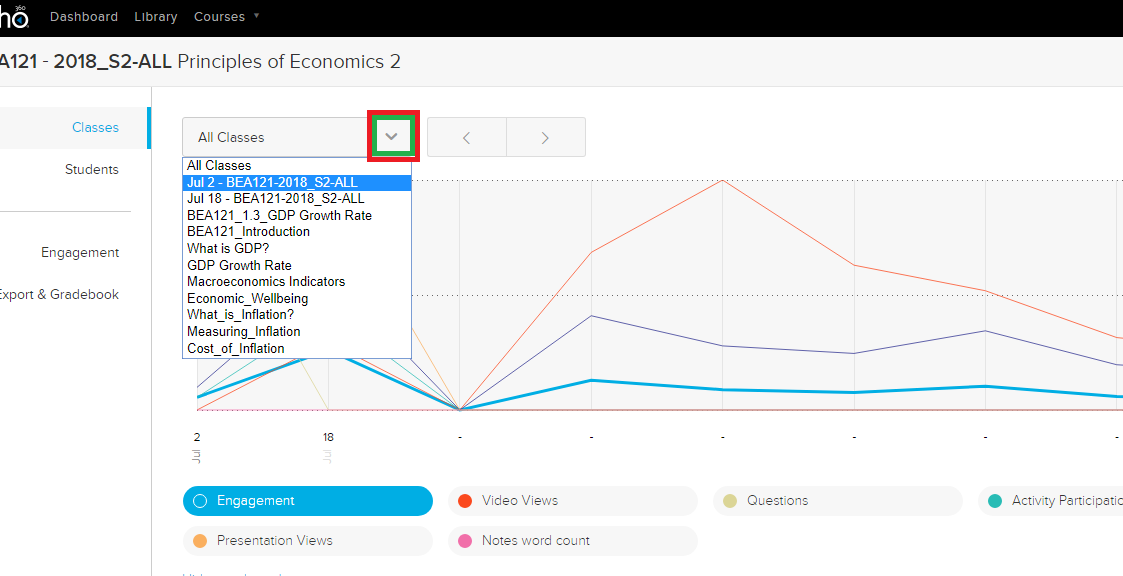
A page will load with view counts, ‘engagement’ data etc. In Echo360 your individual workshop/tutorial/videos are called “classes”. By default the view will show either ‘All Classes’ or it will show the previous selection you made. To see the information for ONE individual workshop/tutorial/class click the dropdown menu and choose which one you’d like to see.
Step 4:
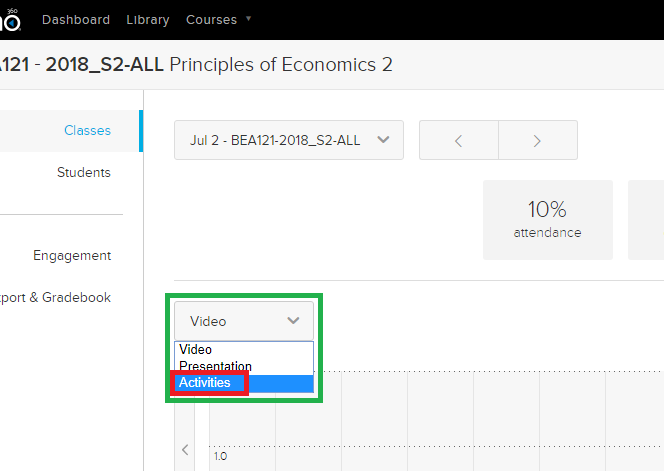
By default the page will show information about the video part of the ‘class’ like viewing stats. To see the data about your Activity Slides there is a second dropdown menu – as shown in the example below – can click the dropdown menu and choose ‘Activities’.
When you click on “Activities” the view changes to show you data collected by the Activity Slides.
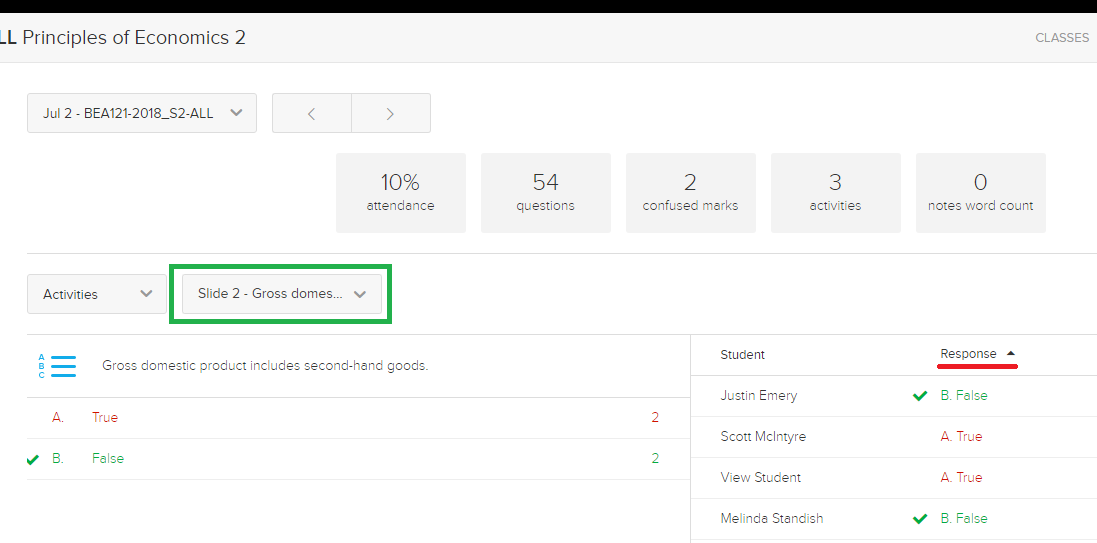
As shown in the example above – the slide information (the question and the possible answer choices) is shown on the left side, the student responses on the right. You can choose from individual slides if you have more than one by using the dropdown menu and you can also sort the column by student name or response by clicking on the column heading. (I’ve underlined the ‘response’ column to show this is the one that is currently ‘sorted’).
Scrolling down further gives some information about whether students have marked particular slides/activities ‘confusing’ and the most/least ‘engaged’ students.
Live Lectures – How to Access and Participate!
If your lecturer has set up the lectures or workshops for ‘Live Streaming’ this means you may be able to access and watch the lecture/workshop live as it is presented, potentially able to also ask questions that the lecturer will see or participate in some of the activities if any are made available. Students can access the live stream from a desktop computer but there is currently only limited access from mobile devices (some further instruction below).
Accessing Live Lecture Streams
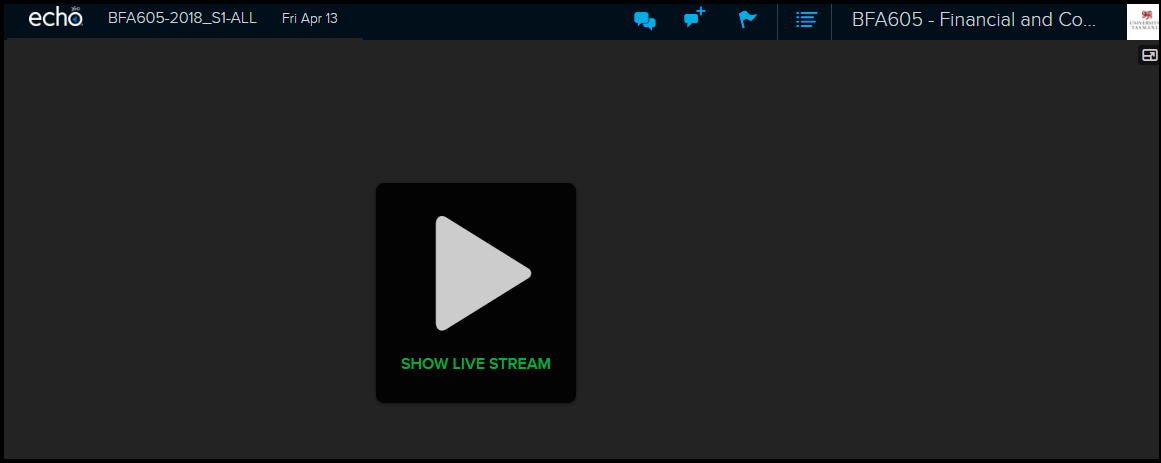
To access the Live Stream you will need to click on the link provided by your lecturer in MyLO -OR- go to the Echo360.org.au link and find your class. You will see an icon for [Live] next to any presentation that is to be made live. If you click on the link before it has started it will show a countdown until the live feed starts.
Once the start time has been reached, click “Show Live Stream” to start the live feed. Note it can take some time to start once you have clicked this button, depending on your internet connection speed and computer.
For the purposes of this help document you should know the difference between the Live Feed and the Presentation Slides.
Live Feed – This is a VIDEO delivered/streamed to your computer/device as it is being delivered in the classroom. It appears in a window area to the left of the Echo360 area when you click ‘Start Live Stream’.
Presentation Slides – If slides and/or activities are loaded to this class they will be available also – however they do not contain any audio (you need to start the video/live stream for audio) and will not follow along with the lecturer, you’ll need to navigate to the correct slides for any activity participation yourself. The slides will appear in a window to the left when you click the thumbnail for the presentation.
Participation in Chat/Questions
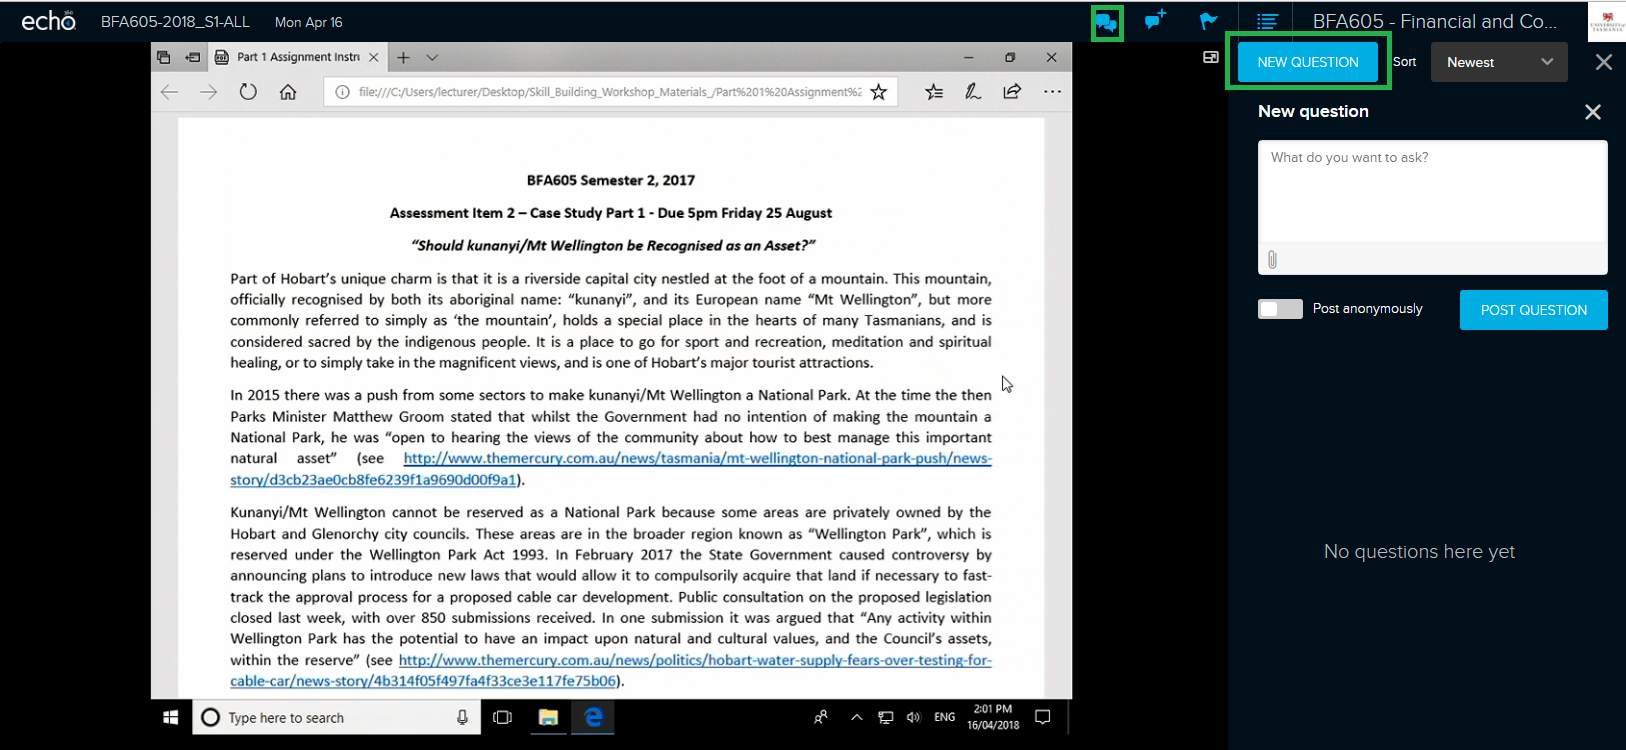
While the Live stream is running you can open a side-bar to see the ‘Q&A’ questions and answers area. The ‘chat’ icon is at the top of the window. To type a question click ‘new question’ and type your question then click ‘Post Question’. Your lecturer may or may not see this question right away, and you might be some seconds behind due to lag – so avoid typing the same question over and over if you’re not getting a response right away. The lecturer may have opted to answer questions in bulk during specific parts of the lecture, or they may have moved on already. If you see a question from another student you know the answer you can also answer it.
(Presentations with Slides and Interactive Activities will be covered in another document)
IMPORTANT: You must have entered your mobile phone number in your account profile to use the SMS option. Please note that you must have accessed the class’s Echo360 page prior to the class starting. If you are watching from the live stream you will already have done so, those watching live in class will also need to ensure they have clicked through to the Echo360 from the MyLO site at some point prior to the class. Otherwise you will receive an error message. Data/Text message rates will apply.
You can return to the Live Feed at any time by clicking on the thumbnail. If you’re having problems getting back from the slides page just go back to the classes page (by clicking on the unit name at the top right of the screen) and then load the stream again.
Access and Issues with Mobile Devices and Access
According to the Echo360 site, support for Live Feed on Android Devices currently unavailable.
Mobile devices may have limited ability to play the live feed. You will need to install the ‘Blackboard Classroom’ app available from the appstore. The instruction on using the app makes the point that to use the app you will need to have clicked through to the Echo360 Recordings from your MyLO unit FIRST for each unit. It will ask you to set up a password for Echo360, your username will be your MyLO username (that is: your entire email address).
Official Help for the App on Echo360.org site – Apple Store Link for App.
When Echo360 detects you are viewing a live stream from a mobile device, it automatically buffers 40 seconds of the stream to ensure smooth playback. This means you may experience a delay in the start of the stream, and that your view will lag anywhere from 30 seconds to a minute behind the real-time action.
Please note the app has very low reviews and many problems have been indicated by the users. If you are able to get to a desktop PC/Mac instead of mobile you will have better chance of it working well, however sending feedback to the app developers of issues you’ve had if any will help hopefully make the app more reliable in future. (wouldn’t hold your breath all the negative reviews are a few years old now and it doesn’t look like anything has changed).
The MyLO Homepage
A quick look at the MyLO Homepage, how to get there and what you’ll see.
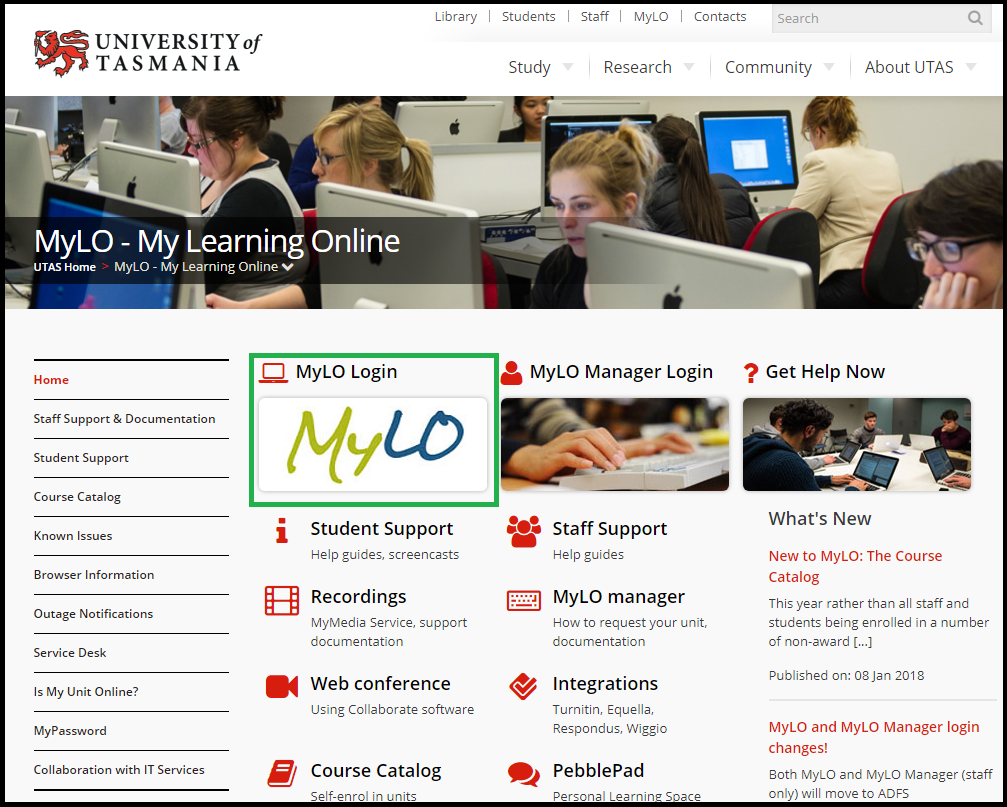
First you will need to find the Log In to MyLO link. If you go to the UTAS Homepage you will see a link in the top-right called ‘MyLO’. The UTAS homepage is www.utas.edu.au
Click on this link to go to the main page where login for MyLO and other associated programs are. You’ll find this a handy page to find help too.
The link to MyLO Login is highlighted below and it’s a good one to bookmark. To log in you will need your UTAS email and password. Have a look at the other links on this page too, there are staff guides and some news items on the right, and a list of useful help links on the left.
(If you don’t have your email/password yet you will need to talk with the relevant academic support team in your faculty/school/college as it will likely be an issue with contracts)
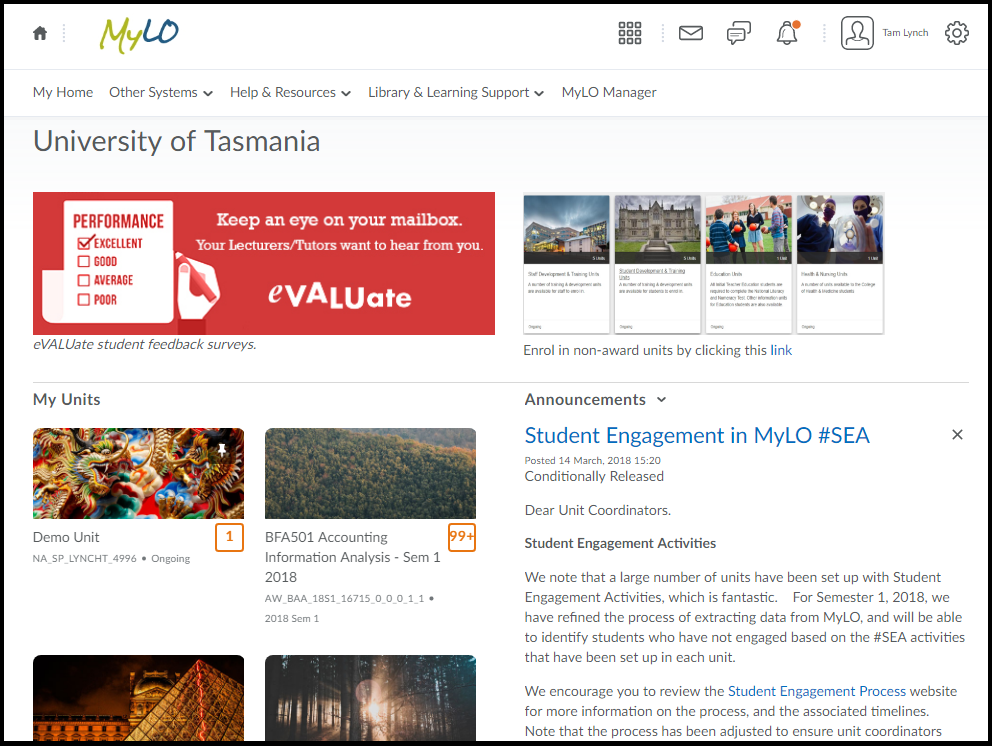
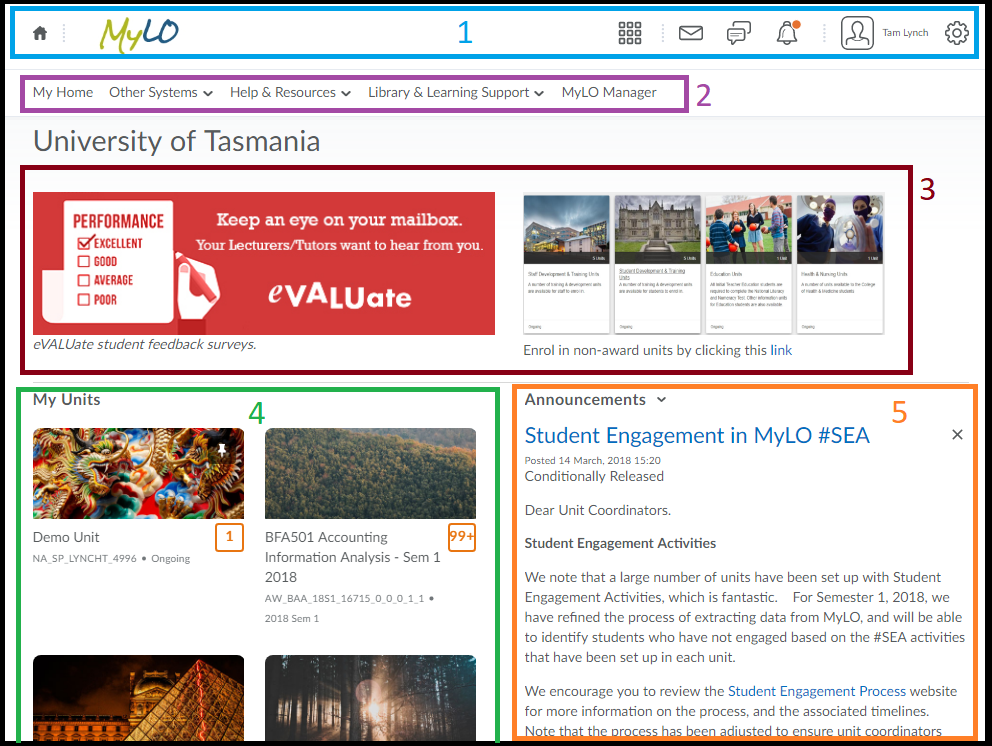
Your MyLO Homepage will likely look something like this:
The Basic Areas are:
1. Toolbar (covered further down)
2. Another Toolbar with links to help resources and useful links (you can never have enough toolbars!)
3. Banners/Information section. Central MyLO Admin control this area.
4. The ‘My Units’ area where units you’ve “pinned” will show up with an icon.
5. The ‘Announcements’ area. Important MyLO related announcements that only show up here and nowhere else on earth.
Toolbars we’ll cover later. First look at the My Units area. You may not see your MyLO Units right away. To see those you will either need to “Pin” them to your MyLO Homepage OR you can search for them each time.
To Pin a Unit Follow These Instructions!
Otherwise to search for units click the “Waffle” icon on the top-right of the page and type any part of the unit’s title or code into the search area. Units matching the search will appear in the list. If the unit you are searching for doesn’t appear – ask your Ed-Tech to check that you have access to it, and that it is currently set up on MyLO.
So let’s have a look at the other bits of the homepage.
The ‘Announcements’ area to the right is also important. This information is not usually sent to anyone via email unless someone in your faculty remembers to go check it so keep an eye on this announcements area every now and then. It will also tell you when MyLO is going to be under ‘scheduled maintenance’.
The link to the Course Catalog is currently top right in the ‘banner’ area. This is where you will get to non-award units and where your students need to go to find them too, there are some instructions on the Course Catalog page if you need further help.
The icons across the top of the page are standard across all pages of MyLO/Units. These icons are:
1. Waffle Icon – for searching for units.
2. Mail – for sending email and finding your sent mail.
3. Subscription Alerts – if you are subscribed to announcements, discussions or other subscribable MyLO content this icon will change if there are new messages.
4. Update Alerts – changes in units will be listed here (mostly useful for students for when new content is posted)
5. Your profile – also lets you change personal settings like your Timezone, notification settings etc.
This last icon is not really useful, ignore it. That’s about it for your MyLO Homepage.
Assign an Existing Grade to a Category
If you create a category in the Gradebook and need to assign an existing grade to it follow these instructions:
Step 1 – Click the ‘Grades’ tool in the toolbar and then go to the ‘Manage Grades’ tab.
Step 2 – All your grades are listed here. Click on the name of the Grade Item you wish to assign to a category.
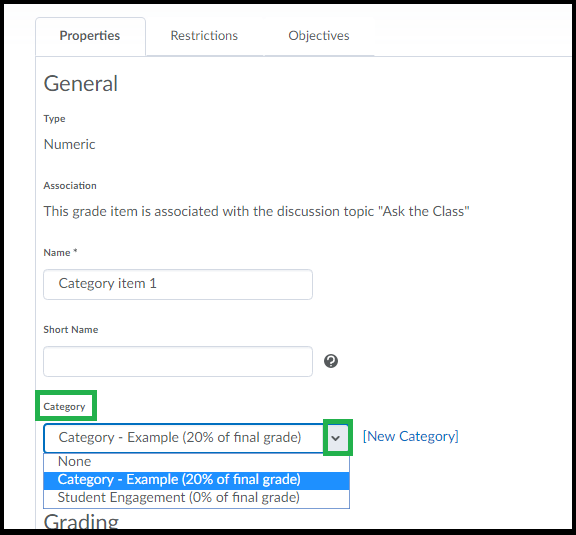
Step 3 – Scroll down a little until you see the option ‘Category’ and use the dropdown menu to select a category. Only previously created Categories are listed. If you haven’t created the Category yet you can create it here using the ‘New Category’ link. Otherwise choose the category you want this grade item to be listed in.
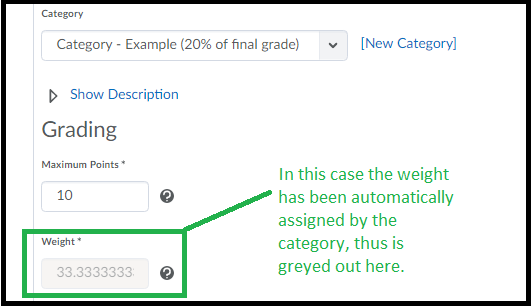
Step 4 – Check the weighting in the grade item. If the category is set up to assign a weight to the grade automatically – the weight option will become greyed out and will show the weighting as assigned by the category. If not greyed out you may have chosen to assign weighting for grades in the category automatically, so now check the grade’s weighting is relative to the Category and is correct.
(grade items inside of a category should normally add up to 100% of the category itself, except in specific circumstances)
Step 5 – Click save and close.
Note: Your grade item may move in the list, it will be indented under the category item. If you need to re-order your grades/categories click the ‘More Options’ button and choose ‘Reorder’.

