How to create a numerical grade item
The numeric grade is the one you’re likely to use the most so here’s how to make one!
Follow these basic steps.
1. Go to the ‘Grades’ tool.
2. Go to ‘Manage Grades’ tab.
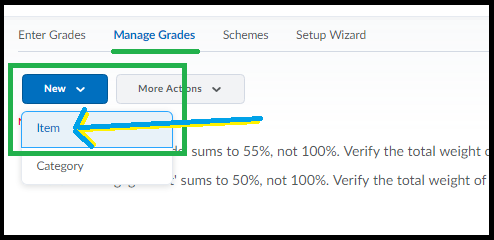
3. Click New then choose ‘Item’.
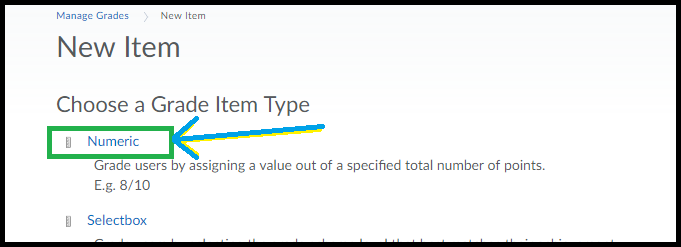
4. Choose ‘Numeric’ from the options that load.
A window will load that has all the options you can set for the grade.
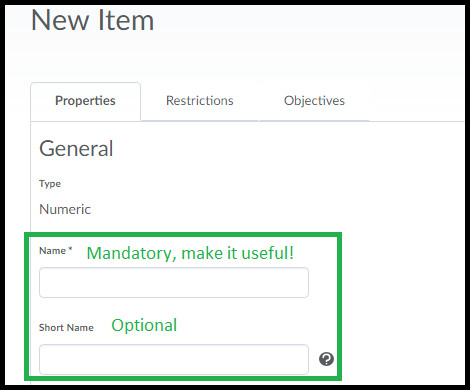
5. Give your grade a useful name. If the name you enter is really long do an optional short name as well so your gradebook isn’t unwieldy.
* Optional: Choose the Category, if you’re using them (it’s not mandatory, so if you’ve never heard of categories you can ignore this option for now). You can also enter a description here – if you want. Also optional.
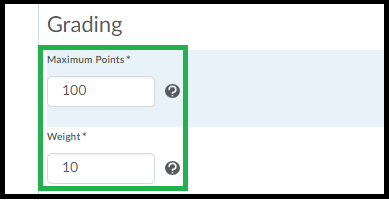
6. Enter the Maximum Points for this grade. If you’re using a weighted gradebook, you’ll also be asked for the grade’s weighting.
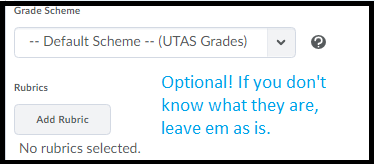
* Optional: There are some other optional settings here, if you want to grade via a rubric directly in the Gradebook – add a rubric here. You can also change the ‘scheme’ – the default is the HD, DN, CR etc scheme.
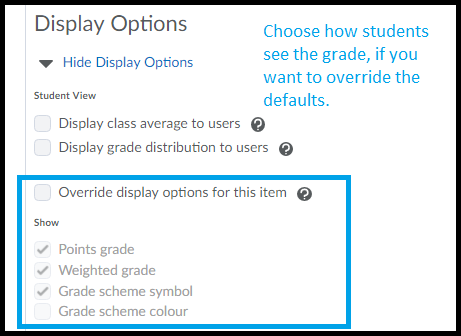
* Optional: The ‘Display options’ allow you to change how your students see the grade item. The default will be shown, click to over-ride the default if you want and select/deselect as you see fit. The options under ‘managing view’ control what ‘staff’ in the unit see.
7. Click ‘Save and Close’ if you are done. Or Save and New if you want to make more grade items.
Your grade is added to the bottom of the list. To re-order click the “More Options” button at the top of your ‘Manage Grades’ area and choose ‘Re-Order’.
How to Set Release Conditions (restrictions / selective release)
Need to make an announcement that is only visible to external students? Want a grade that only ‘tutorial group 6’ can see? Need to release some content to only those who have completed a certain quiz? In many parts of MyLO you can set up release conditions that control who can see a chosen tool/content/announcement.
Release conditions can be set up in tools like (click to see screenshot of where the option is in these tools):
- Announcements
- Assignments and Quizzes
- Content areas (modules or individual files)
- Grades and Categories
- Discussion topics and forums (there are easier ways to set up group discussion in bulk).
Release condition options include things like:
- Membership of a certain group(s)
- Grade range or attempt of a quiz/assignment
- Role in the unit (ie, staff or tutor)
- Checklist completion
Release conditions can be set from within many tools. They are usually situated in the ‘Restrictions’ tab of the settings in the different tools, or in the ‘Edit Properties in place’ option of your content areas, or in the announcement tool as you’re creating the announcement.
Look for the subtitle “Release Conditions” under which you will see two buttons: “Attach existing” and “Create and attach”. The buttons might also be called simply ‘Create’ and ‘Browse’ depending on what tool you’re in. Yes I know.
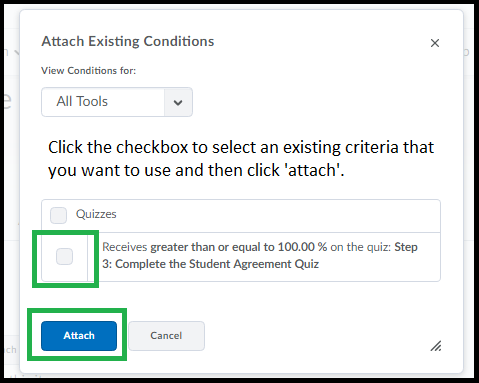
The ‘attach existing’ ( or ‘browse’) button lists all/any criteria that have been created in this unit for other tools in case you want to replicate them easily. To choose an pre-existing criteria just click the check-marks next to the ones you want to use and click ‘attach’.
To make a new release condition: Click the ‘Create’ or the ‘Create and Attach’ button.
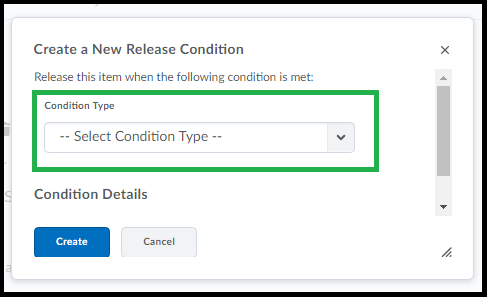
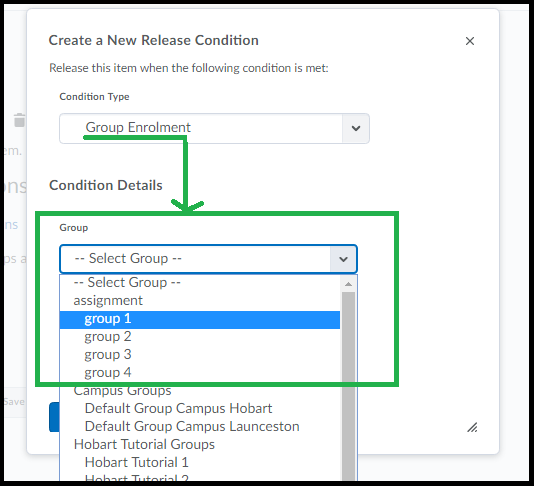
A window will load with a drop-down menu – choose from this menu the type of criteria you need to set. For example if you want only a specific group of students to see an item you will need to choose “Group Membership” (sometimes located under the subheading of ‘classlist’ sometimes not).
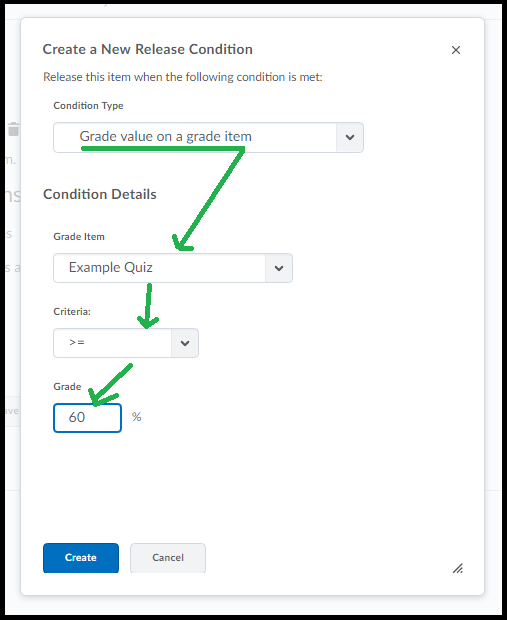
Some of the options, when selected, will then load another drop-down menu, allowing you to further refine the criteria. Some also allow you to type specific information (for example a grade that has to be achieved). The example below shows how more options may load so you can specify further information.
When you have set up the criteria the way you want click ‘Create’.
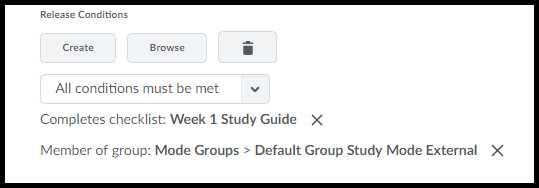
The criteria will be listed under the buttons now. You can add more criteria with the ‘Create and Attach’ or ‘Browse’ buttons.
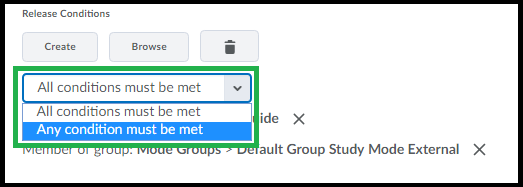
Notice that there is a drop-down menu just above you can specify ‘both’ or ‘either’ under the criteria so ensure it’s set the way you need it to be set using basic logic of “do they need all or one of these to be true”. Think about it. No really. Think about it. You’ll get it.
To remove a restriction … click the X to the right.
Don’t forget to hit the “Save” or “Update” button for the tool you’re on, when you’re done.
Notes:
If you create release conditions for grade items, groups etc – don’t forget that your ‘view student’ will also be subject to those release conditions. For example if you want to preview with the view student something you’ve restricted to a group you’ll need to add the ‘view student’ to that group.
Top level item conditions will also apply to any element within them. For example a release condition you set on a Discussion Forum will ‘apply’ to any topics within it. A release condition you set on a Content Module will ‘apply’ to the submodules within it. If students can’t see something that they should see check there aren’t competing release conditions on higher level components.
Release conditions don’t over-ride options that hide the item, for example setting content draft mode will hide from students even if a release condition is set. Likewise grade items that are hidden are hidden no matter what criteria is set on them.
Release conditions on the Assignment/Quiz tool will also over-ride the “Special Access” option if they conflict. For example if you set up an assignment with a selection criteria of “external students only” but then set up a special access’ for an internal student – that internal student won’t be able to access the assignment, even with the special access set. The best way to mitigate situations where you want to restrict access to a specific group but allow occasional access to specific individuals is to create another separate group for those exception cases – add those specific students to it – then add that ‘exceptions’ group to the list of groups who can access the tool/item in question. Then ensure the drop-down menu above the criteria list is set to “Any condition must be met”.
If confused/stuck/lost please contact your ‘ed-tech’ or flex team for advice.
How to sign up for a tutorial/workshop
To sign up for a tutorial or workshop (or to sign up into things like discussion groups, assignment groups etc) follow the steps below.
Step 1:
Click the link in the Announcements/Content area if you have been provided with a link.
OR
Click the ‘Groups’ tool on the toolbar if the tool is available.
Step 2:
Click the “View Available Groups” button.
You will then see lists of groups that you are able to join. You will need to ensure that you locate the section that relates to your specific campus. All campus specific tutorial signups will be located on this page, so be sure you are looking at the right groups for your campus.
Step 3:
Have a look at the choices for your campus and double-check your timetable so you can choose a time that does not clash with another class.
Step 4:
When you have located the tutorial time you desire click the ‘Join Group’ as circled in the example below. If the group is full you will not be able to join, so you will need to join another group. Make a note of the time and room of the time you have chosen.
Once you click ‘Join Group’ you will then be taken back to the ‘My Groups’ area and the group name will be listed along with the default groups.
To join more groups you will need to click the ‘View Available Groups’ button again.
If you wish to leave the group you can click ‘Leave Group’. You will be asked if you are sure you wish to leave the group.
You will then need to click the ‘Available Groups’ button highlighted in step 2, then click ‘Join Group’ on the desired group.
Note that if you do leave your chosen group and the other groups are full you may not be able to join a different group.
Edit/Change how students see their grades
When you edit or create a grade item you can also control how students see this grade in their gradebook. There are some ‘defaults’ that you can use and change however this document will cover how to set up the grades on an individual basis (the default settings are covered here).
To get to the settings click ‘Grades’ on the toolbar – then click the ‘Manage Grades’ option at the top of the page.
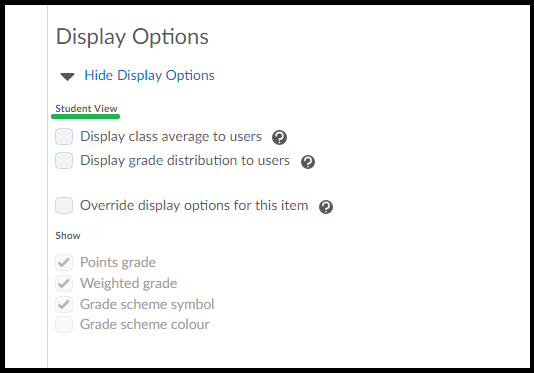
To edit an individual grade (or category) – click on its name in the list. The settings page for that grade will open. You’ll need to scroll down past the settings until you see the heading ‘Display Options’. (click ‘view display options’ if you don’t see any items under the heading).
You should see a sub-heading called ‘Students View’ under which you will see checkboxes to turn on or off different information that will appear to students in the gradebook.
The first two options are for showing or not showing some basic class statistics. Click the (?) icon next to these options to read more about what they are.
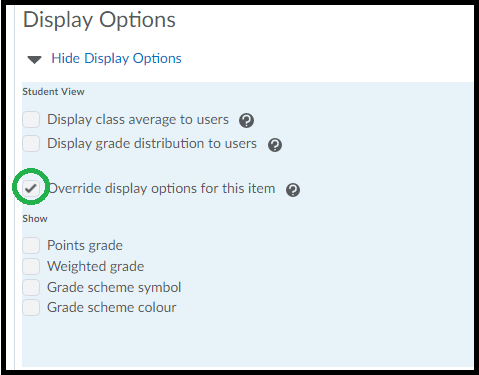
The next option is important – it is to Override the default settings. If you don’t know what your default settings are you can check by using the guide linked at the start of this document. Overriding the default settings allows you to have different settings for each grade item. If you leave this unchecked the rest of the options remain greyed out. To use the ‘Default’ view just leave this option unchecked.
You can then choose to turn on or off any combination of these options as you see fit.
Points grade = the points value as entered to the grade item.
Weighted grade = if you are using a weighted grade book, this is the grade as converted to the weighted grade.
Grade scheme symbol = if the grade is set up to use a scheme (by default every grade uses the UTAS Grades scheme of DN, CR, PP etc) – this will show or hide the ‘symbols’ – for example the default UTAS grade scheme would show a PP if the points received was 55/100 for example. If you are using a different grade scheme this is the option for showing/hiding it from students.
Grade scheme colour = again the default is the UTAS version, but you are able to set up your own. By default this is often left off student view but if turned on it will colour a grade item depending on the scheme you’ve chosen. For the default UTAS grades it is red for NN, green for the other grades.
The options below the ‘Student View’ under the sub-heading ‘Managing view’ relate to the view provided to any Staff/Lecturer/Tutor roles that view this grade in the gradebook. They are separate views – such that you can switch on any or all of the ‘Managing View’ options and they will not be shown to students unless those options are also turned on in the Student View or the default student view.
Click ‘Save’ when you are done with setting up the grade.
To check how students see the options you’ve chosen, click ‘View Grades’ and add some grades to the ‘View’ student grade items, then use the ‘Impersonating the Student View‘ guide to go and check how the grade options you’ve chosen appear to students. Note any grades you’ve set to a date, or to hidden, will not show to the ‘View Student’.
Add a re-usable permanent video link: Public Link
The “Public Link” option is a way to add a ‘permanent’ link to a video that will continue to work even if you rollover your units. This kind of link, however, will NOT collect any statistics about views nor does it allow your students to download the content. If you are not re-using the video – or you want viewing stats – you should add links using the adding Echo360 links via MyLO method instead.
Note: This link can only be created by the person who “owns” the recording – in the case of a lecture recording it will most often be the person who was delivering the lecture (nominated ‘primary instructor’ in MyLO). Or in the case of a file uploaded manually by the person who was logged in & uploaded it.
Step 1: Click into Echo360 either via your MyLO unit – OR – log into Echo360.org.au (choose login via institution).
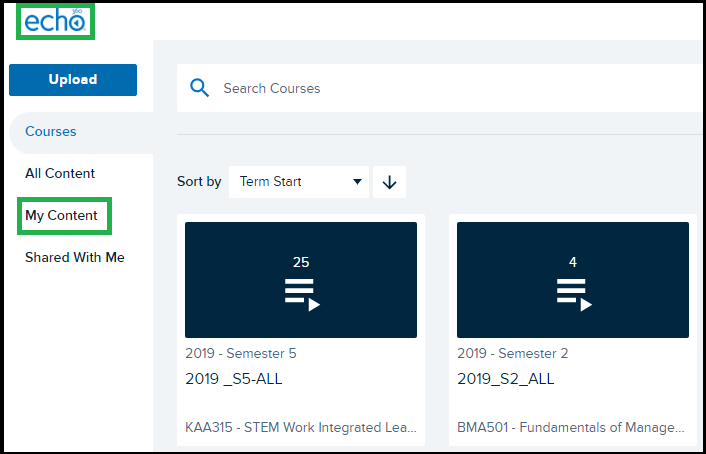
Step 2: Click ‘echo’ the icon to the top/left.
Step 3: Click ‘My Content’ on the left hand side menu.
Step 4: Find the video you wish to create a permanent re-useable link for – you may need to use the search tools to find by unit code, if it was uploaded recently check the ‘sort by’ option is set to ‘date’ & the arrow set to point down so newer video are shown at the top.
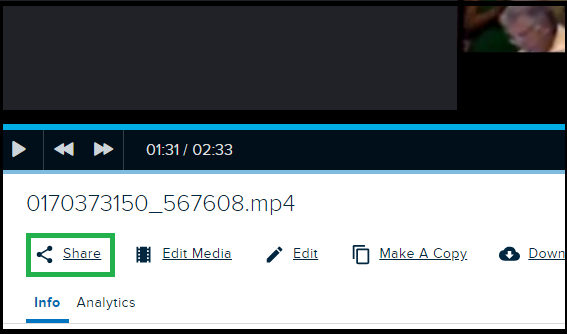
Step 5: When you find your video click on it to preview & check it is the correct video. Then find the ‘Share’ link just under the preview.
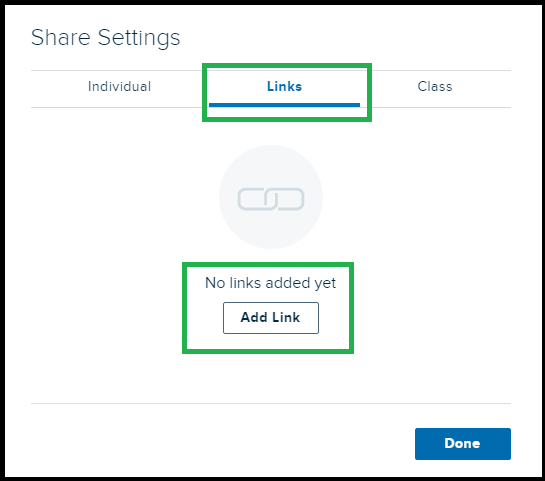
Step 6: A small window will load. Click the middle tab at the top for ‘Links’ then click ‘Add Link’.
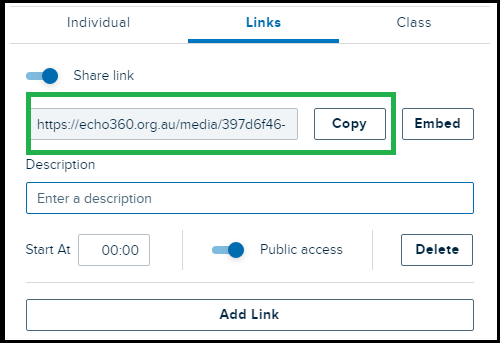
Step 7: Once you click that a section will show on the little popup window that has a bunch of stuff & a long URL, copy that URL – it’s the permanent public link to this video. You can paste this into MyLO as a URL as though you were adding a link to any other website.
Link to a Lecture Recording/Video
How to add a video to your unit that you’ve recorded via the Desktop Capture OR automatically recorded from your lecture.
Please Note: If you add a video this way it will not work the next time you run the unit. If you plan to re-use video there is a more convenient way to add links that is covered in the post “How to Add Public Links – Re-Usable Video Links“.
Step 1: Go to your MyLO Content area and navigate to the folder/module you want the video to be in.
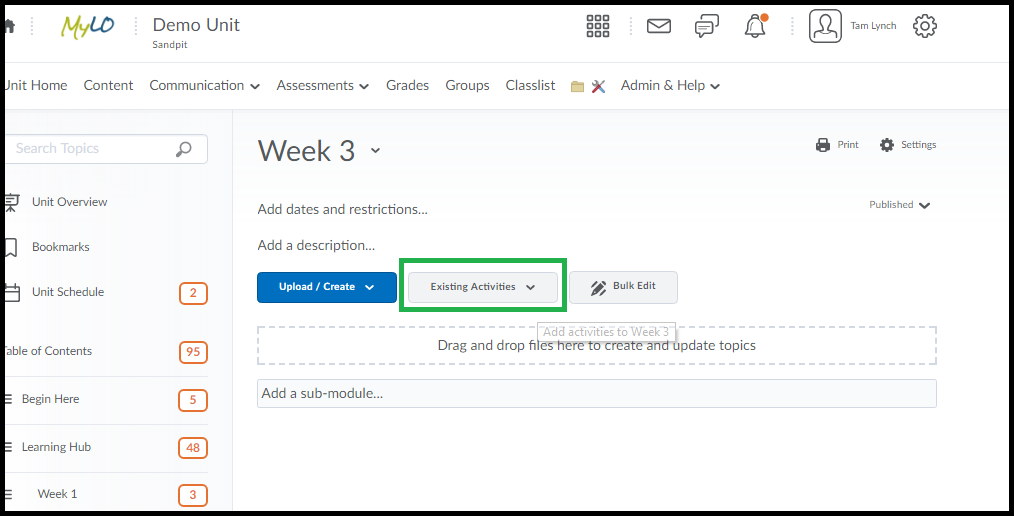
Step 2: Click ‘Existing Activities’ button.
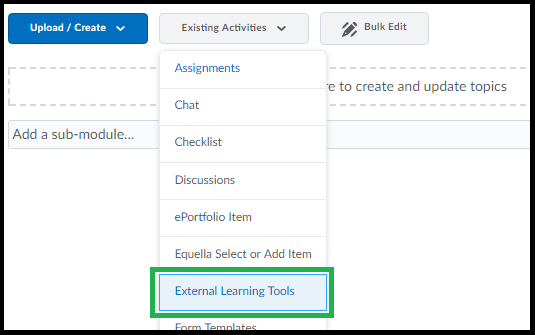
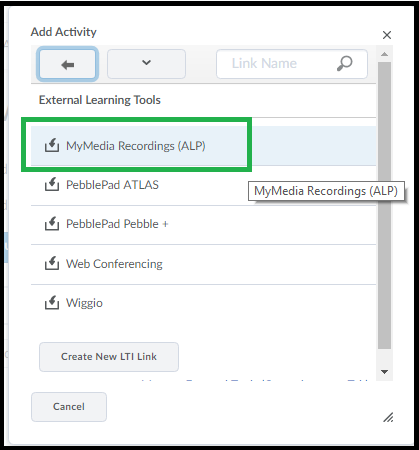
Step 3: Choose ‘External Learning Tools’
Step 4: Select ‘MyMedia Recordings’ (or Echo360 if the name ever gets changed).
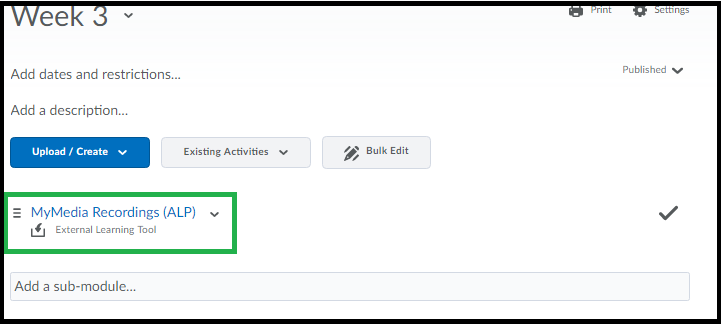
Step 5: The link gets dumped into your content live and with nothing in it – you need to now click on the link that was just created – just click the link text.
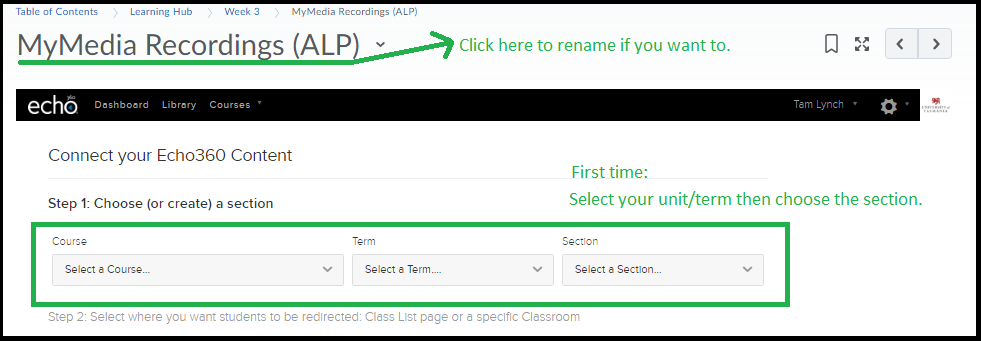
Step 6: If this is the first video you’re adding follow this step, otherwise skip to step 7 – click to choose your unit code, semester and then choose the one in the final drop down menu. There’s usually only 1 option for the last dropdown menu. Then proceed to Step 7.
Step 7: You’ll see a mostly blank screen with three options, click the middle option that says “Link to a Classroom”. It is the one helpfully greyed out, but highlighted below. Important! Click it.
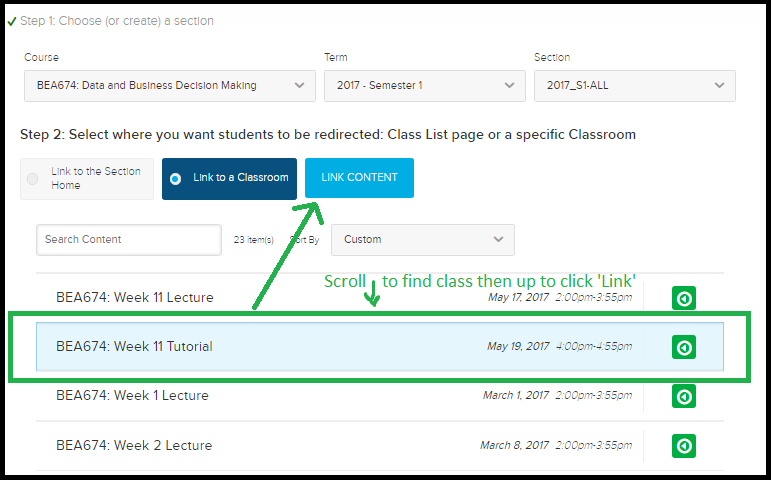
Step 8: List of all videos in the Echo area for your unit appears, click the one you want to link to and choose ‘Link Content’ back up the top. You might be doing some scrolling if you have a long list.
The link is connected and often you will be shown the video you just connected to. There is no way to change what video you just connected, if it’s the wrong one you’ll need to start again and delete this one. Sorry.
To add things like selective release you need to go back to where you can see the link in the list of your content and choose ‘edit properties’as shown below. It is recommended you choose the option to Open as External Resource – this means the video opens in a new Tab in the browser and the student doesn’t lose their place in the MyLO page they were on.
Hiding Content in MyLO
Have something you don’t want students to see just yet? There are ways to hide content from all students – the easiest is to set the content to ‘Draft’ mode. This document covers how to do this with modules/folders and individual files.
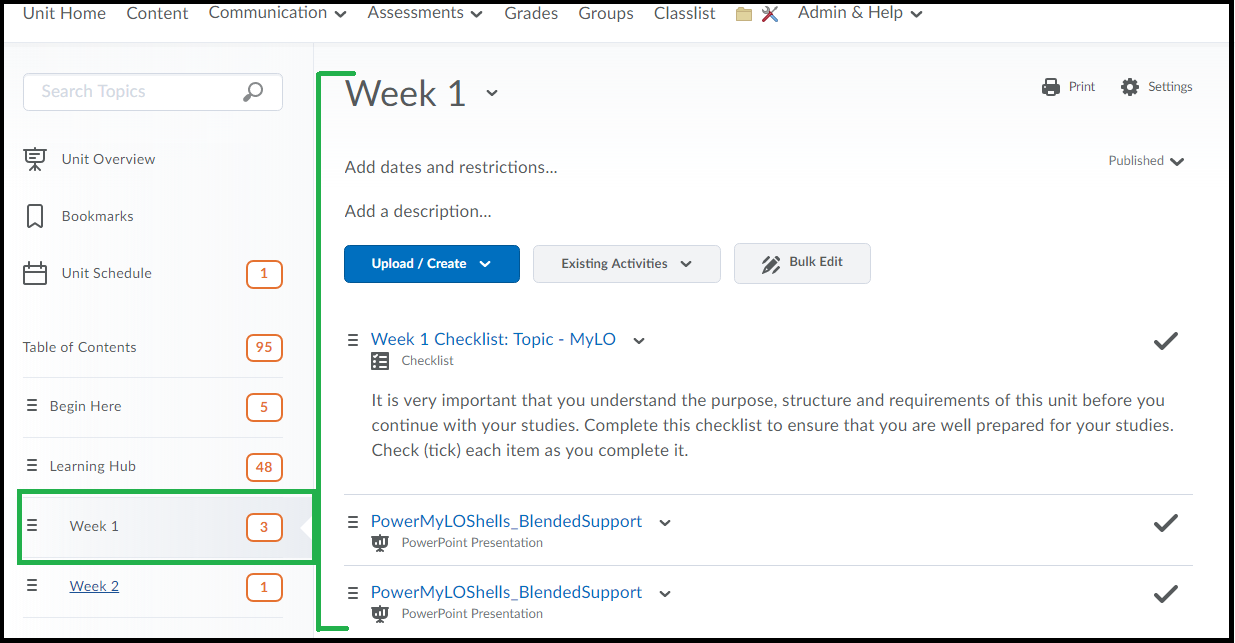
Head to the ‘Content’ area in MyLO where you can see the list of the folders/modules on the left, and their content on the right.
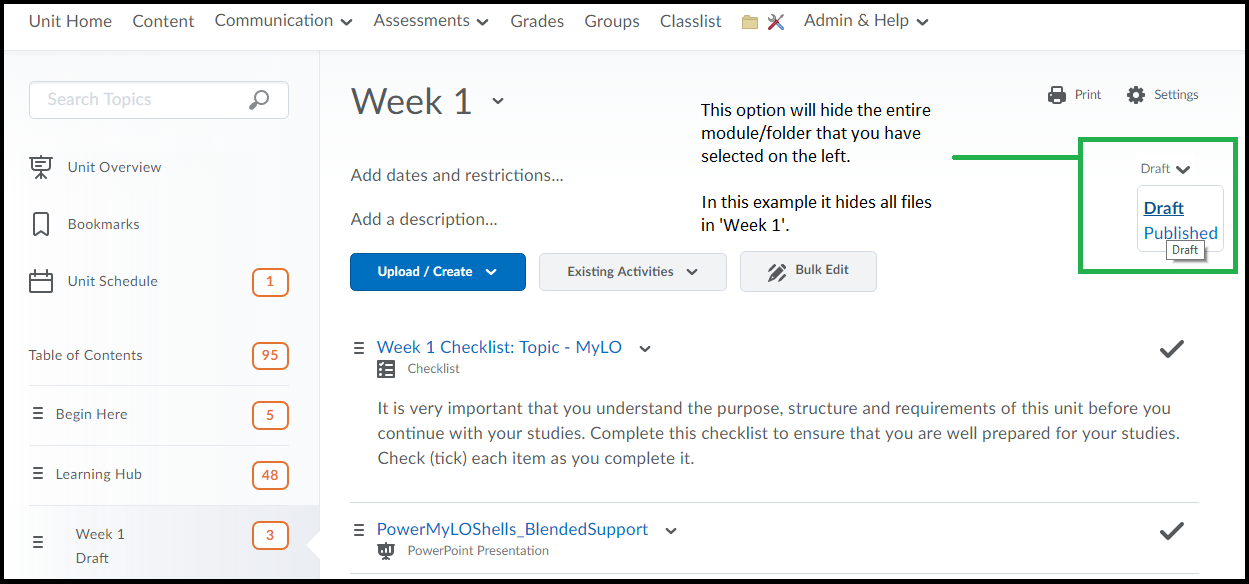
You can set a module (folder) to draft and hide all of the items within.
* Select the Module/Folder on the Left.
* On the right go to the top/right area and choose ‘Draft’ from the menu as circled in the screenshot.
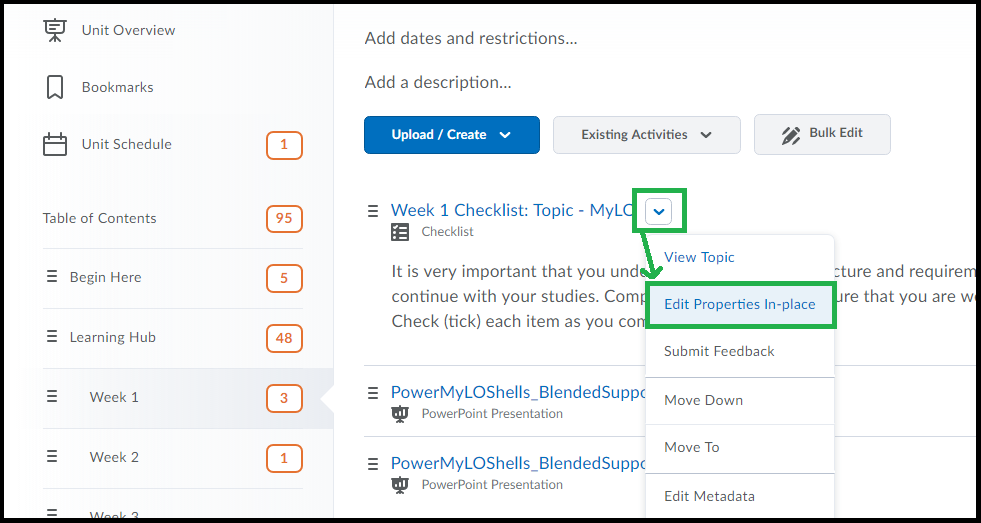
You can set an individual item (like a file) to ‘draft’ also:
* Select the module/folder this item is contained within on the left, so that you can see the link to this item on the right.
* Click the triangle menu to the right of the item and choose ‘Edit Properties in Place’.
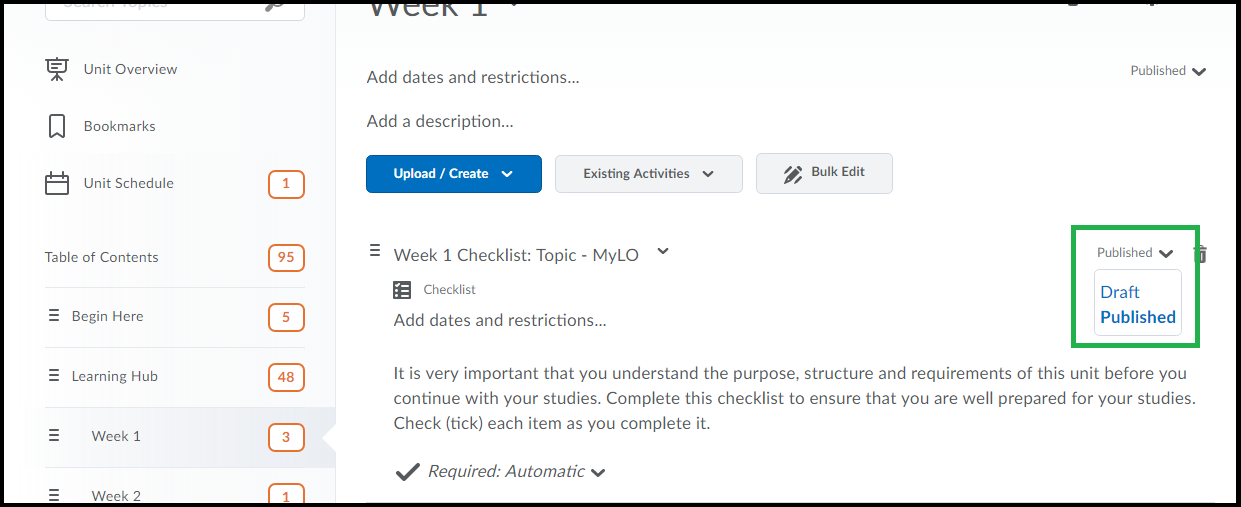
* Now you can select ‘Draft’ from the menu to the right of the item.
To make any item visible again click the ‘Draft’ option and choose ‘Published’.
Bulk Edit allows you to see the option for ‘draft/published’ for multiple files at once.
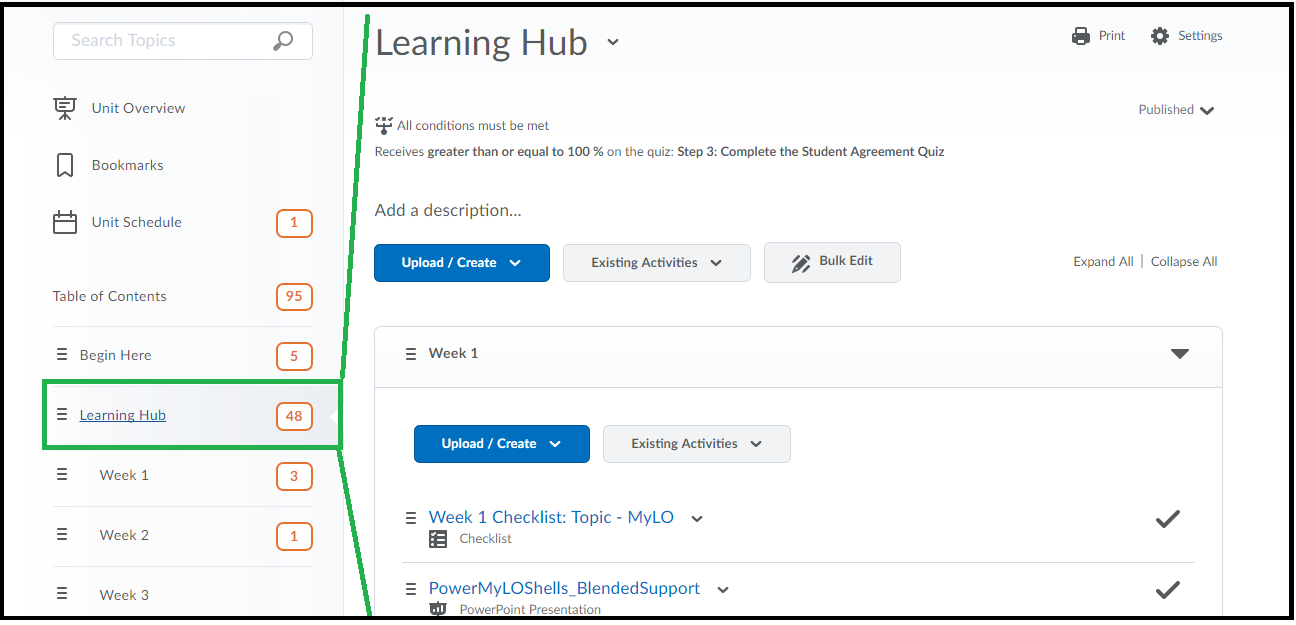
* Click the containing folder/module on the left (ie, the folder/module that contains all the items you wish to make draft/published). In this example I select the Learning Hub, although I want the folder ‘Learning Hub’ itself to still be visible but hide content within.
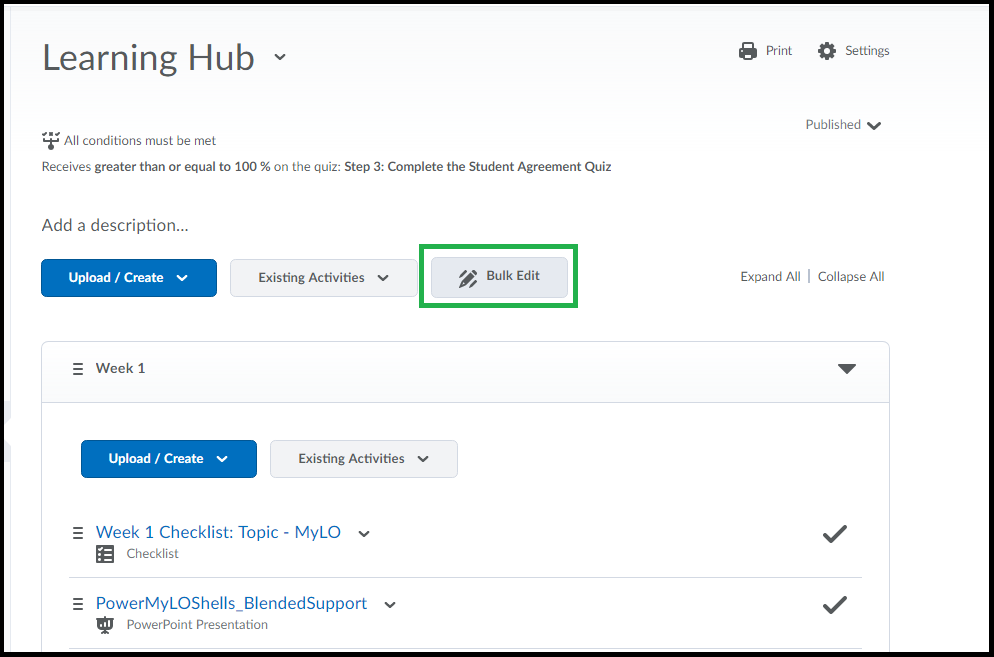
* On the right, at the top there should be a ‘Bulk Edit’ button. Click this button.
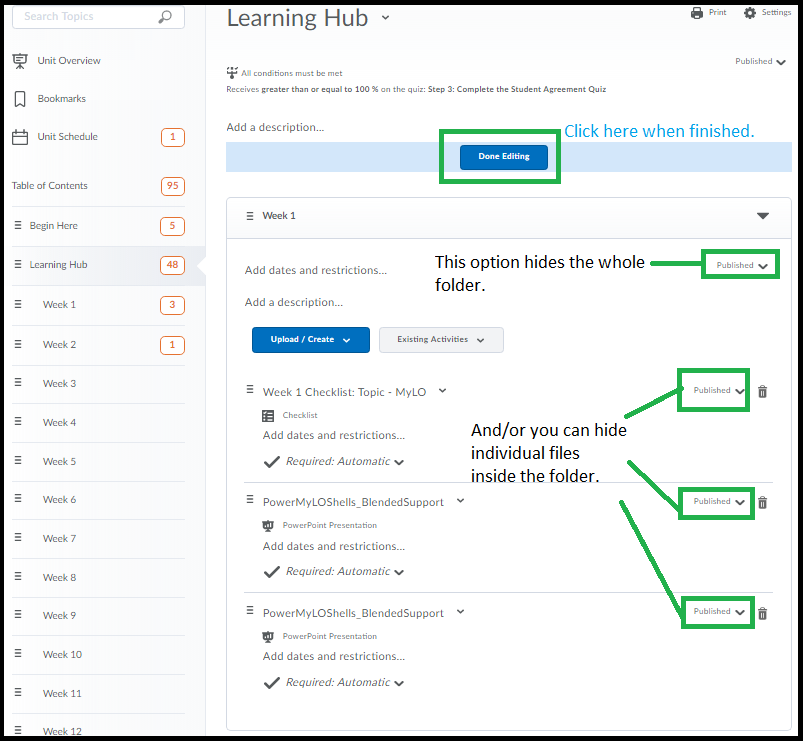
* Now option to make ‘Draft’ or ‘Published’ appears for each folder in the list. Select ‘Draft/Published’ as required for things you want hidden and then click ‘Done Editing’ back at the top of the page.
You can go back to ‘Bulk Edit’ to switch items to ‘Published’ as well, though once set to ‘draft’ the option stays visible on the page and you can click this option to switch to ‘Published’ at any time.
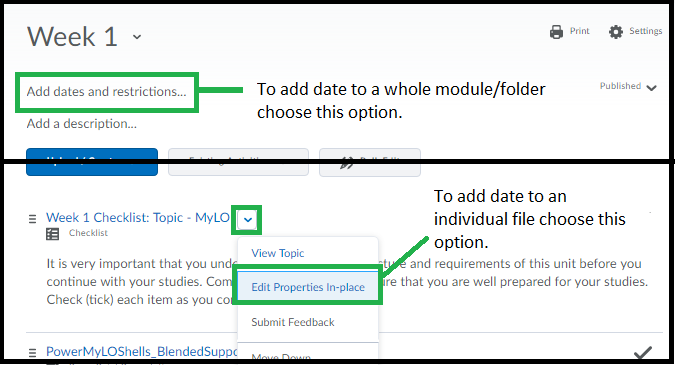
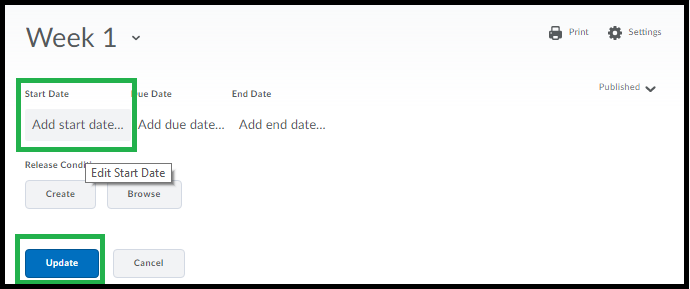
You can alternatively add a start date to folders/modules and files, if you do this you don’t need to also switch to ‘draft’ mode as the item will be hidden until that date is reached.
* Click the containing folder on the left.
* Click the ‘Add Dates and Restrictions’ option on the right OR choose ‘Edit Properties’ if it’s a file.
* Click ‘Add Start Date’ and choose a ‘Start’ date/time and click ‘Update’. You don’t need to set ‘due date’ or ‘end date’ unless you also want to use those options.
To edit any date you choose just click on it again, or click the [X] next to the date to remove it.
(Note: Other staff in your unit will always see items set to ‘draft’ or with dates and other restrictions set)
Create Self Enrolling Groups in MyLO
Self Enrolling Groups are useful when you want students to self-select themselves into groups, for example into Tutorial Groups, Project Groups or Study Groups. Groups in MyLO are contained in sets called ‘Categories’ – so to create a set of groups (like a tutorial signup area) we will need to create a new ‘Category’ of groups for each ‘set’. Follow the instructions below.
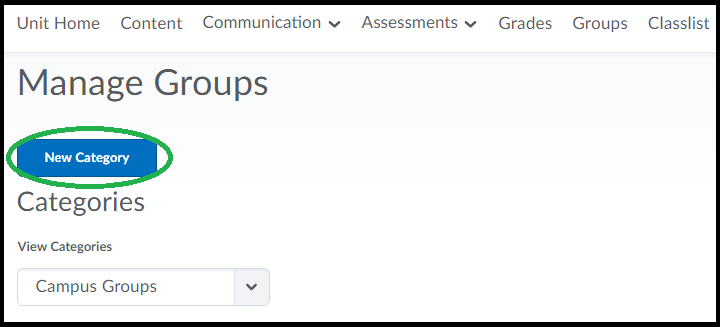
Step 1 – Go to the Groups Tool in MyLO by clicking on the Groups option in the Toolbar.
Step 2 – Click the ‘New Category’ button.
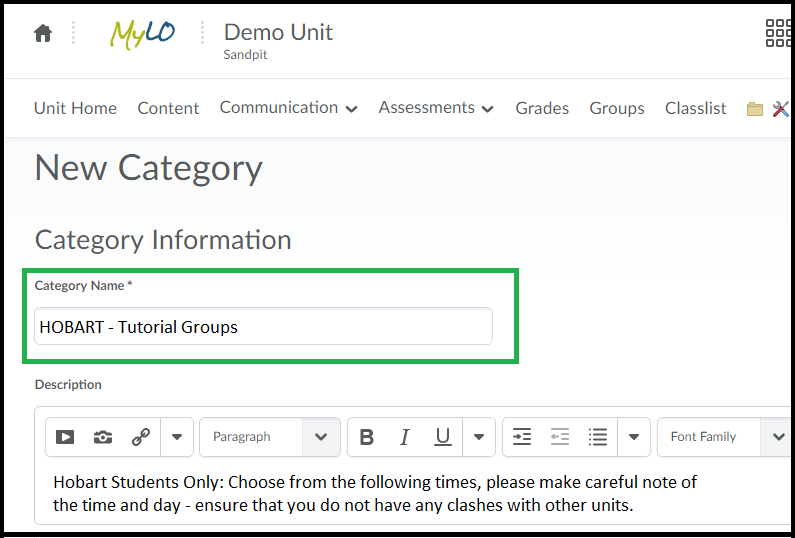
When you click ‘New Category’ you will be taken to a form for creating a set of groups.
Step 3 – Type in the title of the ‘Category’ (ie, Hobart Tutorial Groups) – it should be obvious to your students which groups are contained in this category. You may optionally also type in a description containing some further instructions.
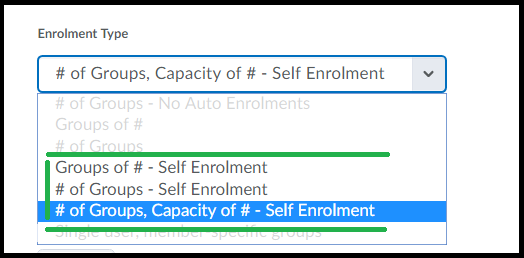
Step 4 – Under the description area you will see a dropdown menu called “Enrolment Type”, select the most appropriate one for your needs. The options that allow students to signup are the options that specify Self-Enrolment. These are explained below.
Groups of # Self Enrolment = You specify how many PER group are allowed, the system will create some groups by default – with that number as maximum for each group.
# of Groups Self Enrolment = You specify how many GROUPS you want, no maximum limit per group is set.
Groups of #, Capacity of # – Self Enrolment = The most useful for Tutorial Signup this allows you to specify how many groups the system creates and how many Maximum students per group. It is the one highlighted in the screenshot below.
Notes:
You can add more groups manually to any of these options later if you need to.
Currently you cannot alter the Maximum number of students in a group once it has been created.
You can Manually enrol students to a group OVER the maximum limit if necessary.
Sadly you currently cannot create groups of differing sizes in the same category.
Step 5 – The ‘Group Prefix’ option is just the default name all groups will have, they will also then be given a number. You can change this later. Type something suitably descriptive but not too long (eg if you type Hobart the groups will be called Hobart 1, Hobart 2 etc).
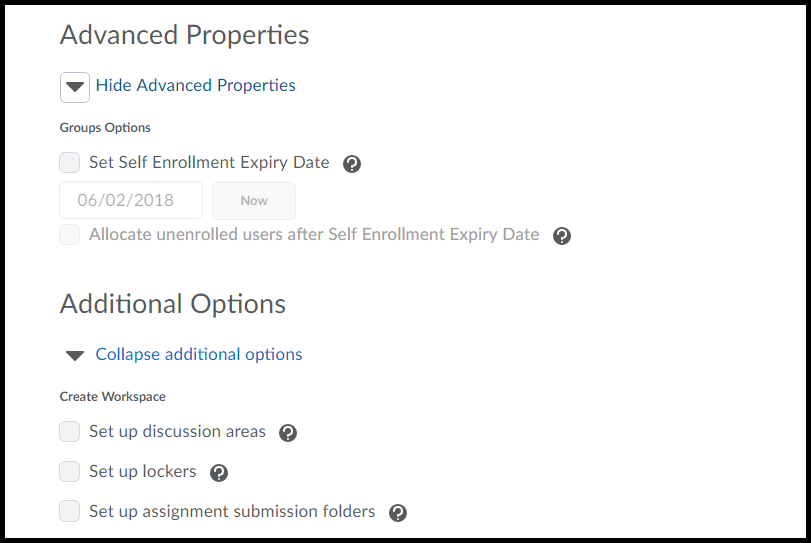
Optional Step – ‘Advanced’ Properties are available here also – you can add a date after which students cannot sign up to these groups (check this on if you wish, then choose the date of expiry). The option to ‘allocate un-enrolled users’ will force any student not already signed up to these groups into a group – including ANY student in your unit so avoid this option if you have multiple cohorts or modes if you are creating tutorial signup.
Optional Step – if you wish to go through adding a locker/discussion/assignment area now you can check one of the options here – for more information on these options check with your Ed-Tech. You can always come back to these options later if you need to.
Step 7 – Click Save.
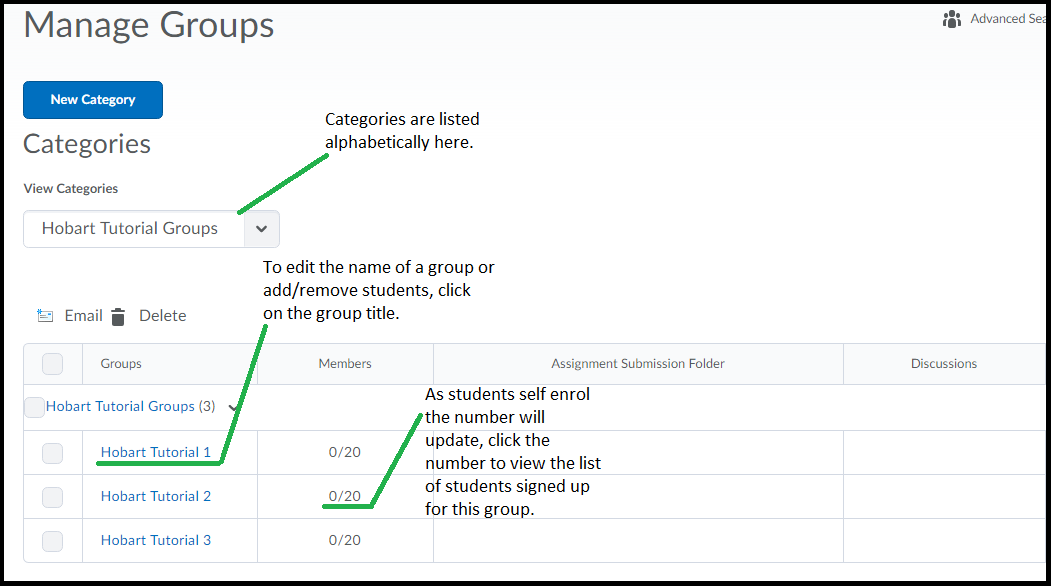
Your groups will now be shown in the category list – to change the name of a group just click on it in the list. You can then see options like – description, title, enroll users. You are always able to add/remove students from self-enrolment groups, see further documentation (to come) or check with your Ed-Tech.
Change your Unit’s MyLO Banner!
Don’t like the default banner? You can change it!
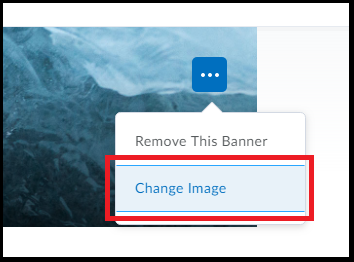
Go to your unit and hover your mouse over the top-right of the banner image (or click if you are on tablet/mobile) – you should see three dots in a square as circled below.
Click the icon and choose “Change Image”.
From the window you can search for a topic/theme/image, or browse the suggested images. To choose an image just click on the ‘Use this Image’ option that appears when you hover your cursor over it. (mobile users just click on it).
You can upload a custom image also – but please ensure you have the correct copyright permissions to do so and that the image is a suitable size and quality. To upload a new image go to the ‘Change Image’ option and choose ‘Upload’ as shown below.
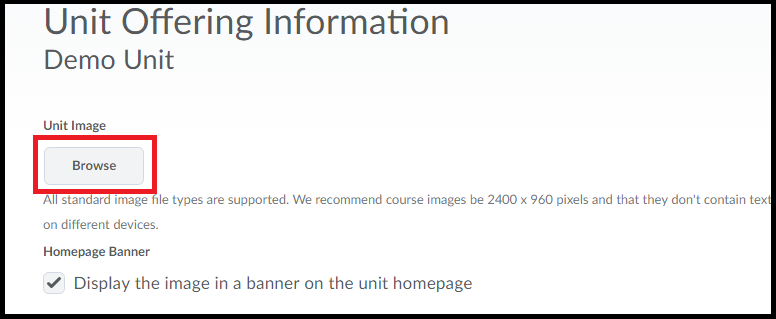
To find the image on your computer/device click the ‘Browse’ icon.
You will see that the recommended size is 2400 x 960 pixels. If you are unsure how large an image is or you’d like to resize one and aren’t sure how please ask your Ed-Tech or Flex team for help.
When you change your Banner it also changes the image used on the MyLO Homepage (this is the one that appears when you Pin a unit to your homepage).
View your unit as a student – Impersonate the ‘Student View’.
You may have seen “View as Student” option in your unit and while it can give you some useful previews of your unit, it doesn’t allow you to complete quizzes or see results. It also doesn’t allow you to submit an assignment and you can’t also test group-based content because there’s no way to enroll in a group in this view.
A solution to this is to do something called “Impersonate the Student View”. This is – a fake student called ‘View Student’ loaded into MyLO units by default. To ‘Impersonate’ this fake student means you’re viewing your unit as a ‘real’ student would see and do such things as checklists, quizzes, assignments and then you will see these submissions as lecturer which means you can assign a fake grade and check how students see their grades, for example. This fake student can enroll in groups or be pre-loaded in groups so you can check group-based content.
How to!
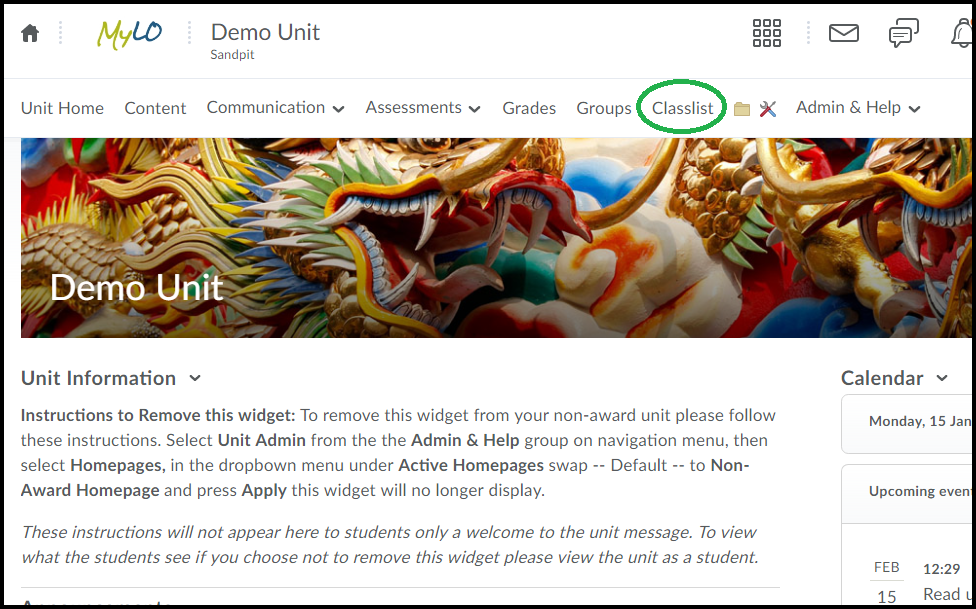
Go to Classlist – located on the toolbar as circled below.
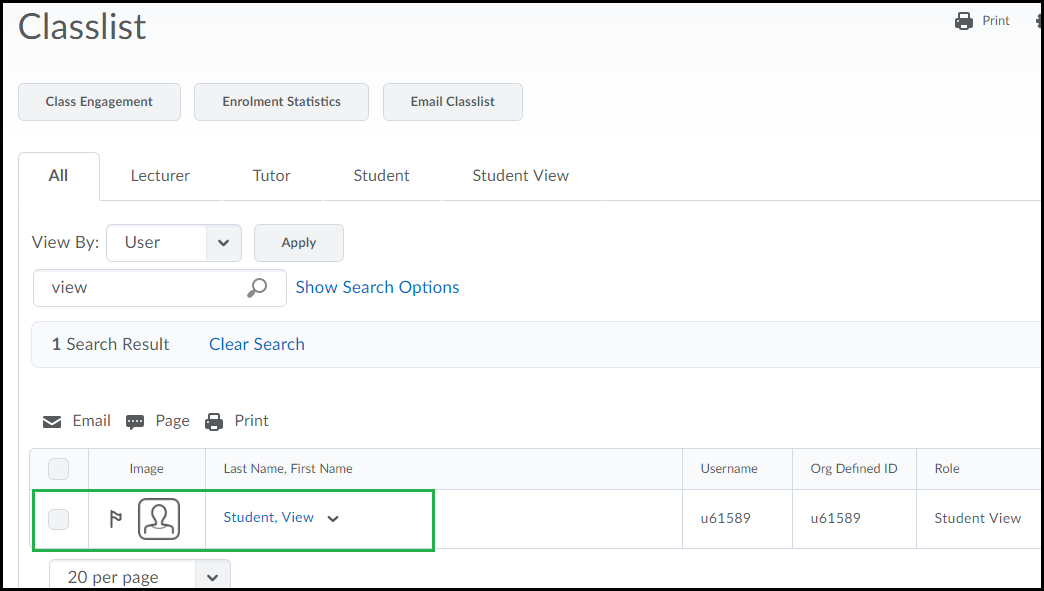
Find ‘View Student’ in the list, you can just search for the word ‘Student’ or ‘View’.
Click the [v] and choose ‘Impersonate’.
You will see a confirmation box, click okay.
You will now be seeing your unit as this “student”. Note that if you have set restrictions on parts of your unit these will apply to this student (for example, View Student won’t see any items you’ve set as ‘draft’). If you want to test something restricted to a specific group, you’ll need to first add View Student to that group. You can also use ‘Student View’ to sign up to groups, but remember to go back in later and ‘leave group’ or remove that fake student from groups they shouldn’t be in (assignment groups, for example).
View Student can complete quizzes and assignments (though not guaranteed it will go through Turnitin correctly). You will then see their submissions in the submissions list.
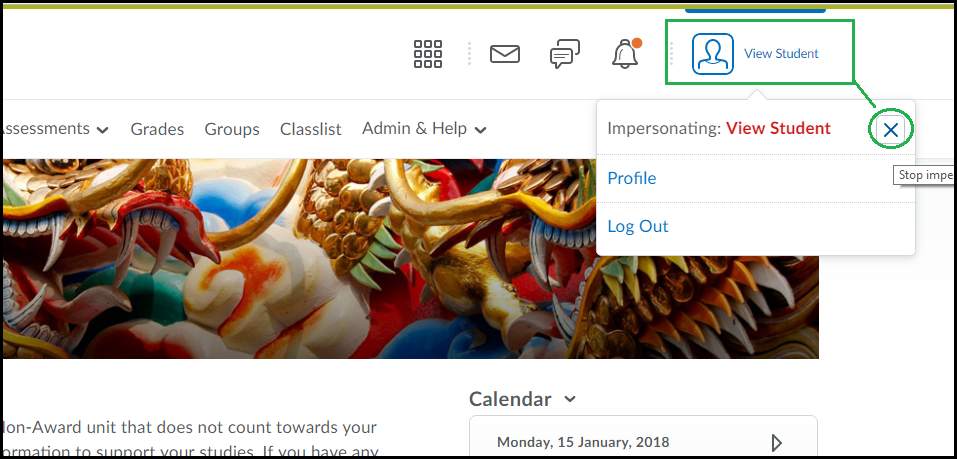
To exit this mode – click the name ‘View Student’ at the top right of any page, then click the ‘X’ as shown below.


