Tag
Grademark
Export a Grademark Set (Classic View) for use in other units
Go to Grademark and click on the Quickmark Editor button located at the top right of the Grademark window.
The Quickmark Manager window will load. The left column shows Grademark sets. The middle column lists individual comments (Quickmarks) included in the selected set. The right column shows options for the selected set.
Click on the name of the set you wish to export (in the left column) so that it becomes highlighted. The individual comments for that set will load into the middle column for you to review/revise if necessary.
Click the small Export icon (looks like a square with an arrow) seen towards the top right of the Quickmark Manager window, then choose Export.
Choose to save the file. Save it somewhere that you can easily find again.

Click the Done button at the bottom-right to close the QuickMark Editor window and return to Grademark.
Import an exported Quickmark Set
Go to Grademark in your chosen unit and Assignment Submission Folder. Choose the Quickmark Editor option (as shown for Export a Grademark Set towards the top of this page ), then choose the Export icon. Choose the Import option. A new window will open. Browse for your exported file by clicking on the Browser button. Select your file (it will upload), then click Import.
Click the Done button at the bottom-right when done to close the Quickmark Editor window and return to Grademark. You should now be able to mark with your imported set.
How to Access your Assignment Feedback
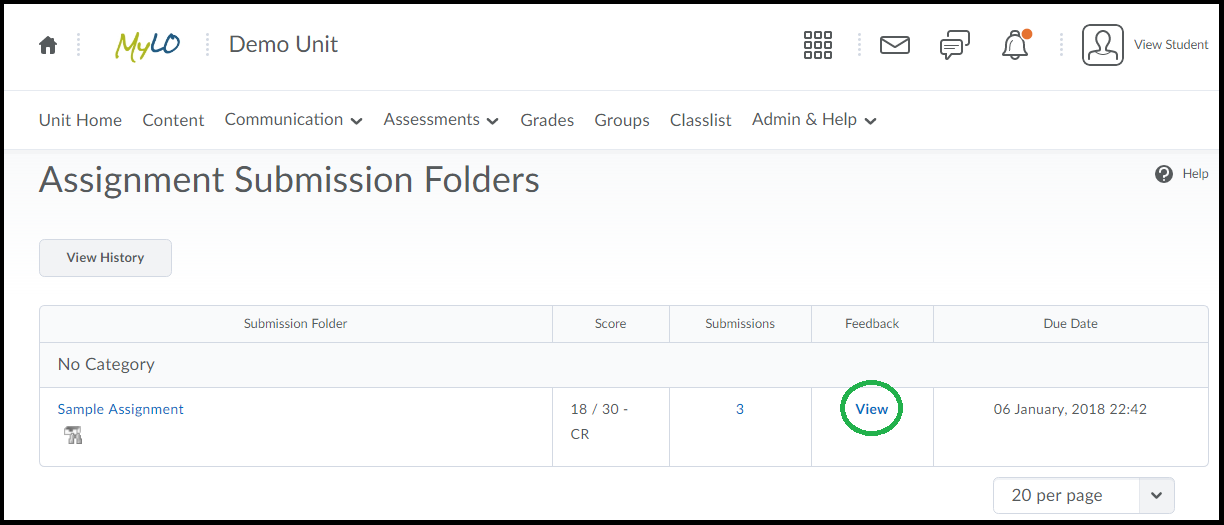
First you will need to click the “Assessments” item from the toolbar, then choose the option ‘Assignments’, as circled below.
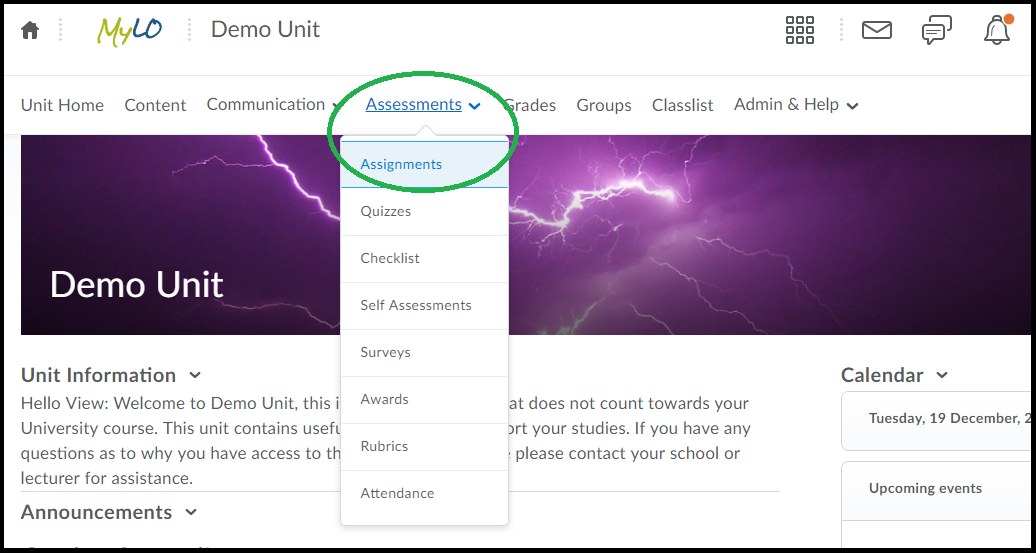
When you load up the Assignments area you should see a list of assignments, with a column titled “Feedback” to the right of each one. When Feedback is published to students a link called “View” will be visible in the Feedback column, as circled below.
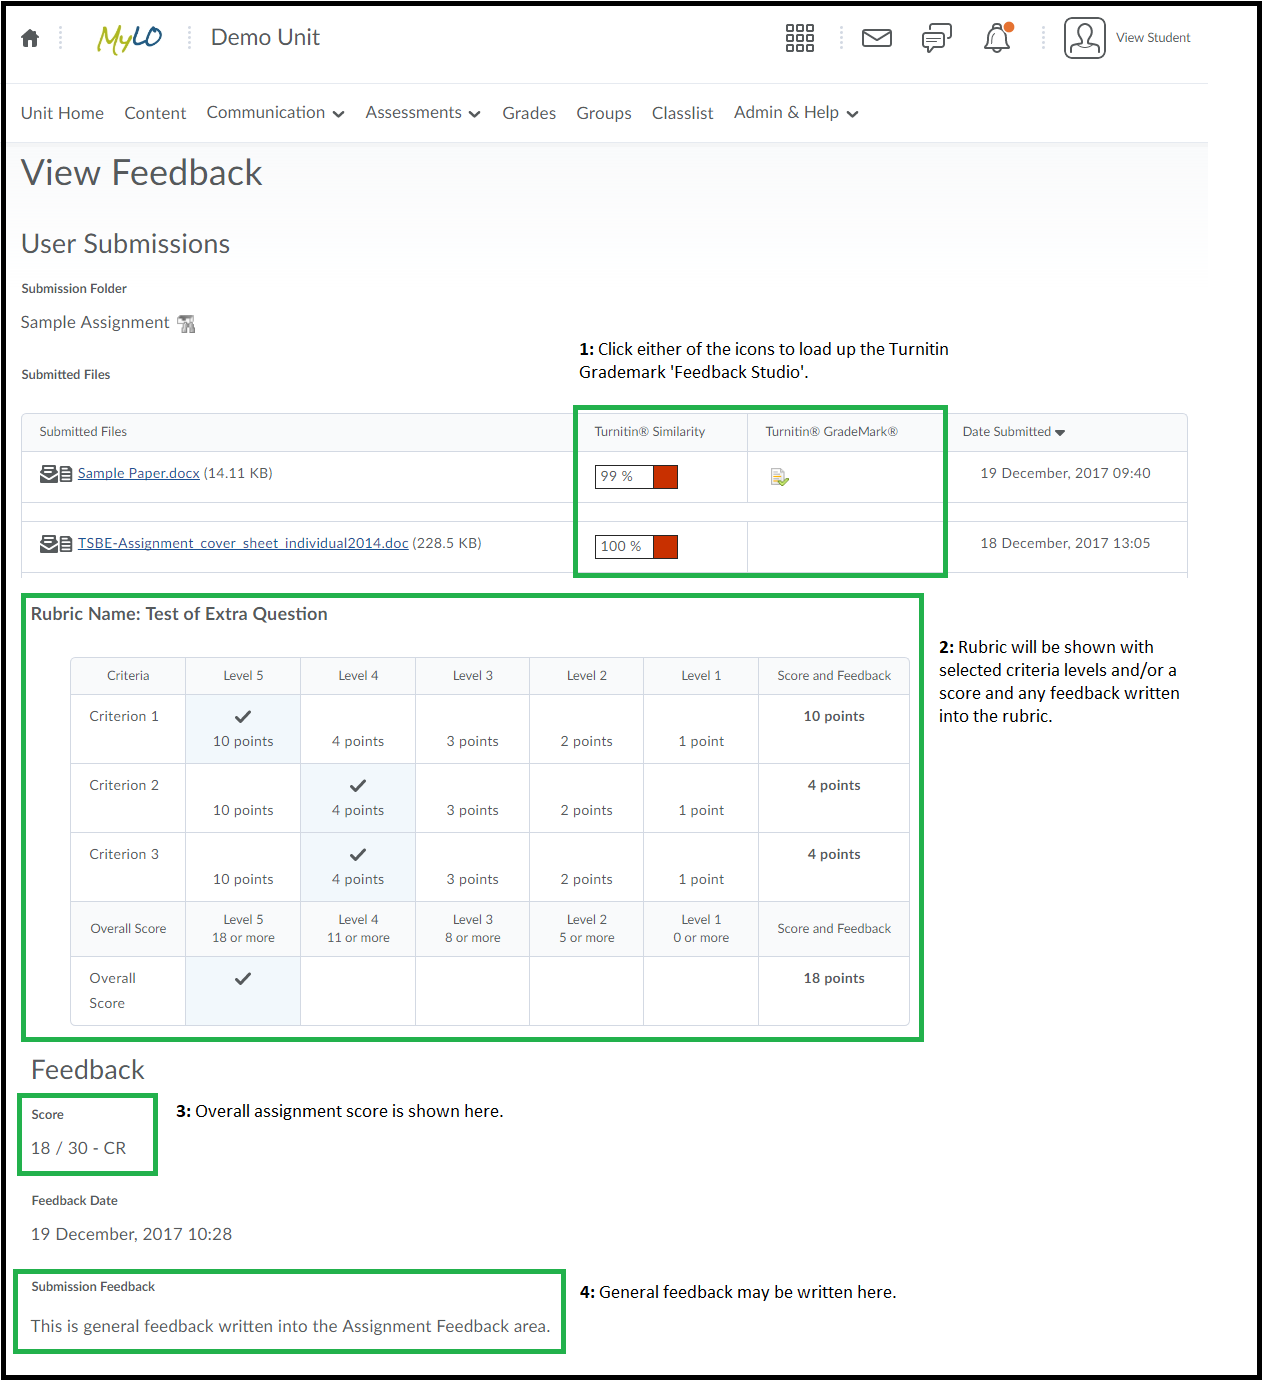
When you click the “View” link you will see one or more of the different kinds of feedback your instructor may have provided.
These are:
(1) Link to Turnitin/Grademark: IF Turnitin or Grademark were used you may see a link to the ‘Turnitin Feedback Studio’. It may be the Similarity Report icon AND/OR the Grademark icon – either will take you to Feedback Studio to view any further comments on your submitted file(s).
(2) Rubrics: If a rubric was used for marking you will see it displayed with the selected levels highlighted.
(3) Overall Score: You may see your overall assignment score.
(4) Submission Feedback: General feedback may be written here.
Grademark is the tool used to mark-up (make comments) your submitted documents. It is linked to Turntin, so you may see to the right of your ‘Submitted Documents’ a link to Turnitin or to Grademark if they have been used.
To access the feedback click either icon that appears. Either icon will load up an area called ‘Feedback Studio’ by default. This shows you your submitted document with the comments shown either as icons you click on, or as text on the page itself.
By default you are likely to see the Similarity Report and Grademark comments together. You may also only see one or the other, depending on what your lecturer/marker has set as visible to you.
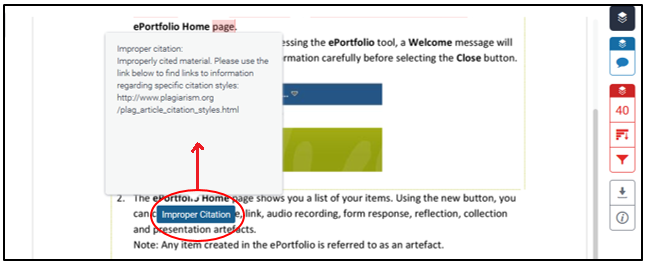
When viewing “bubble” comments (the ones that appear as white text in a blue box) you can click on the blue box to open the full text, an example is circled below.
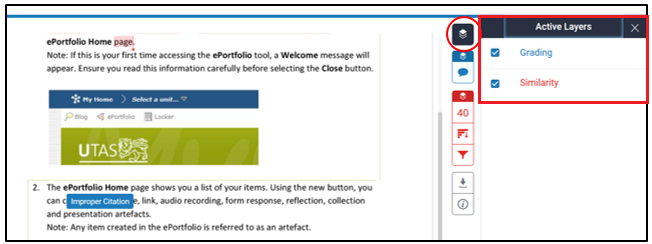
To control the visibility of the Similarity and/or Grademark comments you can click the black icon at the top-right of the page as circled below. It opens options to the left that allow you to turn them off or on.
Taking it online: A comparison of online assessment tools
There are a variety of online tools and software applications that you can use to help students create or perform items for assessment, and submit online. Here, we review some of the tools supported by UTAS.
| Tool | Suitable for… | Submission | Marking and feedback | Considerations |
| Microsoft Office | Creation of a range of documents, from Word Documents, to PowerPoints and Excel spreadsheets. Skype for Business (Lync) can be used to communicate with group members. | Files can be submitted to an Individual or Group Submission Folder. Alternatively, they can be shared with other via a Discussion Topic. | Word documents can be checked for plagiarism/collusion via Turnitin (e.g. Word Documents). Word documents can be ‘marked’ using GradeMark/Feedback Studio. |
|
| Assignment Submission Folder (individual) | Submission of files, including documents, images and videos. | Several files can be submitted at once. | Can be connected to Turnitin for detection of plagiarism/collusion, but only text documents will generate a report. Mark in the Evaluate Submission area. An electronic Rubric can be attached to the Folder and used for marking and feedback. GradeMark/Feedback Studio can be used to make comments on the students’ work. |
|
| Assignment Submission Folder (group) | Submission of files, including documents, images and videos. | Several files can be submitted at once. Only one member of the group needs to submit, but any member can submit if need be. | Can be connected to Turnitin for detection of plagiarism/collusion, but only text documents will generate a report. Mark in the Evaluate Submission area: the feedback and results will be made available to all students in the group. Individual marks can be altered in the Grades tool. An electronic Rubric can be attached to the Folder and used for marking and feedback. GradeMark/Feedback Studio can be used to make comments on the students’ work. |
|
| Quiz | Low-stakes quizzes/tests and Just In Time Teaching (JITT). Best used as a means of helping students check their progress, especially when feedback is integrated and responsive to students’ answers. Thus, best used during semester, not near the end (unless used to aid exams revision). Generally not suitable as a means of demonstrating higher order thinking. | Students must click Submit at the end of the Quiz. Otherwise, their Quiz will be flagged as ‘Attempt in Progress‘ (you can force submission afterwards if need be). Some questions can be automarked, whilst others require manual marking. Marks can easily be published to the Grades tool. Feedback can be delivered immediately, or released from a specific date and time. | It is possible to incorporate feedback according to answer choice OR general feedback related to a question. The feedback can be released immediately, or at a later date. You can mark individual questions if needed (e.g. long answer questions), and alter marks for questions manually if need be. Statistics from the Quiz can used when discussing the Quiz questions with students, and are especially useful for identifying areas of difficulty. |
|
| ePortfolio | Students can generate a Presentation (effectively a website) consisting of reflections, uploaded documents and so forth compiled over a semester. Best for assessments completed over a long period, for example, reflective journals and portfolios. | Submission must be made to an Assignment Submission Folder. Submission can take a while to process and tends to generate a fairly large file. | Mark in the Evaluate Submission area, however, does involve an extra click to open the submission (preferably in a new tab/window). Can be problematic in some browsers. An electronic Rubric can be attached to the Folder and used for marking and feedback. Cannot be procesed through Turnitin, and Grademark/Feedback Studio cannot be used. |
|
| Discussions | Suitable for tasks in which students are required to discuss an issue/come to a consensus and produce something concrete (e.g. a list, with choices justified). Also suitable as a means of supporting collaborative learning. Can be used to support peer review, question and answer, and feedback. For example, students could post a video of their presentation. Other students can view and post questions. | Encourage timely contributions by using staged deadlines. For example, first post due by x, responses due by y. You could also include timeliness of contributions as a criteria in a Rubric. Setting up a Checklist with due dates for each task could help facilitate this. | Provide general feedback and encouragement at a midpoint in the discussion, as well as towards the end and after deadline. We recommend providing feedback in the Discussion itself by posting to the group and weaving/summarising. For marking, use a standalone Grade Item (on a different window/tab). You can attach a Rubric to the Grade Item. |
|
| Blackboard Collaborate Ultra | Groups can meet live online to discuss projects, or to deliver and record a presentation or discussion for assessment. Alternatively, students can deliver a presentation live, online, to you and other students. You can record the presentation as evidence for assessment. Voice, as well as any objects presented on screen, are captured in the recording. | Student groups will need a room created for them. Once they have recorded their session/sessions, they can submit them (with supporting documentation) to a Group Assignment Submission Folder. Live presentations can be assessed live. You can return to the recordings any time. In all cases, we recommend getting students to submit some kind of support material to an Assignment Submission Folder (group or individual), and add the link to a recording to their Comments field. This allows you to use the full features of the Evaluate Submission area to grade and provide feedback. | We recommend using the Evaluate Submission area (associated with an Assignment Submission Folder to grade and provide feedback for groups or individuals. Students will need to submit some sort of supporting documentation, as well as link to a recorded session (if required) to support this. |
|
| Video | Students can capture video of themselves (e.g. talking head) for assessment using a range of tools, including MyLO’s VideoNote, their own smartphone or camera. Useful when you want to: assess students’ individual presentation skills; provide an alternative to written reflection. | Students will need to submit their video to an individual Assignment Submission Folder. If videos are shorter than 3 minutes duration, they can use the VideoNote tool included in the submission window. If you want students to share their videos in some way, it may be advisable to put them up to their Echo360 ALP Library and share a link to/embed the video in a post (rather than getting students to attach a large file to a Discussion post). | Mark and provide feedback using the Evaluate Submission feature. Note that you will not be able to utilise Turnitin or GradeMark/Feedback Studio (as you can’t mark up video files). |
|
Setting up Turnitin and Grademark/Feedback Studio
Turnitin is a text matching service used to compare student-submitted work to the existing literature, as well as student work already stored on its database. Turnitin highlights text matches, allowing you to rapidly detect possible areas of plagiarism or collusion in a student’s writing.
Grademark/Feedback Studio, which is available when a student’s work is submitted through Turnitin, allows you to leave comments on a student’s work electronically. Click here for more information about providing feedback with Grademark/Feedback Studio.
To use Turnitin and/or Grademark/Feedback Studio, you must enable Turnitin when setting up a Assignment Submission Folder (to collect student submissions) in MyLO. Ensure that you do this BEFORE students start submitting their work. Here’s how.
PART 1: Set an End Date for your Assignment Submission Folder
To work effectively, Turnitin requires that you set an End Date in the Assignment Submission Folder’s Restrictions tab.
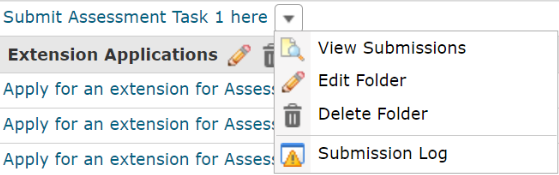
If you have already created an Assignment Submission Folder, you will need to choose to edit it. Do this by selecting the arrowhead to the right of the Folder name, then select the Edit Folder option. Alternatively, when viewing the Submission Folder, click on the Edit Submission Folder button. If you’re already in the midst of creating a Submission Folder, read on.
![]()
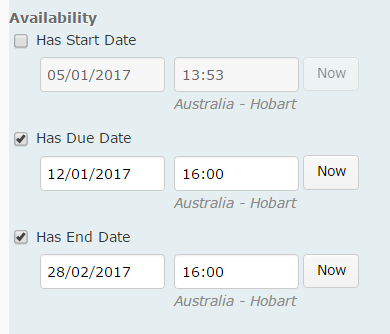
By default, the Properties tab will be open. Select the Restrictions tab.

Scroll down until you see Has End Date. Check the Has End Date option then record a date and time. We recommend that you set the End Date to a few days after final results are released for the semester.
Scroll to the bottom of the page and select the Save button.
PART 2: Connect the Assignment Submission Folder to Turnitin
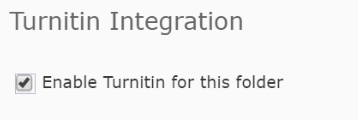
Click on the Turnitin tab (note that you will need to have given the Folder a name before you do this).

Check the box next to the Allow Turnitin for this folder option. Wait a moment while the connection is initiated.
PART 2: Choose the right settings – VERY IMPORTANT!
The following settings are the key to making Turnitin and Grademark/Feedback Studio work the way that you want it to. Do not skip these steps!!!
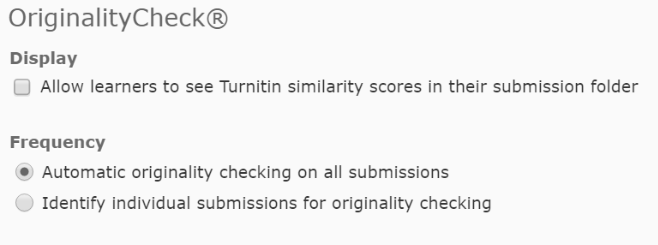
Leave the Allow learners to see Turnitin similarity scores in their submission folder setting (under Display) unchecked. Under Frequency ensure that you have the Automatic originality checking on all submissions options checked. If the Identify individual submissions option is checked instead, you will need to manually click on each file submitted by students to process them through Turnitin. Not fun!
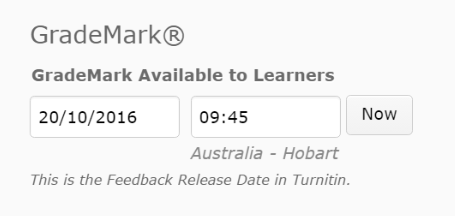
Scroll down and you should see the Grademark available to learners setting. The date recorded here is the date from which students can see the link to access their Grademark/Feedback Studio feedback. We recommend setting this date about one month following the Assignment Submission Folder due date, to avoid any students accidentally seeing their feedback as you’re marking. If you wish to release the feedback earlier, you can always come and alter this date accordingly.
Back to towards the top of the screen, you should see a More Options in Turnitin button. Click on it.
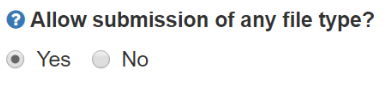
A new window will open. Locate the Allow submission of any file type option. We select you choose Yes. This is especially important if you want to mark files, such as PDFs or some image files, in Grademark/Feedback Studio, even if an Originality Report cannot be generated.
Now click on the Optional Settings option that appears towards the bottom of the screen.
![]()
You should now see more settings. Scroll down until you see the Originality Report generation and resubmissions button. Make sure that the Generate reports immediately (resubmissions are allowed until due date) option is selected. If you do not select this option, you may find that students who submit more than one file (very common) only have the first file processed through Turnitin.

Scroll down until you see the Submit button. If you can’t see it, expand the window to full screen. You should be able to see it then.
![]()
Downloading and printing Grademark feedback
If you use Grademark to provide comments on students’ work, you, or your students, may wish to download or print the feedback.
These instructions should work for both staff & student views in the Grademark interface (known as ‘Feedback Studio’).
First load up the assignment and go into the Feedback Studio area (either by clicking the Originality Report from the Assignment area or by clicking ‘View Feedback’ in grades).
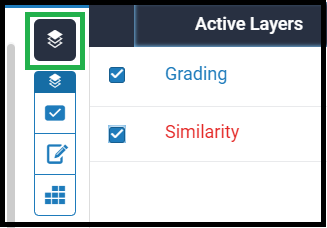
Once Feedback Studio is loaded – locate the toolbar to the right and click on the top-most icon (shown below) – then choose which ‘layers’ you wish to download. You can choose download the grademarks, the originality report or both.
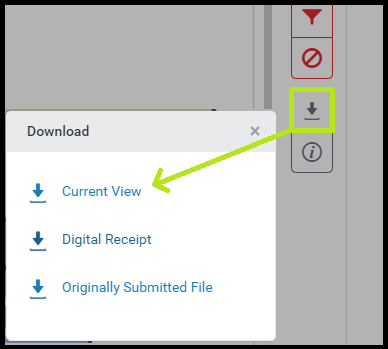
Then click the icon with a ‘down arrow’ on it, as shown below. This will give you the options for downloading. Click ‘current view’ to download the file with your current selections.
When you click an option, depending on your browser, the file with download into your default download directory or you’ll be asked where to save the file.
The PDF that is then created will contain the document with the inline comments shown, some small comments may be shown but larger quickmark comments will likely be shown annotated below the original document.
Grading with different MyLO tools
This table provides an overview of common MyLO tools, and their relationship to Grade Items. It also takes into account electronic Rubrics, Turnitin and Grademark.
| Dropbox | Discussion Topic | Quiz | ePortfolio | Standalone Grade Items |
|
| Attach a Grade Item or use a standalone Grade Item? | Attach a Grade Item | If you are not using a Rubric*, or assessing numerous small group discussions*, attach a Grade Item. |
Attach a Grade Item | Create a Dropbox Folder for students to submit to. Attach a Grade Item to the Dropbox Folder | Use for performances that cannot be submitted, like tracking participation |
| Can Turnitin be used? | Yes | No | No | No | No |
| Can Grademark be used? | Yes (depending on type of file submitted) | No | No | No | No |
| Attach a MyLO Rubric | Attach it to the Dropbox. | You can use a Rubric, but the grading process will be quite complex. *Use a standalone Grade Item instead of attaching a Grade Item to the Discussion. Attach the Rubric (if using) to the standalone Grade Item. | It is possible to use a Rubric for feedback purposes; however, typing directly into the feedback fields within the Quiz tool itself is easier and more efficient. You can attach a feedback (text) Rubric to a Quiz OR a Grade Item associated with a Quiz, but how you mark and where students see the Rubric will differ accordingly. | Attach it to the Dropbox. Requires the use of two monitors – one to view the Rubric, and another to view the students’ work. Does not work well in Google Chrome. | Attach the Rubric to the Grade Item. Best used for feedback purposes only. |
| Mark and provide feedback to a group | Dropbox must be set up as a Group Dropbox when it is first created. | N/A | N/A | N/A | N/A |
| Alter an individual group member’s grade | Do this in the associated Grade Item. Direct students to look at the Grades tool for their final results for the task. | N/A | N/A | N/A | N/A |
How to export and re-use Grademark comments
Before your MyLO unit reaches its end date, you can export a set of Grademark comments (known as Quickmarks) for use in future units. You can also export a set to share with members of your teaching team, so that they can use the same set to mark student assignments. You can only export Bubble comments, e.g. those comments that appear to students when they click on a speech bubble. Text comments, where text is typed directly onto a student’s work, cannot be exported.
NOTE: Once a unit ends in MyLO (e.g. it becomes a ‘past’ unit), you will no longer be able to export a Grademark set, nor will you be able to view it.
At present, there are two different views of Grademark in use. We have provided instructions for the most recent view, Feedback Studio, below. If you prefer to use the old Grademark Classic view, you will find instructions on this page.
Please note that these instructions were written for use with Google Chrome, the browser recommended for use with MyLO. If you are using a different browser, the options presented to you may appear slightly different to the examples shown below.
Export a Grademark Set in Feedback Studio View
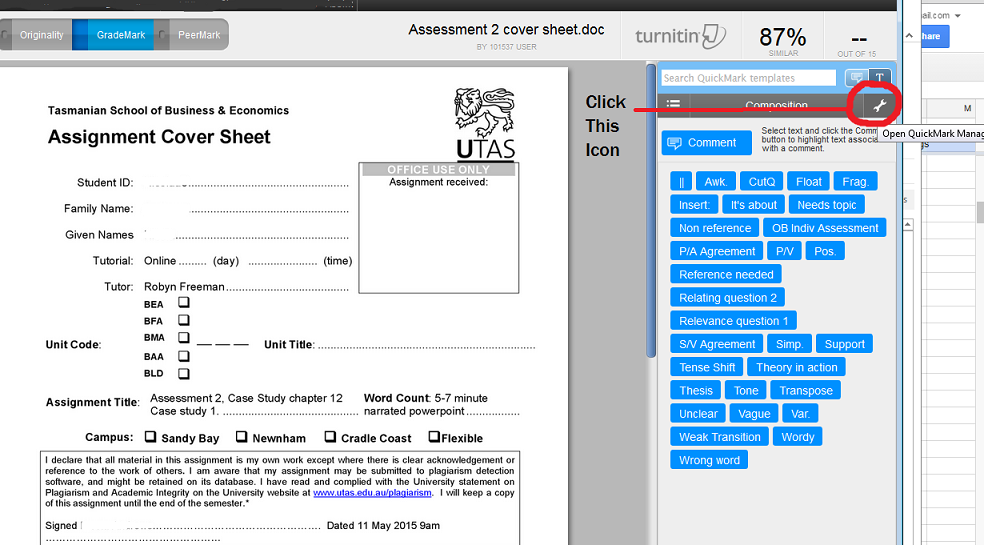
Access Feedback Studio as you normally would to evaluate a student’s work (any student submission in the relevant unit will do). When Feedback Studio loads, select the Quickmarks icon from the menu seen to the right of the screen. It looks like a blue box with a white check inside of it.
![]()
The Quickmarks menu will open on the right side of the screen.

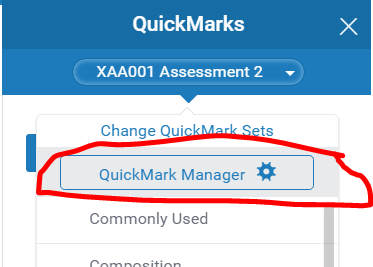
The currently selected Set name will appear in the drop down menu. Click on the name (or the small, white arrow head). Select the Quickmark Manager option.
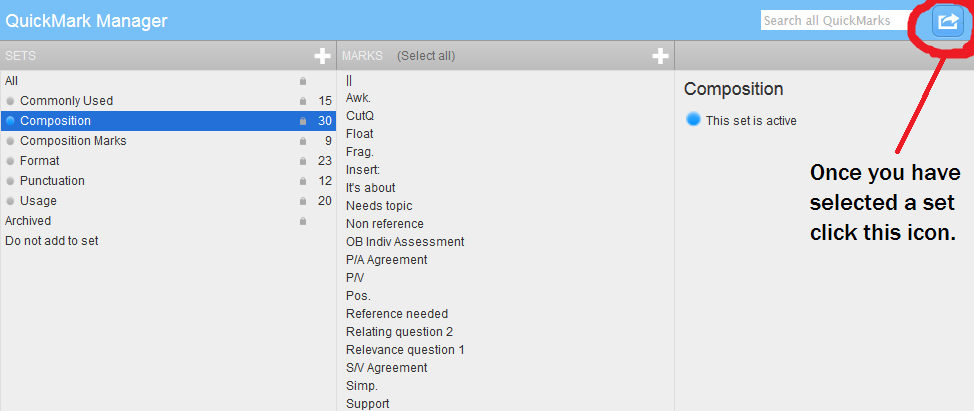
The Quickmark Manager window will open. Click on the menu icon (3 parallel lines, top left corner) and ensure that the set you wish to export is selected. The selected set will have a check next to it. To select a different set, click on it once.
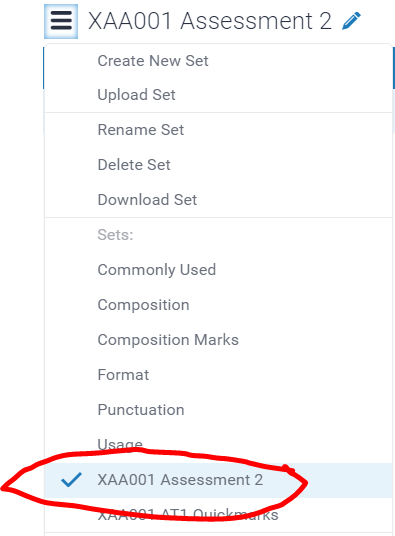
Now, select the Download Set option from the menu.

The Set will now be downloaded to your computer (usually to the Downloads folder associated with your browser). In Google Chrome, you will see the download appear towards the bottom left corner of your screen (most recent download will usually be on the far left). To open the folder containing the download, click on the menu arrowhead and select the Open in Folder option.
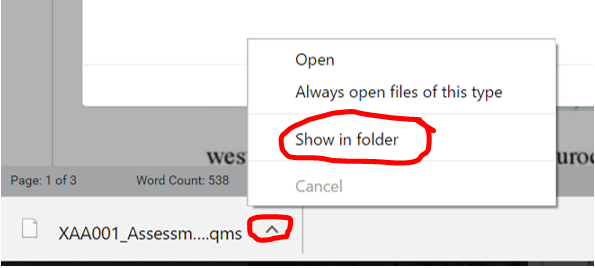
This will open the Downloads folder, and the Grademark Set export file (it will have a qms file extension) will be highlighted. Save the Set somewhere that you will remember by copying it from your Downloads folder, and pasting it into your preferred storage folder.
Import a Grademark Set into a different unit
Access Feedback Studio via a student’s submission in the new unit. When Feedback Studio loads, select the Quickmarks icon from the menu seen to the right of the screen. It looks like a blue box with a white check inside of it.
![]()
The Quickmarks menu will open on the right side of the screen.
The currently selected Set name will appear in the drop down menu. Click on the name (or the small, white arrow head). Select the Quickmark Manager option.
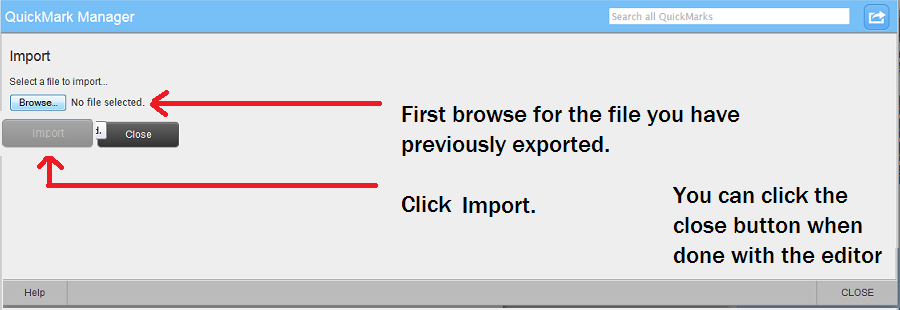
The Quickmarks Manager window will open. Select the menu (three parallel lines, top left corner), then select the Upload Set option.
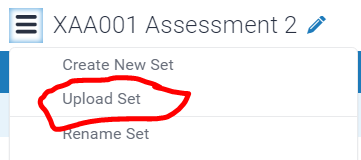
Follow the prompts to upload your set file.
Provide feedback on assessment tasks using Grademark
You can use Grademark to apply comments to electronic assignment submissions. Students can then view the comments once their assessment results have been published.
Why use Grademark?
Grademark allows you to insert comments onto a student’s assignment. You can use an existing bank of comments, known as a Grademark Set, or create new comments as you go. This is somewhat like writing comments in the margins of a student’s assignment. It is potentially much quicker than the analogue method, as you can re-use comments across student submissions.
What can be marked with Grademark?
You can use Grademark to add comments to files that have been submitted to a Group or Individual Dropbox in MyLO. The Dropbox must have Turnitin enabled. A range of different file types can be used with Grademark, including Word documents, images, PDFs and PowerPoint files. View this post to learn how to enable Turnitin/Grademark when setting up a Dropbox. For further information about file types that can be used with Turnitin and Grademark, view this post. Note that some file types will not work with Turnitin or Grademark.
Essential vocabulary
- Quickmarks are drop and drag comments that you can ‘drag’ onto a students work.
- Quickmarks can be categorised into sets. Sets can then be used across different assessment submissions in a unit, or exported for use in other units.
- Text comments are unique to a student’s submission. They cannot be used in other assignments.
- Bubble Comments can be used to highlight text and make comments about. They can also be saved as Quickmarks.
How to mark with Grademark
These short videos will show you how to mark student submissions with Grademark. Alternatively, you may wish to download these printable instructions. One important thing to remember – Grademark saves (most) of your work automatically, so simply close the window and you’re done!
View a student’s submission in Grademark
Add, edit or remove a Text comment (unique to this student’s work)
Add a Bubble Comment
Change between Quickmark Sets and drag Quickmarks onto a student’s submission
Create a new Quickmark Set and add new Quickmarks to it
Edit and delete Grademarks
See an overview of the Comments (including Grademarks) that you have made so far (on screen or in print)
Turnitin and Grademark/Feedback Studio: What file types will work?
Turnitin and Grademark/Feedback Studio can work with a variety of file types. The table below indicates the types of files that students may submit, and whether these file types can generate an Originality Report (for plagiarism checking) and/or be viewed in Grademark/Feedback Studio (note that Feedback Studio combines both the Originality Report and Grademark views on one screen). Note that, to be submitted to Turnitin, a file must be no larger than 40MB.
File type |
Originality Report
|
Comments in
|
Settings |
| Microsoft Word [DOC or DOCX] |
|
|
Must enable Turnitin. Submissions must contain at least one line of text. |
| PowerPoint [PPT or PPTX] |
|
|
Must enable Turnitin. This will only work if the PPT file contains text. It will not work if the file consists of images or videos. |
| HTML (web page) | |
|
Must enable Turnitin. Must contain at least one line of text. |
| Plain Text [TXT] | |
|
Must enable Turnitin. |
| Rich Text Format [RTF] | |
|
Must enable Turnitin. |
| Portable Document Format [PDF] | |
|
It will depend on how the PDF has been generated. If a PDF contains images and no text OR it consists of a series of scanned pages (images), it may not process effectively. Must enable Turnitin. |
| Hangul [HWP] | |
|
Must enable Turnitin. |
| Corel WordPerfect | |
|
Must enable Turnitin. |
| Adobe Postscript | |
|
Must enable Turnitin. Must contain at least one line of text. |
| Image Files (specific types below) |
|
|
Currently not possible. |
| JPEG | |
|
Currently not possible. |
| GIF | |
|
Currently not possible. |
| PNG | |
|
Currently not possible. |
| TIFF | |
|
Currently not possible. |
| BMP | |
|
Currently not possible. |
| PICT | |
|
Currently not possible. |
| Video Files | |
|
N/A |
| ePortfolio Items (e.g. Forms or Reflections) | |
|
N/A |
Help students locate Assignment Submission Folder results and feedback
Would you like your students to access grades and feedback in a Assignment Submission Folder, as well as feedback you have marked up on their submission using Grademark/Feedback Studio? Make sure your students know where to look to get the information they need!
Use our template to quickly and easily create an Announcement, an HTML page, an email (sent from MyLO) or a Checklist. The template contains instructions, with matching images, to help students find their results. You can edit the template to meet your needs.
To use the template, follow these steps:
1 – Use your mouse to select all the text, then copy all the text seen inside the box below.
<p>Dear {firstname},</p>
<p>I am writing to let you know that the results of <<INSERT ASSIGNMENT NAME HERE>> are now available. </p>
<p>Follow the instructions below to access your results and feedback.</p>
<p>To check your results, select the <b><em>Assessments</em>, then <em>Assignments</em></b> from the MyLO toolbar. </p>
<p>You will see a table listing all the <em><strong>Assignment Submission Folders</strong></em> available in the unit (similar to the table seen below). Find the relevant <em><strong>Submission Folder</strong> </em>(the name appears in the far left column). Your score will appear in the <em><strong>Score</strong> </em>column (second column from the left). The <em><strong>Feedback</strong></em><strong> </strong>column (2nd from the right) contains a <em><strong>View</strong></em><strong> </strong>link. Click on the <strong><em>View</em> </strong>link.</p>
<p><img src="http://blogs.utas.edu.au/teaching-at-tsbe/files/2015/01/Assignment-Submission-Folder-student-view-with-View-link-to-feedback.png" alt="Image showing an Assignment Submission and the View icon that can be clicked to view feedback" title="Image showing an Assignment Submission and the View icon that can be clicked to view feedback" width="603" height="74" border="2px" /><br /><br />You will then see a page that includes <<a marked-up rubric that shows the level you attained for each criteria followed by>> some general feedback and your grade. <<I have also provided you with additional feedback using the <em><strong>Grademark</strong></em> tool. I have used this tool to add comments to the document that you have submitted. You can access this feedback by clicking on the small document icon that appears in the <em><strong>Grademark</strong></em><strong> </strong>column. It should look similar to the example shown in the image below.</p>
<p><img src="http://blogs.utas.edu.au/teaching-at-tsbe/files/2015/01/Dropbox-View-Feedback-Grademark.gif" alt="Image showing where to click to access Grademark feedback" title="Image showing where to click to access Grademark feedback" height="184" width="615" border="2px" /></p>
<p>Note that, when Grademark (also known as Feedback Studio) opens, you'll see blue icons with a speech bubble inside them, like this.</p>
<p><img src="http://blogs.utas.edu.au/teaching-at-tsbe/files/2015/01/Comment-icon.png" alt="Bubble Comment in Grademark/Feedback Studio" title="Bubble Comment in Grademark/Feedback Studio" width="71" height="62" border="2px" /></p>
<p>Click on the icons to see the comments made on your work. Alternatively, you can choose to download your work and feedback as a PDF, which you can print out if you wish to. The full comments are shown in order at the end of the PDF. The way you do this will depend on whether the new (Feedback Studio) or 'classic' view of Grademark opens for you. </p>
<p>Look for either a download icon towards the right of the screen, like this<br /><br /><img src="http://blogs.utas.edu.au/teaching-at-tsbe/files/2015/01/Download-option.png" alt="Download link in Feedback Studio" title="Download link in Feedback Studio" border="2px" /></p>
<p>or a Print icon towards the bottom left of the screen, like this.</p>
<p><img src="http://blogs.utas.edu.au/teaching-at-tsbe/files/2015/01/Grademark-Classic-Print-icon.png" alt="Print icon in Grademark Classic" title="Print icon in Grademark Classic" border="2px" /></p>
<p>Choose one of the following options to download and/or print your feedback: <em>Current View; </em>or <em>Download PDF of current view for printing.>></em></p>
<p>Should you have any questions about the grade or feedback that I have provided you with, please don't hesitate to contact me.</p>
<p></p>
2 – In your MyLO unit, create a new Announcement, HTML page, email or a Checklist task. The example seen below is a new Announcement. Give the new item a title/headline, then move on to the next field (where you put the bulk of your message/content). By default, the WYSIWYG editor will open. Click on the source code symbol, seen at the bottom right of the WYSIWYG editor. It looks like this </>![]()
3 – A pop-up window will open. Place your cursor into the blank field, then paste in the code you copied earlier. The code will appear in the field. Click the Save button.
4 – The window will close. You will now notice that the template appears in the WYSIWYG view. You can edit it as you would a Word document, by adding or removing text. We have indicated sections that you may want to edit or remove using brackets <<like this>>. Remember to press Publish or Save (this will depend on which tool you are using) to save your changes.