Category
Assessment
Create a Grade Item
Would you like to be able to record student grades for exams, tutorial presentations, attendance or participation? These sorts of tasks can be graded using a Grade Item in the MyLO Grades tool.
These instructions explain how to create a Grade Item in your unit.
Providing extensions to students
From time to time you may need to provide students with extensions due to illness, technical issues or personal issues.
If a student needs an extension on an online assessment task, you can use the Special Access feature to provide different types of extensions to different students.
This video from Tam Lynch demonstrates how to provide a student with Special Access to a Quiz. Alternatively, you can view it in full screen mode on YouTube (opens in new window).The instructions in the video are also applicable to Assignment Submission Folders.
For advice or assistance regarding Special Access in MylO, please contact the relevant team in your faculty or school.
Getting distance students to submit presentations
Presentations are a common form of assessment for group and individual assessment tasks. Presentations are usually delivered during face to face tutorials. How can we ‘translate’ the task of delivering a presentation into something that is feasible for distance students? Here are three possible solutions.
Presentations during online sessions
If you have a relatively small cohort of distance students, it may be possible to arrange a presentation session, or sessions, during which students can ‘present’ to you and/or the rest of the class. It is also possible for students to meet online and record their own session, and submit the recording for assessment.
Setting up
- Set up sessions in Blackboard Collaborate (Web Conferencing) for your presentation session, or sessions.
- You may wish to get students to register for a particular presentation time. This can be achieved using the MyLO Groups tool. For more information, please contact the TSBE Flexible Education Team.
- If you want to mark this form of presentation in MyLO, you could ask students to submit their slides to an Assignment Submission Folder and associate it with a Grade Item. Alternatively, you could create a standalone Grade Item and record the marks directly into it. For advice about setting up a standalone Grade Item, please contact the TSBE Flexible Education Team.
Considerations
- It can be difficult to find a mutually convenient time for distance students to present. If it is not possible for groups of students to meet online with you, an alternative method of presentation may be required.
- It is possible for students to meet in their own Online Session as moderators and record a presentation. It is not currently possible to ‘lock’ this room to a specific group – but naming the session accurately should be enough.
- A link to the recording can then be submitted to a Assignment Submission Folder for assessment. However, students will need practice and guidance for this method to be a success. If you are considering using this method, please contact the TSBE Flexible Education Team for advice.
- Practice makes perfect – give students access to a room as Moderators so that they can practice setting up and using their microphone, uploading slides and so forth. You could set up a room for a group of distance students for the purpose of assignment preparation.
- Have a plan for the session: you may still need to act as Head Moderator, wrapping up overtime presentations, prompting students to ask questions, introducing presenters and so on.
- Recording the session will allow you to review student presentations. This could be very useful for marking and review purposes.
- If your session occurs after hours (after 6pm), the IT Service Desk will not be available to assist you or your students.
- You (and your students) may feel more comfortable using other common tools like Skype for presentation sessions. Skype can record presentations however testing to ensure the settings are correct for recording audio is essential.
Recording a video and submitting the file to an Assignment Submission Folder
If you are happy for students to present without slide content, you could ask them to record a video of themselves and submit the video file to the Assignment area for assessment. Note that this method is suited to individual presentations, not group presentations.
Setting up
- Link to this document from your Assignment, and/or Assessment folder (in Content) and/or in a News item. The document provides advice to students about appropriate video file formats, in addition to information about submitting a video file to an Assignment Submission Folder.
- Set up an Assignment area and associate it with a Grade Item.
Considerations
- Students will usually have access to some form of device with video recording capability: smart phones; tablets, webcams and most digital cameras can all be used for recording purposes. However, students may not have the technical know-how when it comes to using these devices to record video. Due to the plethora of devices and video apps on the market, there is no single solution or ‘lock-step’ approach to video that is guaranteed to work for all students.
- The only thing students should need to worry about, aside from the quality of their presentation, is the video file format and whether they are visible and audible in their video. Emphasising a need for perfect video techniques may prompt some students to waste countless hours trying to edit out every “um” and “ahh”. Remember: you are not assessing them on their video editing skills – you are assessing them on their general communication skills.
- File format and size can be an issue when uploading to an Assignment Folder. Some students may experience significant delays or time-outs during the upload process. In cases where students experience genuine difficulties uploading video files (e.g. their connection times out), advise them to support their video with some form of written document, for example, an overview of the main points of their presentation. They can upload it to the submission folder along with their video file. The written document can be processed through Turnitin (this feature is turned on when you set up the folder) and associated with a Grade Item, meaning you can use GradeMark to provide feedback on the whole assignment.
- Some students may experience time-outs when they try to submit to the MyLO assignment folder. If so, an alternative submission method may be required. For example, your students could upload their file to YouTube (free for a video of up to 20 minutes duration), or put the file up to a Dropbox or Google Drive account (free). They can then submit the link to the video to you for assessment. They would need to place this in the Assignment Submission Folder comment area.
- Set a submission date during the week, not over the weekend. That way, students can contact the IT Service Desk if they encounter difficulties uploading their work.
- It is difficult (and near impossible without special tools) for students to record both footage of themselves AND a presentation (e.g. PowerPoint) in a video. Consider what is more important: seeing the student, or seeing the presentation? If seeing the presentation is more useful, consider the next option.
Recording audio in a PowerPoint presentation and submitting the file to the Assignment Folder
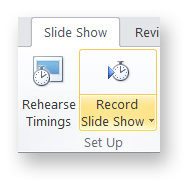
Recent releases of Microsoft’s PowerPoint have included the ability to record audio with a microphone. The tool is known as Record Slide Show and it can be found in the Slideshow ribbon, as seen below. The resulting PowerPoint file can be uploaded to the Assignment Folder for assessment. It is also possible for students to record audio to slides individually.
Setting up
- Consider providing students with a link to helpful information about including audio in a PowerPoint, like this tutorial from Microsoft.
- Set up an Assignment Folder and associate it with a Grade Item.
Considerations
- Turnitin cannot interpret PowerPoint slides. If you wish to use Grademark to add comments to a student’s work, consider asking the student to submit a PDF of their presentation, along with the presentation itself. The PDF file can be processed by Turnitin, allowing Grademark to also be used as well. To save their presentation as a PDF in PowerPoint, students will need to go to File > Save As Adobe PDF.
- Not all students will have access to MS PowerPoint at home. What will you do if they don’t have access to PowerPoint? Is there an alternative that they can use (e.g. submission of a video).
- A microphone is required to record the student’s voice. The microphone could be in the form of a headset, an external webcam (which usually include a microphone), or an inbuilt microphone.
- PowerPoint files with embedded audio can get quite big, so some students may experience difficulties uploading their files to an Assignment Folder.
- When you go to mark the presentation, you will need to open the file in PowerPoint. You may need to click on an Enable Editing button first. Select the Slide Show ribbon, then choose the From beginning option to launch the presentation.
Setting up a Group Assignment for submission of group work
Unless you want to mark an individual submission from every member of a group, it is best to allow groups to submit assessments to a Group Assignment Submission folder. This way, you only need to collect one submission from the group and grade it accordingly.
As long as a Grade Item is assigned to the Assignment, the grade given to the group submission will automatically be applied to each student in the group. For example, if Peta submitted a task on behalf of her group, I could grade the task with 5 points out of 10. When I publish the grade, Peta, as well as her fellow group members will also have 5 points recorded next to their names in the Grades tool. The image below shows how a grade given against a submission is allocated to each member of the group in the Grades tool.
FAQs about using a Group Assignment
How do I set up a Group Assignment Submission Folder?
First, you’re going to need to set up student groups using the Groups tool. There are several grouping options available, if you’re not sure which to use please consult a member of the Flexible Education Team for further advice.
Once you have set up Groups, you can set up an Assignment Submission Folder. Click on ‘Assessment’ then go to ‘Assignments’ then click ‘New Folder’.
The IMPORTANT setting you will need to change is the Folder type – as seen in the image below, you must select the Group Submission Folder option and select the Group category to apply it to.
Can I change the grade assigned to an individual group member?
Yes, but only after you have graded the group submission. For this reason, you may wish to hide the associated Grade Item until after you have finished grading.
Once you have graded the group’s submission, go to the Grades tool. Locate the column (Grade Item) associated with the assessment task. Locate the student whose grade you wish to change. Click on the grade allocated to the student. Your cursor should appear in the grade field, allowing you to type in a new grade. Remember to save your changes and un-hide the Grade Item when you’re ready to release the grades to students.
Setting up an Assignment Submission Folder to collect student assignments
MyLO’s Assignment Submission Folder tool allows students to upload a file, or collection of files, for assessment.
You can create a Submission Folder for individual students to submit to, or you can create a Group Submission Folder so one student can submit on behalf of a group of students.
These instructions will show you how to create a Submission Folder for individual students to submit their work to. If you wish to mark students’ work online, you must also associate a Grade Item with your Submission Folder.
TIPS
Setting up your Submission Folder for Turnitin and Grademark
If you intend to use Turnitin to check student submissions and/or you want to provide students with feedback using Grademark you must enable Turnitin when setting up the Submission Folder.
Note that Turnitin can only generate Originality Reports for certain file types. Grademark/Feedback Studio can be used with a broader range of file types, but you must enable this in the Submission Folder settings. Further information about file types that will work with Turnitin and Grademark is available here.
Link a Grade Item with a Dropbox, Discussion or Quiz
Grade Items act as the connection between an assessment item – like an assignment – and the Grades tool. If you want to mark and record grades online, you may need to associate a Grade Item with an assessment item.
You can link an existing grade item to an Assignment Submission folder, Quiz or Discussion Topic.
- Go to the assessment item you need to attach a grade to. Whether you’re creating a new one, or editing an existing one – find the section where you add a grade (either properties or assessment), then click the drop-down box under the heading ‘Grade Item’ and select an existing grade. If the grade item you had previously created does not appear it likely means this grade item is already being used elsewhere or has been set up as a ‘category’ (you can’t link a category, only individual grades).
You can create a new Grade Item whilst setting up or editing an Assignment Submission folder, Quiz or Discussion Topic. This grade item will then be connected to the assessment item.
- To do so as you create a new assessment item, or edit an existing item you will see (either on the ‘Properties’ tab or the ‘Assessment’ tab) an option for ‘Create a new grade item’.

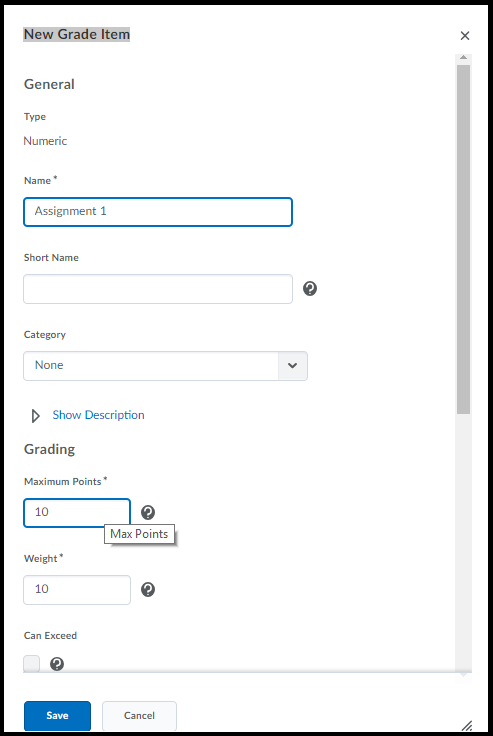
When you click ‘New Grade Item’ a window will pop up – in which you can enter the grade’s name, out of value and weight. If you’re not sure about any of the options here you can just leave them. You can edit this grade later in the Grades tool at any time. When you click ‘Save’ the grade will be created AND it will then be selected to be associated with the assessment you’re currently working in.
Use Web Conferencing to support group assessment tasks and presentations for off-campus students
Many Unit Coordinators include a group-related activity in their suite of assessment tasks. Presentations are a common form of assessment task for groups, but how can off-campus students get together to plan and record a group presentation, or simply just meet as a group?
Using the UTAS web conferencing platform, Blackboard Collaborate Ultra (from hereon referred to as Ultra), students can meet online in a dedicated session and record a single meeting, or hold a sequence of meetings. They can even upload PowerPoint slides and deliver a presentation. The resulting recording can be shared with the class (via a MyLO Discussion) or submitted directly to an Assignment Submission Folder for assessment, along with any relevant documentation like meeting minutes or PowerPoint slides.
For further information about supporting group collaboration and assessment with web conferencing, please contact your college or faculty support team.
Assessing student discussion posts
Here are three methods that can be used to grade student Discussion contributions online:
- Marking with a Grade Item via the Discussion Tool, in which a score and general feedback are provided; or
- Marking with a Rubric via the Discussion Tool, in which an electronic Rubric is used for feedback and/or grade calculation (when a Custom Points Rubric is used).
- Marking via the Gradebook (using just the grade or a rubric attached to the grade) in which you can enter marks into the Gradebook rather than from the Discussion tool – useful if you have multiple discussion topics but only need 1 grade item overall.
As a general rule, we recommend using the simplest method for low-stakes Discussion assessments worth 10 marks or less. Online Rubrics are best used for higher value assessment tasks.
This table details the benefits and limitations of each grading method. In all 3 cases Students view their grade &/or rubric via the Grades tool.
Tools Used |
Benefits & Limitations |
|
Mark using Discussion tool. |
|
|
Mark from a Rubric via Discussion tool. |
|
|
Mark via the Gradebook (a rubric can be optionally attached to a grade item) |
|
|
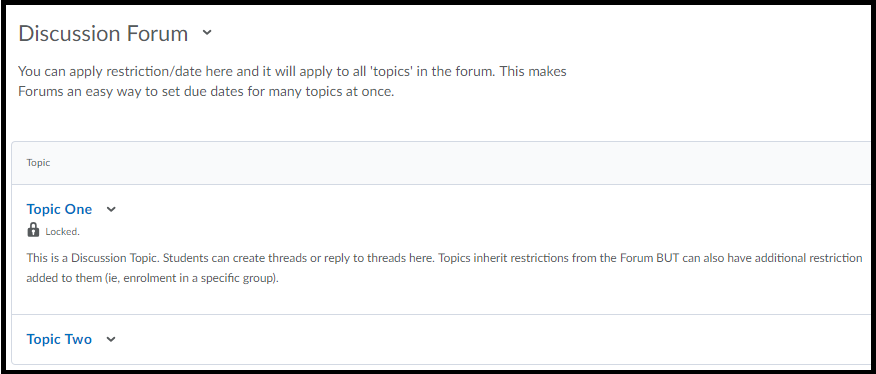
Note when creating Discussions – the ‘Forum’ is only an organisational device, it cannot contain discussion posts on its own. The ‘Forum’ is used to group sets of discussion topics together. A discussion ‘Topic’ is a distinct location for one or more discussion thread(s). Students can’t post directly into a ‘Forum’, you must set up topic(s) first.
Mark using Discussion Tool
- First, set up your Discussion topic. This guide will show you how: How to set up a Discussion topic
- Now associate a Grade Item with the Discussion topic. This guide will show you how: Associate a Grade Item with a Discussion topic
- When it is time to grade students’ Discussion contributions, this guide will show you how: How to grade a Discussion topic via the Discussion tool
Marking via Rubric in Discussion Tool
NOTE: If your College or Faculty features a flexible learning or blended learning team, they may be able to create the electronic Rubric for you, but you will need to have the rubric details ready including any weighting you want attached to the criteria.
- Decide which type of Rubric you will use. This post compares the Custom Points and Text Only Rubric types. Instructions for setting up a Rubric can be found here: Custom Points Rubric creation; Text Only Rubric creation.
- Now set up your Discussion topic (or Topics if you are catering for several Groups of students). This guide will show you how: How to set up a Discussion topic.
- Associate both the Grade Item & the Rubric to your Discussion Topic.
- When it is time to grade your students’ contributions, these guides will show you how to mark using a Rubric: marking with a Custom Point Rubric; marking with a Text Only Rubric.
Mark into the Gradebook (with or without rubric)
- Create a standalone Grade Item/Grade Items and associate your Rubric with the standalone Grade Item/Grade Items. These instructions explain how to set up a standalone Grade Item: How to create a Grade Item.
- Mark via the Grades tool. This guide will show you how: How to grade a Discussion topic via the Grades tool.
Create a MyLO Rubric that will calculate a grade (Custom Points Rubric)
You can grade student assignments using MyLO Rubrics. Creating an Analytic > Custom Points type Rubric will allow you to generate a score for each student, based on the weighting of each criteria, and the levels (e.g. HD, DN, etc.) selected for each criteria. The score does not need to be made visible to the student. You can also record feedback against each criteria if you wish to.
Creating Custom Points Rubrics is somewhat complicated. In some faculties, your local blended learning/distance learning support team may be able to create a Custom Points Rubric on your behalf. You will need to provide them with:
- A word document containing the criteria and level descriptions;
- Weighting or Points values for each criteria, totalling either 100% or up to the points value of the assignment.
- Details of the Assignment Submission Folder or Grade Item that you want the Rubric attached to.
You may be asked to check the Rubric before it is Finalised and attached to an Assignment Submission Folder/Grade Item, as Rubrics cannot be altered once marking commences.
Create a Custom Points Rubric from scratch
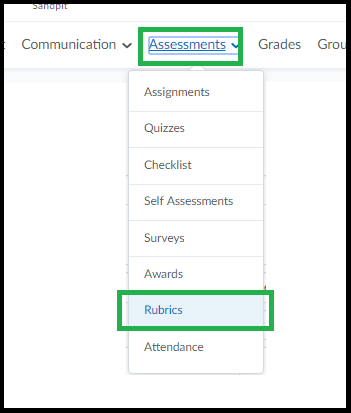
First go to the unit & choose Assessment – Rubrics from the toolbar.
If you don’t already have a rubric to edit just click “New Rubric”.
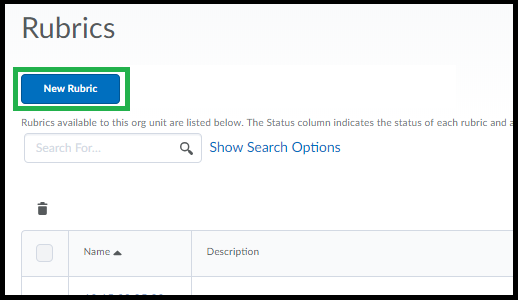
It may take a minute for the page to load, give it a name & check the first set of settings across the top.
Analytic rubric setting means it will calculate a score from multiple criteria. Holistic is one criteria only.
Points vs Custom Points – if your criteria are weighted differently to each other (have different points values to each other) choose ‘Custom Points’. If all of your criteria are worth the same each, you can leave it as “points”. In this help guide we will create ‘custom points’ rubric as this is the most complex.
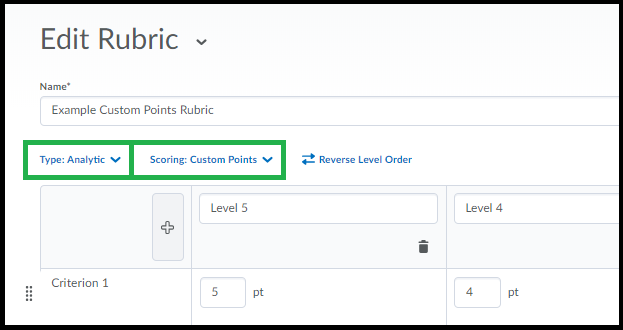
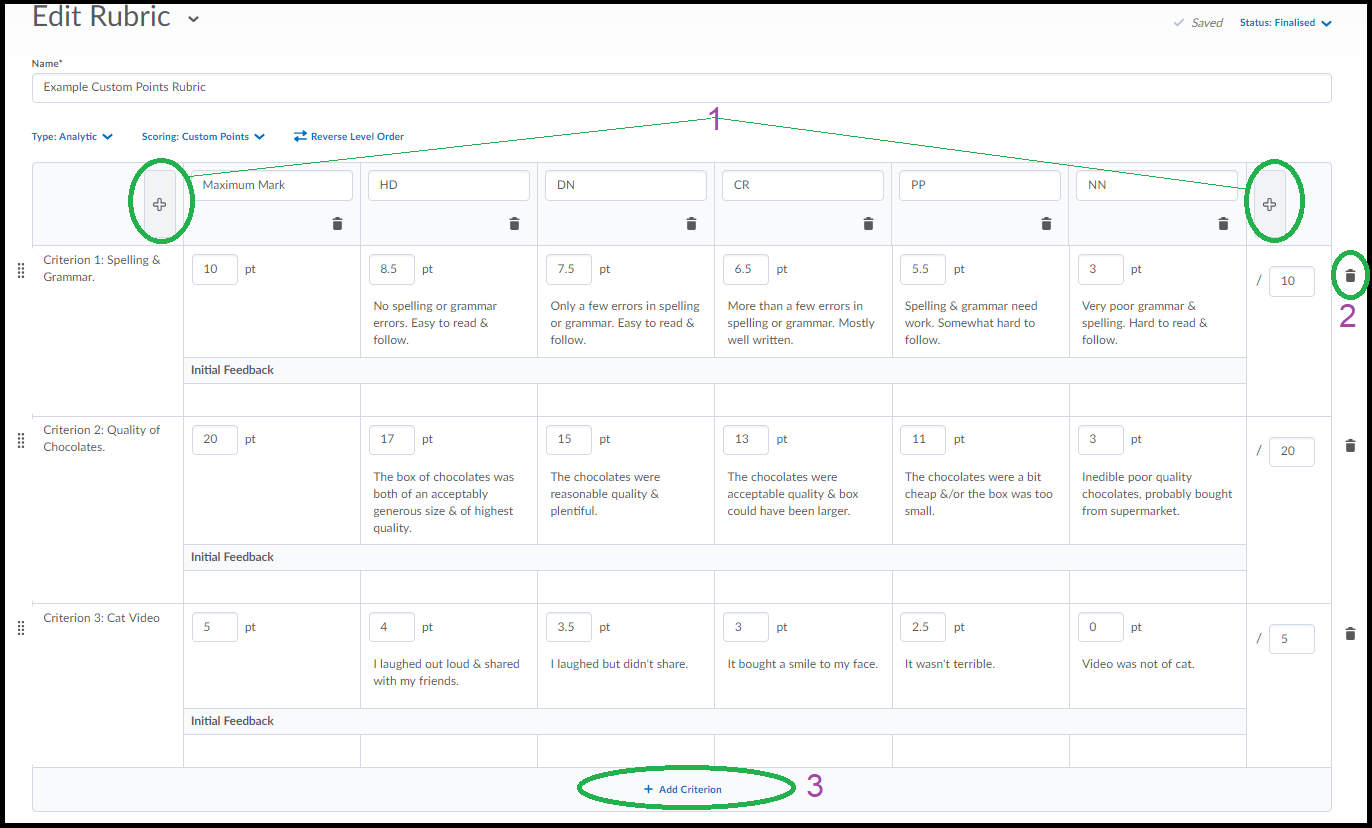
The table will be pre-populated with default values. You can edit any of these values just by clicking into the text & typing. You can also copy/paste text to the cells from Word. Note there is a limit on the number of characters you can use in the Criteria Name column. The rubric tool will SAVE as you go.
1. You can add another column either to the left or right of your columns by clicking either of the [+] buttons at the top.
2. You can remove a criteria by clicking the bin icon to the right of the criteria row.
3. You can add another criteria to the end of the list by clicking ‘Add Criterion’ at the end of the list.
NOTE: With either Points or Custom Points – one column (the default is the right-most) MUST have the maximum obtainable mark for each criteria in it, this is how MyLO Rubric knows how much the rubric is out of. You can , if you want to avoid having the HD column be set at the maximum, use a ‘maximum achievable’ column. Other columns can be set as something lower than the maximum if you prefer. For standard UTAS grades (ie HD, DN etc) the values you use for the DN, CR, PP columns will need to fall into the range defined by the criteria. (HD = 80% – 100%, DN = 70% – 79% etc).
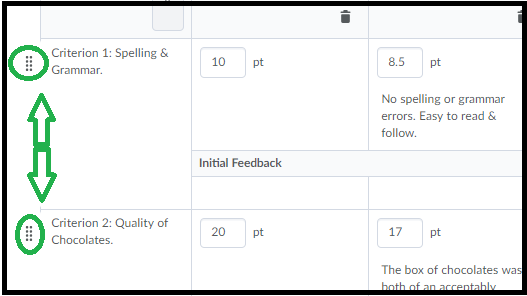
To re-order the criteria just click & drag the criteria using the small icon to the left as circled below.
Once you are done setting up your criteria you can scroll down to check the “overall score” area that calculates an overall level. You can change the default values. You can add or delete extraneous levels entirely by clicking the Plus sign or the Garbage bins. You can delete all but 1 (so you could just have a ‘complete’ level based on any score out above 0 if you want).

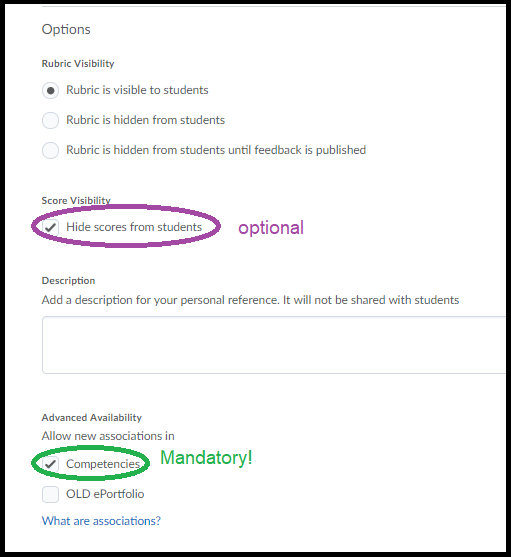
Scroll down a wee bit further and click on “Options” to show important options.
The first set of 3 options defines when the rubric is visible to students. Note that students do like to work “to the rubric” so keep in mind they may ask about it if you decide to turn it off here you might consider giving them a PDF rubric.
Score Visibility: this refers to the scores in individual criteria levels not the overall score. If you check this it just means they’ll see what level they got for each criteria but not the specific number associated with each. They will still see their overall grade. This option is useful to keep as ‘hide’ as it allows for discretion in marking & moderation.
The two options under the description are to “allow associations” which is a rather confusing way of saying “this rubric can be attached to things” – so leave at least the first one checked ON or you can’t then use the rubric anywhere in MyLO because if you un-check it the rubric can’t be added to assignments for … some reason.
You’re not quite done yet!
Scroll all the way back to the top-right to find the option to set the rubric as “Finalised” (why is it up here? why not both at the top & at the bottom?) To use the rubric anywhere it has to be set to “finalised”.

Once Finalised you can now attach this rubric to assignments, grades, or discussions. As you use it for marking it will also auto-save as you go.
Use Rubric statistics to assist with assessment moderation
The MyLO Rubrics statistics feature shows you how grades/levels are distributed across the class, and the average grade/level for each criterion.
To view the Rubric statistics:
Step 1
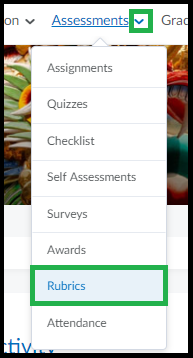
Go to the MyLO site for your unit. Select Assessments > Rubrics.
Step 2
Locate the Rubric you wish to review. Click on the small arrowhead next to the Rubric name, then select View Statistics from the menu.
Step 3
You will see the average score (if a Custom Points Rubric has been used) and average level for the class. To see more, click on the small graph icon that appears in the Actions column.
You will now see three tabs to choose from. The first is Overall. This shows you the percentage of students who have reached each level (e.g. HD, DN, CR…)
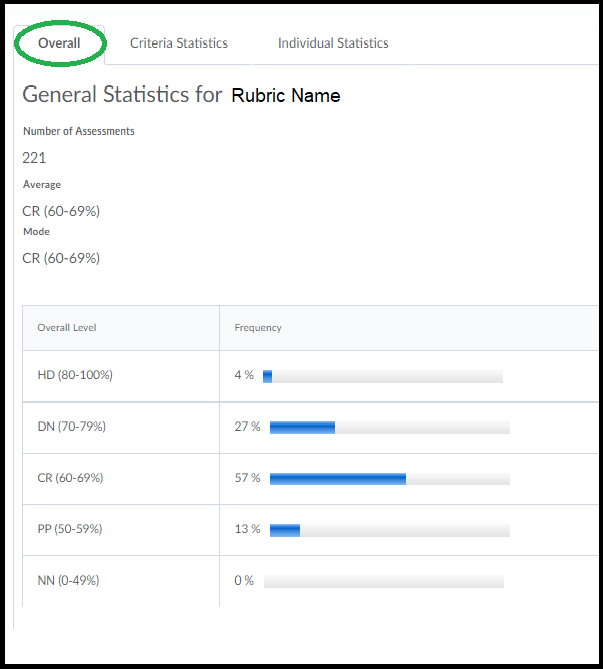
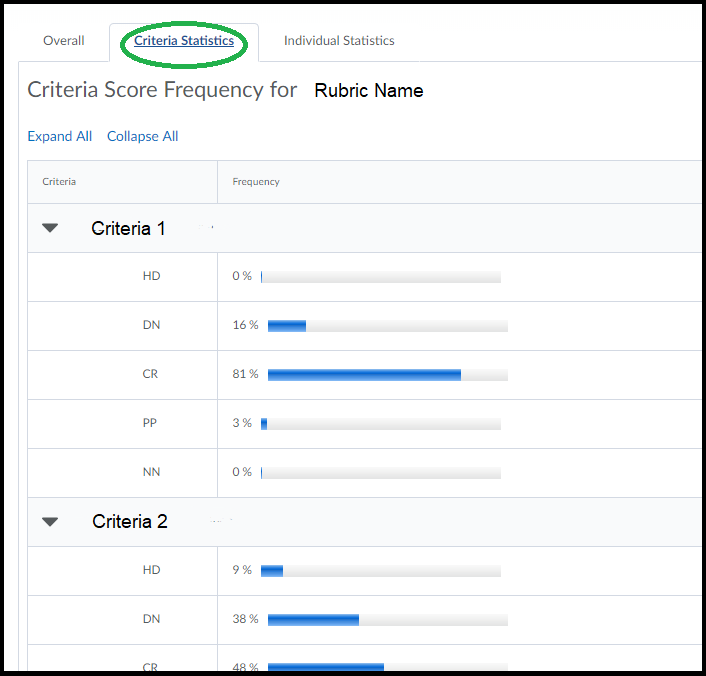
The second tab is Criteria Statistics. This is a very useful view which tells you the percentage of students who have reached each level (e.g. HD, DN, CR…) for each of the rubric criteria.
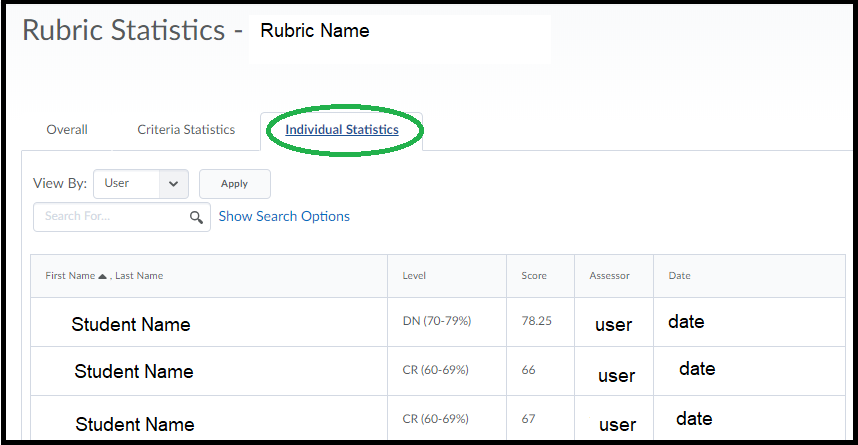
The third tab is Individual Statistics. This will show you the overall level and score (points) attained by each student. You can re-organise the table by student name or assessor name.
