Mark with a Custom Points Rubric (generates a score)
This post covers marking with a rubric that has been set up as a “Custom Points” rubric and that has been attached to either an assignment, discussion or grade item.
A Custom Points Rubric has points associated with each criterion and level of the Rubric. It calculates a total score (and overall level) for a student by adding the points they have scored against each criterion. You are then able to fine-tune this score by overwriting the default scores for each criteria/overall.
This post doesn’t cover setting up the rubric. If you have not done so – set up your rubric following these instruction: (Create a custom points rubric).
To access the rubric for each tool:
Assignment: Click “Evaluate” (or ‘draft saved’) on the right side of the screen in the assignment. The rubrics are then shown as links on the right-side menu area.
Discussion: Click the [v] icon next to the Topic you are assessing then choose “Assess Topic”. From the list of students shown click “Topic Score” and the rubric is shown on the top of the window that loads.
Grade Item (ie, directly into the gradebook): Click the [v] next to the name of the grade and choose “Grade All”. From the window that loads you will see a link to the rubric on the right-side column for each student row.
Note: The Rubric tool will save your work as you go. It is also not possible to edit the rubric in the rubric tool once you’ve started marking, so be sure to preview it in the rubric tool before you start marking to ensure it is correct.
Step 1: Click the ‘level’ for each criteria that best represents the Feedback you wish to provide to students about their work.
The rubric tool is essentially a “feedback” tool – useful for you to calculate a score but primarily the idea is to provide students with useful informative feedback about why the score was arrived at.
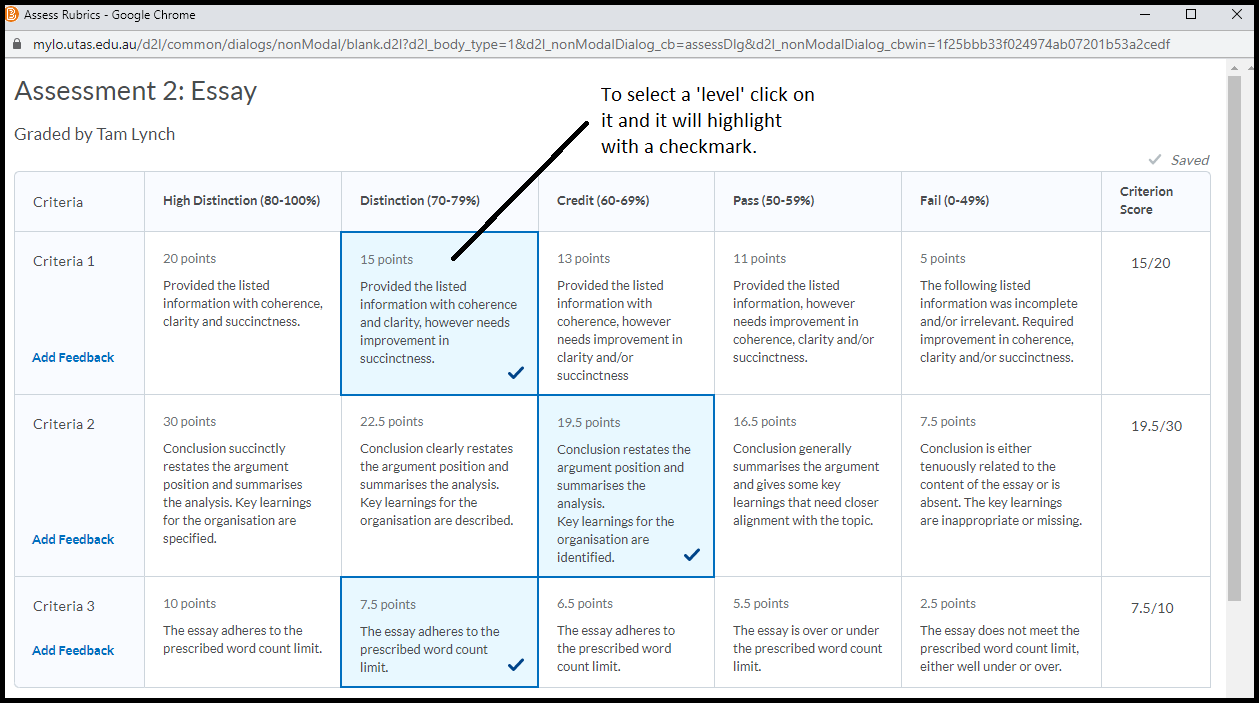
The “default” score associated with this level (as set up in the rubric tool) is then shown on the right of the rubric window. You may need to resize this window if you have a large rubric, or scroll sideways to see it.
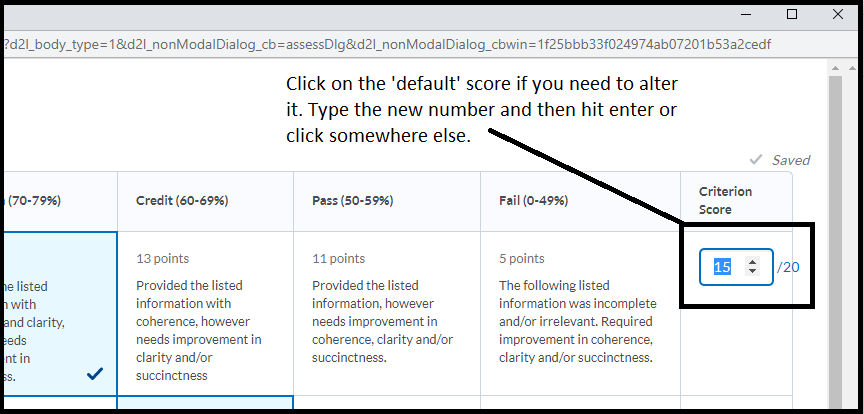
Step 2: Edit the points and feedback associated with a level if required.
Once you’re happy with the criteria levels you’ve chosen to provide to students – you can then alter the score associated with either each level OR the overall score that was calculated.
To edit the score for an individual criteria click on the score as shown on the right of the rubric. Type your new number in and hit enter/return or click elsewhere. Your new score will be highlighted with an asterix to indicate the default was changed. The ‘x’ shown next to the new score will return this score to the default.
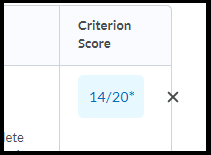 (Showing the score was changed from the default, the X returns the score to the default)
To add written feedback click the ‘add feedback’ link on the left, a box will appear for you to type into. Please note, once you add written feedback here it stays put on the page. Don’t click the X unless you want to wipe what you’ve written*.

Step 3: Check the total at the lower part of the rubric. You can also overwrite this score by clicking on it & typing a new score. You can overwrite the default chosen ‘level’ if your rubric has them – click on the new one to overwrite the default.

Step 4: Click “Close” button at the end of the rubric to finalise the process. Double check the correct score is sent to the ‘score’ field of the tool you’re working in. If it doesn’t – it usually means you have missed a criteria.
* Don’t ask me why it was designed like that, I have no idea why the standard computer logic of x=close was broken for this tool – but here we both are, sighing loudly and reaching for the schnapps.
Comments
This post doesn't have any comments