Category
MyLO Quizzes
Pre-Fill a Long Answer Quiz Question
Did you know you can create a quiz question that allows the student to enter text directly into tables or have other information in the answer box for them to use?
The way to do this is relatively simple but there are a few things you need to remember:
* The Written Response question type is the only type that allows you to pre-fill the answer box.
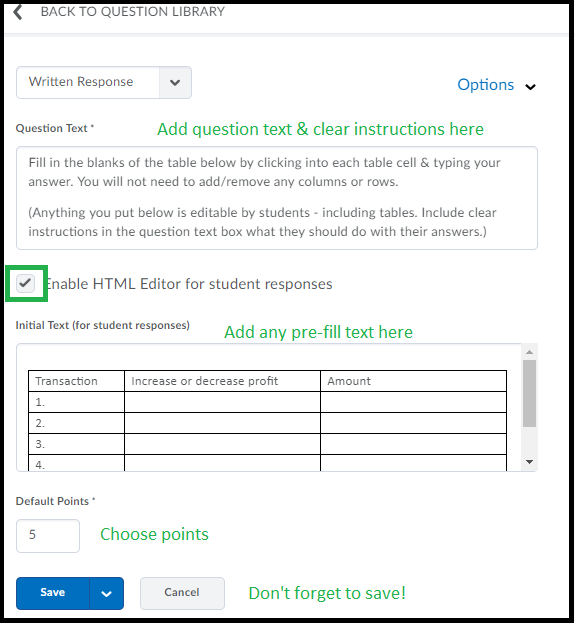
* If you are using tables or other formatting (like lists) you need to also turn on the ‘Use HTML’ option. This will be explained in the setup below.
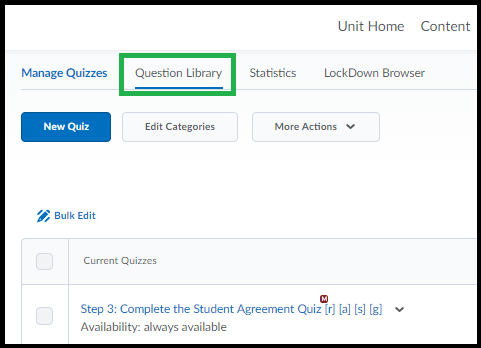
To create a long answer question with pre-filled answers – click on ‘Assessment’ then ‘Quizzes’ – then go to the ‘Question Library’ tab.
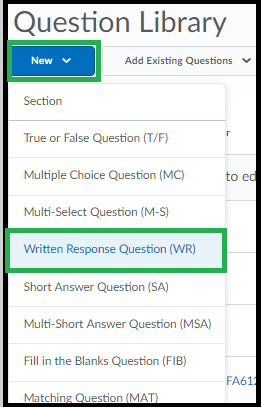
Create new long Written Response question – as shown (or if you have existing question, click on it to edit).
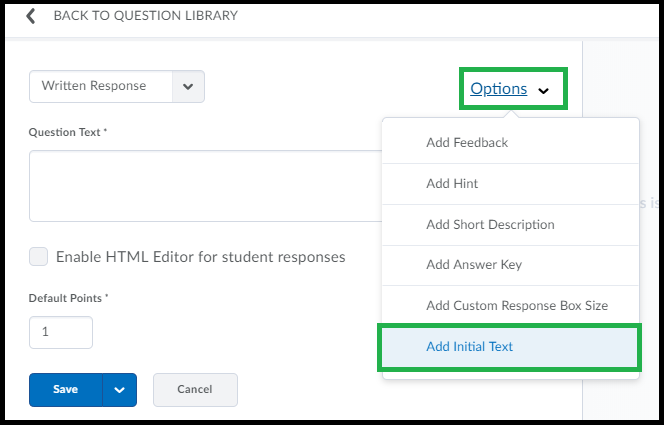
When the question loads, click the ‘Options’ menu just to the top-right. Choose ‘Add Initial Text’.
The answer box is shown below the question text. You can type directly into the pre-fill answer area or you can copy in text. If you are needing a table you’ll need to copy it in from Word or similar. If you are planning to use tables or require the student to use tables you should also turn on the option use HTML Editor.
You can also increase the size of the answer box for students by clicking ‘Options’ & ‘Add Custom Response Box Size’. Ignore the right hand side of the screen. It is not very useful.
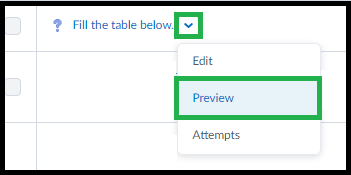
Once you’ve saved the question it will then be listed in your Question Library (you can preview from here to get a better idea of how the question will look). To edit just click on it. Once you’re satisfied with the question you can then add it to a quiz.
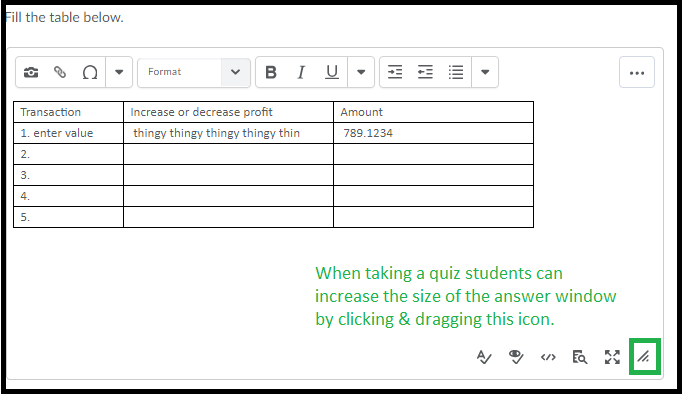
Remind the students that they can increase the size of the answer box – if necessary – by using the small icon to the lower-right of the answer area for the question, this will help with questions that have quite large tables.
Use Quiz statistics to improve teaching and learning
Quizzes can help students check their own learning, especially if useful feedback is provided in response to student responses. Quizzes can also help you adapt your teaching according to needs of your students. The statistics provided by the Quizzes tool can help you quickly determine areas students are strong in, and areas where they may benefit from further learning opportunities (e.g. further discussion or a review during a forthcoming class).
How to access the statistics for a Quiz
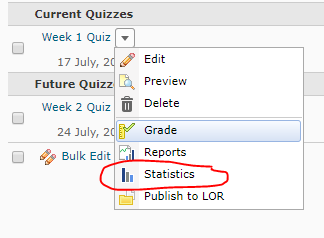
Select Assessments then Quizzes from the MyLO Toolbar. Select the little black arrowhead to the right of the quiz you wish to obtain statistics for, then select Statistics from the menu.
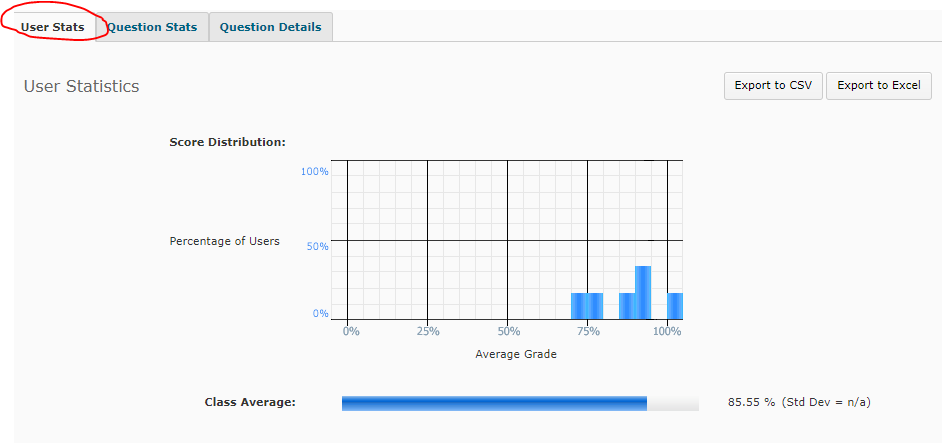
By default, you will be shown the User Stats for the Quiz. This shows you the overall score distribution, and class average, beneath which you will see the overall result for each student (not shown below).
You can navigate between the Question Stats and Question Details tabs to see more useful information.
Question Details provides the most useful information. Here you will see each question (this has been blurred out in the sample image below), followed by the answer options provided to students. The percentage of students who selected each answer option is presented. The correct answer/s are marked by a small blue arrow.
Student Engagement Activity: Track completion of a Quiz
MyLO Quizzes can be very useful for tracking student engagement. They can also be very convenient for you: a Quiz can automatically generate a score and send this score to a connected Student Engagement Activity Grade Item in the Grades tool.
Your local support team may already have some Quizzes, like practice Quizzes or academic integrity Quizzes, ready to go. These Quizzes may be incorporated into your unit as Student Engagement Activities. However, be wary of the relevance of such Quizzes: are your students really going to get anything out of completing them, or are the Quizzes merely being used for convenience?
If you have already prepared Quizzes for assessment purposes, you may also be able to use one of the Quizzes as a Student Engagement Activity. For this to occur, the Quiz must start and end between Week 1 and the end of Week 4 of semester. The title of the associated Grade Item must be altered to include the following text: #SEA.
Of course, you may also wish to develop a Quiz yourself. Quizzes, especially those that incorporate feedback, can be used to help students check their understanding of key terms, theories, concepts and facts included in a unit. For example, a short Quiz can prompt a student to check what they have learned after completing a reading or a lecture.
Quizzes used as Student Engagement Activities needn’t be complicated. Using question types with set answers, like multiple choice questions, means that Quiz attempts can be auto-marked. However, to be truly beneficial to students, Quizzes with set answers must be well-constructed and provide students with meaningful feedback. This post will link you to useful resources about writing good quality multiple choice questions.
If you have a local support team, they may be able to create a Quiz based on the information you provide. To avoid confusion, ensure that you provide the Quiz details, including questions, answers and feedback, in an appropriate format. This Word document provides a useful format for sharing Quiz information with support teams.
When set up correctly, a Quiz should be able to report results directly to a Student Engagement Activity Grade Item in the Grades tool. Thus, it is likely you won’t have to do any data collection yourself. However, there may be barriers that prevent this from happening in some cases.
- If a student fails to Submit a Quiz attempt, the attempt may get stuck In Progress. A score will NOT be recorded in the associated Grade Item until a Quiz attempt has been submitted.
- If you include long answer questions in your Quiz, these questions will not be auto-marked. You will need to mark them and Publish the results so that the final Quiz score appears in the related Grade Item.
Writing multiple choice questions: Useful resources
To be effective learning and assessment tools, multiple choice questions must be well-considered and written.
These resources provide very useful tips, approaches and examples to help you write multiple choice questions:
- Writing Good Multiple Choice Test Questions, Center for Teaching, Vanderbilt University (opens in new window)
- Multiple Choice Questions – Some key principles, Center for Teaching and Learning, Johns Hopkins Bloomberg School of Public Health (opens in new window)
When writing multiple choice questions for assessment, also consider the University of Tasmania’s Guidelines for Good Assessment Practice (opens in new window).
Link to items inside, and outside, of your MyLO unit
MyLO includes a powerful tool known as Quicklinks. This tool allows you to link to a range of items inside and outside of your MyLO site. You can use this tool to create links pretty much anywhere in MyLO including Announcements; Descriptions of Modules and Items; HTML Pages; Discussion posts; and feedback in Assignment Submission Folders, Rubrics and Quizzes.
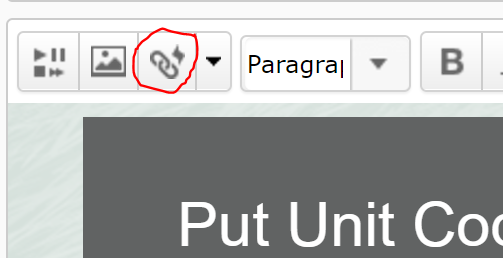
As a general rule, if you can see this icon when creating or editing something, you can use the Quicklinks tool!
In this post, we show you how to insert a Quicklink. including how to choose linking options, in five (5) steps. We then provide a summary of the types of items you can link to, and the best target behaviour to use with each item type.
How to insert a Quicklink and choose your linking options
Step 1
When editing an item in MyLO, place your cursor where you would like the link to appear.
Step 2
Select the Quicklinks tool. It should appear towards the top left of the editing window and will be the third icon from the left hand side.
Step 3
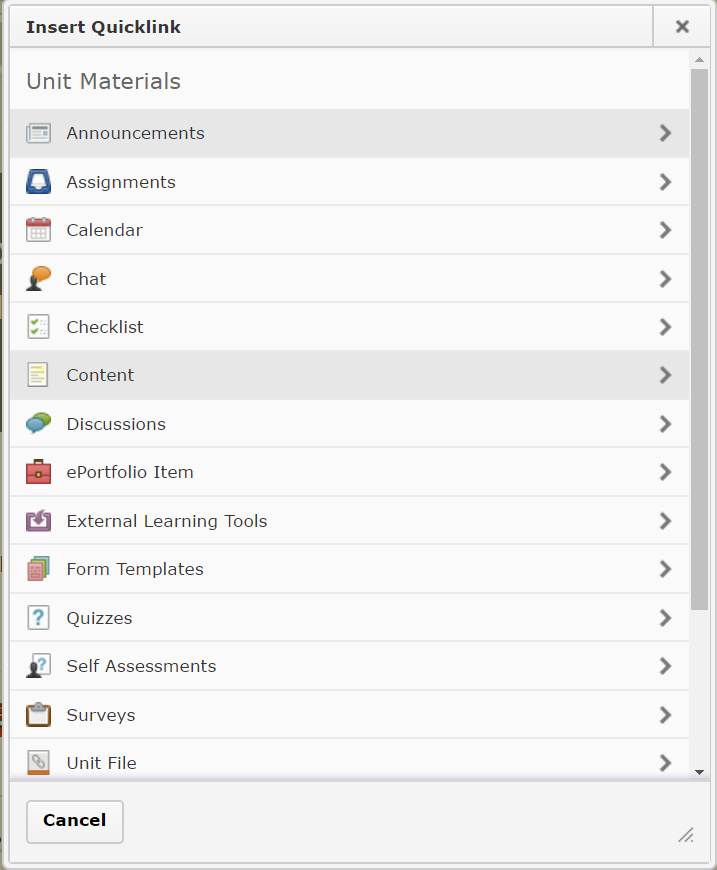
The Insert Quicklink window will open. Select the type of item you wish to insert a link to (for example, here we have selected Content).
Step 4
Work your way through until you have found the item you wish to link to. Select the pencil icon to the left of the item. This allows you to insert a meaningful link text, and control the target behaviour of your link. If you’ve gone too far, use the left-facing arrow symbol (within the Insert Quicklink window) to go back as many times as needed until you reach your preferred option, or press the Cancel button to start again.
NOTE: You cannot select a specific tool or a Content Module to link to. You can only link to items within Tools or Modules. For example, you cannot link to the Assignment Submissions Folder tool, but you can link to an Assignment Submission Folder within the tool.
![]()
Step 5
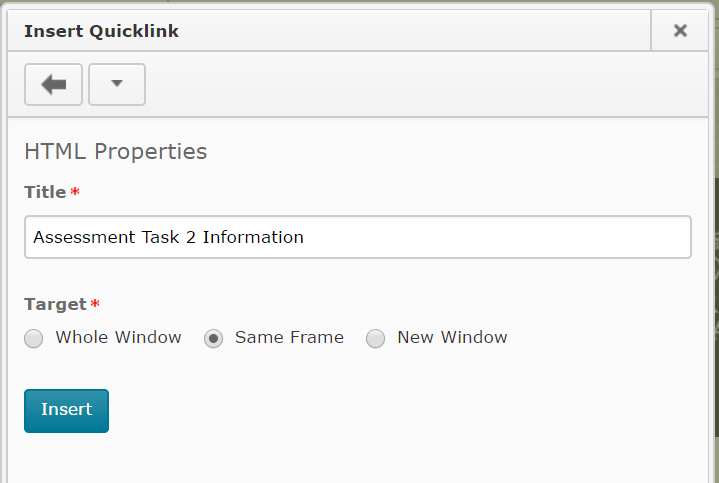
You should now see two options. You can change the default Title text (usually the name of the item) so that it is more meaningful to students. To do this, simply replace the text in the Title field. You can also change the Target. By default, this will be Same Frame. However, we have found that this target behaviour does not work well with many item types. To see if you should change the Target behaviour for a Quicklink, refer to the table towards the end of this page.
TIP: If using the New Window Target behaviour, include the following phrase at the end of your link Title so students know what will happen when they click on the link: (opens in new window). For example: Access the Week 1 Checklist here (opens in new window).
Once you have chosen your options, select the Insert button. Your Quicklink should now appear in the editing window. Continue to edit as normal and don’t forget to Save your work regularly!
Item types and target behaviours
Please note that we have excluded some Quicklinks options as they do not function effectively or are rarely used at UTAS.
| Item Type | Recommended Target Behaviour | Notes |
|---|---|---|
| Assignments | Whole Window | Link directly to an Assignment Submission Folder. |
| Calendar | Whole Window | Link to a Calendar item. |
| Chat | Whole Window | Link to a Chat room. If you haven’t already created a room, you will have the option to Create New Chat. |
| Checklist | Whole Window/New Window | Link to an existing Checklist, or create a new one by selecting Create New Checklist. It can be useful to open a Checklist in a new window if students need to work through the Checklist whilst completing other activities on the MyLO page where you placed the link. |
| Content | Same Frame | Allows you to link to items seen in Modules in Content. Note that you cannot link directly to a Module (folder) using this tool. Some staff find it easier to have a Materials module that they upload class materials to (e.g. Powerpoint Presentations and PDFs). They then use the Content Quicklink, rather than uploading files ad-hoc via the Unit Files Quicklink tool. |
| Discussions | Whole Window | Allows you to link to Forums (best when you have several Group Topics in the one Forum) or individual Topics.To link to a Forum, locate the Forum, and select it. You will see the Forum name, along with all the Topics included in the Forum. Select the small + icon that appears to the right of the Forum name.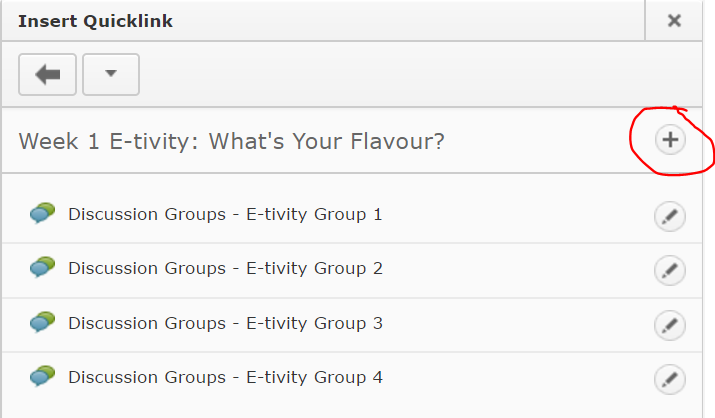 You cannot link to a thread using this method, though that is possible using the Url Quicklink option. |
| External Learning Tools > MyMedia Recordings (ALP) | Whole Window | Creates a link to your Echo360 Section, or to an individual recording in your section (Class). Once the Quicklink is created, you will need to save/preview your item, so that you can follow the link that you have created. You will then need to select the Section/Class you wish to link to take students to. Further instructions are available here for linking to a Section, or here for linking to a single recording (Class). |
| External Learning Tools > MyMedia Recordings (ALP) | Same Frame | Web Conferencing – creates a link to the Web Conferencing tool, so students can then launch the 24-7 room (by selecting the Join Room) or a session (by selecting the session name). |
| Quizzes | Whole Window | Note that students will receive an error message if they try to follow this link before the Start Date or after the End Date has been reached. You may like to mention this in the link text. For example: Please note that you will receive an error message if you try to access the Quiz before DATE/TIME or after DATE/TIME) |
| Surveys | Whole Window/New Window | If students have already completed the maximum number of attempts, they will see a message saying they have no more attempts left. |
| Unit File | New Window | Allows you to select a file from the Manage Files tool (if you have already uploaded the file to MyLO) OR to upload a file from your computer. Uploading a file from your computer via this Quicklink tool will NOT allow you to choose a Target behaviour. We have found this problematic in some cases. You may find it easier to upload files to Manage FIles before linking to them. Alternatively, upload them to a Module (folder) in Content, and link to them using the Content Quicklink. |
| Url | New Window | Allows you to link to a web address (URL). This is typically used to send students to a website outside of MyLO. |
| Equella Select or Add Item | No choice | Allows you to create and link to a new item in the university’s Digital Copyright Management System, known as Equella. You can also link to existing items. This system is generally used to house student readings (like PDFs of a chapter from a book or an article) that are not already available via the UTAS Library. |
| Web Conferencing | N/A | DO NOT USE: Use External Learning Tools option instead. |
How to Check the Quizzes Event Log – Diagnosing a Problem Quiz Attempt
Do you want to investigate a student quiz attempt? The quiz tool in MyLO records a student’s start time and times for all questions answered. This information can determine whether a quiz has crashed and help you decide whether a student should be given a further attempt.
To access the quiz log and see the student’s attempt at a quiz follow the steps below.
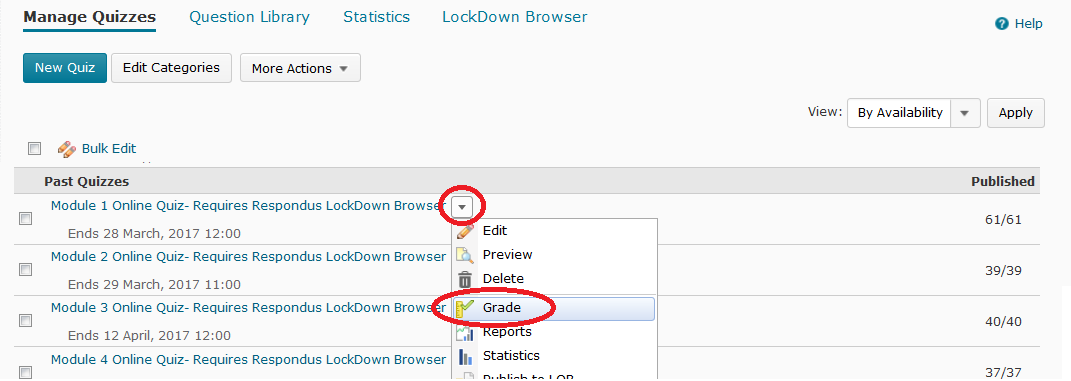
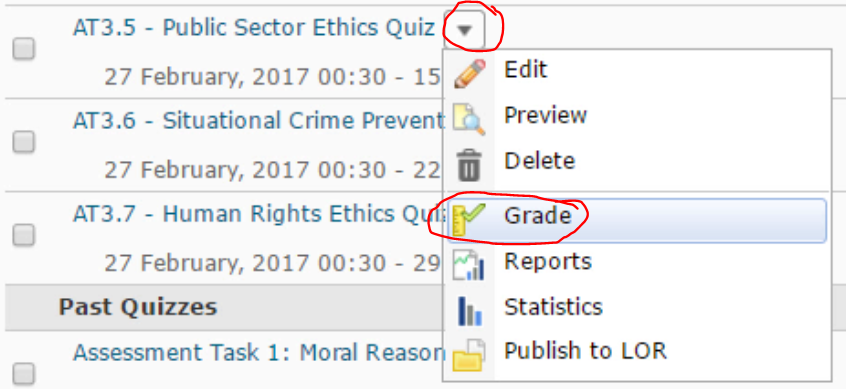
Click into the Quizzes tool from the toolbar, and from the triangle menu to the right of the quiz, choose ‘Grade’ as circled below.
By default you’ll see a list of students who have a successful quiz attempt.
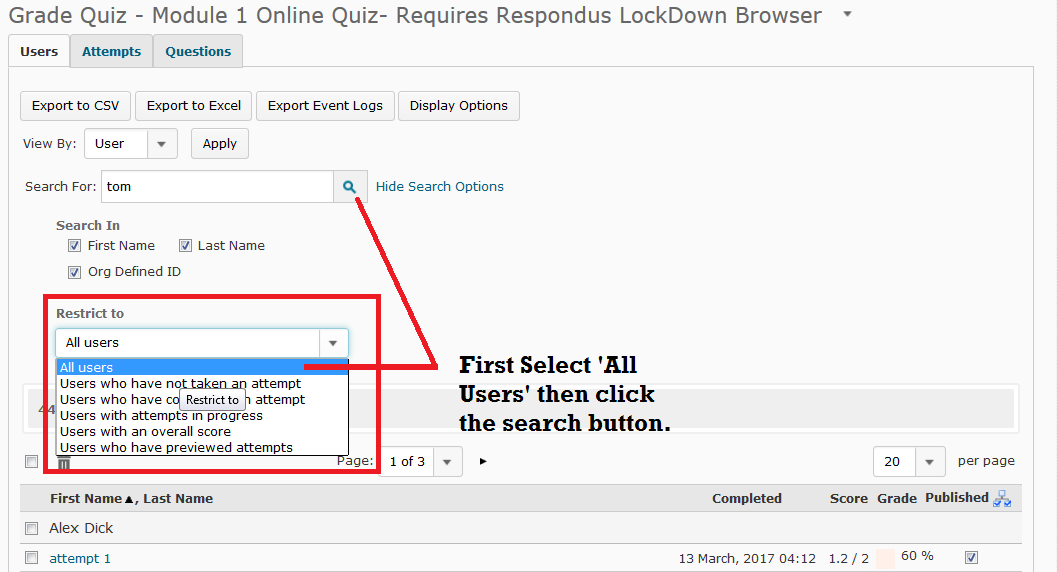
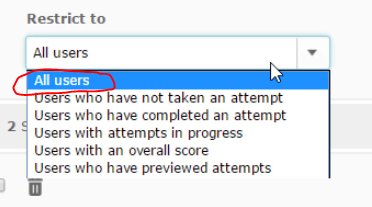
Set the ‘Restrict To’ dropbox to ‘all users’ as circled below, then enter the student’s name into ‘Search For’ (if known) or just leave the field blank to bring up a list of all users in the class. Click the search icon.
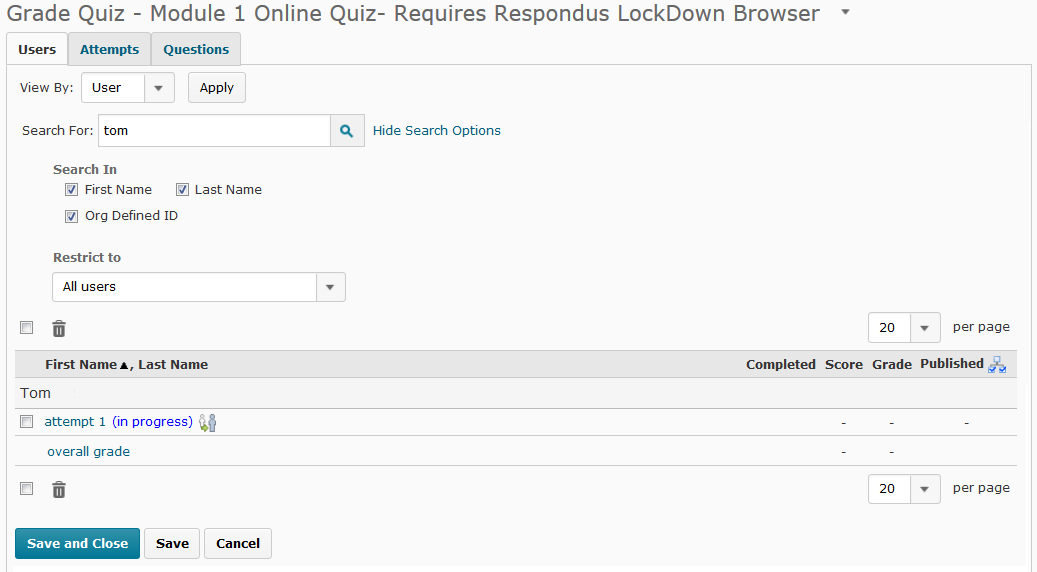
In the following example I’m searching for a specific user.
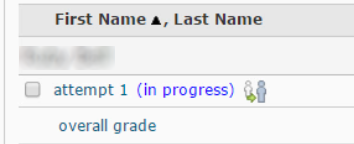
You will see the results of your search below. In this example one user appears – with the attempt listed as ‘in progress’. This means this user didn’t submit the quiz.
To view an attempt even if it has been stuck ‘in progress’, click the ‘attempt’ link as circled. (If your quiz has multiple attempts, each will be listed separately.)
When you click on an attempt to view, the window that loads shows all of the questions they were given in that quiz attempt.
For questions that are marked by the system automatically (i.e. multiple choice questions) a blue arrow indicates the correct answer and you will also see if they have saved their own answer (either with a selected mcq choice or written text). Text under each question indicates whether the student has saved the answer.
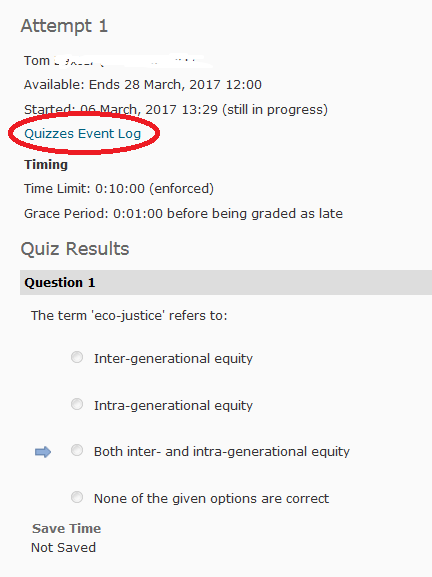
A more detailed log is listed in the Quizzes Event Log. The link appears in every ‘attempt’ page at the top.
The link is circled in the example below.
This log contains every event recorded for that quiz attempt.
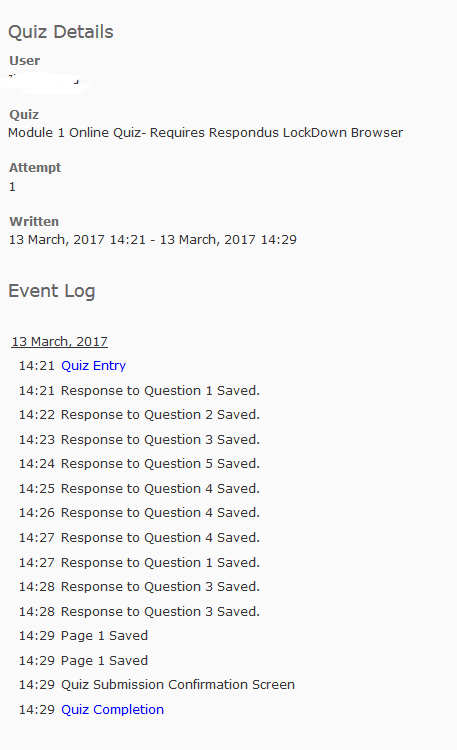
The example below shows what a successful quiz attempt might look like, with quiz entry, questions saved, and quiz confirmation and completion all recorded.
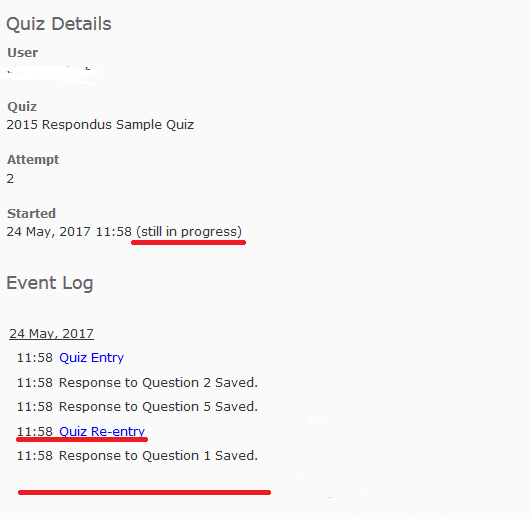
A log for a ‘problem’ attempt might end abruptly with no ‘Quiz Submission’ screen entry or a ‘Quiz exited’ entry. It might show a long pause/break between questions. Where you see ‘Quiz Re-Entry’ it indicates a quiz has been exited and then re-entered by the user.
The example below shows a quiz log for a quiz that was not exited correctly I have highlighted signs that the quiz attempt was problematic. The log shows the quiz was re-entered and exited without submitting as there is no entry for ‘quiz completion’.
Quizzes might also show entries about when the user has run out of time and where they have gone to new pages in the quiz (where the quiz is on multiple pages).
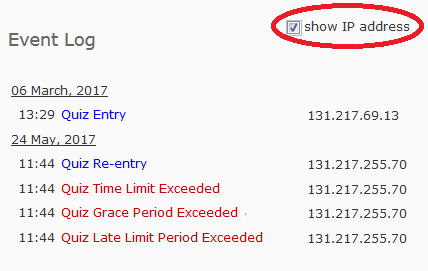
You can also opt to show the ‘IP Address’ of the log entries. If the numbers differ this indicates the user has switched to another computer.
In the example below the box has been checked to show the IP and the numbers below show where a new computer was used after the quiz was re-entered (usually the last 3-6 digits will be the ones that change, if the student switches computers). In the example below the entry shows where the user has switched to another computer. It also shows where the user has run out of time, as each ‘out of time’ event is also logged.
In summary the quiz attempt page and the quiz log don’t ‘prove or disprove’ a crash issue however they can indicate a possible problematic quiz attempt.
For example: A user claims to have crashed out of the quiz, then re-entered from a new computer and had problems saving their quiz.
- If the quiz log doesn’t have any ‘quiz re-entry’ event but instead shows the same IP and also that the user has answered questions throughout but run out of time, this indicates where the story does not match the evidence.
- If the log shows that the quiz was re-entered part way through and the IP address is different – this would support the users story.
With this information, you can decide how you want to deal with the issue. It is possible to ‘fake’ a crash, of course, but if your user’s information is very incongruent with the quiz log you may decide not to allow another attempt.
Solutions to Problem Quiz Attempt (choices below)
If the Quiz attempt shows ‘Still in Progress’ and your student has informed you that they can’t go back and submit the attempt, you can submit on their behalf. This choice is useful if they have the answers saved, as they may not need another attempt. Click here for PDF instructions.
If you’ve determined that the student can retake the quiz you can delete the problem attempt to allow them to try again. Click here for PDF instructions.
You can also give a student another attempt while keeping original attempt(s) intact. Click here for PDF instructions.
Determine the status of a student’s Quiz attempt
From time to time, you may have a student report issues with the completion or submission of a Quiz. For example:
- “I accidentally closed the quiz/lost internet connection/received an error message, and now I can’t get back into the quiz”; or
- “I finished my quiz but I didn’t get a mark/any results”.
You may also find that some of your students don’t have Quiz results recorded in a corresponding Grade Item in the Grades tool.
These issues may be related to a Quiz attempt getting stuck In Progress.
Why does a Quiz attempt get stuck In Progress?
Students may be allowed several attempts at a Quiz. Whilst a student is completing a Quiz attempt, MyLO considers the attempt as being In Progress. Most Quizzes – especially those that contribute to the assessment of a unit – only allow students one attempt. Students are usually set a time limit in which to complete an attempt. If a student:
- forgets to submit their Quiz,
- closes a Quiz and doesn’t return until after the time limit has elapsed, or
- loses access due to a failed connection or accidental closing of a browser tab, and doesn’t return to the Quiz until after the time limit has elapsed,
then their attempt will get stuck In Progress. Even if an attempt is stuck In Progress, it is still counted as one attempt at a Quiz.
Check the status of a student’s Quiz attempt
To check the status of a student’s Quiz attempt, or to discover who in the class has an attempt In Progress, go to the Quizzes tool and locate the Quiz you wish to investigate. Select the small black arrowhead that appears to the right of the Quiz name, then select the Grade option from the menu.
Scroll down until you see the Restrict to option. By default, Users who have completed an attempt will be selected in the drop-down menu. This option is too limiting as it will only find students who have successfully submitted attempts. Instead, select the All Users option. This will allow you to find all the data for the student in question, regardless of what they have/haven’t done with the Quiz. Alternatively, if you want to see ALL students who have an attempt in progress, select Users with attempts in progress.
Now, scroll up until you see the Search for field. To find results for one student, type their first name, surname or student number into the Search for field. Alternatively, if you wish to find ALL students in the class who have an attempt in progress, leave the field blank. Finally, select the search button (small magnifying glass).
You should now see the search results towards the bottom of the screen. In this case, we can see two students who have met the search criteria. The first student has an attempt in progress. The second student has successfully submitted an attempt and has received a score as a result.

IMPORTANT: It is normal to see an attempt In Progress whilst a Quiz is still open to students, as In Progress indicates that a student is working through the Quiz. If the Quiz has closed and student’s attempt is still In Progress, this indicates that there could be a problem.
What do I do if a student’s attempt is stuck In Progress?
There are several options available to you. Your college or faculty’s support team should be able to investigate further, to help you choose the best course of action. This may be to:
- submit the student’s attempt on their behalf, so that a score can be generated;
- delete the in progress attempt so that the student can make another attempt; or
- submit the attempt (for records purposes) and provide the student with an additional attempt.
How to Access Your Quiz Results and Feedback
To access feedback on your quiz follow the steps below:
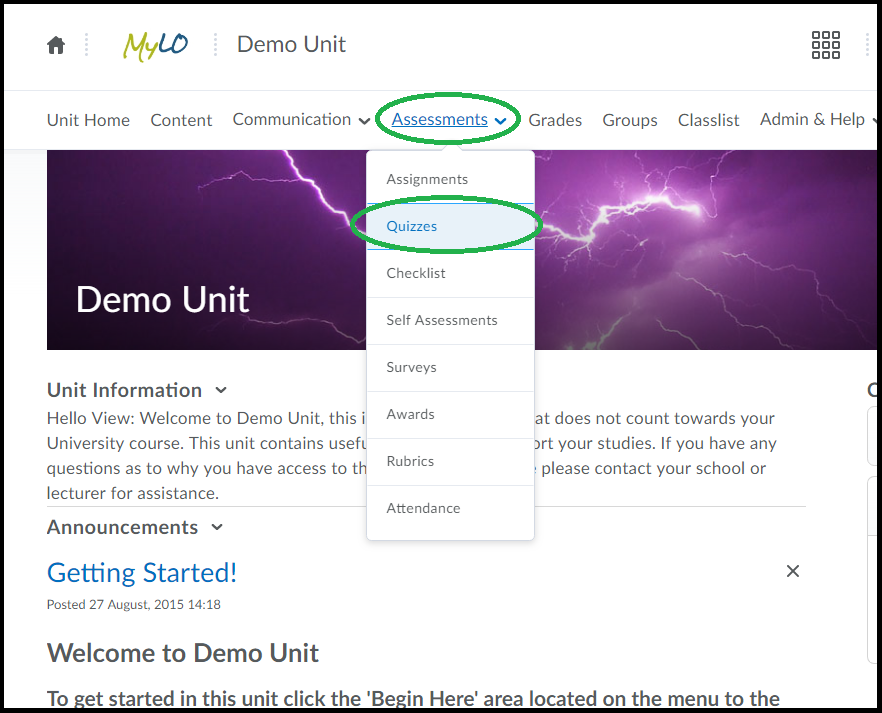
Step 1: Click the ‘Assessments’ item on the toolbar, then choose ‘Quizzes’ as circled below.
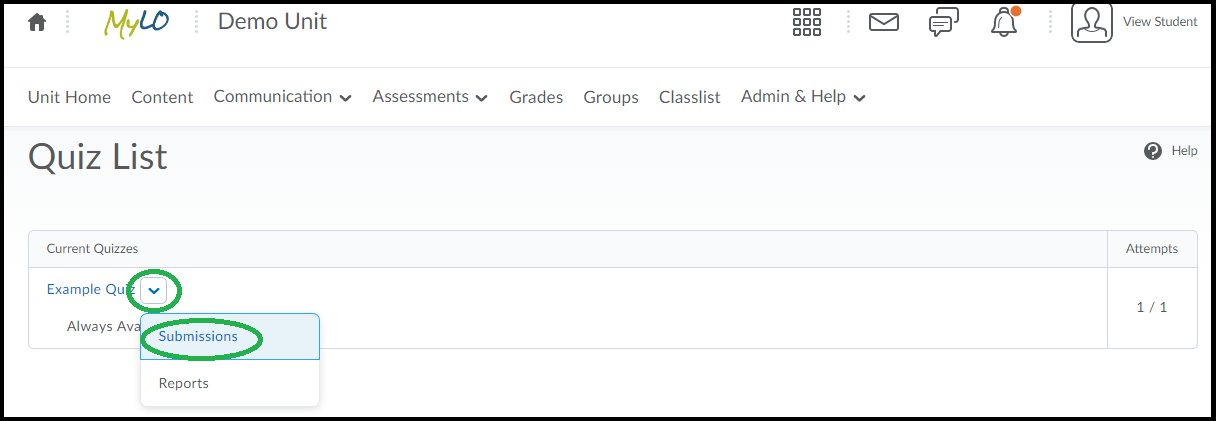
Step 2: You will see a list of quizzes for your unit, locate the quiz you want to view feedback for in the list and click the small icon to its immediate right – see the example below.
Step 3: Choose ‘submissions’ from the options as shown circled below.
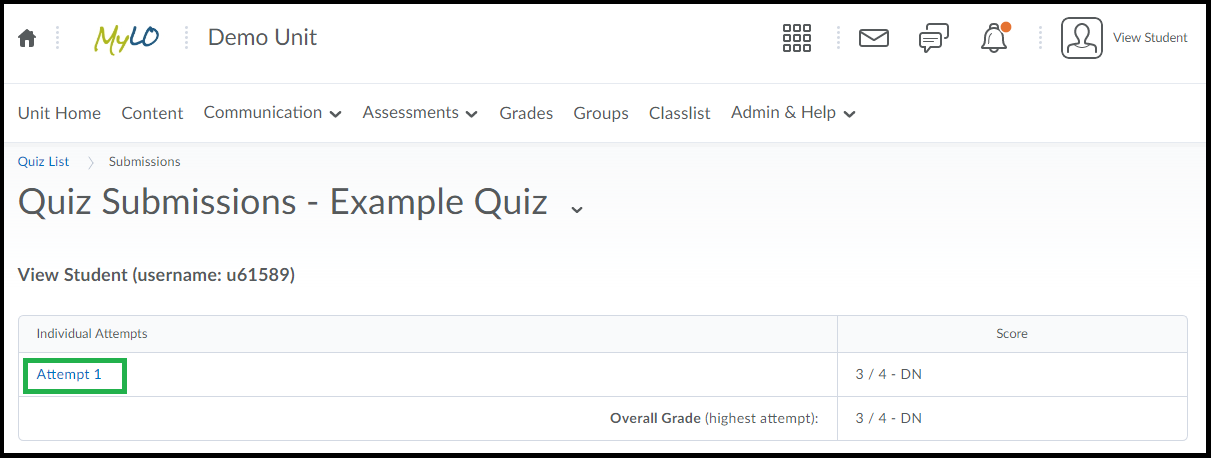
Step 4: You will see a list of attempts for your quiz, and to the right you will see your overall result. If your lecturer has made further feedback/results available you can click on the ‘Attempt’ to see more information. If you have more than one attempt recorded, click the one you wish to view – an example is circled below.
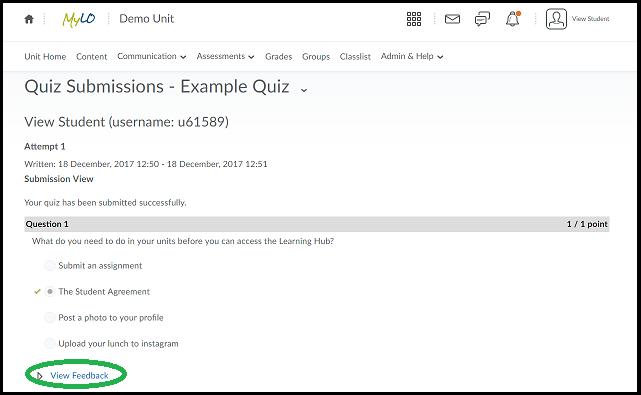
Step 5: You may see a list of questions, with your answer shown and it may also show you what the correct answer was (if enabled). To view any additional feedback click the ‘View Feedback’ link under each question, as circled in the example below.
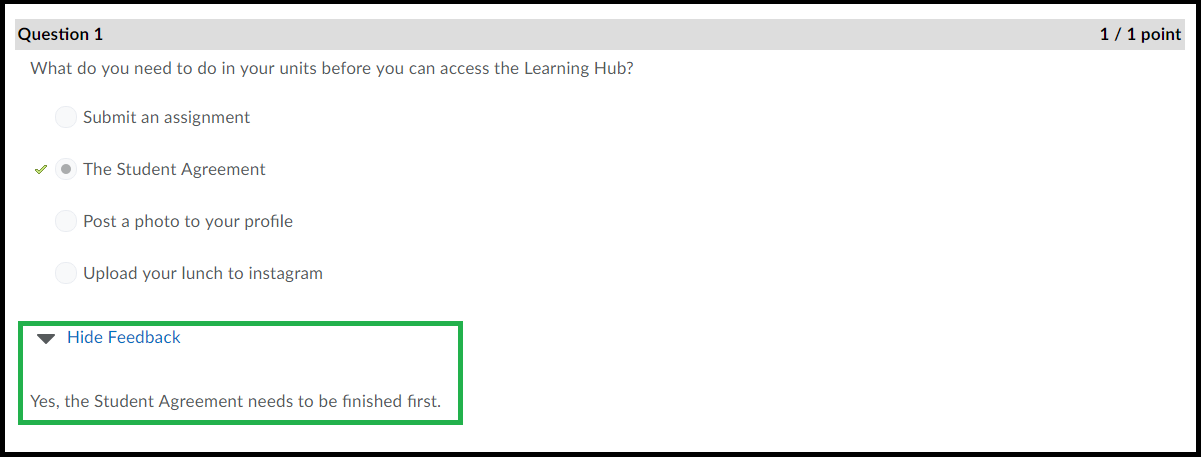
Additional feedback, if it has been provided, will then show beneath each question. You can click the link again (it now shows as ‘Hide Feedback’ to hide the feedback text.
Not all quizzes you do will allow you to view the questions and feedback, if your lecturer/tutor has indicated that the class will be given feedback for a quiz and you cannot see feedback please let them know, as they may need to alter some settings to make it visible.
Taking it online: A comparison of online assessment tools
There are a variety of online tools and software applications that you can use to help students create or perform items for assessment, and submit online. Here, we review some of the tools supported by UTAS.
| Tool | Suitable for… | Submission | Marking and feedback | Considerations |
| Microsoft Office | Creation of a range of documents, from Word Documents, to PowerPoints and Excel spreadsheets. Skype for Business (Lync) can be used to communicate with group members. | Files can be submitted to an Individual or Group Submission Folder. Alternatively, they can be shared with other via a Discussion Topic. | Word documents can be checked for plagiarism/collusion via Turnitin (e.g. Word Documents). Word documents can be ‘marked’ using GradeMark/Feedback Studio. |
|
| Assignment Submission Folder (individual) | Submission of files, including documents, images and videos. | Several files can be submitted at once. | Can be connected to Turnitin for detection of plagiarism/collusion, but only text documents will generate a report. Mark in the Evaluate Submission area. An electronic Rubric can be attached to the Folder and used for marking and feedback. GradeMark/Feedback Studio can be used to make comments on the students’ work. |
|
| Assignment Submission Folder (group) | Submission of files, including documents, images and videos. | Several files can be submitted at once. Only one member of the group needs to submit, but any member can submit if need be. | Can be connected to Turnitin for detection of plagiarism/collusion, but only text documents will generate a report. Mark in the Evaluate Submission area: the feedback and results will be made available to all students in the group. Individual marks can be altered in the Grades tool. An electronic Rubric can be attached to the Folder and used for marking and feedback. GradeMark/Feedback Studio can be used to make comments on the students’ work. |
|
| Quiz | Low-stakes quizzes/tests and Just In Time Teaching (JITT). Best used as a means of helping students check their progress, especially when feedback is integrated and responsive to students’ answers. Thus, best used during semester, not near the end (unless used to aid exams revision). Generally not suitable as a means of demonstrating higher order thinking. | Students must click Submit at the end of the Quiz. Otherwise, their Quiz will be flagged as ‘Attempt in Progress‘ (you can force submission afterwards if need be). Some questions can be automarked, whilst others require manual marking. Marks can easily be published to the Grades tool. Feedback can be delivered immediately, or released from a specific date and time. | It is possible to incorporate feedback according to answer choice OR general feedback related to a question. The feedback can be released immediately, or at a later date. You can mark individual questions if needed (e.g. long answer questions), and alter marks for questions manually if need be. Statistics from the Quiz can used when discussing the Quiz questions with students, and are especially useful for identifying areas of difficulty. |
|
| ePortfolio | Students can generate a Presentation (effectively a website) consisting of reflections, uploaded documents and so forth compiled over a semester. Best for assessments completed over a long period, for example, reflective journals and portfolios. | Submission must be made to an Assignment Submission Folder. Submission can take a while to process and tends to generate a fairly large file. | Mark in the Evaluate Submission area, however, does involve an extra click to open the submission (preferably in a new tab/window). Can be problematic in some browsers. An electronic Rubric can be attached to the Folder and used for marking and feedback. Cannot be procesed through Turnitin, and Grademark/Feedback Studio cannot be used. |
|
| Discussions | Suitable for tasks in which students are required to discuss an issue/come to a consensus and produce something concrete (e.g. a list, with choices justified). Also suitable as a means of supporting collaborative learning. Can be used to support peer review, question and answer, and feedback. For example, students could post a video of their presentation. Other students can view and post questions. | Encourage timely contributions by using staged deadlines. For example, first post due by x, responses due by y. You could also include timeliness of contributions as a criteria in a Rubric. Setting up a Checklist with due dates for each task could help facilitate this. | Provide general feedback and encouragement at a midpoint in the discussion, as well as towards the end and after deadline. We recommend providing feedback in the Discussion itself by posting to the group and weaving/summarising. For marking, use a standalone Grade Item (on a different window/tab). You can attach a Rubric to the Grade Item. |
|
| Blackboard Collaborate Ultra | Groups can meet live online to discuss projects, or to deliver and record a presentation or discussion for assessment. Alternatively, students can deliver a presentation live, online, to you and other students. You can record the presentation as evidence for assessment. Voice, as well as any objects presented on screen, are captured in the recording. | Student groups will need a room created for them. Once they have recorded their session/sessions, they can submit them (with supporting documentation) to a Group Assignment Submission Folder. Live presentations can be assessed live. You can return to the recordings any time. In all cases, we recommend getting students to submit some kind of support material to an Assignment Submission Folder (group or individual), and add the link to a recording to their Comments field. This allows you to use the full features of the Evaluate Submission area to grade and provide feedback. | We recommend using the Evaluate Submission area (associated with an Assignment Submission Folder to grade and provide feedback for groups or individuals. Students will need to submit some sort of supporting documentation, as well as link to a recorded session (if required) to support this. |
|
| Video | Students can capture video of themselves (e.g. talking head) for assessment using a range of tools, including MyLO’s VideoNote, their own smartphone or camera. Useful when you want to: assess students’ individual presentation skills; provide an alternative to written reflection. | Students will need to submit their video to an individual Assignment Submission Folder. If videos are shorter than 3 minutes duration, they can use the VideoNote tool included in the submission window. If you want students to share their videos in some way, it may be advisable to put them up to their Echo360 ALP Library and share a link to/embed the video in a post (rather than getting students to attach a large file to a Discussion post). | Mark and provide feedback using the Evaluate Submission feature. Note that you will not be able to utilise Turnitin or GradeMark/Feedback Studio (as you can’t mark up video files). |
|
Taking it online: In-class tests
If used for formative assessment, in-class tests can be a useful means of helping students check their progress throughout the semester (as long as feedback is provided following the test). The tests can also provide you with rapid feedback about the class’ progress so that you can adapt your teaching focus accordingly. Getting all students – regardless of study mode – to use the same procedure will ensure equity and simplify marking and grades management procedures.
What am I really assessing?
Depending on the nature of the questions, in-class tests tend to assess whether students can remember, comprehend and/or apply what they have learned. As they tend to be fairly short, these tests generally don’t provide a valid assessment of students’ ability to analyse, synthesise or evaluate what they have learned.
Adapting for blended learning and electronic submission
- Online Quizzes
- Use randomised questions and answer options to make collusion difficult.
- Make the most of auto-marked questions (where questions have a definite answer). Long answer questions must be marked manually but can certainly help elicit evidence of higher order thinking from students. It is possible to combine different forms of questions.
- Scores can be transferred to the Grades tool easily.
- Get both cohorts to complete the Quiz online, and get feedback issued at the same time (either via the Quiz tool or via the instructor).
- Statistics for each question can be used as the basis for teaching points (e.g for discussion in online or face-to-face sessions, or in Announcements).
- Scan and submit
- Create an instruction document clearly indicating what students will do and when. This will need to be made available to students as far in advance as possible (preferably a minimum of one week prior).
- Make a ‘test’ document, containing the questions, available on MyLO at a specified date and time (you can use the Special Access feature to release the sheet to students at different times if need be).
- Students complete the test and must submit their work to an Assignment Submission Folder within a given time period (you can set an open and close time for the Folder, and use the Special Access feature to release at different times if need be). Students could submit a Word document or, where ‘workings’ need to be demonstrated, a clear scan of their written work (as a PDF or JPEG).
- If collusion is a concern, create three different papers with slightly different questions (e.g. different amounts, business names etc). Break students into three groups (this can be done automatically with the MyLO Groups tool). One of the three tests is released to each group.
- Mark and provide feedback using the Evaluate Submission area.

