Category
MyMedia (Echo 360) and other multimedia
Use Echo360 to convert/edit/compress video
Echo360 is used at UTAS to host video recorded in class but can also be used by staff/students to upload their own video. The video can then be edited (very basic editing, you can’t add captions or combine multiple video). Once upload all video is ‘processed’ by the system to compress file size & convert to MP4 format so you can also use the site to convert other formats to one standard format (mp4) & compress large video.
Whatever you do – DON’T leave it until the last minute to run video through the site – it can take HOURS to process!
You can upload the following formats to Echo360:
AVI, FLV, M4V, MP4, MOV, WMV, MP3 & WMA
(though depending on the codecs the video might not be compatible, if you’re not sure try it anyway).
Upload:
1. Go to Echo360, the easiest way is to find a unit that has a link to some recordings, this link will also log you in or head to https://echo360.org.au/ If it asks for username/password use the same ones you use for MyLO.
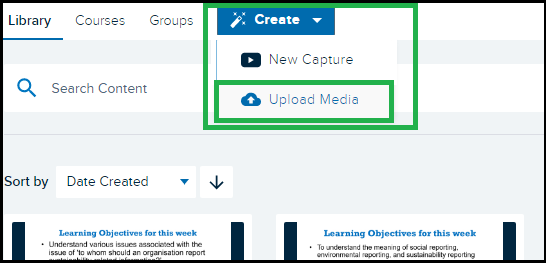
2. Click the ‘Create’ button top left.
3. Click ‘Upload Media’
4. A window will load that you can drag & drop a file into (or click on the icon in the middle of the window to select a file manually).
The file will be loaded to the area in “Library” – you can see a link on the top of the Echo360 page.
The video will process for a while. Depending on how long the video is & how busy the site is the processing time can be quite long, upwards of an hour or more. Once the video is finished processing you can then download or edit. To view the video just click on the video thumbnail in the ‘My Content’ area & use the play controls on the preview screen to play.
Edit:
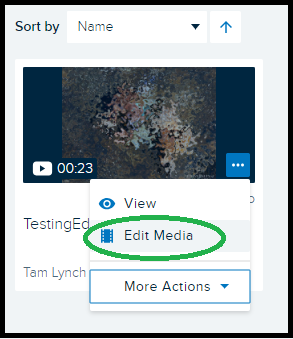
When viewing your video in ‘Thumbnail’ view (the default) you will see a small menu when your cursor is over the thumbnail.
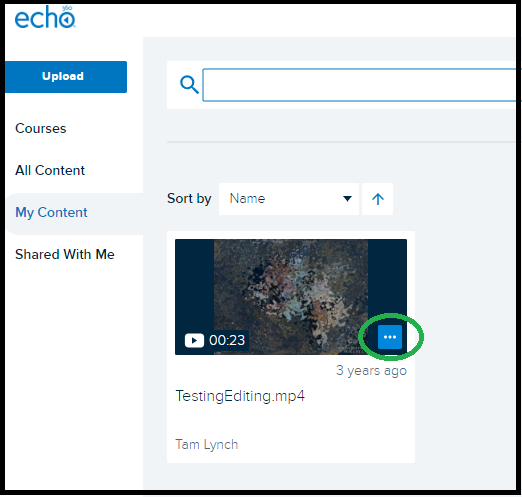
When you click this menu icon you can choose ‘Edit Media’ to edit the video.
The editor has changed recently, for now follow the instruction: https://learn.echo360.com/hc/en-us/articles/360035035812-Editing-Videos
Download:
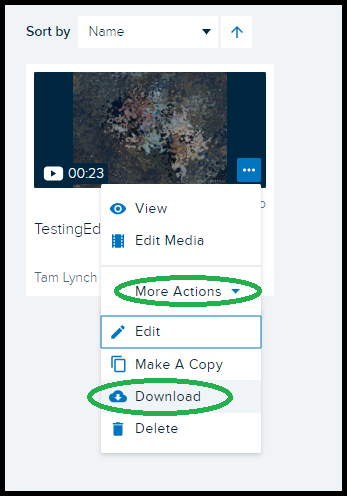
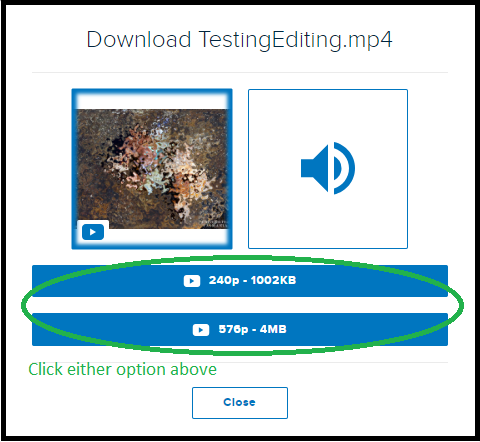
To download the processed file – choose ‘More Actions’ then ‘Download’. You can choose from a smaller or slightly larger file size once you click either it will download to your browsers default download folder (or you will be prompted to save – depending on your browser).
Don’t forget to give this video a watch to ensure the processing was successful & everything looks as it should.
Save Powerpoint Presentation as Video
It is possible to save out a video from a Powerpoint Presentation directly from within Powerpoint.
Before you do – here are some key things to check. It is always a good idea to play back the presentation by going to the Slide Show tab & then click Play, Start Presentation, or From Beginning (depending on your version). Check for any instances where mouse clicks are required – these will need to be changed to automatic.
1. Check that your slide progression is set correctly. The video will convert using whatever slide timings & animations currently set. To check and/or edit your slide timing – go to the Transitions tab & for each slide check the top-right part of the window to check that each slide is set to ‘automatic’ & that a suitable time is entered.
2. Check that any video & audio located on your slides are set to play automatically (or that the timing of their start time is set correctly). To do so click on the object & then view the ‘animations’ tab. The settings of the object is shown on the top-right.
3. Animations that require a mouse-click can also be changed to be timed/automatic using the ‘Animations’ tab. Click the ‘Animations Panel’ button on the Animations tab toolbar to show the side-panel containing a list of all timed objects for that slide. It will help you to locate & correct objects that need to happen at certain times (ie, if you want something to appear halfway through a narration – you can set the object to appear at a specific time using this panel).
4. Save the presentation as a powerpoint file (cntrl-s or File – Save) before you save out as a video – saving as a video will take a long time & you don’t want a sudden powercut or crash to wipe your hard work!
To save out a video version:
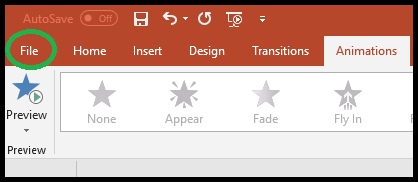
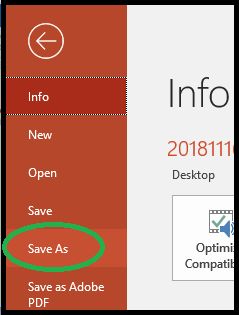
Go to the ‘File’ tab and click the ‘Save As’ option on the left-side of the window.
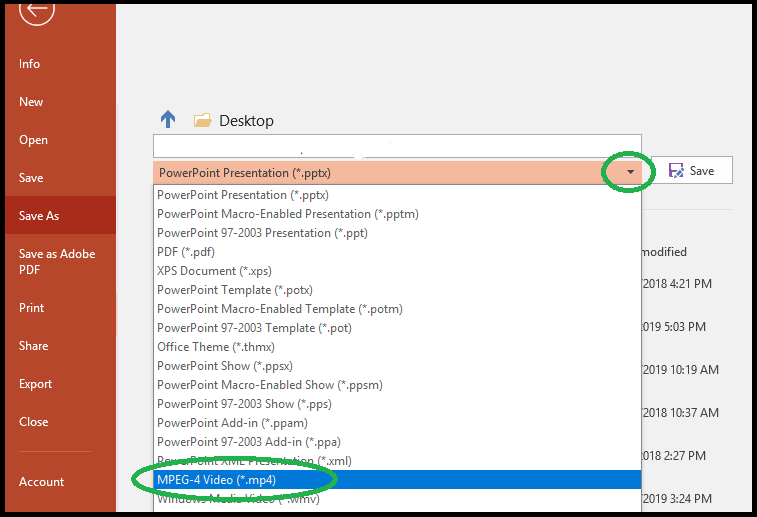
When you see the save options go to the file type dropdown menu & choose MPEG-4 or MP4 as the type.
Give the file a name & location then click ‘Save’.
It will take a long time to save – even for a short presentation. You may see a progress bar along the bottom of the screen. DON’T quit the program until you see the progress bar finish.
If there is any problem with the video you will see a popup notification to let you know, on success it will just finalise on its own without letting you know it was successful.
Remember – always watch the video it produces as there may still be residual issues with the timings/media objects. This MP4 can then be used in other editing software or uploaded to video sharing sites (it will also load fine into Echo360 or MyLO as is).
Live Lectures – How to Access and Participate!
If your lecturer has set up the lectures or workshops for ‘Live Streaming’ this means you may be able to access and watch the lecture/workshop live as it is presented, potentially able to also ask questions that the lecturer will see or participate in some of the activities if any are made available. Students can access the live stream from a desktop computer but there is currently only limited access from mobile devices (some further instruction below).
Accessing Live Lecture Streams
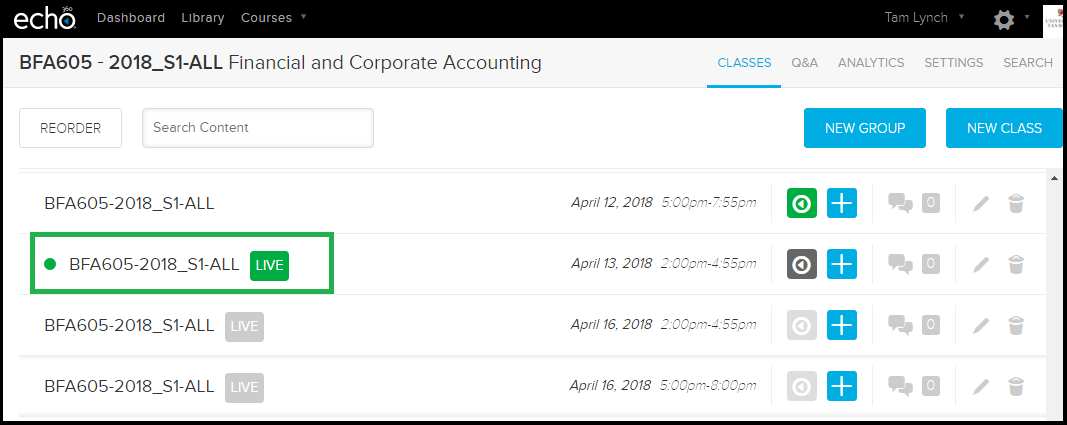
To access the Live Stream you will need to click on the link provided by your lecturer in MyLO -OR- go to the Echo360.org.au link and find your class. You will see an icon for [Live] next to any presentation that is to be made live. If you click on the link before it has started it will show a countdown until the live feed starts.
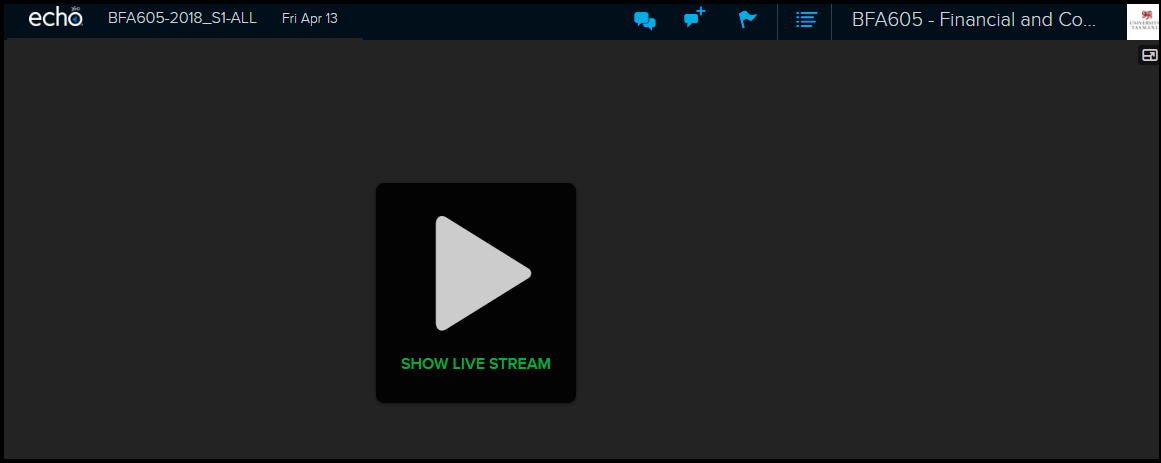
Once the start time has been reached, click “Show Live Stream” to start the live feed. Note it can take some time to start once you have clicked this button, depending on your internet connection speed and computer.
For the purposes of this help document you should know the difference between the Live Feed and the Presentation Slides.
Live Feed – This is a VIDEO delivered/streamed to your computer/device as it is being delivered in the classroom. It appears in a window area to the left of the Echo360 area when you click ‘Start Live Stream’.
Presentation Slides – If slides and/or activities are loaded to this class they will be available also – however they do not contain any audio (you need to start the video/live stream for audio) and will not follow along with the lecturer, you’ll need to navigate to the correct slides for any activity participation yourself. The slides will appear in a window to the left when you click the thumbnail for the presentation.
Participation in Chat/Questions
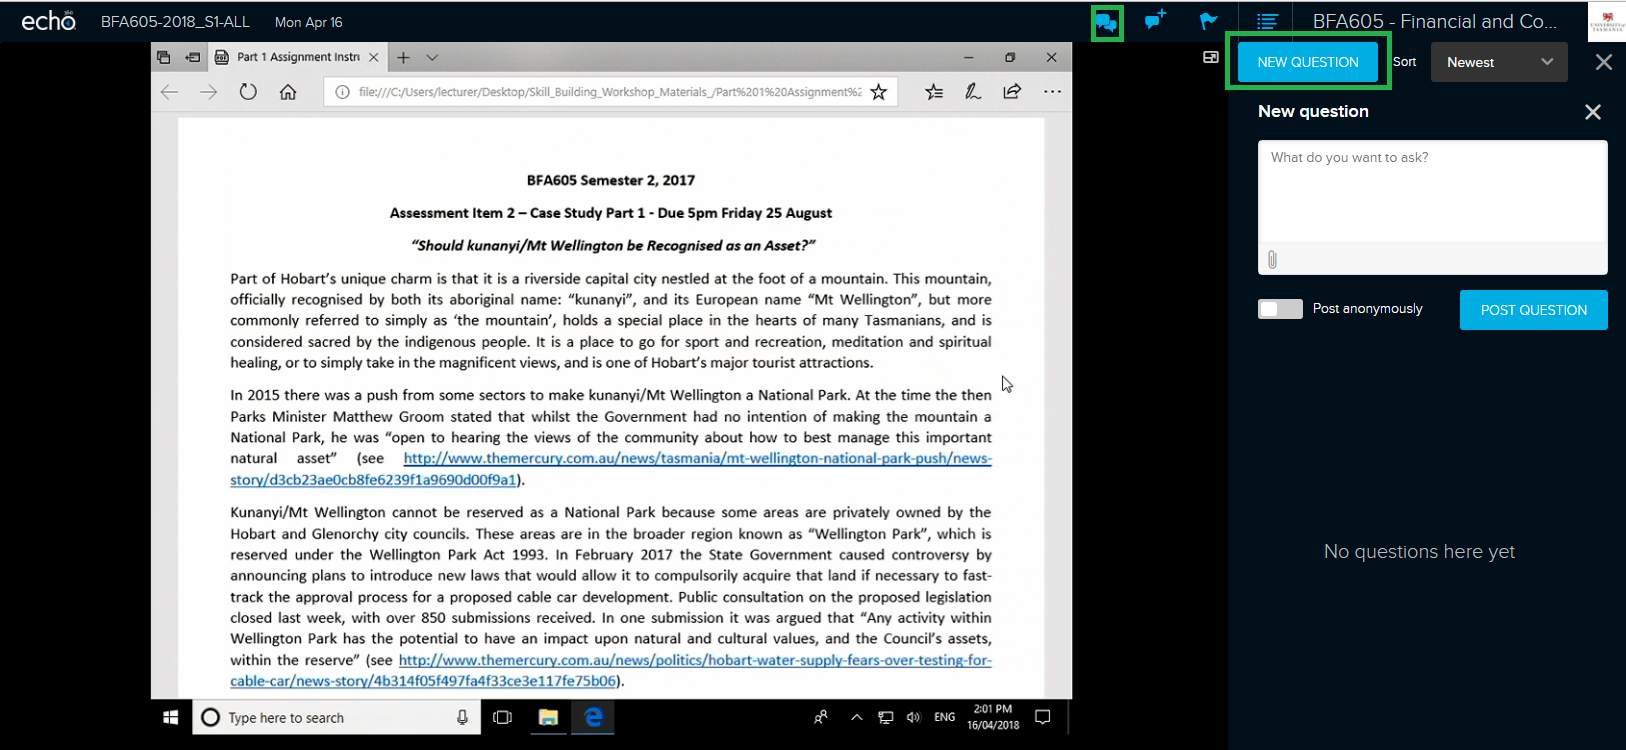
While the Live stream is running you can open a side-bar to see the ‘Q&A’ questions and answers area. The ‘chat’ icon is at the top of the window. To type a question click ‘new question’ and type your question then click ‘Post Question’. Your lecturer may or may not see this question right away, and you might be some seconds behind due to lag – so avoid typing the same question over and over if you’re not getting a response right away. The lecturer may have opted to answer questions in bulk during specific parts of the lecture, or they may have moved on already. If you see a question from another student you know the answer you can also answer it.
(Presentations with Slides and Interactive Activities will be covered in another document)
IMPORTANT: You must have entered your mobile phone number in your account profile to use the SMS option. Please note that you must have accessed the class’s Echo360 page prior to the class starting. If you are watching from the live stream you will already have done so, those watching live in class will also need to ensure they have clicked through to the Echo360 from the MyLO site at some point prior to the class. Otherwise you will receive an error message. Data/Text message rates will apply.
You can return to the Live Feed at any time by clicking on the thumbnail. If you’re having problems getting back from the slides page just go back to the classes page (by clicking on the unit name at the top right of the screen) and then load the stream again.
Access and Issues with Mobile Devices and Access
According to the Echo360 site, support for Live Feed on Android Devices currently unavailable.
Mobile devices may have limited ability to play the live feed. You will need to install the ‘Blackboard Classroom’ app available from the appstore. The instruction on using the app makes the point that to use the app you will need to have clicked through to the Echo360 Recordings from your MyLO unit FIRST for each unit. It will ask you to set up a password for Echo360, your username will be your MyLO username (that is: your entire email address).
Official Help for the App on Echo360.org site – Apple Store Link for App.
When Echo360 detects you are viewing a live stream from a mobile device, it automatically buffers 40 seconds of the stream to ensure smooth playback. This means you may experience a delay in the start of the stream, and that your view will lag anywhere from 30 seconds to a minute behind the real-time action.
Please note the app has very low reviews and many problems have been indicated by the users. If you are able to get to a desktop PC/Mac instead of mobile you will have better chance of it working well, however sending feedback to the app developers of issues you’ve had if any will help hopefully make the app more reliable in future. (wouldn’t hold your breath all the negative reviews are a few years old now and it doesn’t look like anything has changed).
Add a re-usable permanent video link: Public Link
The “Public Link” option is a way to add a ‘permanent’ link to a video that will continue to work even if you rollover your units. This kind of link, however, will NOT collect any statistics about views nor does it allow your students to download the content. If you are not re-using the video – or you want viewing stats – you should add links using the adding Echo360 links via MyLO method instead.
Note: This link can only be created by the person who “owns” the recording – in the case of a lecture recording it will most often be the person who was delivering the lecture (nominated ‘primary instructor’ in MyLO). Or in the case of a file uploaded manually by the person who was logged in & uploaded it.
Step 1: Click into Echo360 either via your MyLO unit – OR – log into Echo360.org.au (choose login via institution).
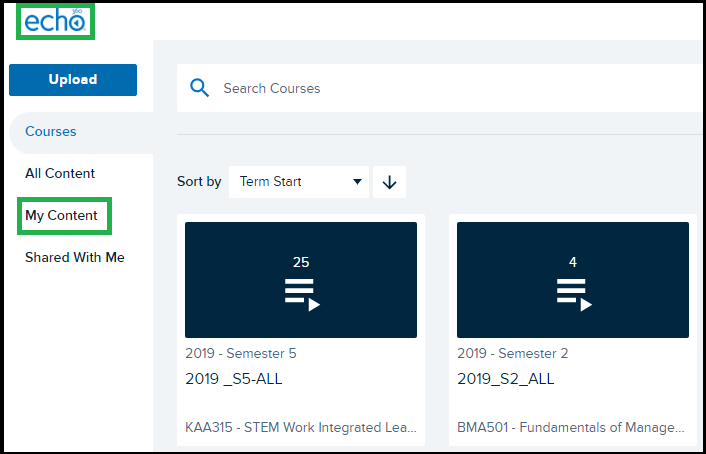
Step 2: Click ‘echo’ the icon to the top/left.
Step 3: Click ‘My Content’ on the left hand side menu.
Step 4: Find the video you wish to create a permanent re-useable link for – you may need to use the search tools to find by unit code, if it was uploaded recently check the ‘sort by’ option is set to ‘date’ & the arrow set to point down so newer video are shown at the top.
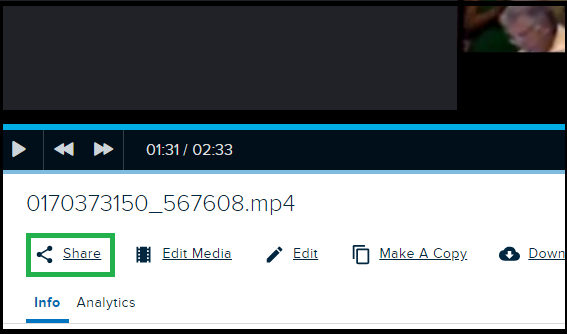
Step 5: When you find your video click on it to preview & check it is the correct video. Then find the ‘Share’ link just under the preview.
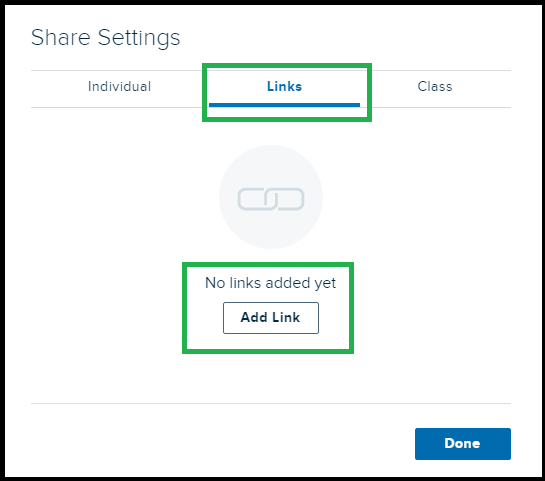
Step 6: A small window will load. Click the middle tab at the top for ‘Links’ then click ‘Add Link’.
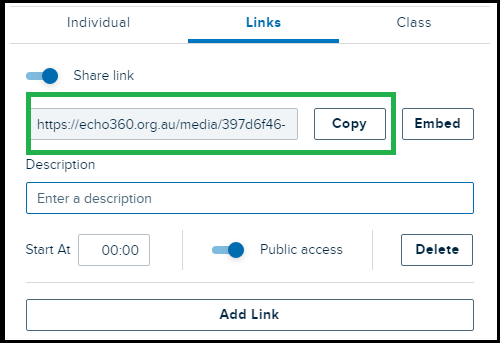
Step 7: Once you click that a section will show on the little popup window that has a bunch of stuff & a long URL, copy that URL – it’s the permanent public link to this video. You can paste this into MyLO as a URL as though you were adding a link to any other website.
Link to a Lecture Recording/Video
How to add a video to your unit that you’ve recorded via the Desktop Capture OR automatically recorded from your lecture.
Please Note: If you add a video this way it will not work the next time you run the unit. If you plan to re-use video there is a more convenient way to add links that is covered in the post “How to Add Public Links – Re-Usable Video Links“.
Step 1: Go to your MyLO Content area and navigate to the folder/module you want the video to be in.
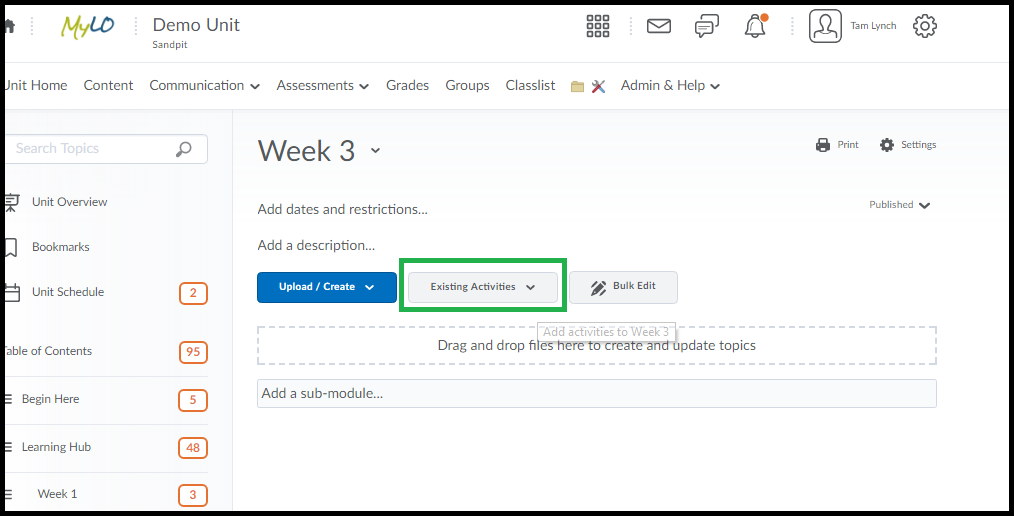
Step 2: Click ‘Existing Activities’ button.
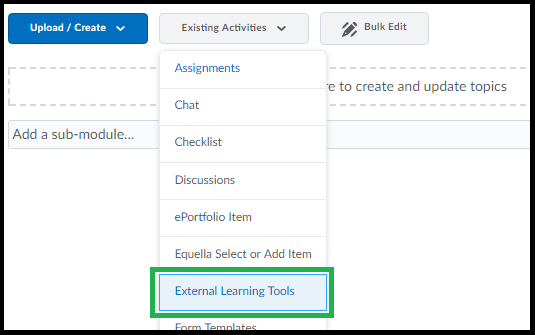
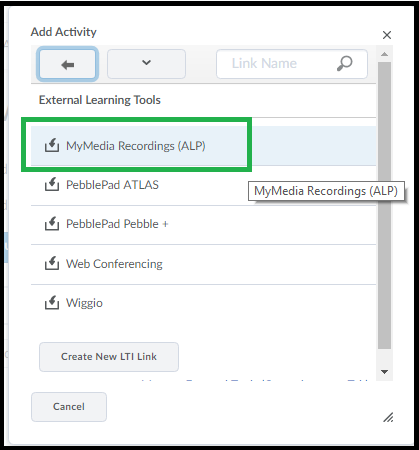
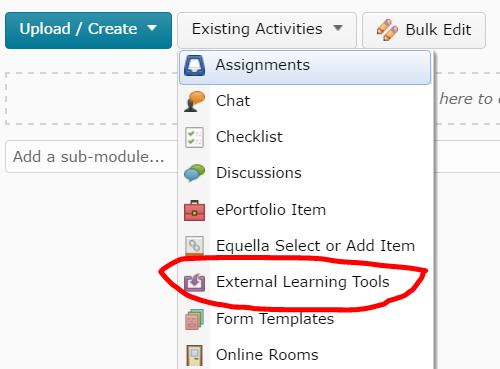
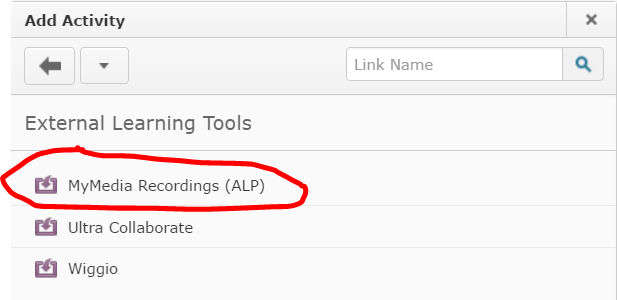
Step 3: Choose ‘External Learning Tools’
Step 4: Select ‘MyMedia Recordings’ (or Echo360 if the name ever gets changed).
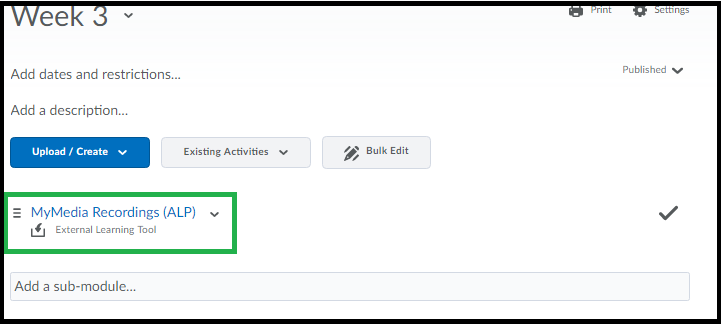
Step 5: The link gets dumped into your content live and with nothing in it – you need to now click on the link that was just created – just click the link text.
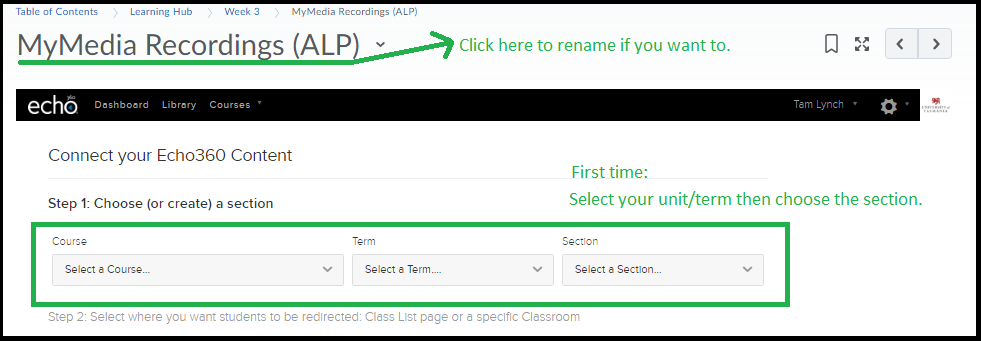
Step 6: If this is the first video you’re adding follow this step, otherwise skip to step 7 – click to choose your unit code, semester and then choose the one in the final drop down menu. There’s usually only 1 option for the last dropdown menu. Then proceed to Step 7.
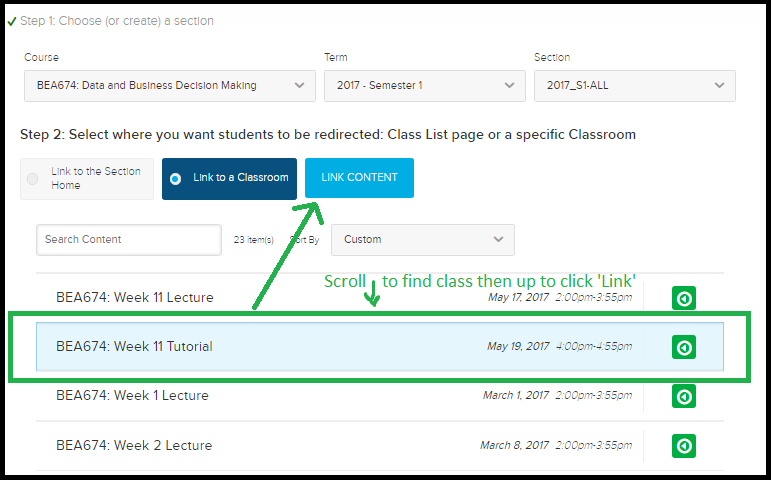
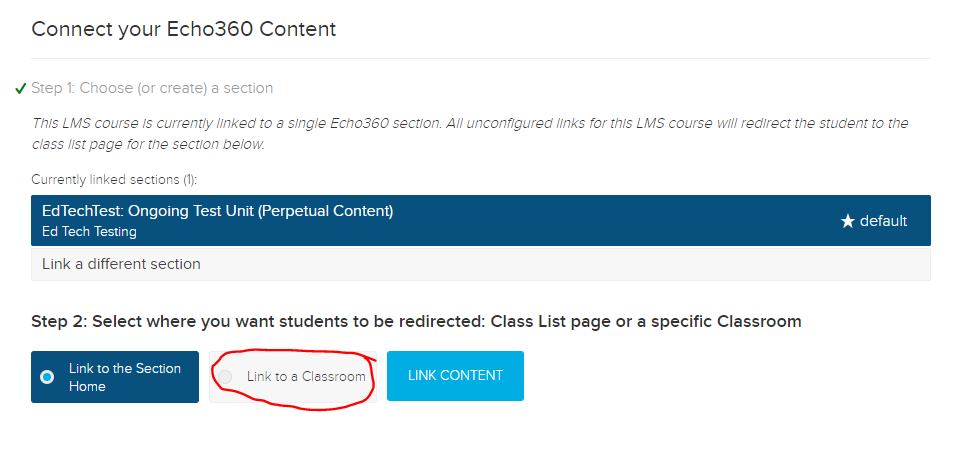
Step 7: You’ll see a mostly blank screen with three options, click the middle option that says “Link to a Classroom”. It is the one helpfully greyed out, but highlighted below. Important! Click it.
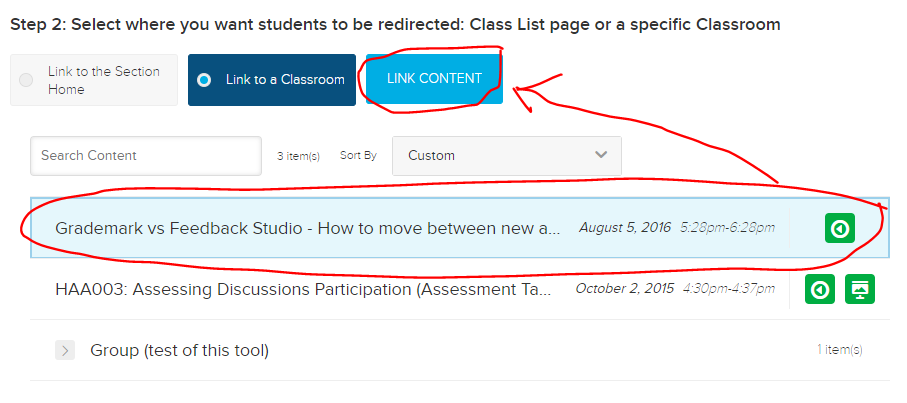
Step 8: List of all videos in the Echo area for your unit appears, click the one you want to link to and choose ‘Link Content’ back up the top. You might be doing some scrolling if you have a long list.
The link is connected and often you will be shown the video you just connected to. There is no way to change what video you just connected, if it’s the wrong one you’ll need to start again and delete this one. Sorry.
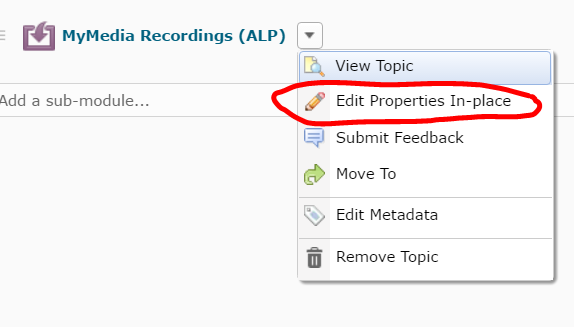
To add things like selective release you need to go back to where you can see the link in the list of your content and choose ‘edit properties’as shown below. It is recommended you choose the option to Open as External Resource – this means the video opens in a new Tab in the browser and the student doesn’t lose their place in the MyLO page they were on.
Embed an Echo360 video in an HTML page
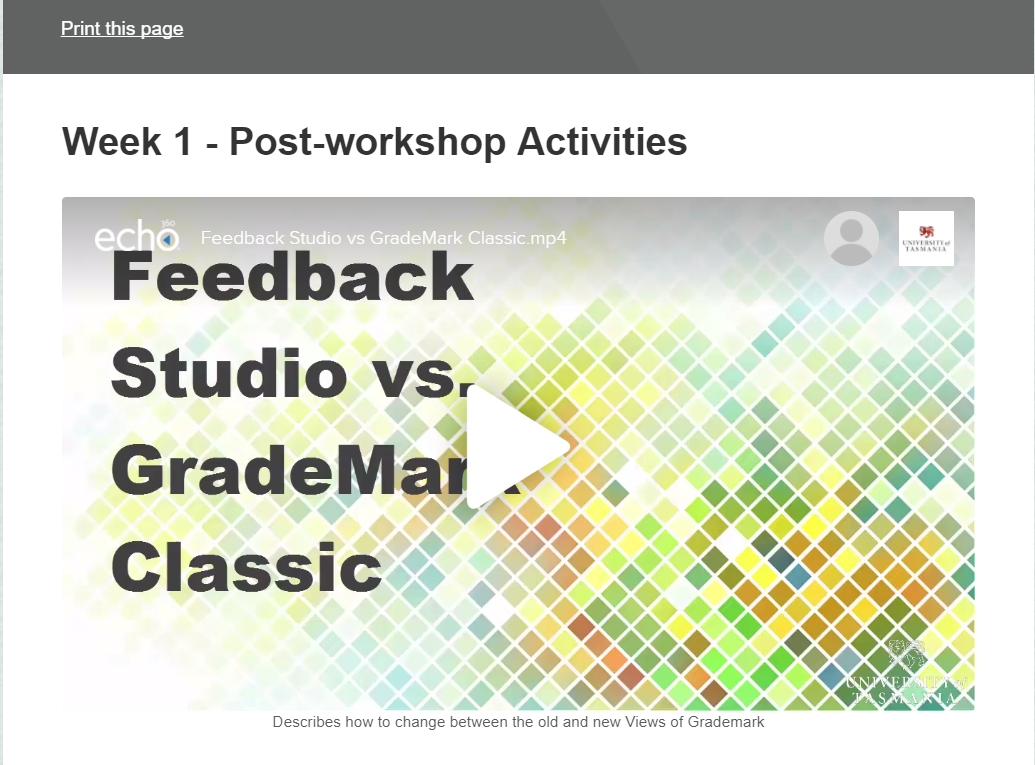
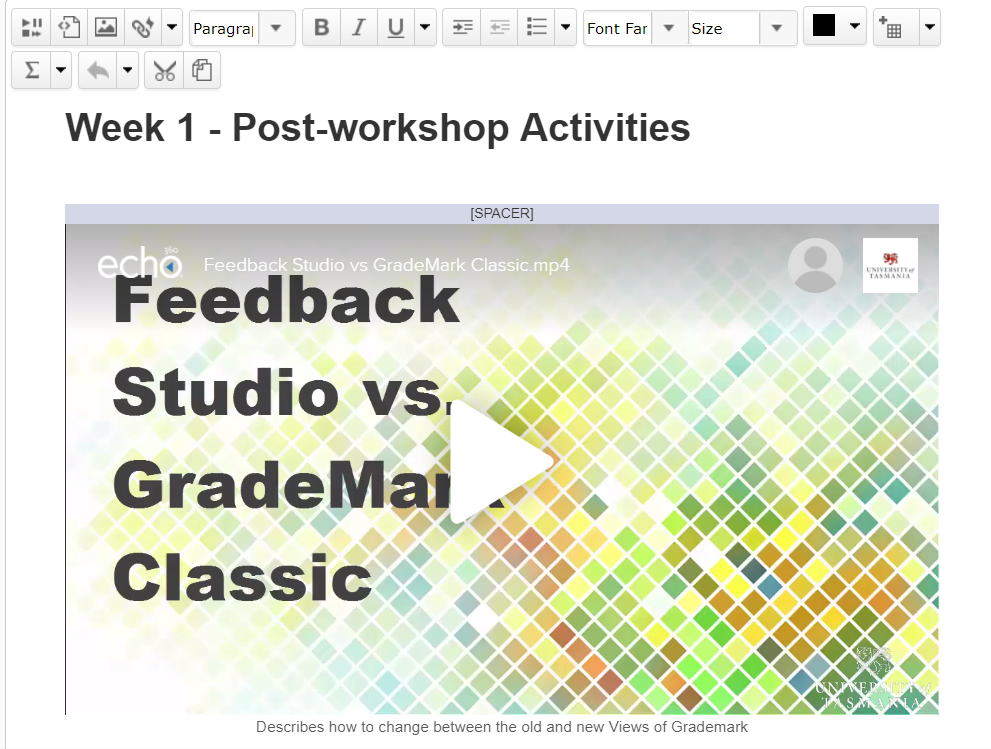
If you upload a video to your Echo360 Library, or to an Echo360 Section, you can embed the video in a page in your MyLO site using a feature called a Public Link. The resulting video may look something like this when inserted into an HTML page based on the ICB template.
If you embed an Echo360 video in an HTML page, you are using what is known as a Public Link. Public links will not allow you to track who has accessed the video. It is also possible for savvy students to obtain and share the link to the video with students outside your unit (and to the general public). If you would like to be able to track which students have accessed a video, and only allow access to UTAS users, we recommend that you upload your video to a unit Section and use a Quicklink to provide access to the video.
If you’re certain you want to use a Public Link, follow these instructions.
Before you start
Have the following open, each in a different browser tab.
- The HTML page in your MyLO site that you wish to add the video to, preferably already in editing mode.
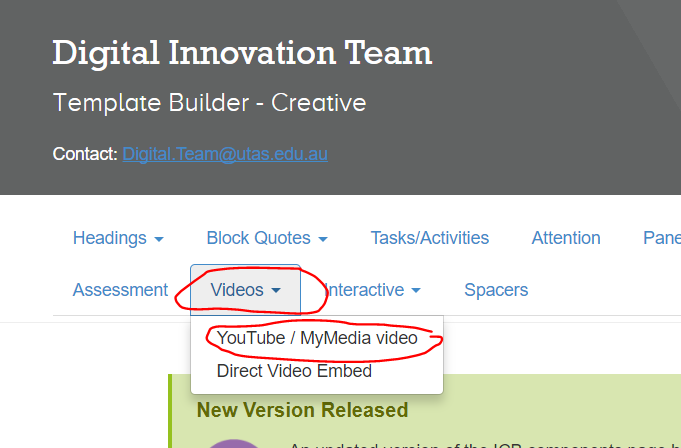
- The ICB Template page. You may wish to select the Video menu, then choose the YouTube/MyMedia video option, in advance.
- Your Echo360 Library or a unit Section. You can usually access these from a link in your MyLO site OR by logging in (via institution) at www.echo360.org.au (opens in new window)
Step 1
Locate the video you wish to use, either from the Echo360 Section for your unit, or from your Echo360 Library.
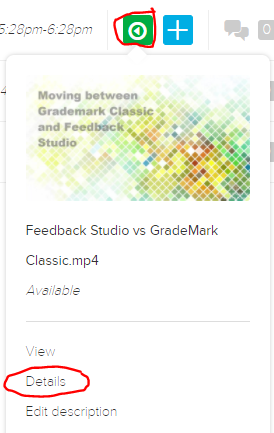
If you are using a video from an Echo360 Section, select the green icon to the right of the video name and choose Details from the menu.
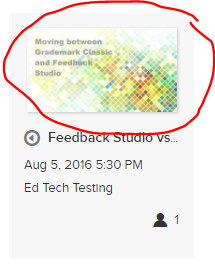
If you are using a video from your Library, you will need to locate the video and click on the preview image.
Step 2
You will see three tabs appear beneath the video. Select the Sharing tab.
Step 3
Scroll down until you see the heading Public links. If you cannot see a link there already, select the Add Public Link button.
Step 4
A link will now appear. Select the Embed button to the right.
Step 5
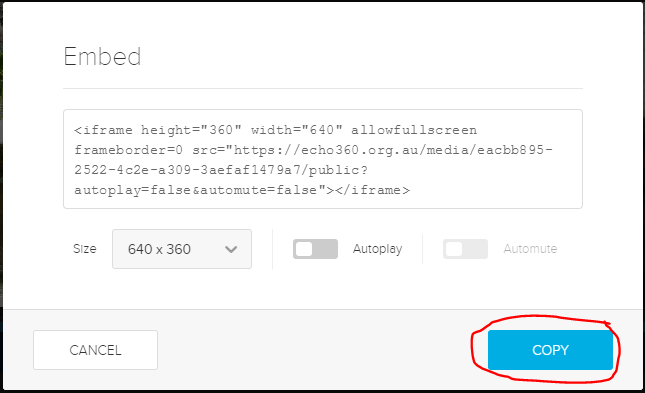
A new window will pop up. This contains the embed code. Select the Copy button. This will copy the code to your computer’s temporary memory.
Step 6
Now jump to the browser tab containing the ICB template page. If you haven’t already done so, select the Video menu, then choose the YouTube/MyMedia video option.
Step 7
Scroll down under the video until you see the Embed Code field. Place your cursor in the field, use one of the following keyboard shortcuts to paste in the embed code you copied earlier:
- On a PC, CTRL + V; or
- On a Mac, Command + V.
This should copy the code into the field. Once the code appears in the field, press the Copy to Clipboard button. This copies some more code into your computer’s temporary memory, to make your video more responsive to different screen widths and devices.
Step 8
Now jump to the browser tab containing your MyLO site. Ensure that the page you wish to add the video to is in editing mode. Place your cursor where you would like the video to appear, then use one of these keyboard shortcuts:
- On a PC, CTRL + V; or
- On a Mac, Command + V.
Your video should then appear on the page. You can replace the caption beneath the video by selecting it and replacing it with your own text OR you can select it and delete it.
Step 9
Continue to work on your page. When you’re finished, don’t forget to save!
Link to items inside, and outside, of your MyLO unit
MyLO includes a powerful tool known as Quicklinks. This tool allows you to link to a range of items inside and outside of your MyLO site. You can use this tool to create links pretty much anywhere in MyLO including Announcements; Descriptions of Modules and Items; HTML Pages; Discussion posts; and feedback in Assignment Submission Folders, Rubrics and Quizzes.
As a general rule, if you can see this icon when creating or editing something, you can use the Quicklinks tool!
In this post, we show you how to insert a Quicklink. including how to choose linking options, in five (5) steps. We then provide a summary of the types of items you can link to, and the best target behaviour to use with each item type.
How to insert a Quicklink and choose your linking options
Step 1
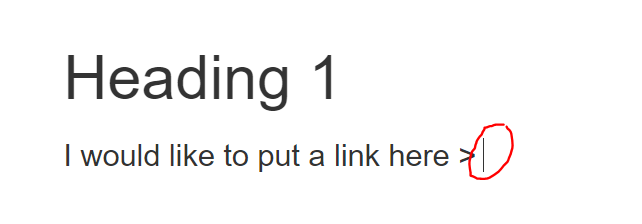
When editing an item in MyLO, place your cursor where you would like the link to appear.
Step 2
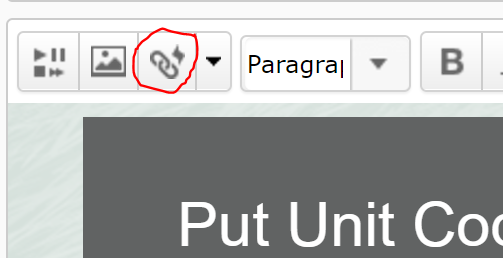
Select the Quicklinks tool. It should appear towards the top left of the editing window and will be the third icon from the left hand side.
Step 3
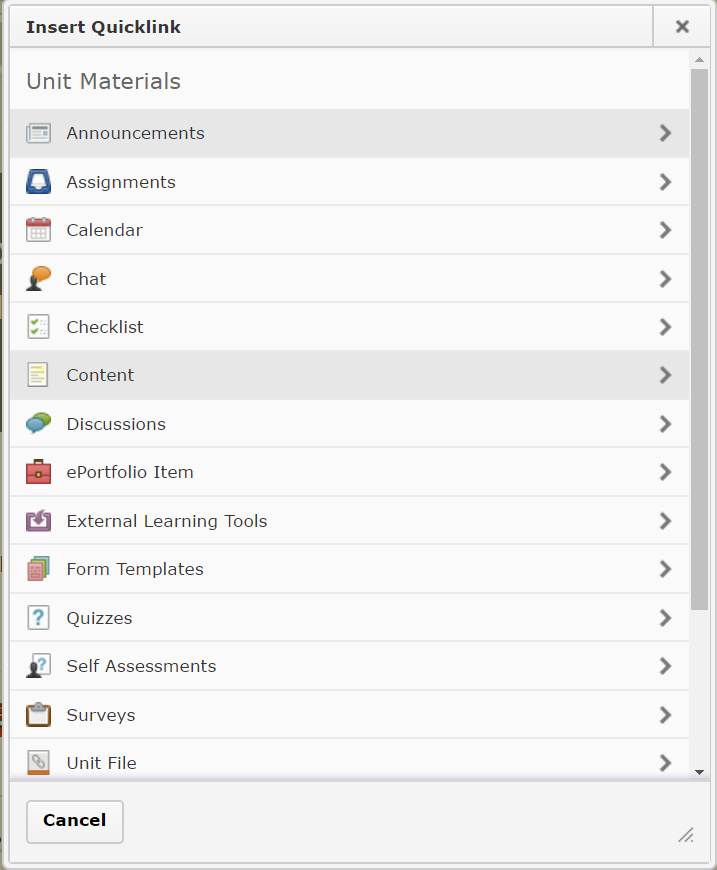
The Insert Quicklink window will open. Select the type of item you wish to insert a link to (for example, here we have selected Content).
Step 4
Work your way through until you have found the item you wish to link to. Select the pencil icon to the left of the item. This allows you to insert a meaningful link text, and control the target behaviour of your link. If you’ve gone too far, use the left-facing arrow symbol (within the Insert Quicklink window) to go back as many times as needed until you reach your preferred option, or press the Cancel button to start again.
NOTE: You cannot select a specific tool or a Content Module to link to. You can only link to items within Tools or Modules. For example, you cannot link to the Assignment Submissions Folder tool, but you can link to an Assignment Submission Folder within the tool.
![]()
Step 5
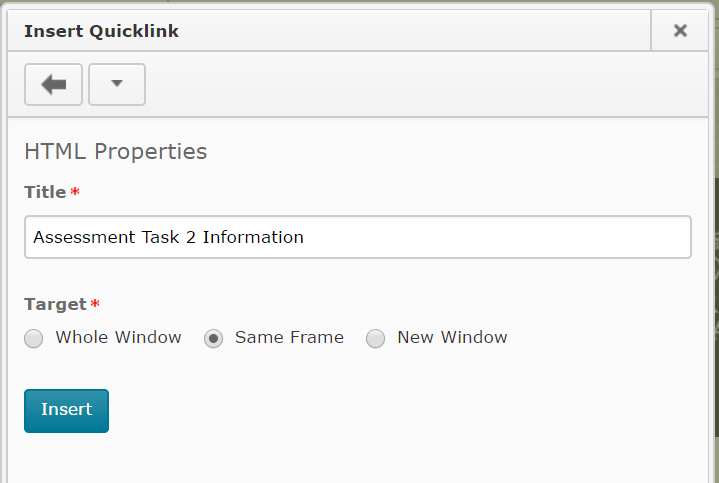
You should now see two options. You can change the default Title text (usually the name of the item) so that it is more meaningful to students. To do this, simply replace the text in the Title field. You can also change the Target. By default, this will be Same Frame. However, we have found that this target behaviour does not work well with many item types. To see if you should change the Target behaviour for a Quicklink, refer to the table towards the end of this page.
TIP: If using the New Window Target behaviour, include the following phrase at the end of your link Title so students know what will happen when they click on the link: (opens in new window). For example: Access the Week 1 Checklist here (opens in new window).
Once you have chosen your options, select the Insert button. Your Quicklink should now appear in the editing window. Continue to edit as normal and don’t forget to Save your work regularly!
Item types and target behaviours
Please note that we have excluded some Quicklinks options as they do not function effectively or are rarely used at UTAS.
| Item Type | Recommended Target Behaviour | Notes |
|---|---|---|
| Assignments | Whole Window | Link directly to an Assignment Submission Folder. |
| Calendar | Whole Window | Link to a Calendar item. |
| Chat | Whole Window | Link to a Chat room. If you haven’t already created a room, you will have the option to Create New Chat. |
| Checklist | Whole Window/New Window | Link to an existing Checklist, or create a new one by selecting Create New Checklist. It can be useful to open a Checklist in a new window if students need to work through the Checklist whilst completing other activities on the MyLO page where you placed the link. |
| Content | Same Frame | Allows you to link to items seen in Modules in Content. Note that you cannot link directly to a Module (folder) using this tool. Some staff find it easier to have a Materials module that they upload class materials to (e.g. Powerpoint Presentations and PDFs). They then use the Content Quicklink, rather than uploading files ad-hoc via the Unit Files Quicklink tool. |
| Discussions | Whole Window | Allows you to link to Forums (best when you have several Group Topics in the one Forum) or individual Topics.To link to a Forum, locate the Forum, and select it. You will see the Forum name, along with all the Topics included in the Forum. Select the small + icon that appears to the right of the Forum name.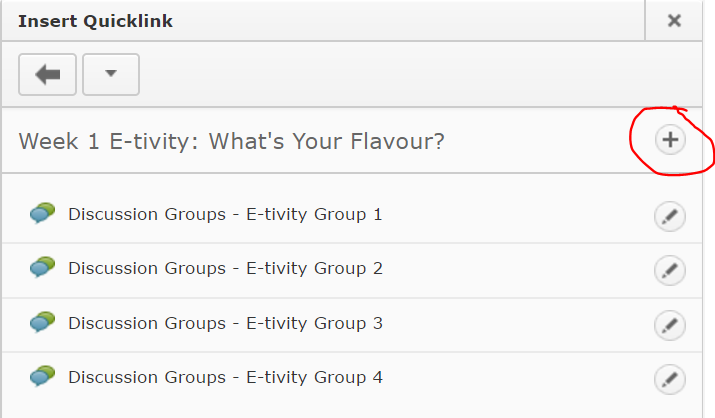 You cannot link to a thread using this method, though that is possible using the Url Quicklink option. |
| External Learning Tools > MyMedia Recordings (ALP) | Whole Window | Creates a link to your Echo360 Section, or to an individual recording in your section (Class). Once the Quicklink is created, you will need to save/preview your item, so that you can follow the link that you have created. You will then need to select the Section/Class you wish to link to take students to. Further instructions are available here for linking to a Section, or here for linking to a single recording (Class). |
| External Learning Tools > MyMedia Recordings (ALP) | Same Frame | Web Conferencing – creates a link to the Web Conferencing tool, so students can then launch the 24-7 room (by selecting the Join Room) or a session (by selecting the session name). |
| Quizzes | Whole Window | Note that students will receive an error message if they try to follow this link before the Start Date or after the End Date has been reached. You may like to mention this in the link text. For example: Please note that you will receive an error message if you try to access the Quiz before DATE/TIME or after DATE/TIME) |
| Surveys | Whole Window/New Window | If students have already completed the maximum number of attempts, they will see a message saying they have no more attempts left. |
| Unit File | New Window | Allows you to select a file from the Manage Files tool (if you have already uploaded the file to MyLO) OR to upload a file from your computer. Uploading a file from your computer via this Quicklink tool will NOT allow you to choose a Target behaviour. We have found this problematic in some cases. You may find it easier to upload files to Manage FIles before linking to them. Alternatively, upload them to a Module (folder) in Content, and link to them using the Content Quicklink. |
| Url | New Window | Allows you to link to a web address (URL). This is typically used to send students to a website outside of MyLO. |
| Equella Select or Add Item | No choice | Allows you to create and link to a new item in the university’s Digital Copyright Management System, known as Equella. You can also link to existing items. This system is generally used to house student readings (like PDFs of a chapter from a book or an article) that are not already available via the UTAS Library. |
| Web Conferencing | N/A | DO NOT USE: Use External Learning Tools option instead. |
Managing MyMedia Echo360 Recordings in your unit’s Section
Are you hosting videos or recordings for your unit in MyMedia Echo360? To help your students find what they need from your Echo360 Section, you may find it helpful to name your recordings (called Classes in Echo360) effectively and present the classes in a logical, sequential order. These instructions will help you rename classes and change the order that classes appear in.
Rename a Class
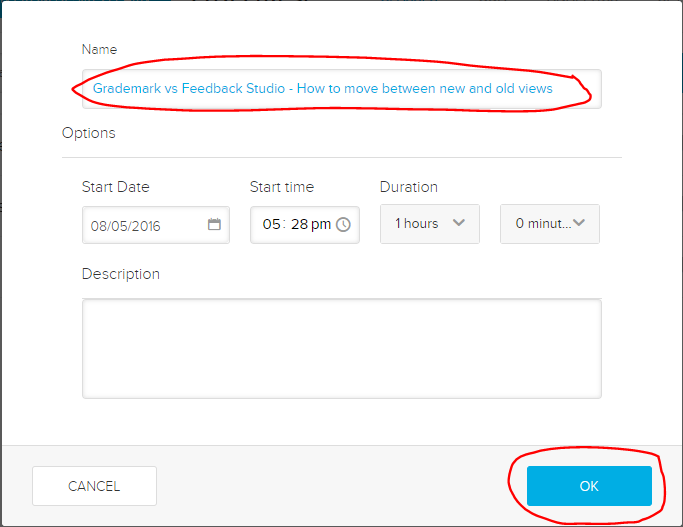
Locate the class you wish to rename. Select the small pencil icon that appears to the right of the class name.
A new dialogue box will open. Make changes in the Name field to rename the class, then select the OK button.
NAMING TIPS:
Use Week or Module references, followed by the recording name, to indicate sequence. For example:
Module 1: Interview with Dr Lucien Blake
Change the order of Classes
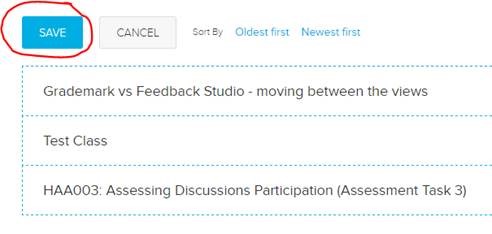
Select the REORDER button that appears towards the top left of the list of classes.
The classes will now be bordered by a dotted line. To move a class you can either:
- select a class, drag it into a new position, then release the mouse button; or
- use the arrowheads to the right of the class name to move the class up and down the list.
When you have finished making changes to the order of the classes, select the Save button (top left of the list) to save your changes.
Provide a link to an individual MyMedia (Echo360) recording on a HTML page
Many MyLO units include a link to a MyMedia Echo360 section. This provides students with access to a list of all the recordings (known as classes) associated with the unit. Though access to a full list of recordings is very useful, students can find it difficult to keep track of which recordings they should watch during a given week, especially if recordings are not clearly named or not listed in order. It is possible to provide students with a link to a single recording using the External Learning Tools feature. Here’s how to add a link to an HTML page. Step 2 onward can also be applied to Announcements and Discussion Posts.
Step 1
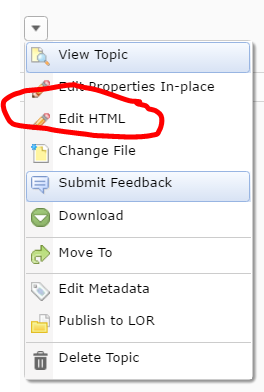
In Content, locate the page you wish to add the link to. Choose to edit the page by selecting the Edit HTML button or select the black arrowhead next to the page’s name and select Edit HTML.
Step 2
Place your cursor on the page by clicking (once) where you would like the link to appear. Now select the Quicklinks tool from the editing toolbar. It will be the third icon from the left.
Step 3
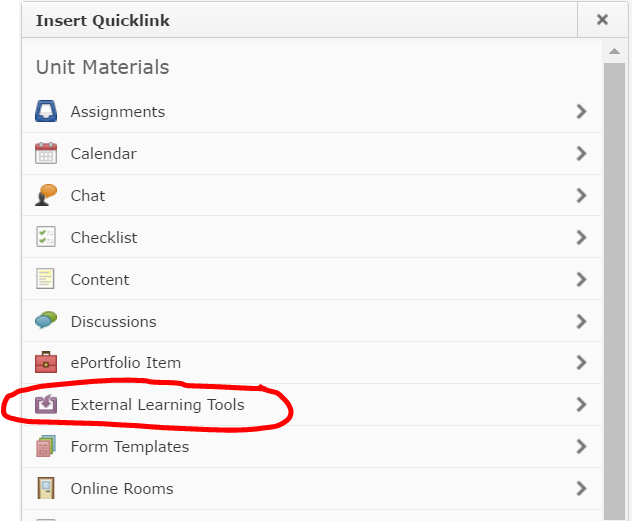
The Quicklinks window will open. Select the External Learning Tools option.
Step 4
Select the small pencil (Options) icon that appears to the right of the MyMedia Recordings (ALP) option.
Step 5
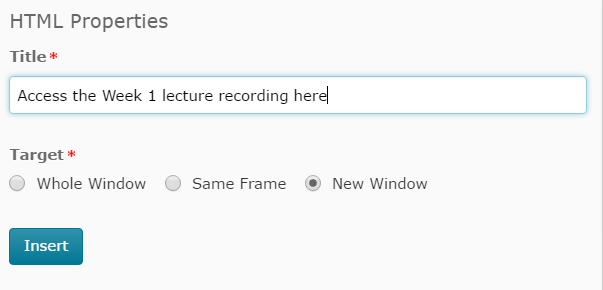
At this point, you can rename the link by changing the text in the Title field (by default, it will say MyMedia Recordings (ALP)). For example, Access the Week 1 lecture recording here (opens in new window). We recommend including the phase “(opens in new window)” in the link title for accessibility purposes.
Select the New Window option. Finally, select the Insert button.
Step 6
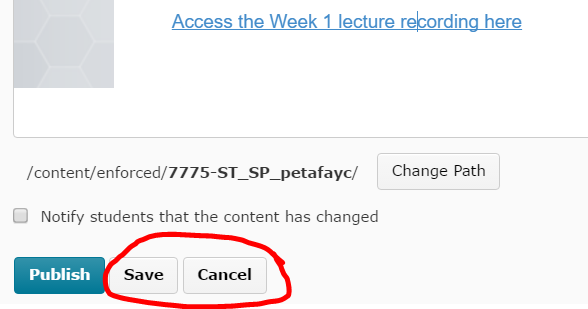
The link will now appear in your page. You will now need to tell it which recording to show students. First, scroll to the bottom of your page and select the Save button, then Cancel button. If the page is already available to students, you will need to select the Update option instead.
Step 7
Now that your page is back in preview mode, click on the link that you have just created to open your Echo360 MyMedia section in a new tab.
If you are linking to a section for the first time from this unit, you will need to choose a Course (unit code), Term (semester and year), and Section (the semester and year again) first. If you have already linked to the section from this MyLO unit, you will be presented with the section straight away. Select the Link to Classroom option.
Step 8
A list of all the recordings will appear. Select the recording you wish students to view by clicking on it so that it becomes highlighted. Scroll back towards the top and select the Link Content button.
That’s it! You’re done.
Link from a MyLO unit to a MyMedia Echo360 Section
A unit may have MyMedia Echo360 section associated with it. The section provides students with access to a list of all the recordings (known as classes) associated with the unit.
Many MyLO Units include a Recordings (or similar) folder in the Contents section, usually as part of generic Faculty Template. This folder may/may not already contain a link. You will need to ensure that the link will take students to the correct section. Here’s how.
Step 1
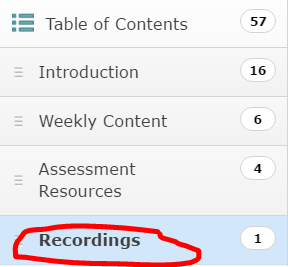
Navigate to the Content Module you wish to add the link to. In most College of Arts and Law units, there will be a Recordings (or equivalent) folder in the Content tool. Make sure the folder is selected in the Table of Contents (it will be highlighted in blue if selected).
You may/may not have a link in this folder. If you already have a link set up here, move to Step 4. If there is no link at all, move on to Step 2.
Step 2
First, you need to create the link to MyMedia Echo360. To do this, select the Existing Activities button, then select the External Learning Tools option.
Step 3
The Add Activity window will open. Select the MyMedia Recordings (ALP) option by clicking on it.
Step 4
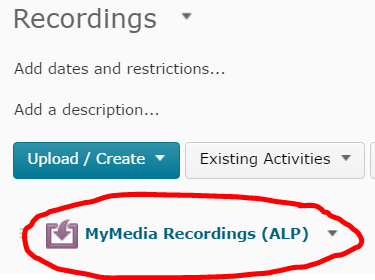
You will now see a link appear in the Recordings folder. By default it will be named MyMedia Recordings (ALP).
Step 5
It is important to ensure that the link opens in a new window. To do this, select the black arrowhead that appears on the right side of the link, then select Edit Properties in Place from the menu.
Step 6
Check the box next to the Open as External Resource option. If you would like to change the name of the link, you can also do that in this view by clicking on the link and replacing the link text. Finally, click away (e.g. by selecting the Recordings folder from the Table of Contents again) to save your changes.
Step 7
The link will now need to be set up to send students to the correct section. Click on the link to open it (the page will open in a new window). You will need to select a Course, Term and Section. You can search for a course using a unit code. The term refers to the semester offering. The section repeats the semester and year offering (e.g 2016_S5_ALL refers to Semester 5, 2016). If you cannot see the section you want, you may need to request the creation of a MyMedia Echo360 section for your unit (requires UTAS username and password).
Step 8
Once you have selected a section, you will see some options below. Select the Link to the Section Home button, then select the Link Content button. That’s it! You’re done.

