Tool Review: Groups
What does it do?
The Groups tool allows you to create and manage groups of students. You can then set up Release Conditions to release items in MyLO to students in a particular groups or groups.
Useful terminology
Groups are organised into Categories. A group must be assigned to a Category.
By default, MyLO already provides you with some groups, including:
- Mode Groups
- Default Group Study Mode External – A group of students enrolled as Distance students
- Default Group Study Mode Internal – A group of students enrolled as Face to Face students
- Campus Groups
- Default Group Campus Hobart – Includes students enrolled to study on the Hobart campus AND all distance (External) students
- Default Group Campus Launceston – Includes students enrolled to study face to face on the Launceston campus
- Default Group Campus Cradle Coast – Includes students enrolled to study face to face on the Cradle Coast (Burnie) campus
Helpful resources and instructions
- An introduction to the Groups tool.
- Send an email to the members of a Group.
- Create groups with randomly allocated members.
NOTE: MyLO cannot create groups from groups. For example, you can’t create groups with randomly allocated members from the Default Group Study Mode External group. If you only want to create groups for one cohort of students, you will need to create empty groups for manual enrolment. - Create self-enrolment groups.
Great for tutorial or workshop sign up! Once created, students can enrol themselves in these groups. You can set a maximum capacity, so only a certain number of students can enrol. You may also wish to edit the group names to match tutorial dates and times. NOTE: You can not restrict access to these group sign-up based on membership of another group. - Create empty groups for manual enrolment.
Ideal for the creation of groups within a specific cohort, or groups that you have created based on skill sets, personality matches and so forth. - Editing group names and enrolling/removing students from groups.
- Advanced search options in the Groups tool.
How to export and re-use Grademark comments
Before your MyLO unit reaches its end date, you can export a set of Grademark comments (known as Quickmarks) for use in future units. You can also export a set to share with members of your teaching team, so that they can use the same set to mark student assignments. You can only export Bubble comments, e.g. those comments that appear to students when they click on a speech bubble. Text comments, where text is typed directly onto a student’s work, cannot be exported.
NOTE: Once a unit ends in MyLO (e.g. it becomes a ‘past’ unit), you will no longer be able to export a Grademark set, nor will you be able to view it.
At present, there are two different views of Grademark in use. We have provided instructions for the most recent view, Feedback Studio, below. If you prefer to use the old Grademark Classic view, you will find instructions on this page.
Please note that these instructions were written for use with Google Chrome, the browser recommended for use with MyLO. If you are using a different browser, the options presented to you may appear slightly different to the examples shown below.
Export a Grademark Set in Feedback Studio View
Access Feedback Studio as you normally would to evaluate a student’s work (any student submission in the relevant unit will do). When Feedback Studio loads, select the Quickmarks icon from the menu seen to the right of the screen. It looks like a blue box with a white check inside of it.
![]()
The Quickmarks menu will open on the right side of the screen.

The currently selected Set name will appear in the drop down menu. Click on the name (or the small, white arrow head). Select the Quickmark Manager option.
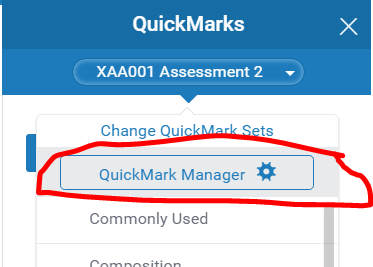
The Quickmark Manager window will open. Click on the menu icon (3 parallel lines, top left corner) and ensure that the set you wish to export is selected. The selected set will have a check next to it. To select a different set, click on it once.
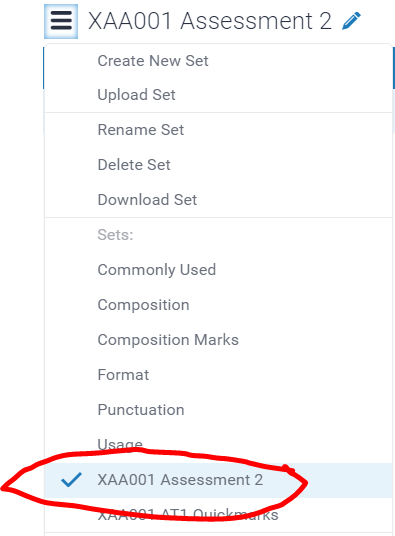
Now, select the Download Set option from the menu.

The Set will now be downloaded to your computer (usually to the Downloads folder associated with your browser). In Google Chrome, you will see the download appear towards the bottom left corner of your screen (most recent download will usually be on the far left). To open the folder containing the download, click on the menu arrowhead and select the Open in Folder option.
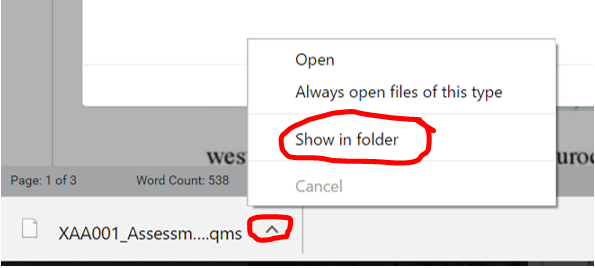
This will open the Downloads folder, and the Grademark Set export file (it will have a qms file extension) will be highlighted. Save the Set somewhere that you will remember by copying it from your Downloads folder, and pasting it into your preferred storage folder.
Import a Grademark Set into a different unit
Access Feedback Studio via a student’s submission in the new unit. When Feedback Studio loads, select the Quickmarks icon from the menu seen to the right of the screen. It looks like a blue box with a white check inside of it.
![]()
The Quickmarks menu will open on the right side of the screen.
The currently selected Set name will appear in the drop down menu. Click on the name (or the small, white arrow head). Select the Quickmark Manager option.
The Quickmarks Manager window will open. Select the menu (three parallel lines, top left corner), then select the Upload Set option.
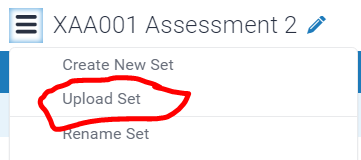
Follow the prompts to upload your set file.
Marking short and long answer questions in MyLO Quizzes
MyLO is not capable of auto-marking complex free text responses (e.g. of more than one or two words) for short (SA) and long answer (LA) quiz questions.
If students are likely to write full sentence answers, you will need to check student responses to SA and LA questions, and mark their answers accordingly.
You can do this using the Grade option attached to a Quiz. This document takes you through the process of marking Quiz responses, one step at a time.
How can I see the emails that I have sent from within MyLO?
MyLO allows you to send emails to individual students or groups of students, from a range of different tools.
MyLO does keep a record of the emails that you have sent from within the system*. Here’s how to check your Sent Items in MyLO:
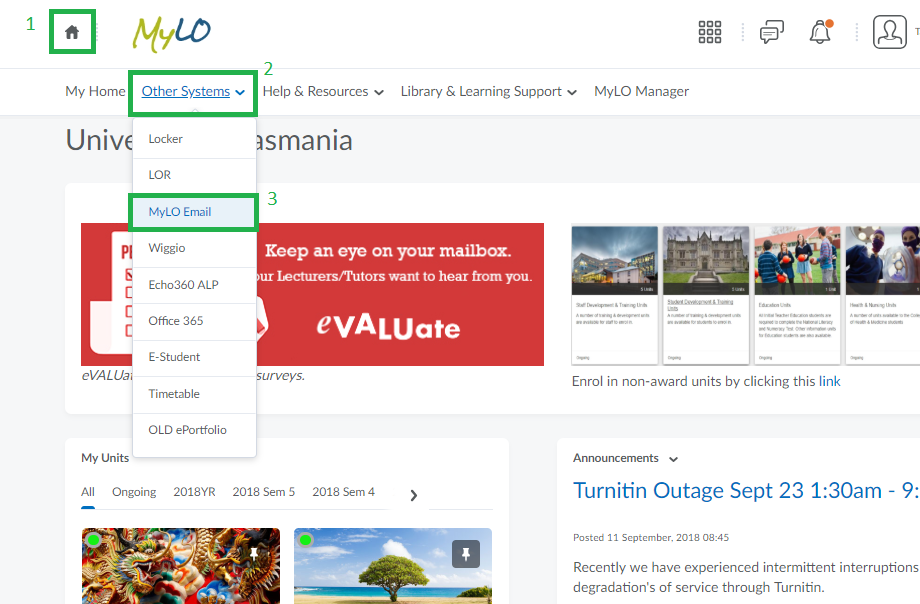
- Go out of any unit and back to the MyLO Homepage by clicking the ‘House’ icon on the top-left of the page.
- Find the menu “Other Systems”.
- Choose ‘MyLO Mail’.
- The ‘Sent Mail’ is a grey button on the top right of the MyLO Mail page.
*MyLO will not keep a record of emails that have been sent to students as the result of an Intelligent Agent.
Create a MyLO Rubric to provide feedback (without scores)
You can use a MyLO Rubric to provide feedback to students, even if you don’t intend to generate a mark with the Rubric. This type of Rubric is known as an Analytic Text Only. NOTE: You will still need to choose an overall score (level) when marking.
Follow the instructions below to create a Rubric for feedback only. If you would like to use a Rubric for feedback and marking (e.g. to generate an overall score or Grade), check out this post instead.
Step 1
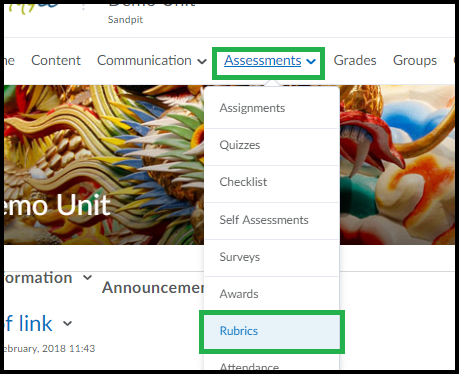
Select Assessment > Rubrics from the MyLO toolbar.
Step 2
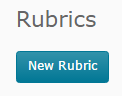
Select the New Rubric button.
Step 3
Configure the Properties for your Rubric as shown in the image below.
- Give your Rubric a Name, and keep the Rubric Status as Under Development.
- You can give your Rubric a short Description if you wish to (this is optional).
- The Rubric Type must be set as Analytic.
- Record the Initial # of criteria. This will generally be five: one each for HD, DN, CR, PP and NN. As this Rubric is for feedback only, you may wish to use novel levels, such as Pass/Fail (two levels).
- Record the Initial # of criteria. This reflects how many rows will be seen in the Rubric (other than the Levels header and a final row for the Overall grade). You can add or remove criteria rows later if you need to.
Once you have set the Properties, scroll down and select the Save button.

Step 4
Select the Levels and Criteria tab.

Step 5
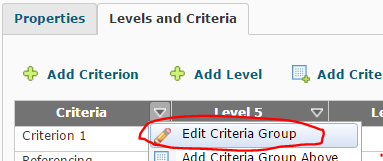
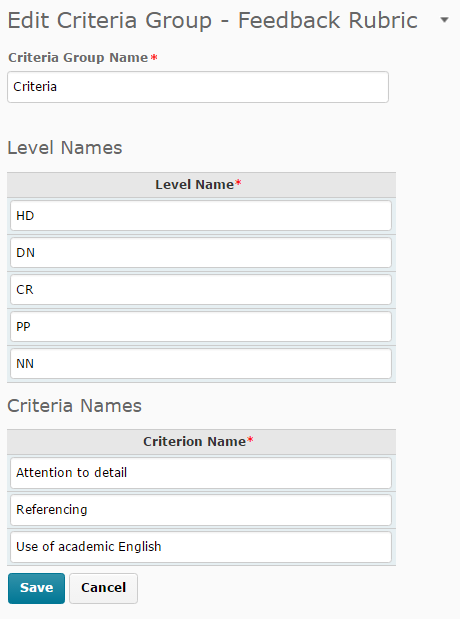
By default, the level names are Level 5, Level 4 etc. You will need to change the Level names to names you would like to use. At this point, you can also add your Criterion Descriptions. Select the arrowhead next to Criteria (left cell, top row), then select Edit Criteria Group.
Replace the existing Level names with your own names, then add in the Criterion. For efficiency, you can tab between the fields. You can also paste text (e.g. from a Word document) into each cell using keyboard shortcuts or browser menu options. Scroll down and select the Save button when you have finished (you may need to scroll down to see it).
Step 6
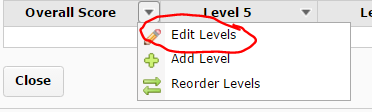
You will now need to edit the Level names in the Overall Score row (bottom row of the Rubric) to match those of the top row. To do this, select the arrowhead next to Overall Score (left cell, bottom row), then select Edit Levels.
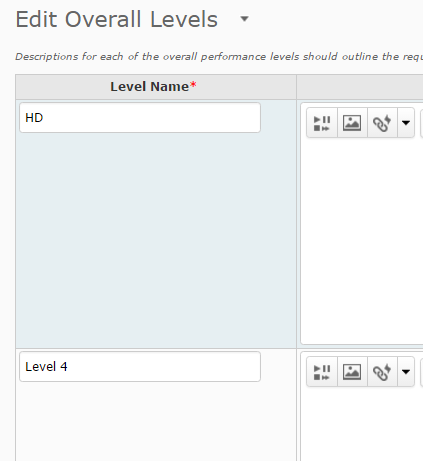
Edit the Overall Level Names. There is no need to add a Description or Feedback. When you have finished, scroll down and select the Save button at the bottom of the page.
Step 7
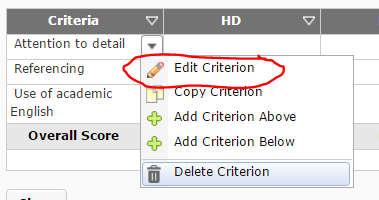
You can now enter the Level descriptions for each criterion. You can either edit all the criterion descriptions for the same Level (e.g. those in the same column) by selecting the arrowhead next to a Level and choosing Edit Level…
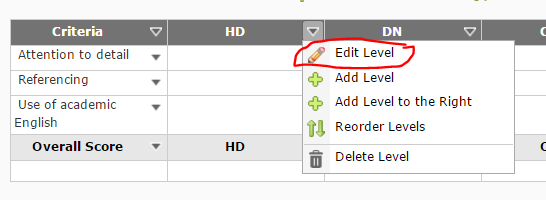
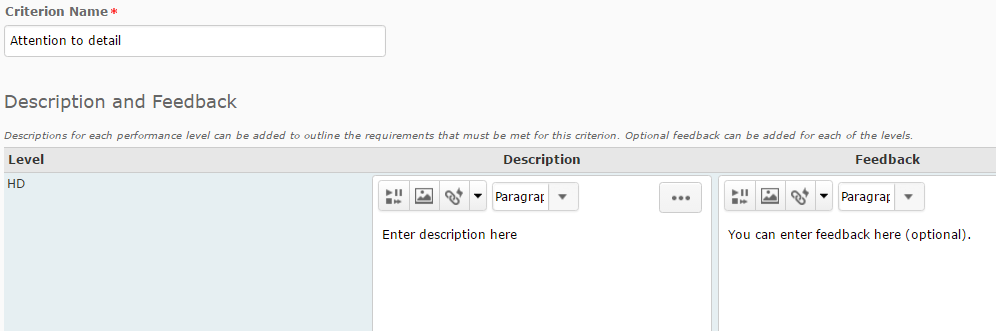
… or edit all the descriptions associated with one criterion (e.g. those in the same row), by selecting the arrowhead next to that criteria, then selecting Edit Criterion.
Whichever method you choose, type OR copy and paste in your descriptions into the Description field. You can add Feedback if you wish. A student will only see this feedback if you select this criterion level when marking their work.
Step 8
Continue entering the descriptions until your Rubric is complete. Remember to save your work by selecting the Save button (bottom left of the screen). Once your Rubric is finished, you will need to Finalise it and attach it to the relevant Assignment Submission Folder or Grade Item.
Compiling ePortfolio items into a Presentation for submission to a MyLO Dropbox
If your students have been recording reflections using the ePortfolio tool – whether via Forms or via self-initiated Reflections – you may want to assess their work at some point.
Students can submit individual ePortfolio items to you via a Dropbox. However, if you would like students to submit several ePortfolio items for assessment, it may be preferable for them to create an ePortfolio Presentation. A Presentation is a web page (or collection of pages) containing items that the students have added to their ePortfolio over time. The Presentation can then be submitted to a MyLO Dropbox for assessment.
If you would like to get your students to create ePortfolio Presentations for assessment, these printable instructions [PDF] will help guide them through the process.
Provide feedback on assessment tasks using Grademark
You can use Grademark to apply comments to electronic assignment submissions. Students can then view the comments once their assessment results have been published.
Why use Grademark?
Grademark allows you to insert comments onto a student’s assignment. You can use an existing bank of comments, known as a Grademark Set, or create new comments as you go. This is somewhat like writing comments in the margins of a student’s assignment. It is potentially much quicker than the analogue method, as you can re-use comments across student submissions.
What can be marked with Grademark?
You can use Grademark to add comments to files that have been submitted to a Group or Individual Dropbox in MyLO. The Dropbox must have Turnitin enabled. A range of different file types can be used with Grademark, including Word documents, images, PDFs and PowerPoint files. View this post to learn how to enable Turnitin/Grademark when setting up a Dropbox. For further information about file types that can be used with Turnitin and Grademark, view this post. Note that some file types will not work with Turnitin or Grademark.
Essential vocabulary
- Quickmarks are drop and drag comments that you can ‘drag’ onto a students work.
- Quickmarks can be categorised into sets. Sets can then be used across different assessment submissions in a unit, or exported for use in other units.
- Text comments are unique to a student’s submission. They cannot be used in other assignments.
- Bubble Comments can be used to highlight text and make comments about. They can also be saved as Quickmarks.
How to mark with Grademark
These short videos will show you how to mark student submissions with Grademark. Alternatively, you may wish to download these printable instructions. One important thing to remember – Grademark saves (most) of your work automatically, so simply close the window and you’re done!
View a student’s submission in Grademark
Add, edit or remove a Text comment (unique to this student’s work)
Add a Bubble Comment
Change between Quickmark Sets and drag Quickmarks onto a student’s submission
Create a new Quickmark Set and add new Quickmarks to it
Edit and delete Grademarks
See an overview of the Comments (including Grademarks) that you have made so far (on screen or in print)
Hiding or un-hiding Grade Items
When they visit the Grades tool, your students will only see Grade Items that have been made visible to them.
In this video, Peta explains how to make a Grade Item visible or invisible to students by altering its settings. She also explains how to restrict visibility to particular groups of students.
If you use Grade Categories, please make note:
Categories can be used to organise Grade Items. Like Grade Items, Categories can be hidden from student view. You make them visible/invisible the same way that you would do for a Grade Item. However, if you hide a Category from students, this will automatically hide all the Grade Items in that category, even if they are set up to be visible.
Publishing Quiz results so students can see them
Where are Quiz results published to?
There are two places where Quiz results can be published so students can see them. The first is the Quizzes tool. This view is controlled by the Submission View settings, which can be altered when you create or edit a Quiz. This image shows how feedback may appear to a student in the Quizzes tool. In this example, students can see their answer, as well as the correct answer (indicated by a green tick), and their score for the question.
A Quiz score can also be published to the Grades tool. This tool is generally used when a Quiz score will form part of the formal assessment of a unit. The Quiz will need to be connected to a Grade Item for this to work. You can decide when (or if) students will be able to view the Grade Item. Students will only see the total score for a Quiz here – they will not be able to see their answers, correct answers and so forth.
Can results be published automatically?
If a Quiz can be auto-marked by MyLO, it is possible to publish the results in the Quizzes and/or Grades tools automatically. This works in cases where multiple choice, true/false and similar question types have been used. However, it is not suitable for Quizzes with questions that need to be marked manually, like short and long answer questions. You will need to ensure that particular settings are in place in order for this to work. See the Publishing results to Grades section below for more information. Click here for more information about questions types.
Publishing results in the Quizzes tool using Submission Views
By default, when a student completes a Quiz, they will see their score. As a Unit Coordinator/Lecturer, you can control what information is released, and when it is released, using the Submission Views option (you can see this when you edit the Quiz).
- If you want to show students their score and feedback immediately after they complete a Quiz, you will need to change the Default View settings to include particular information, like incorrect answers, correct answers and so forth.
- If you do not want students to see their score immediately after they finish a Quiz, you will need to turn off the Show attempt score and overall attempt score option in the Default View settings.
- If you do not want students to see a score and/or feedback until a particular date and time, you should set up an Additional View.
Tam demonstrates how to edit the Default View and Additional View settings in this video. Alternatively, download this step by step guide to creating a Quiz.
Publishing results to Grades
If you wish to publish Quiz results to the Grades tool, you will need to ensure that the Quiz is connected to a Grade Item. These instructions explain how. You will also need to decide whether or not you want the Grade Item to be hidden from students or not. You can also choose which groups of students should see the grades. This post explains how to change the settings of a Grade Item to make it visible/invisible to students, and to release it to particular groups.
To publish to Grades automatically, you will need to have these settings in place before students commence the Quiz.
These settings can all be found in the Quiz settings (click the dropdown arrow next to the Quiz name and select Edit).
In the Assessments tab:
- Ensure that the Quiz is linked to a Grade Item.
- Under the heading Auto Export to Grades, check the Allow automatic export to Grades option.
- Under the heading Automatic Grade, check the Allow attempt to be set as graded immediately upon completion option.
To publish to Grades after marking or checking Quiz results.
In this video, Peta shows you how to publish Quiz results manually, and how to avoid common mistakes when publishing results.
Turnitin and Grademark/Feedback Studio: What file types will work?
Turnitin and Grademark/Feedback Studio can work with a variety of file types. The table below indicates the types of files that students may submit, and whether these file types can generate an Originality Report (for plagiarism checking) and/or be viewed in Grademark/Feedback Studio (note that Feedback Studio combines both the Originality Report and Grademark views on one screen). Note that, to be submitted to Turnitin, a file must be no larger than 40MB.
File type |
Originality Report
|
Comments in
|
Settings |
| Microsoft Word [DOC or DOCX] |
|
|
Must enable Turnitin. Submissions must contain at least one line of text. |
| PowerPoint [PPT or PPTX] |
|
|
Must enable Turnitin. This will only work if the PPT file contains text. It will not work if the file consists of images or videos. |
| HTML (web page) | |
|
Must enable Turnitin. Must contain at least one line of text. |
| Plain Text [TXT] | |
|
Must enable Turnitin. |
| Rich Text Format [RTF] | |
|
Must enable Turnitin. |
| Portable Document Format [PDF] | |
|
It will depend on how the PDF has been generated. If a PDF contains images and no text OR it consists of a series of scanned pages (images), it may not process effectively. Must enable Turnitin. |
| Hangul [HWP] | |
|
Must enable Turnitin. |
| Corel WordPerfect | |
|
Must enable Turnitin. |
| Adobe Postscript | |
|
Must enable Turnitin. Must contain at least one line of text. |
| Image Files (specific types below) |
|
|
Currently not possible. |
| JPEG | |
|
Currently not possible. |
| GIF | |
|
Currently not possible. |
| PNG | |
|
Currently not possible. |
| TIFF | |
|
Currently not possible. |
| BMP | |
|
Currently not possible. |
| PICT | |
|
Currently not possible. |
| Video Files | |
|
N/A |
| ePortfolio Items (e.g. Forms or Reflections) | |
|
N/A |