Tag
Feedback
Create a MyLO Rubric to provide feedback (without scores)
You can use a MyLO Rubric to provide feedback to students, even if you don’t intend to generate a mark with the Rubric. This type of Rubric is known as an Analytic Text Only. NOTE: You will still need to choose an overall score (level) when marking.
Follow the instructions below to create a Rubric for feedback only. If you would like to use a Rubric for feedback and marking (e.g. to generate an overall score or Grade), check out this post instead.
Step 1
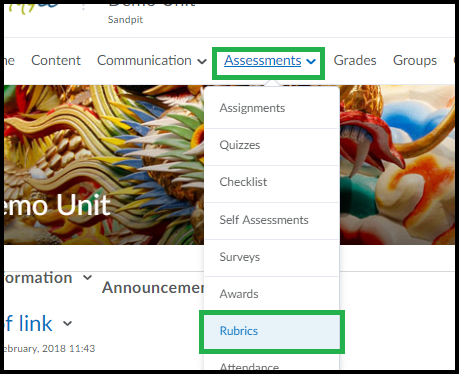
Select Assessment > Rubrics from the MyLO toolbar.
Step 2
Select the New Rubric button.
Step 3
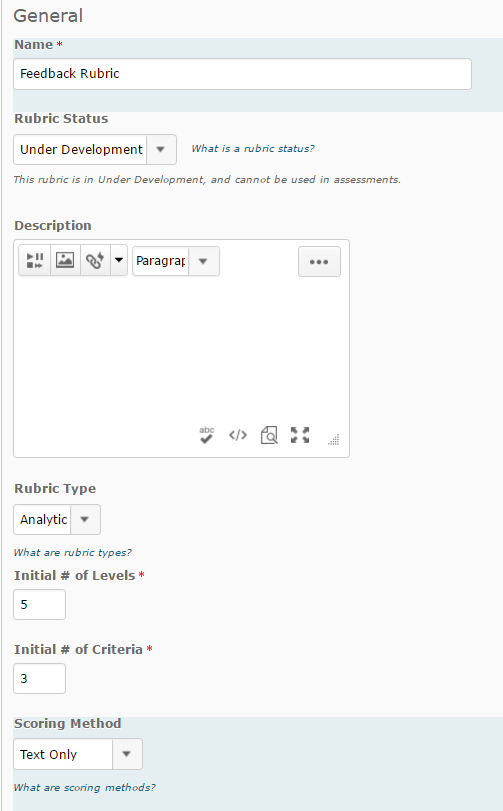
Configure the Properties for your Rubric as shown in the image below.
- Give your Rubric a Name, and keep the Rubric Status as Under Development.
- You can give your Rubric a short Description if you wish to (this is optional).
- The Rubric Type must be set as Analytic.
- Record the Initial # of criteria. This will generally be five: one each for HD, DN, CR, PP and NN. As this Rubric is for feedback only, you may wish to use novel levels, such as Pass/Fail (two levels).
- Record the Initial # of criteria. This reflects how many rows will be seen in the Rubric (other than the Levels header and a final row for the Overall grade). You can add or remove criteria rows later if you need to.
Once you have set the Properties, scroll down and select the Save button.
Step 4
Select the Levels and Criteria tab.
Step 5
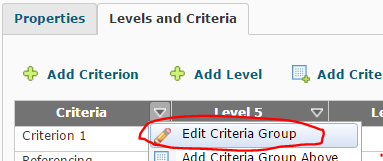
By default, the level names are Level 5, Level 4 etc. You will need to change the Level names to names you would like to use. At this point, you can also add your Criterion Descriptions. Select the arrowhead next to Criteria (left cell, top row), then select Edit Criteria Group.
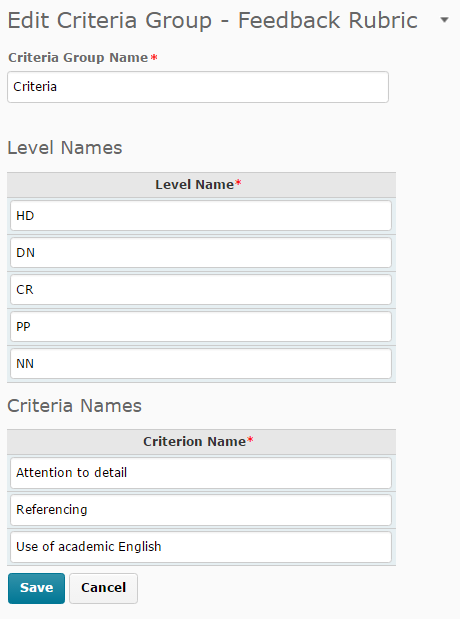
Replace the existing Level names with your own names, then add in the Criterion. For efficiency, you can tab between the fields. You can also paste text (e.g. from a Word document) into each cell using keyboard shortcuts or browser menu options. Scroll down and select the Save button when you have finished (you may need to scroll down to see it).
Step 6
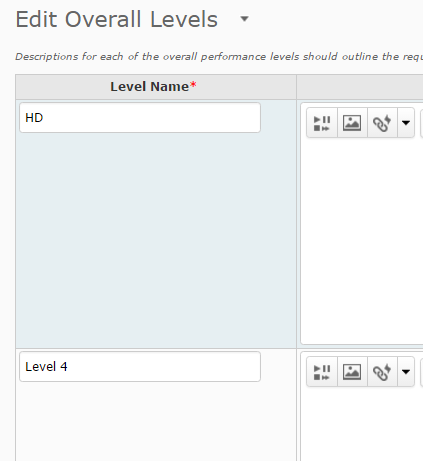
You will now need to edit the Level names in the Overall Score row (bottom row of the Rubric) to match those of the top row. To do this, select the arrowhead next to Overall Score (left cell, bottom row), then select Edit Levels.
Edit the Overall Level Names. There is no need to add a Description or Feedback. When you have finished, scroll down and select the Save button at the bottom of the page.
Step 7
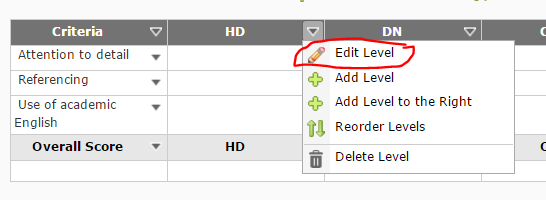
You can now enter the Level descriptions for each criterion. You can either edit all the criterion descriptions for the same Level (e.g. those in the same column) by selecting the arrowhead next to a Level and choosing Edit Level…
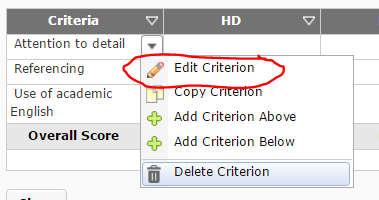
… or edit all the descriptions associated with one criterion (e.g. those in the same row), by selecting the arrowhead next to that criteria, then selecting Edit Criterion.
Whichever method you choose, type OR copy and paste in your descriptions into the Description field. You can add Feedback if you wish. A student will only see this feedback if you select this criterion level when marking their work.
Step 8
Continue entering the descriptions until your Rubric is complete. Remember to save your work by selecting the Save button (bottom left of the screen). Once your Rubric is finished, you will need to Finalise it and attach it to the relevant Assignment Submission Folder or Grade Item.
Help students locate Assignment Submission Folder results and feedback
Would you like your students to access grades and feedback in a Assignment Submission Folder, as well as feedback you have marked up on their submission using Grademark/Feedback Studio? Make sure your students know where to look to get the information they need!
Use our template to quickly and easily create an Announcement, an HTML page, an email (sent from MyLO) or a Checklist. The template contains instructions, with matching images, to help students find their results. You can edit the template to meet your needs.
To use the template, follow these steps:
1 – Use your mouse to select all the text, then copy all the text seen inside the box below.
<p>Dear {firstname},</p>
<p>I am writing to let you know that the results of <<INSERT ASSIGNMENT NAME HERE>> are now available. </p>
<p>Follow the instructions below to access your results and feedback.</p>
<p>To check your results, select the <b><em>Assessments</em>, then <em>Assignments</em></b> from the MyLO toolbar. </p>
<p>You will see a table listing all the <em><strong>Assignment Submission Folders</strong></em> available in the unit (similar to the table seen below). Find the relevant <em><strong>Submission Folder</strong> </em>(the name appears in the far left column). Your score will appear in the <em><strong>Score</strong> </em>column (second column from the left). The <em><strong>Feedback</strong></em><strong> </strong>column (2nd from the right) contains a <em><strong>View</strong></em><strong> </strong>link. Click on the <strong><em>View</em> </strong>link.</p>
<p><img src="http://blogs.utas.edu.au/teaching-at-tsbe/files/2015/01/Assignment-Submission-Folder-student-view-with-View-link-to-feedback.png" alt="Image showing an Assignment Submission and the View icon that can be clicked to view feedback" title="Image showing an Assignment Submission and the View icon that can be clicked to view feedback" width="603" height="74" border="2px" /><br /><br />You will then see a page that includes <<a marked-up rubric that shows the level you attained for each criteria followed by>> some general feedback and your grade. <<I have also provided you with additional feedback using the <em><strong>Grademark</strong></em> tool. I have used this tool to add comments to the document that you have submitted. You can access this feedback by clicking on the small document icon that appears in the <em><strong>Grademark</strong></em><strong> </strong>column. It should look similar to the example shown in the image below.</p>
<p><img src="http://blogs.utas.edu.au/teaching-at-tsbe/files/2015/01/Dropbox-View-Feedback-Grademark.gif" alt="Image showing where to click to access Grademark feedback" title="Image showing where to click to access Grademark feedback" height="184" width="615" border="2px" /></p>
<p>Note that, when Grademark (also known as Feedback Studio) opens, you'll see blue icons with a speech bubble inside them, like this.</p>
<p><img src="http://blogs.utas.edu.au/teaching-at-tsbe/files/2015/01/Comment-icon.png" alt="Bubble Comment in Grademark/Feedback Studio" title="Bubble Comment in Grademark/Feedback Studio" width="71" height="62" border="2px" /></p>
<p>Click on the icons to see the comments made on your work. Alternatively, you can choose to download your work and feedback as a PDF, which you can print out if you wish to. The full comments are shown in order at the end of the PDF. The way you do this will depend on whether the new (Feedback Studio) or 'classic' view of Grademark opens for you. </p>
<p>Look for either a download icon towards the right of the screen, like this<br /><br /><img src="http://blogs.utas.edu.au/teaching-at-tsbe/files/2015/01/Download-option.png" alt="Download link in Feedback Studio" title="Download link in Feedback Studio" border="2px" /></p>
<p>or a Print icon towards the bottom left of the screen, like this.</p>
<p><img src="http://blogs.utas.edu.au/teaching-at-tsbe/files/2015/01/Grademark-Classic-Print-icon.png" alt="Print icon in Grademark Classic" title="Print icon in Grademark Classic" border="2px" /></p>
<p>Choose one of the following options to download and/or print your feedback: <em>Current View; </em>or <em>Download PDF of current view for printing.>></em></p>
<p>Should you have any questions about the grade or feedback that I have provided you with, please don't hesitate to contact me.</p>
<p></p>
2 – In your MyLO unit, create a new Announcement, HTML page, email or a Checklist task. The example seen below is a new Announcement. Give the new item a title/headline, then move on to the next field (where you put the bulk of your message/content). By default, the WYSIWYG editor will open. Click on the source code symbol, seen at the bottom right of the WYSIWYG editor. It looks like this </>![]()
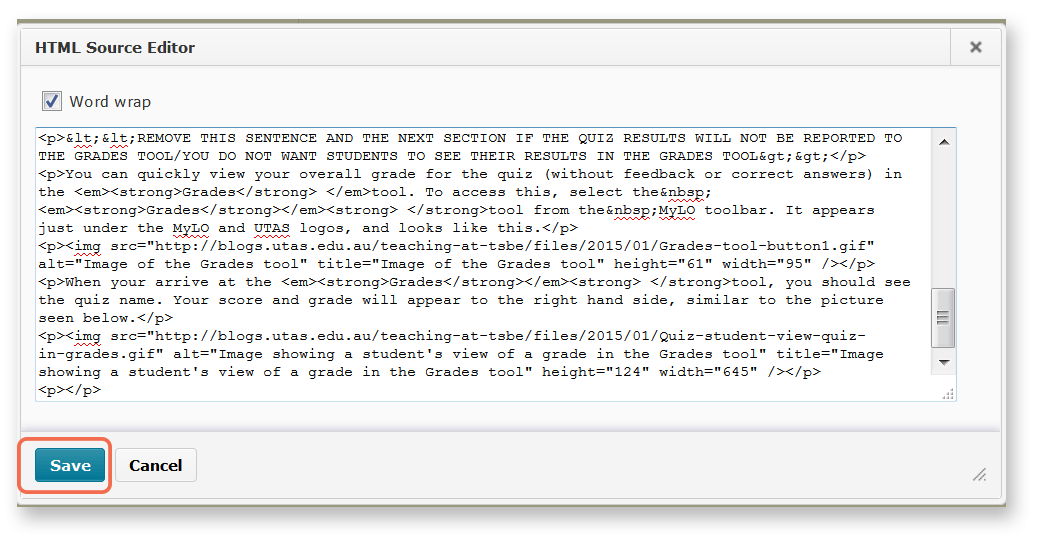
3 – A pop-up window will open. Place your cursor into the blank field, then paste in the code you copied earlier. The code will appear in the field. Click the Save button.
4 – The window will close. You will now notice that the template appears in the WYSIWYG view. You can edit it as you would a Word document, by adding or removing text. We have indicated sections that you may want to edit or remove using brackets <<like this>>. Remember to press Publish or Save (this will depend on which tool you are using) to save your changes.
Student Resource: How to locate Grades and feedback associated with an assignment submission
This Blog Entry explains how students can find their grade, feedback, Rubric feedback and Grademark feedback via the Assignment tool.
Please feel free to add the link to your MyLO site, or print it and hand it out to students, if you feel it would be helpful.
Setting up an Assignment Submission Folder to collect student assignments
MyLO’s Assignment Submission Folder tool allows students to upload a file, or collection of files, for assessment.
You can create a Submission Folder for individual students to submit to, or you can create a Group Submission Folder so one student can submit on behalf of a group of students.
These instructions will show you how to create a Submission Folder for individual students to submit their work to. If you wish to mark students’ work online, you must also associate a Grade Item with your Submission Folder.
TIPS
Setting up your Submission Folder for Turnitin and Grademark
If you intend to use Turnitin to check student submissions and/or you want to provide students with feedback using Grademark you must enable Turnitin when setting up the Submission Folder.
Note that Turnitin can only generate Originality Reports for certain file types. Grademark/Feedback Studio can be used with a broader range of file types, but you must enable this in the Submission Folder settings. Further information about file types that will work with Turnitin and Grademark is available here.
Assessing student discussion posts
Here are three methods that can be used to grade student Discussion contributions online:
- Marking with a Grade Item via the Discussion Tool, in which a score and general feedback are provided; or
- Marking with a Rubric via the Discussion Tool, in which an electronic Rubric is used for feedback and/or grade calculation (when a Custom Points Rubric is used).
- Marking via the Gradebook (using just the grade or a rubric attached to the grade) in which you can enter marks into the Gradebook rather than from the Discussion tool – useful if you have multiple discussion topics but only need 1 grade item overall.
As a general rule, we recommend using the simplest method for low-stakes Discussion assessments worth 10 marks or less. Online Rubrics are best used for higher value assessment tasks.
This table details the benefits and limitations of each grading method. In all 3 cases Students view their grade &/or rubric via the Grades tool.
Tools Used |
Benefits & Limitations |
|
Mark using Discussion tool. |
|
|
Mark from a Rubric via Discussion tool. |
|
|
Mark via the Gradebook (a rubric can be optionally attached to a grade item) |
|
|
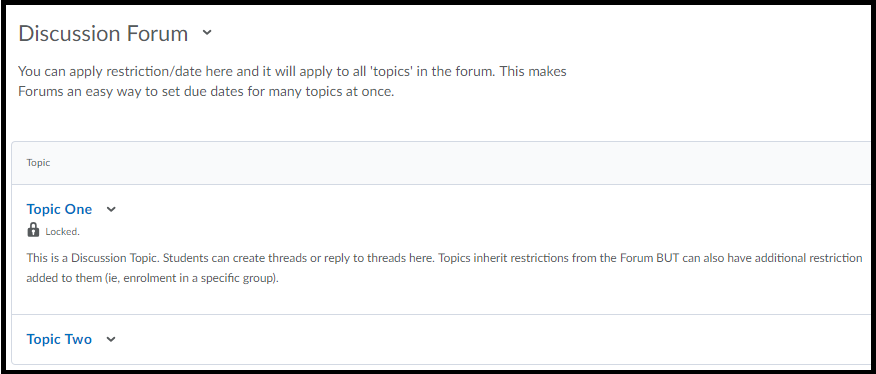
Note when creating Discussions – the ‘Forum’ is only an organisational device, it cannot contain discussion posts on its own. The ‘Forum’ is used to group sets of discussion topics together. A discussion ‘Topic’ is a distinct location for one or more discussion thread(s). Students can’t post directly into a ‘Forum’, you must set up topic(s) first.
Mark using Discussion Tool
- First, set up your Discussion topic. This guide will show you how: How to set up a Discussion topic
- Now associate a Grade Item with the Discussion topic. This guide will show you how: Associate a Grade Item with a Discussion topic
- When it is time to grade students’ Discussion contributions, this guide will show you how: How to grade a Discussion topic via the Discussion tool
Marking via Rubric in Discussion Tool
NOTE: If your College or Faculty features a flexible learning or blended learning team, they may be able to create the electronic Rubric for you, but you will need to have the rubric details ready including any weighting you want attached to the criteria.
- Decide which type of Rubric you will use. This post compares the Custom Points and Text Only Rubric types. Instructions for setting up a Rubric can be found here: Custom Points Rubric creation; Text Only Rubric creation.
- Now set up your Discussion topic (or Topics if you are catering for several Groups of students). This guide will show you how: How to set up a Discussion topic.
- Associate both the Grade Item & the Rubric to your Discussion Topic.
- When it is time to grade your students’ contributions, these guides will show you how to mark using a Rubric: marking with a Custom Point Rubric; marking with a Text Only Rubric.
Mark into the Gradebook (with or without rubric)
- Create a standalone Grade Item/Grade Items and associate your Rubric with the standalone Grade Item/Grade Items. These instructions explain how to set up a standalone Grade Item: How to create a Grade Item.
- Mark via the Grades tool. This guide will show you how: How to grade a Discussion topic via the Grades tool.

