Tag
Grade item
Attach a Rubric to a Grade Item so that you can mark with it
Once you have created an electronic Rubric in MyLO, you can attach it to a Grade Item. We recommend attaching Rubrics to standalone Grade Items that will be used to grade Discussions, or to keep track of work that is performed in class, like participation or presentations. This page will show you how.
We recommend attaching Rubrics directly to an Assignment Submission Folder, rather than to the associated Grade Item. If you need to attach a Rubric to an Assignment Submission Folder instead, you will find these instructions more helpful.
NOTE: One of the down-sides of attaching a Rubric to a Grade Item, is that the Rubric Score will not articulate to the Grade Item (as it does when used with a Assignment Submission Folder) automatically. When you finish marking a Rubric, make note of the Rubric total score, then record this into the Grade Item Score field.
Step 1
Before you finalise your Rubric and attach it, you must ensure that the Rubric is correctly set up. You may wish to return to the Rubrics tool and check the text and settings before finalising it.
WARNING
Once you have started marking with a Rubric, you must not edit it. If you do, you will lose any marks/feedback you have recorded in the Rubric to date. Please check your Rubric carefully before marking with it.
Step 2
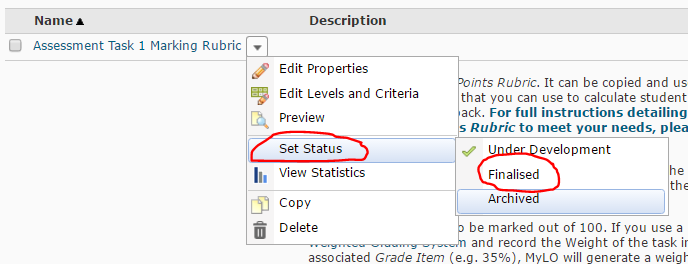
Select Rubrics from the MyLO toolbar, then locate your completed Rubric. Select the black arrowhead to the right of the rubric name. Select Set Status, then choose Finalised (a Rubric cannot be attached to another item unless finalised).
Step 3
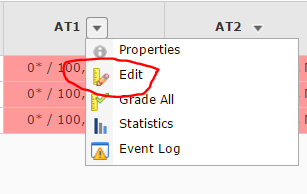
Select the Grades tool from the MyLO toolbar. Locate the Grade Item that you would like to attach the Rubric to. Select the black arrowhead next to the Grade Item name, then choose Edit from the menu.
Step 4
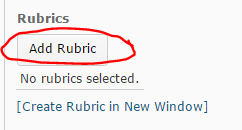
The Properties tab should open by default. Scroll down until you see the Rubrics heading. Select the Add Rubric button.
Step 5
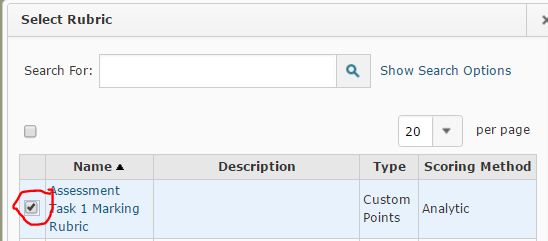
The Select Rubric window will open. Select a Rubric by checking the checkbox next to it, then select the Add Selected button (seen at the bottom of the window).
Step 6
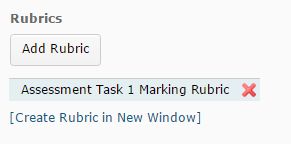
You should now see the Rubric name appear under the Add Rubric button. Scroll down and select the Save and Close button. If you have selected the wrong Rubric, select the red cross (the Rubric name will now appear crossed out), then select the Add Rubric button to select a different Rubric.
You can now start marking with your Rubric.
Create a Grade Item in the Grades tool
A Grade Item is a column of the Grades tool dedicated to tracking the grades associated with a particular task. It may be associated with a MyLO assessment tool like a Dropbox or Quiz, or it could be a standalone item used to track classroom participation or presentations.
These step-by-step instructions explain how to create a Grade Item.
Quickly grade un-submitted work as 0
Depending on the way you have set up your Grades tool, and the structure of your assessment tasks, you may need to grade un-submitted student work with a value of 0. If you don’t record ANY value against a Grade Item, MyLO will ‘drop’ that Grade Item from a Category or from the Final Calculated Grade for a student. This can be problematic if you do not want these Grade Items dropped from the student’s overall grade for the unit.
Publish final assessment marks to the Grades tool without releasing the marks and feedback to students
UTAS requires that academics do not release students’ final assessment task marks on MyLO until after the exam period and release of formal grades by the University. You can still mark students’ final assessment piece online and publish the marks to the Grades tool, but you will need to ensure that students cannot see the marks or feedback associated with their final assessment. This is achieved by:
- hiding the Assignment Submission Folder/Quiz Submission View and associated Grade Item from students; and
- ensuring that students cannot see Grades or Assignment Submission Folders in the My/User Progress tool.
These items must be hidden from students before you publish and grades or feedback. The instructions from page 3 of this [PDF] will show you how.
Tool Review: Grades
What does it do?
The Grades tool is used to track student participation and grades over time. You can also use the Grades tool to provide students with a summary of their overall Grade grades. This snapshot of the Standard View of the Grades tool points out some of the key features of the tool.
Useful terminology
Grade Item
A column of the Grades tool dedicated to tracking the grades associated with a particular task. It may be associated with a MyLO assessment tool like a Dropbox or Quiz, or it could be a standalone item used to track classroom participation or presentations.
Standalone Grade Item
A Grade Item that is not linked to any type of MyLO activity. Generally used to track attendance and participation, or the scores associated with an in-class performance (like a presentation).
Category
Used to organise Grade Items into clusters. It can convert the sum total of all the Grade Items in the Category in accordance with specified weightings. The outcome of this calculation is seen as a Subtotal. Categories can also be set up to drop a specified number of items with the lowest or highest grades, or to drop ungraded items.
Settings
Used to control elements of the Grades tool, such as whether a points or weightings system is used, the way students see their Grades (by default) and the way you see Grades.
Release Conditions
Control student access to Grade objects, based on date, or on Group membership (including whether students are enrolled in Internal or External study modes).
Helpful resources and instructions
- How to set up your Grades tool
This comprehensive guide contains all you need to know to set up your Grades tool to suit the structure of your unit assessment, and your preferred method of viewing Grades. - How to hide or un-hide Grade Items for students
- How to create a Standalone Grade Item
This is a useful method of tracking Grades for items that will not be completed in, or submitted to, MyLO, for example, participation or in class presentations. - How to associate a Grade Item with a Dropbox, Discussion or Quiz
- How to release internal grades to students
This post explains how you can use the Final Calculated Grade tool to release an internal grade to students, prior to them sitting a final examination. - Publish final assessment marks to the Grades tool without releasing the marks and feedback to students
- Export Grades to an Excel Spreadsheet
- Quickly grade unsubmitted work as 0
The Grades tool will ‘drop’ Grade Items from a Category subtotal or the Final Calculated Grade if no numerical score is recorded. If you don’t want a student’s grade for an item to be dropped, you will need to record a score. 0 should be recorded to represent non-submission/no-show.
Create a MyLO Rubric to provide feedback (without scores)
You can use a MyLO Rubric to provide feedback to students, even if you don’t intend to generate a mark with the Rubric. This type of Rubric is known as an Analytic Text Only. NOTE: You will still need to choose an overall score (level) when marking.
Follow the instructions below to create a Rubric for feedback only. If you would like to use a Rubric for feedback and marking (e.g. to generate an overall score or Grade), check out this post instead.
Step 1
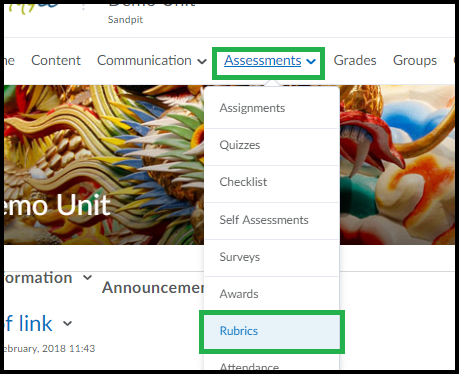
Select Assessment > Rubrics from the MyLO toolbar.
Step 2
Select the New Rubric button.
Step 3
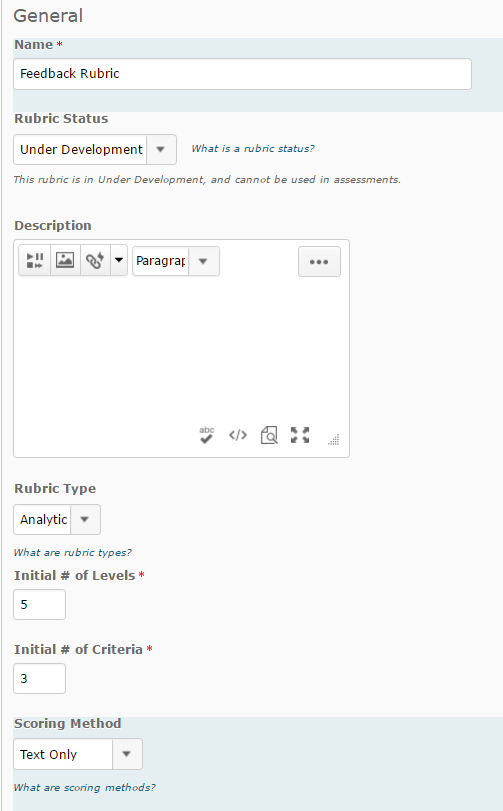
Configure the Properties for your Rubric as shown in the image below.
- Give your Rubric a Name, and keep the Rubric Status as Under Development.
- You can give your Rubric a short Description if you wish to (this is optional).
- The Rubric Type must be set as Analytic.
- Record the Initial # of criteria. This will generally be five: one each for HD, DN, CR, PP and NN. As this Rubric is for feedback only, you may wish to use novel levels, such as Pass/Fail (two levels).
- Record the Initial # of criteria. This reflects how many rows will be seen in the Rubric (other than the Levels header and a final row for the Overall grade). You can add or remove criteria rows later if you need to.
Once you have set the Properties, scroll down and select the Save button.
Step 4
Select the Levels and Criteria tab.
Step 5
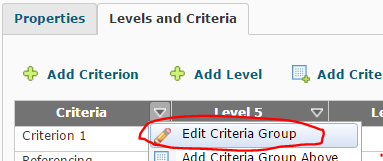
By default, the level names are Level 5, Level 4 etc. You will need to change the Level names to names you would like to use. At this point, you can also add your Criterion Descriptions. Select the arrowhead next to Criteria (left cell, top row), then select Edit Criteria Group.
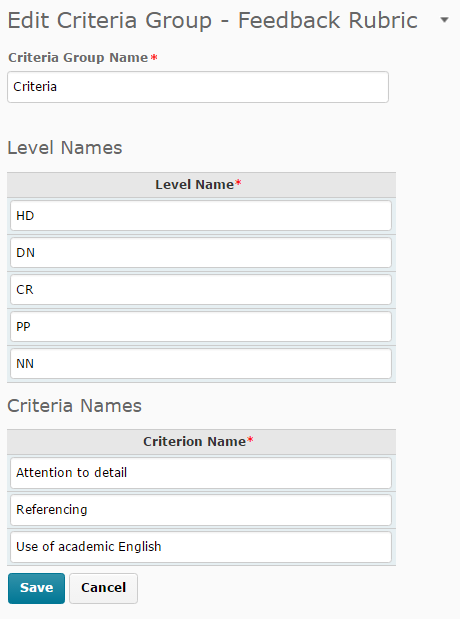
Replace the existing Level names with your own names, then add in the Criterion. For efficiency, you can tab between the fields. You can also paste text (e.g. from a Word document) into each cell using keyboard shortcuts or browser menu options. Scroll down and select the Save button when you have finished (you may need to scroll down to see it).
Step 6
You will now need to edit the Level names in the Overall Score row (bottom row of the Rubric) to match those of the top row. To do this, select the arrowhead next to Overall Score (left cell, bottom row), then select Edit Levels.
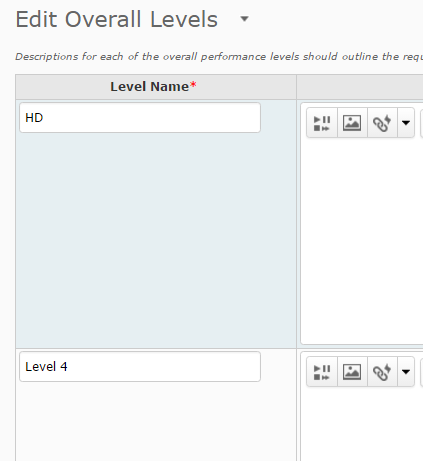
Edit the Overall Level Names. There is no need to add a Description or Feedback. When you have finished, scroll down and select the Save button at the bottom of the page.
Step 7
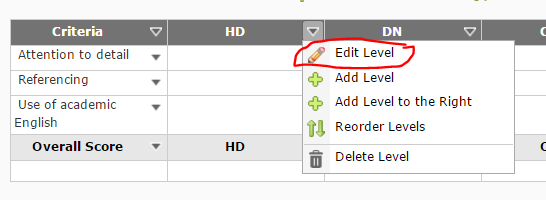
You can now enter the Level descriptions for each criterion. You can either edit all the criterion descriptions for the same Level (e.g. those in the same column) by selecting the arrowhead next to a Level and choosing Edit Level…
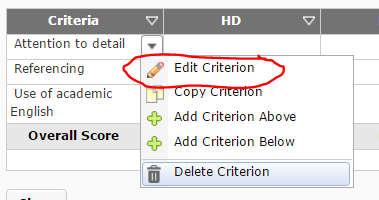
… or edit all the descriptions associated with one criterion (e.g. those in the same row), by selecting the arrowhead next to that criteria, then selecting Edit Criterion.
Whichever method you choose, type OR copy and paste in your descriptions into the Description field. You can add Feedback if you wish. A student will only see this feedback if you select this criterion level when marking their work.
Step 8
Continue entering the descriptions until your Rubric is complete. Remember to save your work by selecting the Save button (bottom left of the screen). Once your Rubric is finished, you will need to Finalise it and attach it to the relevant Assignment Submission Folder or Grade Item.
Hiding or un-hiding Grade Items
When they visit the Grades tool, your students will only see Grade Items that have been made visible to them.
In this video, Peta explains how to make a Grade Item visible or invisible to students by altering its settings. She also explains how to restrict visibility to particular groups of students.
If you use Grade Categories, please make note:
Categories can be used to organise Grade Items. Like Grade Items, Categories can be hidden from student view. You make them visible/invisible the same way that you would do for a Grade Item. However, if you hide a Category from students, this will automatically hide all the Grade Items in that category, even if they are set up to be visible.
Link a Grade Item with a Dropbox, Discussion or Quiz
Grade Items act as the connection between an assessment item – like an assignment – and the Grades tool. If you want to mark and record grades online, you may need to associate a Grade Item with an assessment item.
You can link an existing grade item to an Assignment Submission folder, Quiz or Discussion Topic.
- Go to the assessment item you need to attach a grade to. Whether you’re creating a new one, or editing an existing one – find the section where you add a grade (either properties or assessment), then click the drop-down box under the heading ‘Grade Item’ and select an existing grade. If the grade item you had previously created does not appear it likely means this grade item is already being used elsewhere or has been set up as a ‘category’ (you can’t link a category, only individual grades).
You can create a new Grade Item whilst setting up or editing an Assignment Submission folder, Quiz or Discussion Topic. This grade item will then be connected to the assessment item.
- To do so as you create a new assessment item, or edit an existing item you will see (either on the ‘Properties’ tab or the ‘Assessment’ tab) an option for ‘Create a new grade item’.

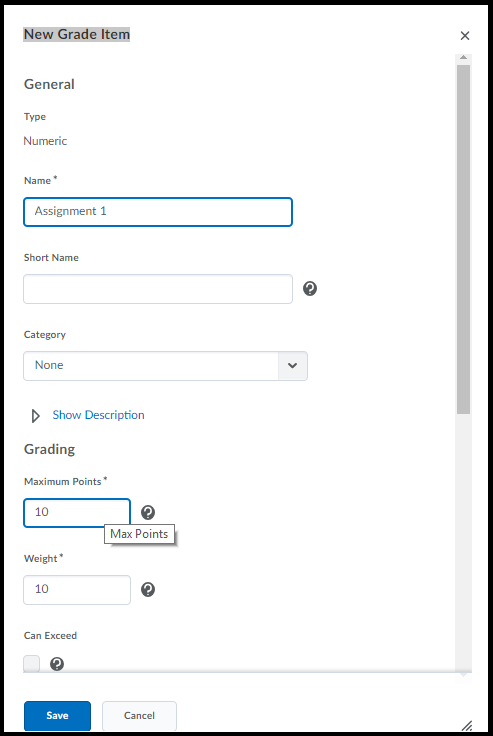
When you click ‘New Grade Item’ a window will pop up – in which you can enter the grade’s name, out of value and weight. If you’re not sure about any of the options here you can just leave them. You can edit this grade later in the Grades tool at any time. When you click ‘Save’ the grade will be created AND it will then be selected to be associated with the assessment you’re currently working in.

