Category
MyLO Assignments
Grading Solution: Students submit the same assessment task at different times
This solution would suit scenarios like this:
Students must deliver a presentation for one assessment task. The task is worth 20% of the unit assessment. Students may deliver their presentation at a nominated tutorial time between weeks 5 and 10 of semester. You decide to make students submit their presentation plan/slides to a Dropbox the day prior to their scheduled presentation session. You will provide feedback to students and record their mark via the Dropbox folder. The issue you need to resolve here is different due dates for different students.
Options
You have three options in this scenario:
- Create a Dropbox with no Start, Due or End Date restrictions and link it to a single Grade Item (see Grade a single assessment task comprising one item). A date will be recorded against each student’s submission, but overdue submissions will not be flagged as late.
- Place students in presentation groups (based on their presentation delivery date) using the Groups tool. Create one Dropbox and associate a Grade Item (see Grade a single assessment task comprising one item). Use the Dropbox Restrictions to add a Special Access condition for each presentation group that specifies a Due date unique to that group. Students will see the due date specified by their Special Access condition. Their submission will be flagged as late if the fail to submit before the due date set as their Special Access condition.
- This is the most complex option. Place students in presentation groups (based on their submission date) using the Groups tool. Create a unique Dropbox folder for each presentation group. You will also need to create a new Grade Item to attach to each Dropbox. You may wish to restrict access to each Dropbox and Grade Item according to Group membership using Release Conditions.
The remainder of this section assumes that you have chosen option 3. If you have chosen options 1 or 2, refer to the instructions for Grade a single assessment task comprising one item.
Grading system and other requirements
This method requires the use of a weighted grading system and the use of a special marking method (refer to When Marking section below).
You will need:
- Create one Category to represent the assessment task and use the options suggested here.
- Create one Grade Item per Dropbox and use the options suggested here. You must link each Grade Item to the Category that you have created.
- Create one Dropbox for each presentation group. You must link each Dropbox with one of the Grade Items that you have created.
To see an example of what this solution might look like in the Grades tool, download this PDF.
When marking:
You will need to do the following:
- Record marks only for those Grade Items that the student needs to complete. Leave the other Grade Items unmarked. For example, if Tam needs to deliver only one presentation, and delivers it during Week 6, record a mark for her only in the Week 6 Grade Item.
- If a student fails to submit an item that they are expected to complete, record a 0 as their grade. For example, View Student failed to deliver their presentation for Week 5 and has therefore received 0 for this assessment task.
Grading Solution: Distance students and face-to-face students complete different items as part of the same assessment task
This solution would suit scenarios like this:
Students will deliver a presentation and then respond to questions from teachers and peers for an Assessment Task worth 35 marks. Face-to-face (F2F) students deliver their presentation and respond to questions in class. You will use a standalone Grade Item to provide F2F students with a grade and feedback. Distance students will pre-record a presentation. They will submit a copy to a Dropbox (worth 70%). You make the presentations available for viewing by linking to them to Discussion Topic. You will mark the Discussion Topic to assess how students respond to questions about their presentation (worth 30%).
Grading system and other requirements
This method requires the use of a weighted grading system. See also the instructions for marking un-submitted and irrelevant items below.
You will need to:
- Create one Category to represent the assessment task and use the options described here.
- Create one Grade Item per assessment item and use the options described here. You must link each Grade Item to the Category that you have created.
- Link each Dropbox/Discussion/Quiz with one of your new Grade Items. If students perform a task in class and do not need to submit items electronically, you can skip this step.
To see an example of what this solution might look like in the Grades tool, download this PDF.
When marking:
- Do not record a mark for items that a student does not need to submit.
- If a student fails to submit an item that they are expected to complete, record a 0 as their grade.
In the example below, Tam is studying F2F, while View Student is studying by Distance. Tam has received a mark of 67/100 for the presentation she delivered in class. No marks need to be recorded for the other tasks, as the F2F Presentation is worth 100% of Assessment 3 (A3) for F2F students.
View Student, on the other hand, failed to participate in the Distance Q&A required of Distance students. To account for this, a 0 mark was recorded for this task, bringing down the student’s overall mark (Subtotal) for the assessment task accordingly.
Grading Solution: Grade a single assessment task comprising two or more items
This solution would suit scenarios like this:
- Students submit four items at different points, each to a separate Dropbox. Three submissions are each worth 10%. The fourth submission is worth 70% of Assessment Task 3.
- Students submit four items at different points during your unit, each to a separate Dropbox. Each submission is worth 25% of Assessment Task 3.
- Students complete 10 Quizzes. Each Quiz is worth 10% of Assessment Item 3.
- Students work in groups to create a Report. It is submitted to a group Dropbox and worth 70% of Assessment Item 3. Students then submit a personal reflection about the task to an individual Dropbox. This is worth 30% of Assessment Item 3.
Grading system and other requirements
This method requires the use of a weighted grading system. When marking, you will need to record a 0 for students who have not submitted work.
You will need to:
- Create one Category to represent the assessment task and use the options described here.
- Create one Grade Item per assessment item and use the options described here. You must link each Grade Item to the Category that you have created.
- Link each Dropbox/Discussion/Quiz with one of your new Grade Items. If students perform a task in class and do not need to submit items electronically, you can skip this step.
To see an example of what this solution might look like in the Grades tool, download this PDF.
When marking:
The Category Subtotal will calculate correctly only if you record a zero (0) for each un-submitted piece of work. Here are some instructions on how to mark un-submitted items with a 0 quickly.
Grading Solution: Grade a single assessment task comprising one item
This solution would suit scenarios like this:
- Students submit their work to a MyLO Dropbox. Their submission is worth 100% of Assessment Task 1.
- Students contribute to one Discussion Topic. Their contributions to the topic are worth 100% of Assessment Task 1.
- Students complete a Quiz. The Quiz is worth 100% of Assessment Task 1.
- Students complete a presentation in class. It is worth 100% of the Assessment Task. As no files will be submitted, you will use a Standalone Grade Item.
You will need to:
- Create one Grade Item and use the options described here.
- Link a Dropbox/Discussion/Quiz with your new Grade Item. If students perform their task in class and do not need to submit something electronically, you can skip this step.
To see an example of what this solution might look like in the Grades tool, download this PDF.
Attach a Rubric to an Assignment Submission Folder so that you can mark with it
Once you have created an electronic Rubric in MyLO, you can attach it to an Assignment Submission Folder. This post will show you how. Once you have attached the Rubric, you can mark with it.
Step 1
Before you finalise your Rubric and attach it, you must ensure that the Rubric is correctly set up. You may wish to return to the Rubrics tool and check the text and settings before finalising it.
WARNING
Once you have started marking with a Rubric, you must not edit it. If you do, you will lose any marks/feedback you have recorded in the Rubric to date. Please check your Rubric carefully before marking with it.
Step 2
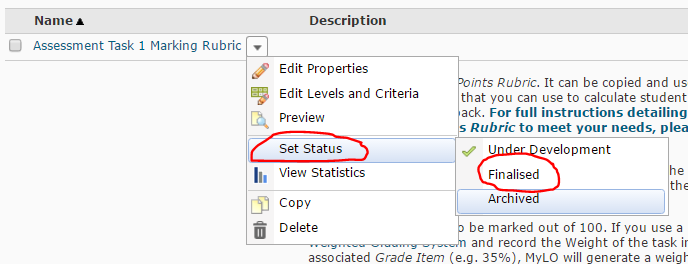
Select Rubrics from the MyLO toolbar, then locate your completed Rubric. Select the black arrowhead to the right of the rubric name. Select Set Status, then choose Finalised (a Rubric cannot be attached to another item unless finalised).
Step 3
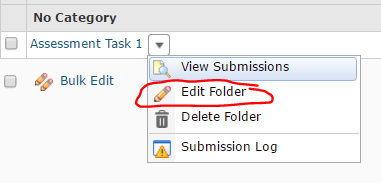
Select the Assignments tool from the MyLO toolbar. Locate the Assignment Submission Folder that you would like to attach the Rubric to. Select the black arrowhead next to the Submission Folder name, then choose Edit Folder from the menu.
Step 4
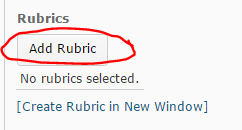
The Properties tab should open by default. Scroll down until you see the Rubrics heading. Select the Add Rubric button.
Step 5
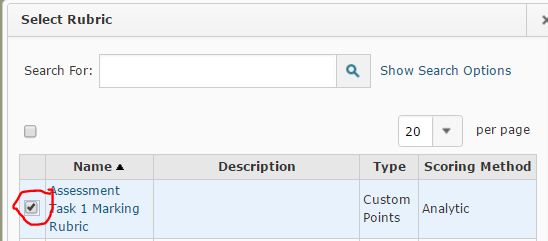
The Select Rubric window will open. Select a Rubric by checking the checkbox next to it, then select the Add Selected button (seen at the bottom of the window).
Step 6
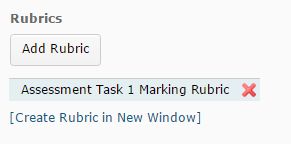
You should now see the Rubric name appear under the Add Rubric button. Scroll down and select the Save and Close button. If you have selected the wrong Rubric, select the red cross (the Rubric name will now appear crossed out), then select the Add Rubric button to select a different Rubric.
You can now start marking Assignment Submissions with your Rubric.
Create a Grade Item in the Grades tool
A Grade Item is a column of the Grades tool dedicated to tracking the grades associated with a particular task. It may be associated with a MyLO assessment tool like a Dropbox or Quiz, or it could be a standalone item used to track classroom participation or presentations.
These step-by-step instructions explain how to create a Grade Item.
Grading with different MyLO tools
This table provides an overview of common MyLO tools, and their relationship to Grade Items. It also takes into account electronic Rubrics, Turnitin and Grademark.
| Dropbox | Discussion Topic | Quiz | ePortfolio | Standalone Grade Items |
|
| Attach a Grade Item or use a standalone Grade Item? | Attach a Grade Item | If you are not using a Rubric*, or assessing numerous small group discussions*, attach a Grade Item. |
Attach a Grade Item | Create a Dropbox Folder for students to submit to. Attach a Grade Item to the Dropbox Folder | Use for performances that cannot be submitted, like tracking participation |
| Can Turnitin be used? | Yes | No | No | No | No |
| Can Grademark be used? | Yes (depending on type of file submitted) | No | No | No | No |
| Attach a MyLO Rubric | Attach it to the Dropbox. | You can use a Rubric, but the grading process will be quite complex. *Use a standalone Grade Item instead of attaching a Grade Item to the Discussion. Attach the Rubric (if using) to the standalone Grade Item. | It is possible to use a Rubric for feedback purposes; however, typing directly into the feedback fields within the Quiz tool itself is easier and more efficient. You can attach a feedback (text) Rubric to a Quiz OR a Grade Item associated with a Quiz, but how you mark and where students see the Rubric will differ accordingly. | Attach it to the Dropbox. Requires the use of two monitors – one to view the Rubric, and another to view the students’ work. Does not work well in Google Chrome. | Attach the Rubric to the Grade Item. Best used for feedback purposes only. |
| Mark and provide feedback to a group | Dropbox must be set up as a Group Dropbox when it is first created. | N/A | N/A | N/A | N/A |
| Alter an individual group member’s grade | Do this in the associated Grade Item. Direct students to look at the Grades tool for their final results for the task. | N/A | N/A | N/A | N/A |
Publish final assessment marks to the Grades tool without releasing the marks and feedback to students
UTAS requires that academics do not release students’ final assessment task marks on MyLO until after the exam period and release of formal grades by the University. You can still mark students’ final assessment piece online and publish the marks to the Grades tool, but you will need to ensure that students cannot see the marks or feedback associated with their final assessment. This is achieved by:
- hiding the Assignment Submission Folder/Quiz Submission View and associated Grade Item from students; and
- ensuring that students cannot see Grades or Assignment Submission Folders in the My/User Progress tool.
These items must be hidden from students before you publish and grades or feedback. The instructions from page 3 of this [PDF] will show you how.
How to export and re-use Grademark comments
Before your MyLO unit reaches its end date, you can export a set of Grademark comments (known as Quickmarks) for use in future units. You can also export a set to share with members of your teaching team, so that they can use the same set to mark student assignments. You can only export Bubble comments, e.g. those comments that appear to students when they click on a speech bubble. Text comments, where text is typed directly onto a student’s work, cannot be exported.
NOTE: Once a unit ends in MyLO (e.g. it becomes a ‘past’ unit), you will no longer be able to export a Grademark set, nor will you be able to view it.
At present, there are two different views of Grademark in use. We have provided instructions for the most recent view, Feedback Studio, below. If you prefer to use the old Grademark Classic view, you will find instructions on this page.
Please note that these instructions were written for use with Google Chrome, the browser recommended for use with MyLO. If you are using a different browser, the options presented to you may appear slightly different to the examples shown below.
Export a Grademark Set in Feedback Studio View
Access Feedback Studio as you normally would to evaluate a student’s work (any student submission in the relevant unit will do). When Feedback Studio loads, select the Quickmarks icon from the menu seen to the right of the screen. It looks like a blue box with a white check inside of it.
The Quickmarks menu will open on the right side of the screen.
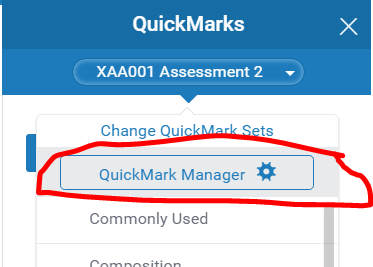
The currently selected Set name will appear in the drop down menu. Click on the name (or the small, white arrow head). Select the Quickmark Manager option.
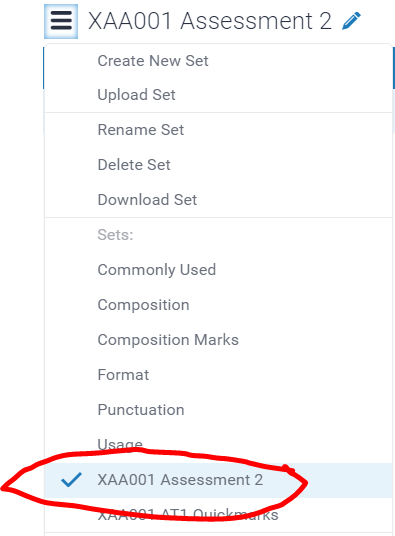
The Quickmark Manager window will open. Click on the menu icon (3 parallel lines, top left corner) and ensure that the set you wish to export is selected. The selected set will have a check next to it. To select a different set, click on it once.
Now, select the Download Set option from the menu.
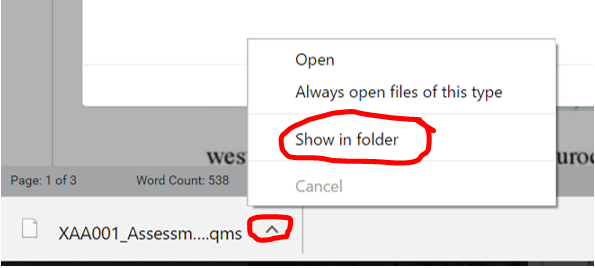
The Set will now be downloaded to your computer (usually to the Downloads folder associated with your browser). In Google Chrome, you will see the download appear towards the bottom left corner of your screen (most recent download will usually be on the far left). To open the folder containing the download, click on the menu arrowhead and select the Open in Folder option.
This will open the Downloads folder, and the Grademark Set export file (it will have a qms file extension) will be highlighted. Save the Set somewhere that you will remember by copying it from your Downloads folder, and pasting it into your preferred storage folder.
Import a Grademark Set into a different unit
Access Feedback Studio via a student’s submission in the new unit. When Feedback Studio loads, select the Quickmarks icon from the menu seen to the right of the screen. It looks like a blue box with a white check inside of it.
The Quickmarks menu will open on the right side of the screen.
The currently selected Set name will appear in the drop down menu. Click on the name (or the small, white arrow head). Select the Quickmark Manager option.
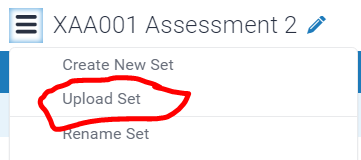
The Quickmarks Manager window will open. Select the menu (three parallel lines, top left corner), then select the Upload Set option.
Follow the prompts to upload your set file.
Create a MyLO Rubric to provide feedback (without scores)
You can use a MyLO Rubric to provide feedback to students, even if you don’t intend to generate a mark with the Rubric. This type of Rubric is known as an Analytic Text Only. NOTE: You will still need to choose an overall score (level) when marking.
Follow the instructions below to create a Rubric for feedback only. If you would like to use a Rubric for feedback and marking (e.g. to generate an overall score or Grade), check out this post instead.
Step 1
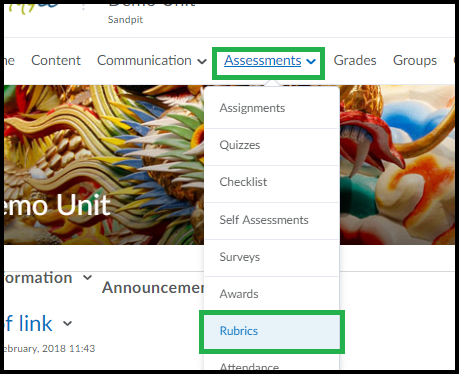
Select Assessment > Rubrics from the MyLO toolbar.
Step 2
Select the New Rubric button.
Step 3
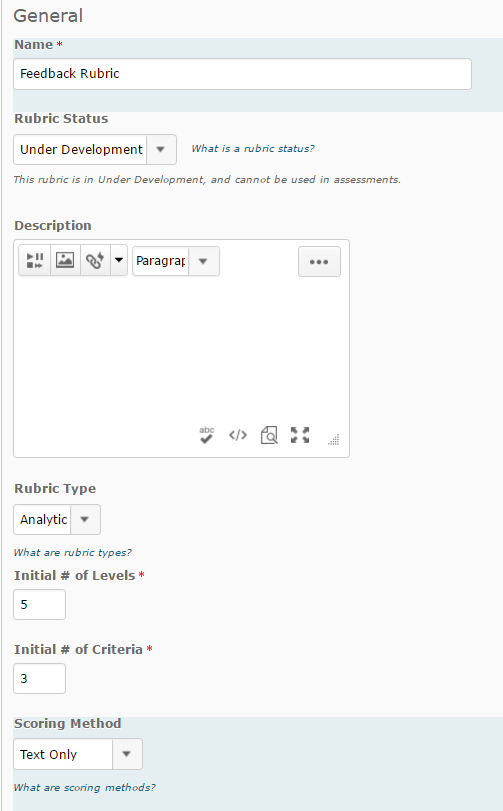
Configure the Properties for your Rubric as shown in the image below.
- Give your Rubric a Name, and keep the Rubric Status as Under Development.
- You can give your Rubric a short Description if you wish to (this is optional).
- The Rubric Type must be set as Analytic.
- Record the Initial # of criteria. This will generally be five: one each for HD, DN, CR, PP and NN. As this Rubric is for feedback only, you may wish to use novel levels, such as Pass/Fail (two levels).
- Record the Initial # of criteria. This reflects how many rows will be seen in the Rubric (other than the Levels header and a final row for the Overall grade). You can add or remove criteria rows later if you need to.
Once you have set the Properties, scroll down and select the Save button.
Step 4
Select the Levels and Criteria tab.
Step 5
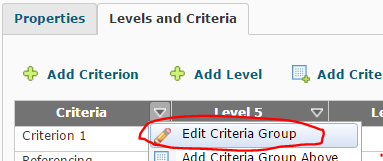
By default, the level names are Level 5, Level 4 etc. You will need to change the Level names to names you would like to use. At this point, you can also add your Criterion Descriptions. Select the arrowhead next to Criteria (left cell, top row), then select Edit Criteria Group.
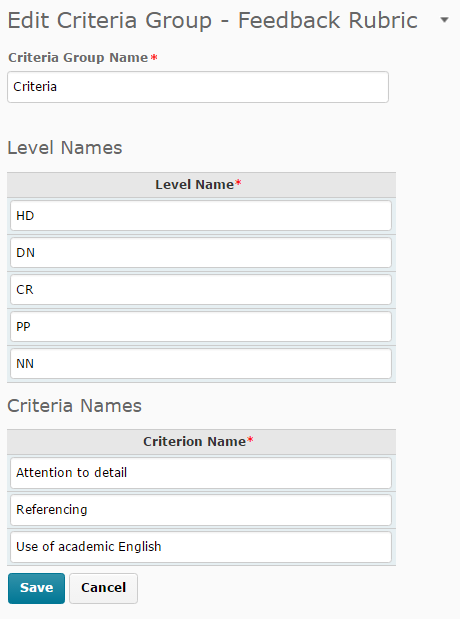
Replace the existing Level names with your own names, then add in the Criterion. For efficiency, you can tab between the fields. You can also paste text (e.g. from a Word document) into each cell using keyboard shortcuts or browser menu options. Scroll down and select the Save button when you have finished (you may need to scroll down to see it).
Step 6
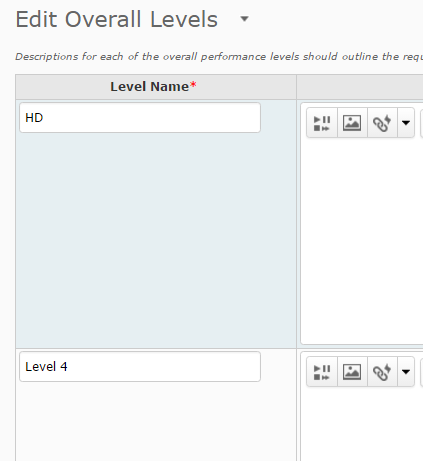
You will now need to edit the Level names in the Overall Score row (bottom row of the Rubric) to match those of the top row. To do this, select the arrowhead next to Overall Score (left cell, bottom row), then select Edit Levels.
Edit the Overall Level Names. There is no need to add a Description or Feedback. When you have finished, scroll down and select the Save button at the bottom of the page.
Step 7
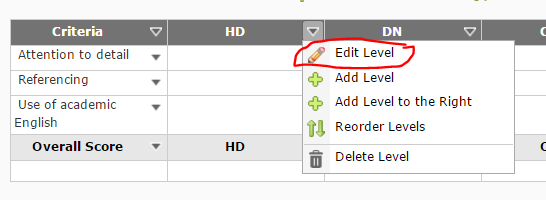
You can now enter the Level descriptions for each criterion. You can either edit all the criterion descriptions for the same Level (e.g. those in the same column) by selecting the arrowhead next to a Level and choosing Edit Level…
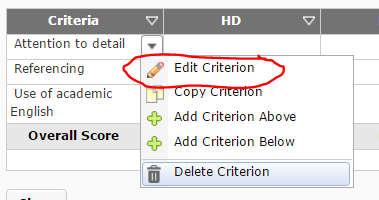
… or edit all the descriptions associated with one criterion (e.g. those in the same row), by selecting the arrowhead next to that criteria, then selecting Edit Criterion.
Whichever method you choose, type OR copy and paste in your descriptions into the Description field. You can add Feedback if you wish. A student will only see this feedback if you select this criterion level when marking their work.
Step 8
Continue entering the descriptions until your Rubric is complete. Remember to save your work by selecting the Save button (bottom left of the screen). Once your Rubric is finished, you will need to Finalise it and attach it to the relevant Assignment Submission Folder or Grade Item.


