Grading Solution: Grade a single assessment task comprising two or more items
This solution would suit scenarios like this:
- Students submit four items at different points, each to a separate Dropbox. Three submissions are each worth 10%. The fourth submission is worth 70% of Assessment Task 3.
- Students submit four items at different points during your unit, each to a separate Dropbox. Each submission is worth 25% of Assessment Task 3.
- Students complete 10 Quizzes. Each Quiz is worth 10% of Assessment Item 3.
- Students work in groups to create a Report. It is submitted to a group Dropbox and worth 70% of Assessment Item 3. Students then submit a personal reflection about the task to an individual Dropbox. This is worth 30% of Assessment Item 3.
Grading system and other requirements
This method requires the use of a weighted grading system. When marking, you will need to record a 0 for students who have not submitted work.
You will need to:
- Create one Category to represent the assessment task and use the options described here.
- Create one Grade Item per assessment item and use the options described here. You must link each Grade Item to the Category that you have created.
- Link each Dropbox/Discussion/Quiz with one of your new Grade Items. If students perform a task in class and do not need to submit items electronically, you can skip this step.
To see an example of what this solution might look like in the Grades tool, download this PDF.
When marking:
The Category Subtotal will calculate correctly only if you record a zero (0) for each un-submitted piece of work. Here are some instructions on how to mark un-submitted items with a 0 quickly.
Grading Solution: Grade a single assessment task comprising one item
This solution would suit scenarios like this:
- Students submit their work to a MyLO Dropbox. Their submission is worth 100% of Assessment Task 1.
- Students contribute to one Discussion Topic. Their contributions to the topic are worth 100% of Assessment Task 1.
- Students complete a Quiz. The Quiz is worth 100% of Assessment Task 1.
- Students complete a presentation in class. It is worth 100% of the Assessment Task. As no files will be submitted, you will use a Standalone Grade Item.
You will need to:
- Create one Grade Item and use the options described here.
- Link a Dropbox/Discussion/Quiz with your new Grade Item. If students perform their task in class and do not need to submit something electronically, you can skip this step.
To see an example of what this solution might look like in the Grades tool, download this PDF.
Attach a Rubric to an Assignment Submission Folder so that you can mark with it
Once you have created an electronic Rubric in MyLO, you can attach it to an Assignment Submission Folder. This post will show you how. Once you have attached the Rubric, you can mark with it.
Step 1
Before you finalise your Rubric and attach it, you must ensure that the Rubric is correctly set up. You may wish to return to the Rubrics tool and check the text and settings before finalising it.
WARNING
Once you have started marking with a Rubric, you must not edit it. If you do, you will lose any marks/feedback you have recorded in the Rubric to date. Please check your Rubric carefully before marking with it.
Step 2
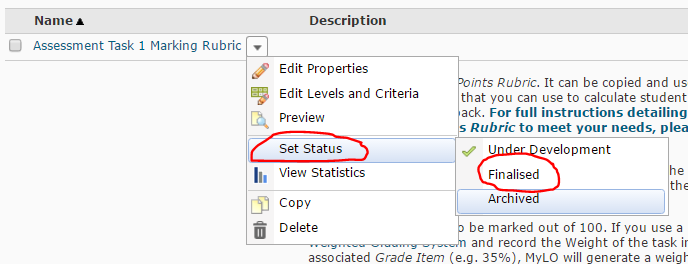
Select Rubrics from the MyLO toolbar, then locate your completed Rubric. Select the black arrowhead to the right of the rubric name. Select Set Status, then choose Finalised (a Rubric cannot be attached to another item unless finalised).
Step 3
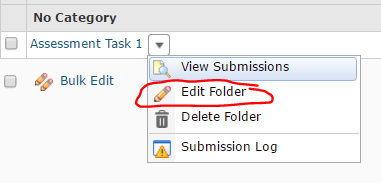
Select the Assignments tool from the MyLO toolbar. Locate the Assignment Submission Folder that you would like to attach the Rubric to. Select the black arrowhead next to the Submission Folder name, then choose Edit Folder from the menu.
Step 4
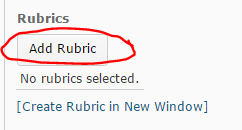
The Properties tab should open by default. Scroll down until you see the Rubrics heading. Select the Add Rubric button.
Step 5
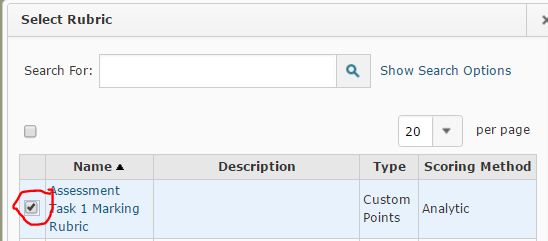
The Select Rubric window will open. Select a Rubric by checking the checkbox next to it, then select the Add Selected button (seen at the bottom of the window).
Step 6
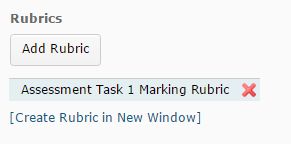
You should now see the Rubric name appear under the Add Rubric button. Scroll down and select the Save and Close button. If you have selected the wrong Rubric, select the red cross (the Rubric name will now appear crossed out), then select the Add Rubric button to select a different Rubric.
You can now start marking Assignment Submissions with your Rubric.
Attach a Rubric to a Grade Item so that you can mark with it
Once you have created an electronic Rubric in MyLO, you can attach it to a Grade Item. We recommend attaching Rubrics to standalone Grade Items that will be used to grade Discussions, or to keep track of work that is performed in class, like participation or presentations. This page will show you how.
We recommend attaching Rubrics directly to an Assignment Submission Folder, rather than to the associated Grade Item. If you need to attach a Rubric to an Assignment Submission Folder instead, you will find these instructions more helpful.
NOTE: One of the down-sides of attaching a Rubric to a Grade Item, is that the Rubric Score will not articulate to the Grade Item (as it does when used with a Assignment Submission Folder) automatically. When you finish marking a Rubric, make note of the Rubric total score, then record this into the Grade Item Score field.
Step 1
Before you finalise your Rubric and attach it, you must ensure that the Rubric is correctly set up. You may wish to return to the Rubrics tool and check the text and settings before finalising it.
WARNING
Once you have started marking with a Rubric, you must not edit it. If you do, you will lose any marks/feedback you have recorded in the Rubric to date. Please check your Rubric carefully before marking with it.
Step 2
Select Rubrics from the MyLO toolbar, then locate your completed Rubric. Select the black arrowhead to the right of the rubric name. Select Set Status, then choose Finalised (a Rubric cannot be attached to another item unless finalised).
Step 3
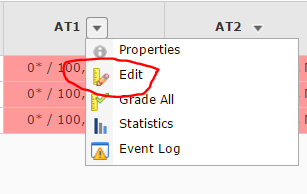
Select the Grades tool from the MyLO toolbar. Locate the Grade Item that you would like to attach the Rubric to. Select the black arrowhead next to the Grade Item name, then choose Edit from the menu.
Step 4
The Properties tab should open by default. Scroll down until you see the Rubrics heading. Select the Add Rubric button.
Step 5
The Select Rubric window will open. Select a Rubric by checking the checkbox next to it, then select the Add Selected button (seen at the bottom of the window).
Step 6
You should now see the Rubric name appear under the Add Rubric button. Scroll down and select the Save and Close button. If you have selected the wrong Rubric, select the red cross (the Rubric name will now appear crossed out), then select the Add Rubric button to select a different Rubric.
You can now start marking with your Rubric.
Create a Grade Item in the Grades tool
A Grade Item is a column of the Grades tool dedicated to tracking the grades associated with a particular task. It may be associated with a MyLO assessment tool like a Dropbox or Quiz, or it could be a standalone item used to track classroom participation or presentations.
These step-by-step instructions explain how to create a Grade Item.
Create a Category in the Grades tool
A Category is used to organise Grade Items into groups in the Grades tool. It can convert the sum total of all the Grade Items in the Category in accordance with specified weightings. The outcome of this calculation is seen as a Subtotal. Categories can also be set up to drop a specified number of items with the lowest or highest grades, or to drop ungraded items. To learn more about Grades and Categories have a look at the documents: Grades Primer and in particular the document Grades and Categories.
To create a Category:
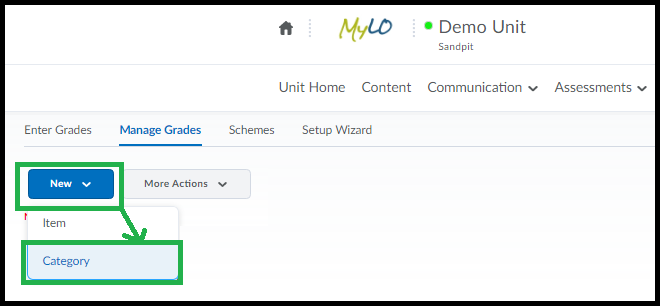
Step 1 – Click on ‘Grades’ and go to the ‘Manage Grades’ tab.
Step 2 – Click the ‘New’ button at the top of the page and Choose ‘Category’ from the options.
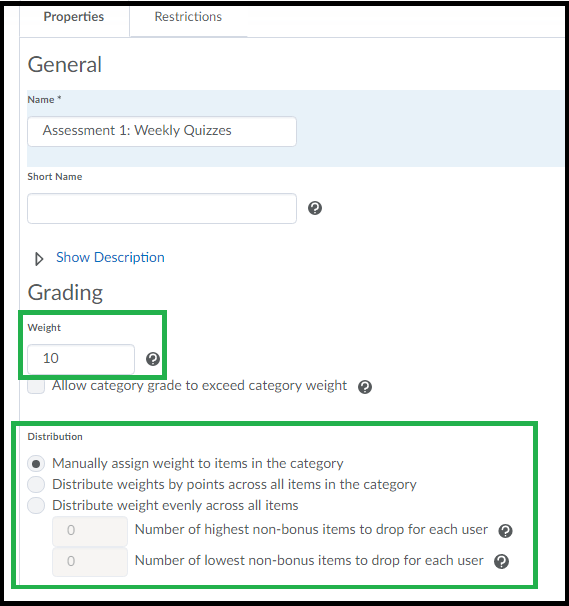
Step 3 – Give the category a name that states clearly what it is. You can also optionally set a ‘short name’ (how the grade will appear in your ‘enter grades’) and a description.
Step 4– Choose the ‘Weight’ for the category (ie, what will the total of the grades inside it will be worth overall).
Step 5 – Choose a ‘distribution’ option. For more information about what they do see the document ‘Grades and Categories‘ which explains in some further detail. If you choose to distribute the weights of grades evenly (option 3) you can also optionally choose to drop 1 or more highest or lowest grade item. Grade items that are ‘dropped’ are shown in the ‘Enter Grades’ page with a (!) icon.
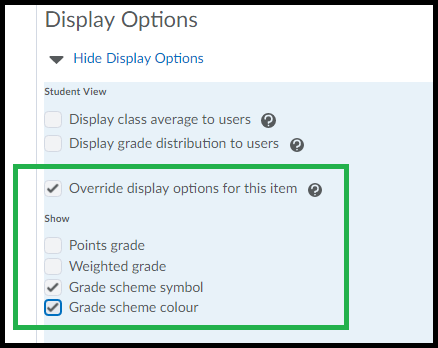
Step 6 – If you want specific view settings for students you can choose them here, you may need to set the option for ‘Override the default settings’ if you wish to use different settings to the default.
You can even choose to un-select all of the options. If none are chosen- the Category will still show in the student’s gradebook as an ‘organisational’ item, so this can be a handy way to organise a ‘complex’ gradebook even if you choose not to use the subtotals.
Step 8 – Click ‘Save and Close’.
This then adds the category to the bottom of the list of your grades. You can now either create new grades and assign them to the category or you can edit existing grades to add them to the category.
Grading with different MyLO tools
This table provides an overview of common MyLO tools, and their relationship to Grade Items. It also takes into account electronic Rubrics, Turnitin and Grademark.
| Dropbox | Discussion Topic | Quiz | ePortfolio | Standalone Grade Items |
|
| Attach a Grade Item or use a standalone Grade Item? | Attach a Grade Item | If you are not using a Rubric*, or assessing numerous small group discussions*, attach a Grade Item. |
Attach a Grade Item | Create a Dropbox Folder for students to submit to. Attach a Grade Item to the Dropbox Folder | Use for performances that cannot be submitted, like tracking participation |
| Can Turnitin be used? | Yes | No | No | No | No |
| Can Grademark be used? | Yes (depending on type of file submitted) | No | No | No | No |
| Attach a MyLO Rubric | Attach it to the Dropbox. | You can use a Rubric, but the grading process will be quite complex. *Use a standalone Grade Item instead of attaching a Grade Item to the Discussion. Attach the Rubric (if using) to the standalone Grade Item. | It is possible to use a Rubric for feedback purposes; however, typing directly into the feedback fields within the Quiz tool itself is easier and more efficient. You can attach a feedback (text) Rubric to a Quiz OR a Grade Item associated with a Quiz, but how you mark and where students see the Rubric will differ accordingly. | Attach it to the Dropbox. Requires the use of two monitors – one to view the Rubric, and another to view the students’ work. Does not work well in Google Chrome. | Attach the Rubric to the Grade Item. Best used for feedback purposes only. |
| Mark and provide feedback to a group | Dropbox must be set up as a Group Dropbox when it is first created. | N/A | N/A | N/A | N/A |
| Alter an individual group member’s grade | Do this in the associated Grade Item. Direct students to look at the Grades tool for their final results for the task. | N/A | N/A | N/A | N/A |
Do I need to create different Grade Items and Categories to represent different cohorts of students?
We do not recommend creating different Grade Items or Categories for different cohorts, unless the submission methods used for each cohort are substantially different (see scenarios on next page).
Markers can easily change the marking environment to view a specific group of students. This means there is no need to create separate Dropbox Folders or Grade Items to differentiate between cohorts (in most cases). You can choose to view and mark only External or Internal students. If you have set up tutorial/workshop groups using the MyLO Groups tool, you can choose to mark students in a particular tutorial/workshop group. You can do this in any environment that features the View By tool. These instructions will show you how.
Some examples of scenarios that require the creation of different Grade Items to represent different cohorts
- All students must deliver a presentation. Face-to-face students do this in class. They also respond to questions about their presentation in class. The marker records F2F students’ grades for both activities in a single standalone Grade Item in MyLO. Distance students must submit a presentation to a Dropbox folder. Thereafter, their presentations are shared in a Discussion Topic. They must reply to students’ queries about their presentation. The marks for their replies are recorded in a Grade Item connected to the Discussion.
- Students must contribute to small group discussion tasks over a period of time. Each group requires its own Discussion Topic; therefore, a different Grade Item has to be created to connect to each group’s Topic
Even in these scenarios, there may some creative ways to avoid the creation of multiple Grade Items. For example, in Scenario 1 all students could be required to submit their slides/notes to a Dropbox prior to their presentation, and all marks could be recorded in the same Grade Item.
We suggest discussing different scenarios with a member of the Flexible Education Team. It is best to do this whilst designing your assessment tasks, as small changes made at this point can make a big difference to the organisation and complexity of your Grades tool down the track.
Change how you see the Grades tool
You can easily change how you see grades in the Grades tool. For example, you may wish to see only the Grade Scheme, or you can choose to see Points, Weighted and Grade Schemes presented. These instructions will show you how.
Note that these changes will apply only to YOUR view of the Grades tool. Tutors and other colleagues who wish to see the same view, will have to follow the procedure themselves. You will need to follow these instructions to change the way that students see their Grades.
Should I use a ‘weighted’ or ‘points’ grading system?
Before you start building your Grades tool, you should make a decision about the grading system that you’re going to use. This decision will impact on the options you will have available to you when setting up Categories and Grade Items. You can download a printable version of this explanation (complete with pictures) if you would prefer to read off screen.
Once you have made a decision, follow these instructions to check your current grade system and change it if necessary.
Points system
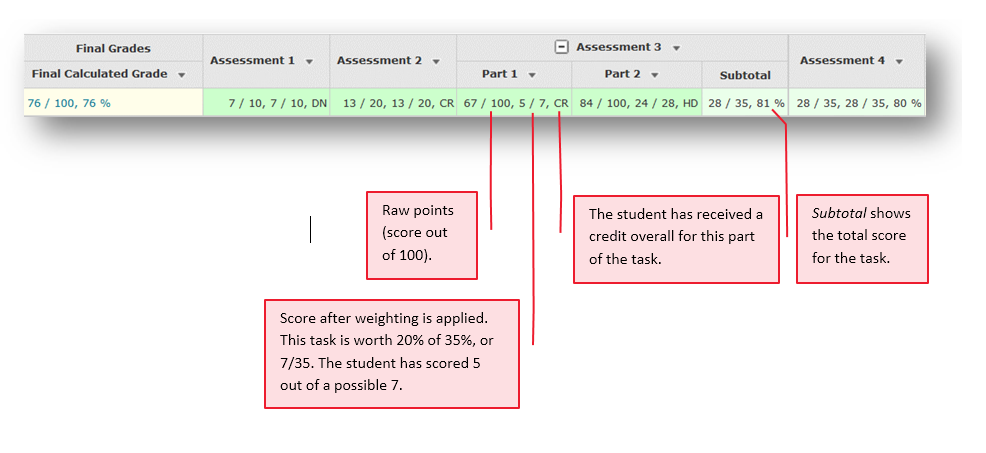
The points system is simple, but it does have limitations. It does not suit scenarios where multiple Grade Items contribute to the same assessment task. Furthermore, the Final Grade Calculation, which shows a student’s progress on marked assessments to date, will show only a percentage or UTAS Grade when this system is used. A points system suits scenarios in which you have only one Grade Item per assessment task for all students. The image below shows a Grades tool using a points system.
Weighted system
Using a weighted system provides you with more flexibility. Firstly it allows you to mark a Grade Item out of 100 points. MyLO can then calculate the overall grade according to the weight allocated to the Item. Weightings can also be used to determine the contribution that a particular Grade Item makes to a Category. For example, let’s say you have Part 1 and Part 2 of Assessment 3. Each part is marked separately, but you need an overall score for the assessment. Assessment 3 is worth 35% (35/100) of the unit. You can set up Part 1 to be worth 20% of the assessment task, and Part 2 to be worth 80%. The Category Subtotal will calculate the overall grade for Assessment 3.

