Creating a VideoNote video in MyLO
VideoNote is a tool included with MyLO. It allows you to capture short videos of up to three (3) minutes using a webcam and microphone*. The tool is available anywhere that you can see the WYSIWYG (What You See Is What You Get) editor in MyLO, including: HTML pages; Discussion descriptions and posts; Quiz questions answer options and feedback; the Announcements, Assignment Submission Folder General Feedback field; and more. To learn how to use VideoNote, refer to the How to section below or download this PDF from the MyLO Support Team. The PDF also includes instructions showing how to locate and embed an existing VideoNote.
FAQs
- What is VideoNote best used for?
VideoNote is best for one-take, short videos, such as module introductions, short explanations/stories to illustrate concepts, and provide video feedback to students. - Can I capture my screen activity with VideoNote?
No. VideoNote only captures webcam video. If you’d like to capture activity on your monitor (e.g. a PowerPoint presentation), use Echo360 ALP Personal Capture. - Can students download a VideoNote video?
No. VideoNote videos are streamed, meaning they must be viewed online. This is generally OK, as the videos are quite short. Videos uploaded to Echo360 ALP can be downloaded or viewed online. - Can I edit a VideoNote recording?
No. VideoNote is designed for short, one-take videos. If you wish to create videos that will need editing, use Echo360 ALP Personal Capture.
How to
NOTE: You must use a device with a recent version of Adobe Flash Player enabled in order to record VideoNotes at this time. This generally means that you will not be able to create a VideoNote
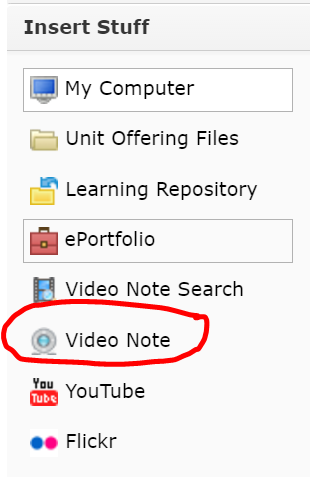
You can use VideoNote anywhere you see the WYSIWYG editor (usually when you are creating something for the first time or editing it). Specifically, you will need to see the Insert Stuff tool. It will be the first tool on the left hand side, and will look like this:
![]()
The Insert Stuff window will open. Choose the Video Note option from the side menu.
You will see a preview of your webcam video appear on screen. NOTE: You may be prompted to Allow something at this point. If so, check the Allow option. When you’re ready to record, click on the New Recording button to start recording. The recording will start straight away.
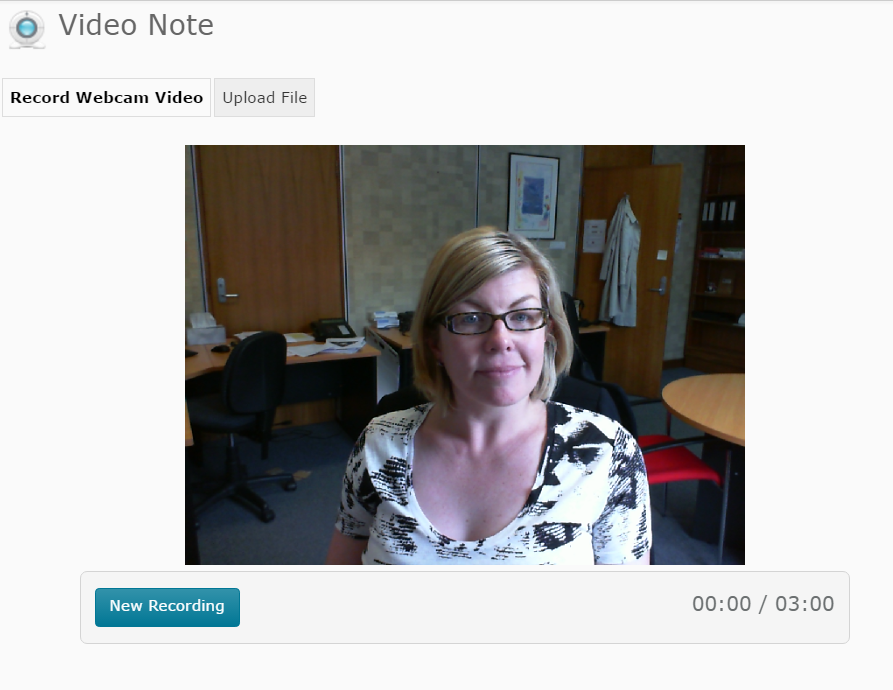
As you’re recording, you will see the time count down towards the bottom right of the window. When you’re ready to stop, click on the Stop Recording button. Note that the recording will end automatically at 3:00 duration.
![]()
As soon as you click Stop Recording, a preview of the video will play. If you’re not happy with it and would like to record again, click the New Recording button. If you’re happy with the video, click on the Next button that appears to the bottom left of the screen.
![]()
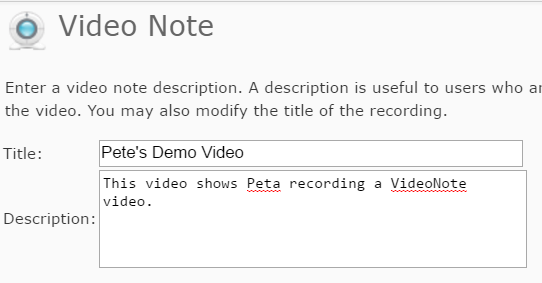
You will be prompted to add a Title and a Description. IMPORTANT: Make note of the title, as it can be very useful when searching for your existing VideoNotes in the future. The Description is shown to users who cannot see the video due to browser limitations.
Click the Next button. You should now see a preview of your video. You may not see the preview immediately, as it can take a while for the video to process. If you see a screen like this…
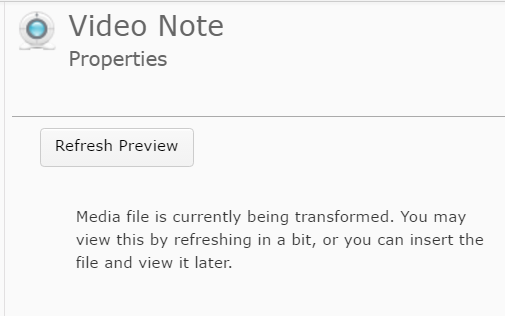
and you want to see a preview, wait a few moments and click Refresh Preview. If you’re happy to continue, click the Insert button that appears towards the bottom left of the window.
![]()
Your video (or the ‘processing’ message) should now appear in the page/description/post/field that you are editing. Once you have finished editing, click Save/Save and Close/Publish.
*Most webcams include a microphone, however, these microphones are not very useful for recording in environments with a lot of background noise (e.g. a shared office). They also tend to have a limited range, so are not very good if you tend move away from your computer (e.g. where the web cam is positioned). Using a USB headset is a good alternative to a webcam microphone, and tends to capture higher quality audio without the background noise. Consult your local IT Hub to ask about acquiring a USB headset.
Comments
This post doesn't have any comments