Category
Facilitation and Class Management
Technical Issues Handy Hints
This article discusses common technical problems with MyLO and associated software and some handy ways to help!
Students can’t hear me in online room? (Blackboard Collaborate)
- While the Online Rooms are generally reliable the more common issues encountered with Online Rooms are around audio not working (lecturer or student).
- I have personally found that when a USB headset has worked in the past but is not working suddenly – unplug it from the USB port and plug back in. That sometimes fixes the issue.
- Consider having a ‘test and see’ session before the official start of Online Tutorials so that you and your students can test your equipment/browser etc.
- If one browser is not loading the room, try another. You may find particular browsers more reliable than others. Chrome is recommended however I have personally also found Firefox to be very reliable.
- Ensure your browser and any associated software (ie, Flash player) are up to date.
- It is hard to diagnose student audio problems, each set up is quite different – consider having some useful guides set up in your unit so that they can do some troubleshooting before contacting you or ITR. Ask your Ed-Tech to help set some up! (these are in the TSBE template by default).
Students can’t get to Grademark Feedback to view comments?
- Students won’t see their Grademark Feedback until the assignment is set to “published”.
- Students may have trouble getting into Grademark for Units that have gone past their End Date. (ie past the end of semester). This is a known issue for which the solution is, currently, for staff to go into the assignment & download the Grademark comments as PDF. For this reason it is useful to remind students to download any feedback they wish to keep before classes end.
Student can’t submit subsequent assignment files to a submission area?
- Occasionally staff may have students who have submitted one file to the Assignment Submission area then state they can’t submit again.
- Sometimes this is because they are not sure how to go back to do so.
- Sometimes it because the assignment settings only allow one submission.
- Sometimes it is because the ‘end-date’ has been reached.
- Check settings for submission and/or consider providing some help files. For students who are re-submitting files they need to click on the assignment name as they did the first time, many get lost when they click the link under ‘submissions’ instead.
Student’s file didn’t go through Turnitin?
- This is one of the most common staff questions regarding Turnitin.
- When a file does not go through the system it will show as a triangle icon with ! where the report icon would normally be.
- Hover your mouse over this icon for a small explanation of the issue.
- If the issue is “File does not contain valid text” it means the file cannot be read as text by the system. For example a PDF that has been created by scanning text with a scanner, or a scanned hand-written document. Your student will need to submit a file with electronic text – like a word document.
- Issues like “Could not contact server” can sometimes be resolved by clicking the small icon to the right of the ! This will resubmit the file to Turnitin.
- If you see “Invalid File type” or similar – it means the file is not the required type of file (ie, it might be a Zip or Video). Your student will need to resubmit an appropriate file.
- If the file shows a score of 0% and doesn’t load up the report in Turnitin you will need to lodge a service desk ticket.
Student states their Quiz crashed halfway through?
- By far and away the most common technical issue with quizzes is working out whether the students claim of the quiz crash is accurate and how to allow them another go.
- There is a way to view the “event log” in any quiz attempt. This shows when the quiz was entered, when each question was saved and whether the quiz was exited normally. Get to know how to access and interpret this log. [Click here for more information]
- You can resolve issues with attempts that are ‘stuck’ by following the instructions here [PDF].
- When allowing another attempt of a quiz the ‘Special Access’ now allows you to keep any original attempts by over-riding the maximum attempts allowed. [PDF]
Handy Tips from Common Student Discussion Questions
This page details common student questions and details strategies you can use to alleviate the number of questions you receive via MyLO Discussion posts and emails.
QUESTION: Will lectures be recorded? Where are the recordings?
- Include the following information in your Unit Outline (perhaps under Details of Teaching Arrangements).
- whether or not lecture recordings will be captured;
- when recordings will be made available (usually within an hour of a face-to-face lecture ending);
- how recordings will be made available (e.g. via Echo360); and
- where students can access the recordings. Be specific about the location of recordings. ‘You can access recordings in MyLO’ is fairly vague. ‘You can access recordings from our unit MyLO site by selecting Content from the toolbar, then select Recordings from the Table of Contents‘ is far more specific.
- Ensure that your students can find the recordings easily in MyLO by placing the link/s in an obvious location and labelling the links/s clearly. Many templates include a specific folder in Content in which a link to the unit’s Echo360 section can be placed (for example, in a folder called Recordings). Alternatively, you might like to provide links to individual recordings when relevant, for example, in Module or Weekly pages in Content. Try to make the link names meaningful: by default, when you create a link to a Section or individual recording (Class), MyLO will use the link title, MyMedia Recordings (ALP). You may wish to change this to something like: Access recordings for this unit or Access this week’s lecture here.
- If you only intend to provide a link to a Section, instead of links to individual recordings, consider renaming your lecture recordings in your Echo360 Section, and placing them in a logical sequence.
- Many students request downloadable recordings: the setting to allow downloads is on by default but the option appears only if you give students access to the ‘list of all recordings’. Talk to your local support team for more information.
QUESTION: Why is there no sound in the lecture recording/why is there no recording this week?
- Get students in the classroom to remind you to take the microphone off mute and switch your radio microphone (if using)!
- Record with both the lectern microphone and radio microphone (where available). This is especially important if you tend to move around the room or away from the lectern.
- Have a back-up plan in place for recordings that lack quality (or any) sound, or for recordings that fail. For example, record the session with a small recording device. and let students know what the plan is — i.e. let them know that if a recording fails for some reason a backup will be made available within (X) days.
- Check for past recordings that are high quality. They could be used as a back-up for failed lecture recording. You can download these from an old unit Section or share them from you Library to your unit’s Section. Your local support team may be able to help you edit out extraneous content to make a succinct, reusable recording.
- Consider flipping your approach and pre-recording a sequence of short lectures that are used across several iterations of your unit.
- If something does go wrong, let the students know as soon as possible via Announcement or Email. Let them know your back-up plan and when they can expect to see the replacement materials online.
QUESTION: What is the format of Assignment X?/ What is included in the word count? / How many pages? (etcetera)
- The most common student questions relate to assessment.
- Look through Discussion posts (or old emails) from past units to see if there are FAQs that you can address in advance. Include answers to these FAQs with the details of an Assessment Task. Many MyLO sites include an Assessments or Assessment Resources folder in Content that you can add this sort of information in the form of a PDF or web (HTML) page.
- If you have taught a few iterations of the unit (or similar units) you may be able to identify common spelling, grammatical, formatting or referencing errors that students should avoid. You may wish to provide examples of these and how to avoid them.
- If your assignment has specific formatting requirements, it is handy to provide a student guide together with other assignment details. Some staff have provided Word Documents as templates (e.g. with margins, styles and headings already set up).
- There are frequent requests for ‘exemplar’ assignments. A good-quality example of the writing genre and the format required may be useful to those unfamiliar with a certain approach to writing. There are many great, free resources on the web that may find it useful to provide links to.
QUESTION: What is included in the word count? Is there a leeway on the word count?
- This is a very common question! Make it clear (in the Unit Outline and in any related Content folders in your MyLO site) exactly what is included in the word count, and the leeway (e.g. 10% under or over) that you may be willing to accept.
QUESTION: How do I submit my assignment? Where can I submit my assignment?
- Check that you have set up an Assignment Submission Folder for collection of the Assignment.
- Check that the Start, Due and End Dates for the Folder are correct: when folders are copied over from a past delivery of a unit, the old dates still apply.
- Though students can usually access the Assignments tool by selecting Assessments, then Assignments, from the MyLO toolbar, this may not be immediately obvious to them. You can easily include a direct link to an Assignment Submission Folder in a Module (folder) in Content, Announcement, Discussion post or HTML page using the Quicklinks tool.
QUESTION: Where is the grade/feedback for Assignment X? When will we get our grades?
- Provide an estimate of when students can expect to find their grades for each assignment and where they will find feedback in MyLO. If you don’t know in advance, tell students you will let them know as soon as possible. A good way of doing this is to send out an Announcement or Email shortly after the due date, thanking students for their submissions; advising them of when they can expect their feedback. Once you have completed marking and moderation, you may wish to alert students to the availability of their grades and feedback using the same method.
- Students may find it difficult to locate their Grades and Feedback, especially if they are new to online grading. The templates linked here include step-by-step instructions, including screenshots, to help your students locate their results: for assignments submitted to an Assignment Submission Folder; for a Quiz.
- It is useful to keep grade delivery consistent across units in a program. Students who are used to going, say, the Grades tool for most of their units will be surprised not to find them there in other units.
- Check that you have published (Assignment Submission Folders) and/or made visible the relevant Grade Item.
- Students often report problems accessing marked-up feedback in Grademark/Feedback Studio. This post details some common technical issues to look out for when releasing Feedback Studio feedback.
QUESTION: Who wants to join my group?
- For units that have group work, you may find lots of students requesting group members in your class Discussion area. Don’t let these sorts of posts clog up your Discussion!
- Consider creating a separate Discussion area for students searching for group members.
- Alternatively, you can create Groups for students to sign-up to. You may wish to ask your local support team for assistance with this.
QUESTION: I can’t see X content item/Where is the link to X?
- There are a range of potential triggers for this question: the name of a link may not be clear; the item may be restricted with a Start or End date; the item may only be available to a certain Group of students; the item may be in Draft mode; or the students need to complete an activity before they are given access to the item.
- Use the Descriptions attached to Content Modules (folders) or items to explain when or how students will be given access to content there. For example, ‘Remember: You will not see next week’s module until you have completed this week’s Quiz‘). If you use HTML Pages, place a warning (perhaps using one of the Attention objects included with the ICB Template) above a link that has restrictions applied.
- Keep filenames clear and logical, or rename the file once it is uploaded to a Module or HTML Page
- Keep your Content area well organised. Consider using Module (folder) names and Sub-modules (sub-folders) that make the structure and sequence of content clear. Many students appreciate content being organised by week or module.
QUESTION: When/where is the Online Tutorial/Web Conference?
- Online tutorials are not listed in the official UTAS timetable. Announcement advising when and how sessions times will be determined. Some staff like to run a survey inviting students to nominated their preferred time (from a selection of three or four possibilities). Your local support team may be able to assist with this.
- Set up a Web-Conferencing folder and include a link to the Web Conferencing tool there. Your local support team may have a suite resources that they can bring in to your MyLO unit, to help students set up their computer/device before your first session begins.
- Choose an access method and stick with it: get students to access the Web Conferencing tool and click the Join Room button every time there is a session (this takes students to your unit’s 24-7 room); or set up a Session (with time and date parameters) for each class.
Tool Review: Web Conferencing (Blackboard Collaborate Ultra)
What does it do?
Web comferencing allows staff and students to meet in real time in a virtual (online) space. During a session, participants can use text based chat, audio chat and/or video to communicate. An electronic whiteboard allows for the sharing and live annotation of PowerPoint presentations (though video and animations embedded in PowerPoint presentations will not work). When participant internet connections are reliable, live presentations of your computer screen can also be shared, allowing you to show students through a website, demonstrate the use of an Excel spreadsheet, annotate a Word document and so forth. The moderator of a session has some control over what the participants of the room are able to do with the available tools. The moderator is also able to record all or part of a session for later viewing. You can even invite an external presenter to join the session, even if they are not a UTAS staff member or student.
At present, the Web conferencing tool used at UTAS is Blackboard Collaborate Ultra (often referred to as Ultra). Ultra works on Mac and PC, and mobile devices (when the free Blackboard Student app is installed). Skype for Business is sometimes used, but this tends to be reserved for meetings between UTAS staff.
Useful terminology
- Room: an online space dedicated to your unit. The room is available anytime whilst the unit is active. Many staff refer to this room as a web room to help students differentiate between synchronous face-to-face activity, and synchronous online activity.
- Session: the term used to describe the activity that occurs in a room when the moderator and participants meet together. By default, your unit will have its own room. You can pre-book sessions to take place between set dates and times. These occur in addition to your unit room.
- Moderator: the person/people in control of permissions and functionality in the room. Moderators can remove other participants, control which tools participants can use, change the role of participants (to presenters or moderators), share materials via the room whiteboard and start a recording.
- Presenter: has the same permissions as a participant, but has the ability to share items on the room whiteboard.
- Participant: any person participating in a session that does not have the permissions of a moderator or a presenter.
What is Web conferencing best for?
- Real-time meetings between distributed learners.
- Virtual tutorials, workshops or lectures where interactivity between participants and/or moderator is desired. If a session is more for ‘show and tell’, a video recording is often more suitable than a web conference.
- Student meeting rooms to help support collaborative group work between students.
- Drop-in information sessions, or Q&A sessions about forthcoming assessment tasks.
- Guest lectures, where you would like the guest presenter to respond to student queries (these can be easier to run in a web conferencing setting than in a physical lecture theatre).
Capabilities and tools
Mark with a Text Only (feedback) Rubric
A Text Only Rubric has no points associated with criterion and levels. Unlike a Custom Points Rubric, this type of Rubric will NOT calculate a score or Overall Level for you. You must select a level of achievement against each criterion, then specify and Overall Level.
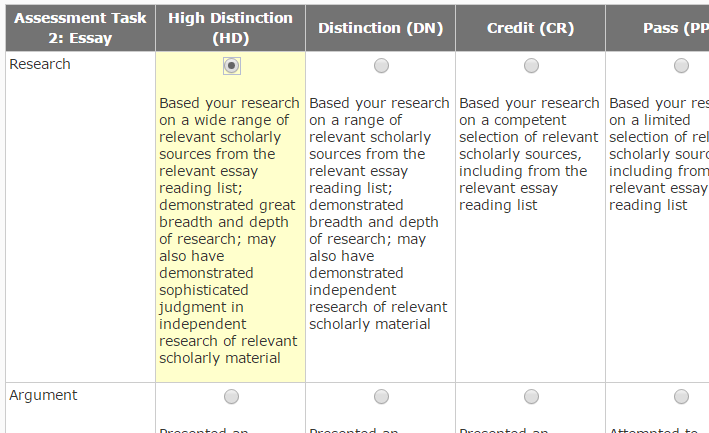
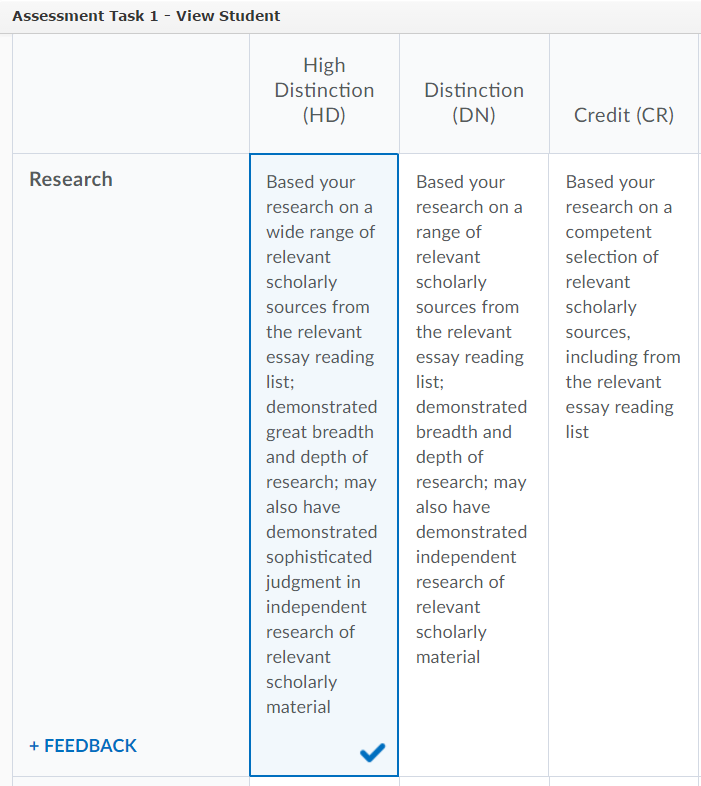
Please note that the ‘look’ of a Rubric may change depending on whether you are marking from an Assignment Submission Folder or from a Grade Item. We have represented this by providing two screen shots for each instruction: the view from an Assignment Submission Folder is always presented in the first image; the view from a Grade Item is always presented in the second image.
Please note that these instructions do not explain how to access a Rubric. You can see how to access a Rubric from an Assignment Submission Folder here, or from a Grade item here.
Choose a level for each criterion
Choose a level for each criterion by clicking on it. When marking a Rubric from an Assignment Submission Folder, you will notice that the selected level is highlighted by a selected radio button (see first image). When marking from a Grade Item the selected level will be highlighted, and a small check mark will appear in the bottom right corner (see second image). To change the level, simply click on a different level.
Edit the feedback associated with a level
If you wish to provide a student with feedback in relation to a particular criterion, first select the level. You will notice that an editing icon appears. When marking from an Assignment Submission Folder, this icon will appear in the far right column (see top image). When marking from a Grade Item, you will need to select the + FEEDBACK link that appears in the far left column (see bottom image).
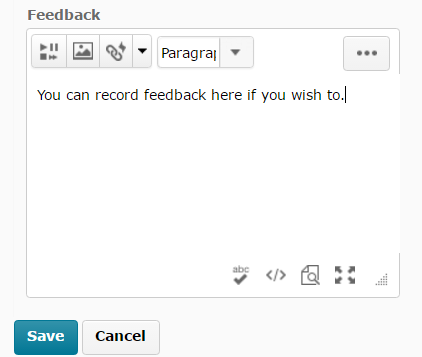
The editing views are slightly different. If you are marking from an Assignment Submission Folder, a new dialogue box will open. Here, you can record feedback if required (see top image). If you are marking from a Grade Item, you will see a Criterion Feedback field open at the bottom of the selected level. Type in your feedback, then select DONE to save it and keep marking.
From time to time, remember to click the Save button to save your work (appears underneath the Rubric).
Choose an Overall Level
Once you have chosen levels against each criteria, you will need to select an Overall Level. To do this, select one of the level fields in the bottom row of the Rubric.
Save the Rubric
- If you’re marking from an Assignment Submission Folder, uncheck the Transfer rubric feedback to general feedback for the assignment option (this option is not very useful).
- Finally, select the Save & Record button.
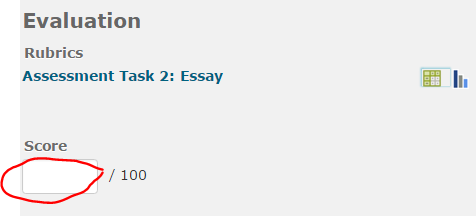
The overall score from the Rubric will not be reflected in the Evaluation Score field in an Assignment Submission Folder (see first image) or in the Grade field in a Grade Item (see second image). You will need to record the score manually. Remember to Save your work after recording the score.
Mark with a Custom Points Rubric (generates a score)
This post covers marking with a rubric that has been set up as a “Custom Points” rubric and that has been attached to either an assignment, discussion or grade item.
A Custom Points Rubric has points associated with each criterion and level of the Rubric. It calculates a total score (and overall level) for a student by adding the points they have scored against each criterion. You are then able to fine-tune this score by overwriting the default scores for each criteria/overall.
This post doesn’t cover setting up the rubric. If you have not done so – set up your rubric following these instruction: (Create a custom points rubric).
To access the rubric for each tool:
Assignment: Click “Evaluate” (or ‘draft saved’) on the right side of the screen in the assignment. The rubrics are then shown as links on the right-side menu area.
Discussion: Click the [v] icon next to the Topic you are assessing then choose “Assess Topic”. From the list of students shown click “Topic Score” and the rubric is shown on the top of the window that loads.
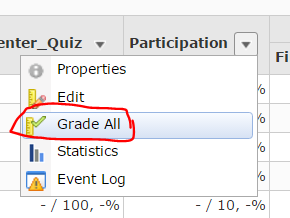
Grade Item (ie, directly into the gradebook): Click the [v] next to the name of the grade and choose “Grade All”. From the window that loads you will see a link to the rubric on the right-side column for each student row.
Note: The Rubric tool will save your work as you go. It is also not possible to edit the rubric in the rubric tool once you’ve started marking, so be sure to preview it in the rubric tool before you start marking to ensure it is correct.
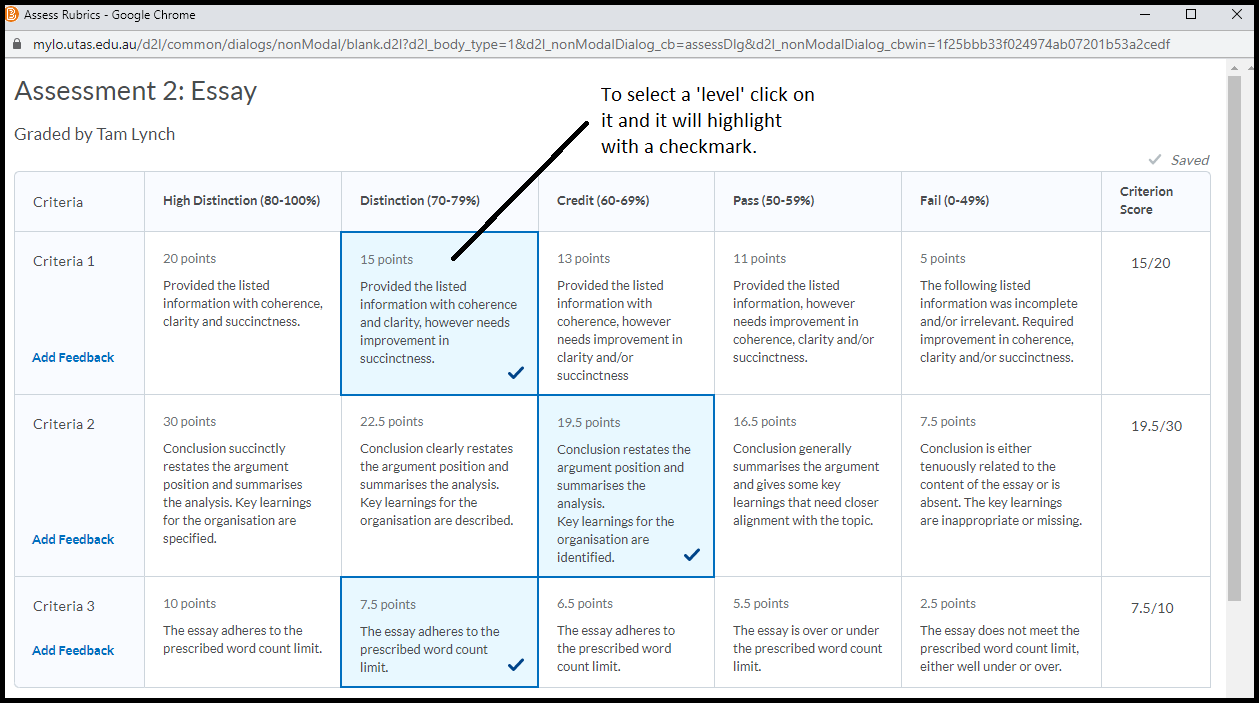
Step 1: Click the ‘level’ for each criteria that best represents the Feedback you wish to provide to students about their work.
The rubric tool is essentially a “feedback” tool – useful for you to calculate a score but primarily the idea is to provide students with useful informative feedback about why the score was arrived at.
The “default” score associated with this level (as set up in the rubric tool) is then shown on the right of the rubric window. You may need to resize this window if you have a large rubric, or scroll sideways to see it.
Step 2: Edit the points and feedback associated with a level if required.
Once you’re happy with the criteria levels you’ve chosen to provide to students – you can then alter the score associated with either each level OR the overall score that was calculated.
To edit the score for an individual criteria click on the score as shown on the right of the rubric. Type your new number in and hit enter/return or click elsewhere. Your new score will be highlighted with an asterix to indicate the default was changed. The ‘x’ shown next to the new score will return this score to the default.
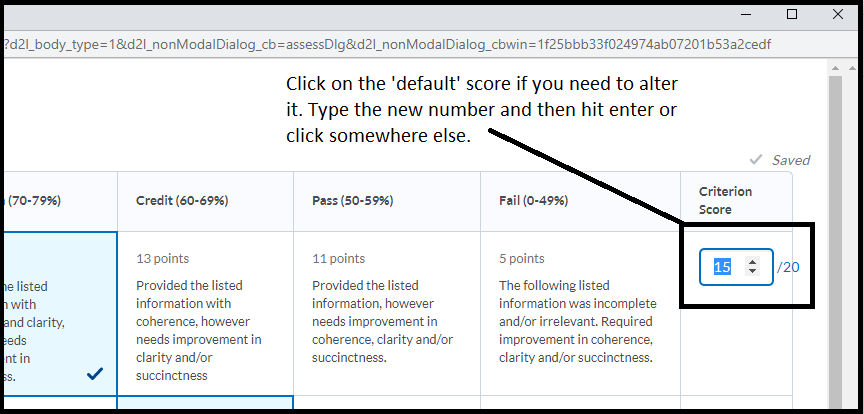
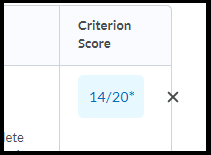 (Showing the score was changed from the default, the X returns the score to the default)
To add written feedback click the ‘add feedback’ link on the left, a box will appear for you to type into. Please note, once you add written feedback here it stays put on the page. Don’t click the X unless you want to wipe what you’ve written*.
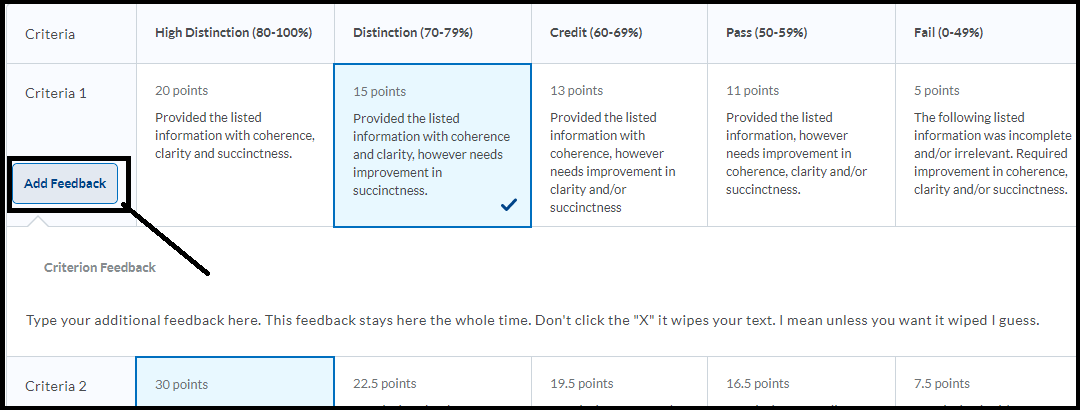
Step 3: Check the total at the lower part of the rubric. You can also overwrite this score by clicking on it & typing a new score. You can overwrite the default chosen ‘level’ if your rubric has them – click on the new one to overwrite the default.
Step 4: Click “Close” button at the end of the rubric to finalise the process. Double check the correct score is sent to the ‘score’ field of the tool you’re working in. If it doesn’t – it usually means you have missed a criteria.
* Don’t ask me why it was designed like that, I have no idea why the standard computer logic of x=close was broken for this tool – but here we both are, sighing loudly and reaching for the schnapps.
Access a Rubric from a Grade Item
You may need to mark directly into a Grade Item in the Grades tool. This generally happens when the ‘product’ that students will be assessed on cannot be submitted to an Assignment Submission Folder. For example, you may be assessing student participation or a presentation delivered face-to-face. A Grade Item is often also used to mark contributions to online Discussions. These instructions will show you how to access a Rubric when marking a Grade Item.
Step 1
Open the Grades tool by selecting it from the MyLO toolbar.
Go to the “Enter Grades” tab.
Locate the Grade Item that you wish to mark. You may need to scroll sideways to find it. Select the arrowhead to the right of the Grade Item name, then select Grade All from the menu.
Step 2
The Grade Item page will open. Scroll down until you see the list of student names. TIP: You can filter the names you see by searching for a specific student name OR selecting a specific Group of students. Next to each student’s name, you will see several cells. The first is the Grade cell, where you can record the student’s grade (as a score). The fourth is for Feedback. Clicking on the speech bubble icon in this cell will allow you to add general text feedback for the student to read. The fifth cell, Assessment, contains an icon that will launch the associated Rubric. Click on the icon to launch the Rubric.
Remember to SAVE on each page!!
Instructions showing how to mark with a Custom Points Rubric (generates a score) are available here. Instructions showing how to mark with a Text Only Rubric (for feedback only) are available here.
Mark Using Rubric from an Assignment Submission Folder submission
Step 1
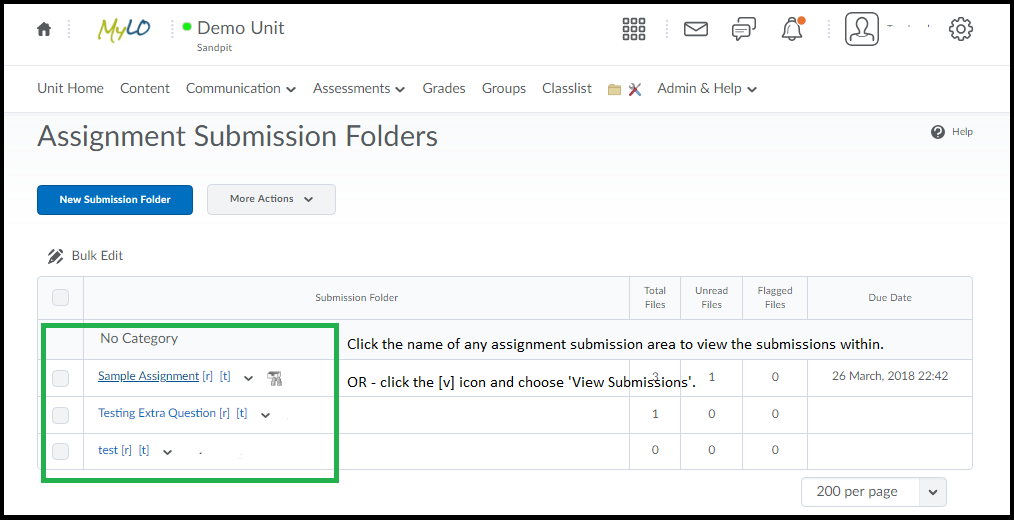
Go to the Assignments tool from the toolbar.
Click on the assignment you wish to mark.
Step 2
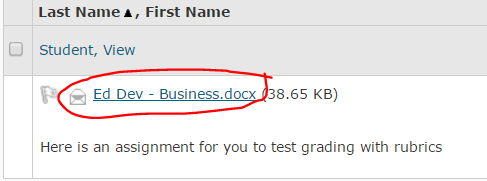
A new page will load. Scroll down until you see a list of student submissions. The student’s names will appear, followed by the files they have submitted. You can view an individual file by clicking on the file name (this is usually the quickest option, especially if students have submitted cover sheets which you do not have to mark).
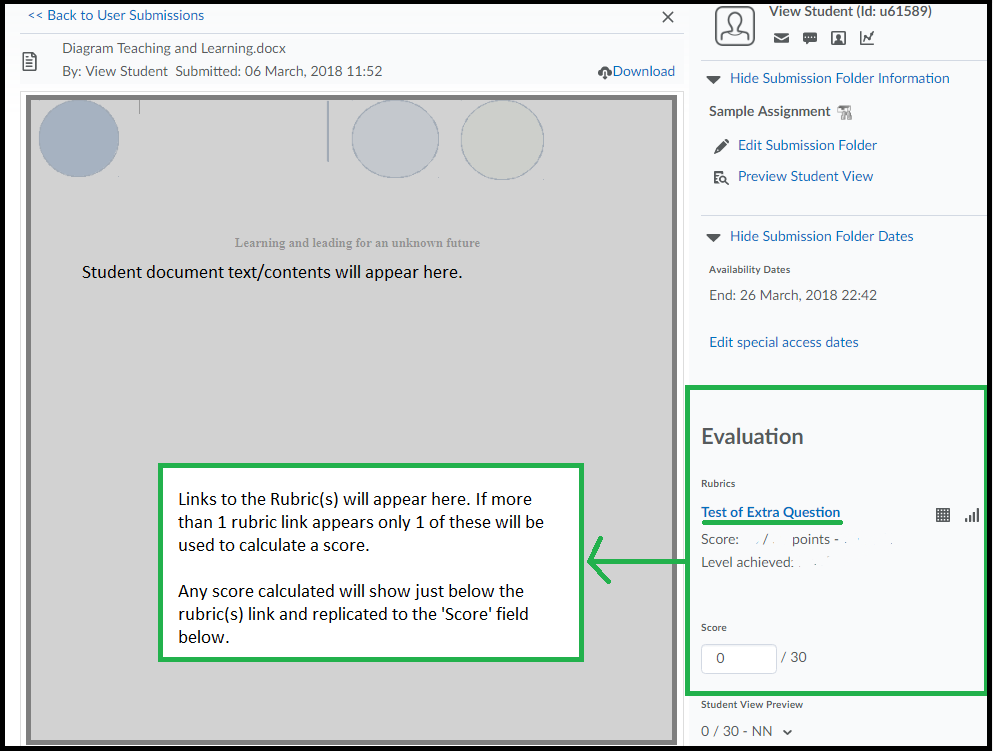
A preview of the student’s work will load, as the screenshot below shows the content of the assignment will appear to the left, the “Evaluation” area to the right.
Step 3
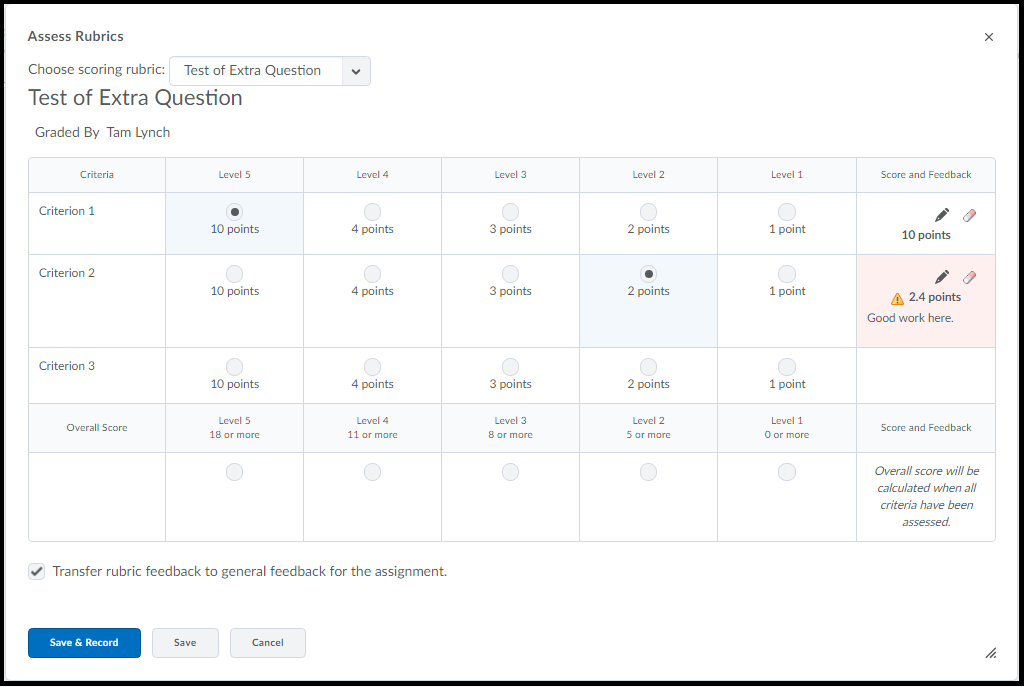
Click on the name of the rubric to load it up – it will appear in a new window. You may need to resize the window to see the whole rubric. The example below shows a “Custom Points” rubric, this being the most commonly used rubric.
You will see the list of criteria and levels arranged somewhat like above (yours is likely to have more text than this example). To “choose” a level just click the radio button. It is more important to choose the option that contains the most relevant feedback for your student – the default score can be altered.
To alter the score click the Pencil icon – over on the right of the rubric – then enter an alternate score and/or optional feedback text. When you do this you’ll notice a small icon (see above, the second criteria shows as red shaded and an icon in the ‘Score and Feedback’ area indicating that a ‘custom’ score was entered for this criteria.
To have the rubric fully calculate a score you MUST choose an option for EVERY criteria.
When you have completed the rubric choose “Save and Record” to send the score to the ‘Score’ field of the assignment (which then is sent to grades).
(The option you see in the screenshot ‘Transfer rubric feedback’ relates to any text you have typed that gets transferred to the “Feedback” area, this option is on by default but is optional).
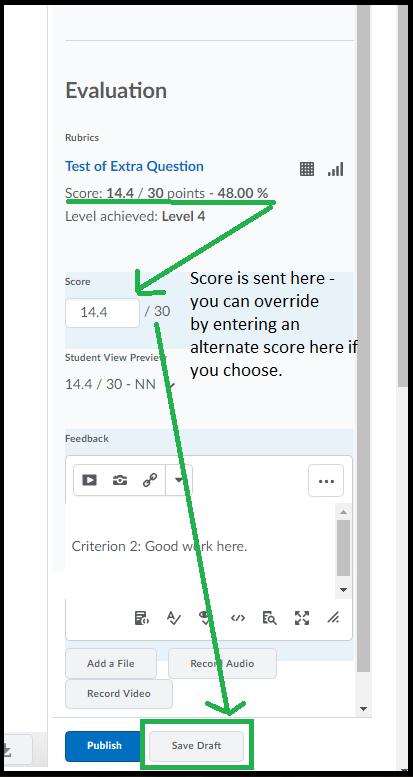
When you click Save and Record you will see the score appear in the ‘Score’ field. If none appears it may mean there is a score missing for one of the criteria. You can click on the rubric at any time to edit/alter the mark – just remember to hit save and record each time.
As you can see from the above screenshot the rubric score that was calculated – when I click ‘Save and Record’ – is sent to the ‘Score’ field. You can always alter the score here too if you want.
Remember if you are marking and do not want to release the score to students YET – click ‘Save Draft’.
Instructions showing how to mark with a Text Only Rubric (for feedback only) are available here.
Change your Dialog Setting to increase ease of marking with a Rubric
In the past, when marking a submission to an Assignment Submission Folder, a Rubric would open over the top of a student’s work. To get back to the student’s work, you would either have to save and close the Rubric, or open Grademark in a new browser tab so that you could view the student’s work in one tab and view the Rubric in another tab. Tedious! A personal Dialog setting in MyLO allows you to choose to open ‘dialogue boxes’ in a new window (or pop-up). This means that a Rubric will open in a new window so you can minimise it while looking at a student’s work, move it around your screen easily, or maximise the window so you can see the whole Rubric easily. Yay! To see a demonstration of the difference this setting makes, view this brief video (02:46, opens in new window).
Follow these instructions to change the setting.
Step 1
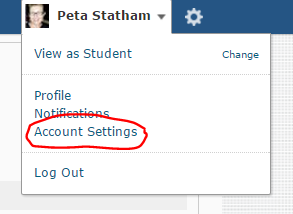
Towards the top right of your screen, you should see your name. Click the arrowhead to the left of your name, then select Account Settings.
Step 2
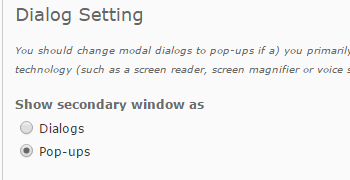
Scroll down until you see Dialog Setting heading. Choose the Pop-ups option from the Show secondary window as option, as seen below. Select the Save and Close button (bottom of the screen).
You’re done!
Monitoring and reporting on student engagement
In November 2016, Academic Senate determined that actions must be taken to monitor student engagement in all units. A student is considered actively engaged when they undertake and complete activities. Students who display minimal or no engagement with unit activities may be subject to university-initiated withdrawal.
If you are coordinating a unit, you will be expected to participate in the engagement monitoring process from Semester 2, 2017.
What you will need to do
You will need to incorporate two activities that can be used as indicators of student engagement in your unit. Both activities must occur within the first four weeks of semester. Records of student participation in these activities must be recorded in the Grades tool of your unit’s MyLO site. The data must be recorded in the Grades tool by the Friday (5pm) of Week 4.
The university will pull engagement data from your unit’s MyLO Grades tool*: you will need to ensure that your MyLO unit is set up correctly to facilitate collection of the data. This means that you will need to:
- Identify two activities that will be used to measure student engagement;
- Clearly identify the two activities to students in your Unit Outline;
- Set up two Grade Items in your unit’s Grades tool using the correct naming conventions; and
- Record participation data in the Grade Items. This may occur automatically (e.g. when a Quiz activity is used), or manually.
*Though we were initially advised that a computer script would automatically draw student engagement data from MyLO Grades, it appears unlikely that this technology will be developed in time for Semester 2. As a result, Unit Coordinators may need to review the Student Engagement Activity data that they have recorded in their MyLO Grades tool, and report any disengaged students. We will update this page as soon as we receive further information about the reporting procedure for Semester 2, 2017.
Identify two activities
The activities need to indicate active student participation: they do not need to provide a measure of student learning. You can use activities that already occur within the first four weeks of your unit, or you may wish to add new activities. The following table provides a list of common activities. It also indicates whether reporting to the Grades tool can be automated, or whether a level of manual data input (from the teaching team) will be required. Engagement should be reflected by a simple scoring (assuming that 0 indicates a lack of engagement).
Clearly identify the two engagement activities to students through your Unit Outline
The type of Unit Outline that you use may vary depending on your College or Discipline. The latest version of the UTAS Unit Outline Proforma (available here) includes a section called Specific attendance/performance requirements. Here you can record details of your Student Engagement Activities so that students clearly understand what is required of them.
Set up two Grade Items using the correct naming conventions
You must include two Grade Items in your unit’s Grades tool: one for each Engagement Activity. If your College or Faculty has a support team, they may set up the Grade Items for you by request.
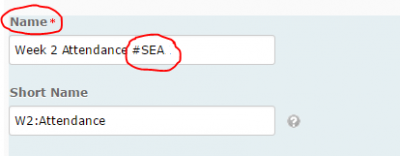
The full name of these Grade Items must incorporate the phrase #SEA. When you create or edit a Grade Item, record the correct name into the Name field in the Properties tab.
The way you set up the Grade Items will vary according to the type of engagement activity that you have designed. These Solutions to Common Grading Scenarios will help you determine the best way to set up your Grade Items. Some Grade Items will be standalone, that is, not connected to any MyLO tool. Others may be directly connected to a tool like a Quiz.
For further advice about setting up Grade Items, please contact your Faculty or School’s online/blended learning support team.
Record participation data in the Grade Items
By 5pm Friday of the end of Week 4, the Grade Items associated with each Engagement Activity must have a score recorded for each student (e.g. 0 for non-engagement, and 1 for engagement). The way you record this data will depend on the type of activity and the way you have set up your Grade Items. Tutors and other members of the teaching team may need some training to ensure that they know how to record these scores efficiently and correctly.
For further advice about recording data in Grade Items, please contact your Faculty or School’s online/blended learning support team.
Link from a MyLO unit to a MyMedia Echo360 Section
A unit may have MyMedia Echo360 section associated with it. The section provides students with access to a list of all the recordings (known as classes) associated with the unit.
Many MyLO Units include a Recordings (or similar) folder in the Contents section, usually as part of generic Faculty Template. This folder may/may not already contain a link. You will need to ensure that the link will take students to the correct section. Here’s how.
Step 1
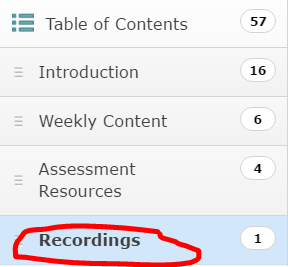
Navigate to the Content Module you wish to add the link to. In most College of Arts and Law units, there will be a Recordings (or equivalent) folder in the Content tool. Make sure the folder is selected in the Table of Contents (it will be highlighted in blue if selected).
You may/may not have a link in this folder. If you already have a link set up here, move to Step 4. If there is no link at all, move on to Step 2.
Step 2
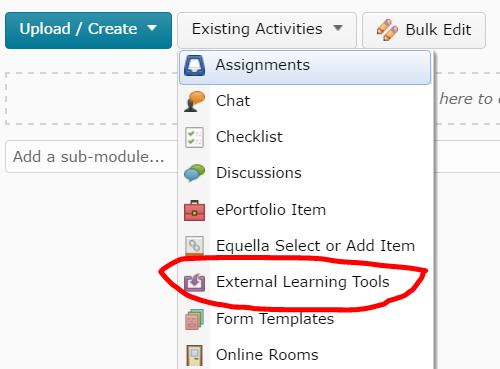
First, you need to create the link to MyMedia Echo360. To do this, select the Existing Activities button, then select the External Learning Tools option.
Step 3
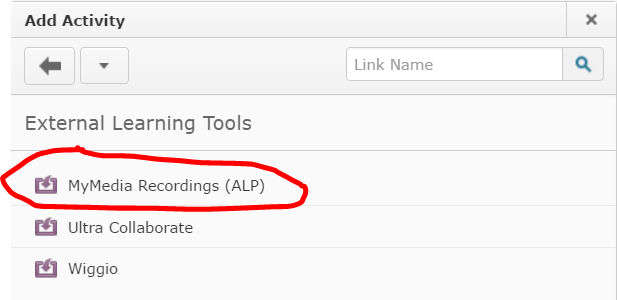
The Add Activity window will open. Select the MyMedia Recordings (ALP) option by clicking on it.
Step 4
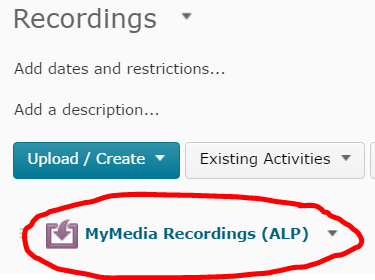
You will now see a link appear in the Recordings folder. By default it will be named MyMedia Recordings (ALP).
Step 5
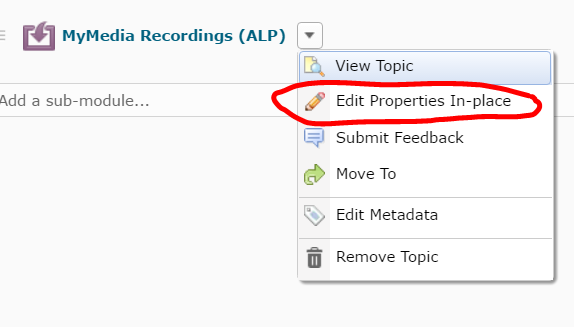
It is important to ensure that the link opens in a new window. To do this, select the black arrowhead that appears on the right side of the link, then select Edit Properties in Place from the menu.
Step 6
Check the box next to the Open as External Resource option. If you would like to change the name of the link, you can also do that in this view by clicking on the link and replacing the link text. Finally, click away (e.g. by selecting the Recordings folder from the Table of Contents again) to save your changes.
Step 7
The link will now need to be set up to send students to the correct section. Click on the link to open it (the page will open in a new window). You will need to select a Course, Term and Section. You can search for a course using a unit code. The term refers to the semester offering. The section repeats the semester and year offering (e.g 2016_S5_ALL refers to Semester 5, 2016). If you cannot see the section you want, you may need to request the creation of a MyMedia Echo360 section for your unit (requires UTAS username and password).
Step 8
Once you have selected a section, you will see some options below. Select the Link to the Section Home button, then select the Link Content button. That’s it! You’re done.

