Category
MyLO Grades
Export Grade Columns – Ready for Importing Later
In order to import grades to MyLO the format of the spreadsheet must be exactly correct. This post will cover how to export a file that will then be ready for re-importing, should you have any reason to fill grades to a spreadsheet for later import.
1. Ensure your grades exist in MyLO first. Creating Grades is covered here.
2. Go to ‘Grades’ tool & then to ‘Enter Grades’.
3. Click ‘Export’ button at the top.
You will now see a new screen with options to select.
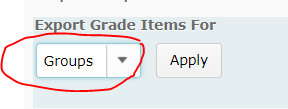
OPTIONAL: If you need to send particular groups of students to staff (ie, Launceston campus students to marker A & Hobart to Marker B) choose the groups at the top first. Remember to click “Apply” after you choose the group. Click it again to be sure. You can only export one category or group at a time.

4. Select the following:
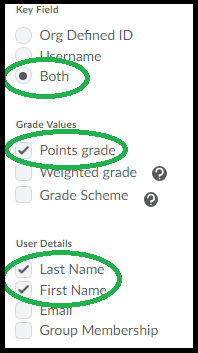
Under ‘Key Field’ select ‘Both’. (you only need to import Username, but having both is useful).
Under ‘Grades Values’ ONLY select Points Grades (even if you have weighted grades, you must select ‘Points’ or it won’t import).
Under ‘User Details’ you don’t need to select names – however for someone marking presentations for example it can help to have the names listed. Don’t select group membership unless needed (ie, you’re sorting the file by one of the group sets).
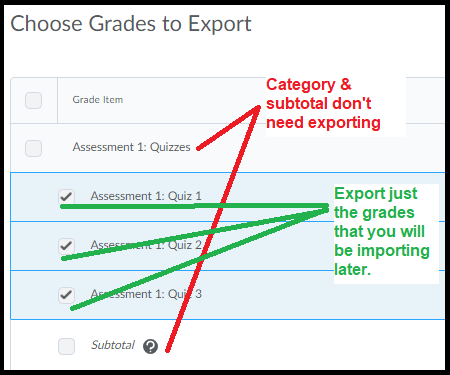
Under ‘Choose Grades to Export’ select the grades you will be importing later. You should avoid selecting categories & subtotals (these are calculated by MyLO directly, you shouldn’t need to be importing them), but you can select grades that are inside of categories.
Click ‘Export to CSV’. This file can be read by Excel & other spreadsheet software.
This file is now able to be filled & re-imported directly so long as the formatting is not altered & the file type is kept as ‘CSV’.
Please ensure your markers know not to alter any column headers or delete columns or remove any #’s.
Assign an Existing Grade to a Category
If you create a category in the Gradebook and need to assign an existing grade to it follow these instructions:
Step 1 – Click the ‘Grades’ tool in the toolbar and then go to the ‘Manage Grades’ tab.
Step 2 – All your grades are listed here. Click on the name of the Grade Item you wish to assign to a category.
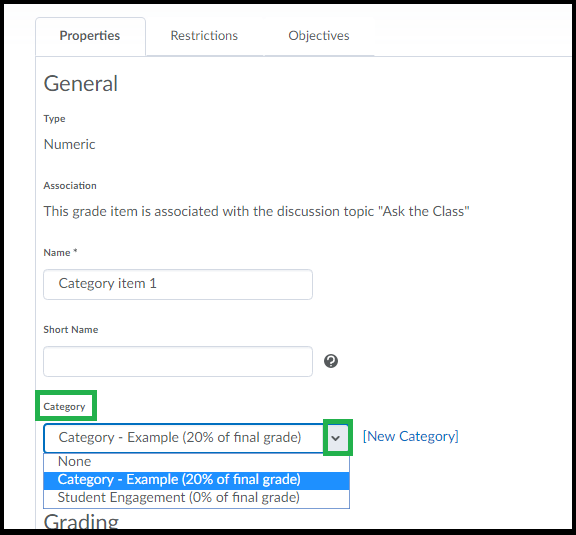
Step 3 – Scroll down a little until you see the option ‘Category’ and use the dropdown menu to select a category. Only previously created Categories are listed. If you haven’t created the Category yet you can create it here using the ‘New Category’ link. Otherwise choose the category you want this grade item to be listed in.
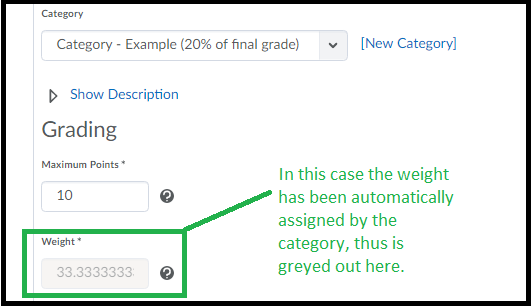
Step 4 – Check the weighting in the grade item. If the category is set up to assign a weight to the grade automatically – the weight option will become greyed out and will show the weighting as assigned by the category. If not greyed out you may have chosen to assign weighting for grades in the category automatically, so now check the grade’s weighting is relative to the Category and is correct.
(grade items inside of a category should normally add up to 100% of the category itself, except in specific circumstances)
Step 5 – Click save and close.
Note: Your grade item may move in the list, it will be indented under the category item. If you need to re-order your grades/categories click the ‘More Options’ button and choose ‘Reorder’.
How to create a numerical grade item
The numeric grade is the one you’re likely to use the most so here’s how to make one!
Follow these basic steps.
1. Go to the ‘Grades’ tool.
2. Go to ‘Manage Grades’ tab.
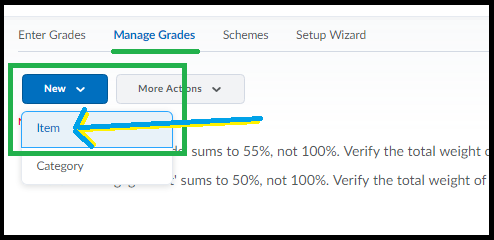
3. Click New then choose ‘Item’.
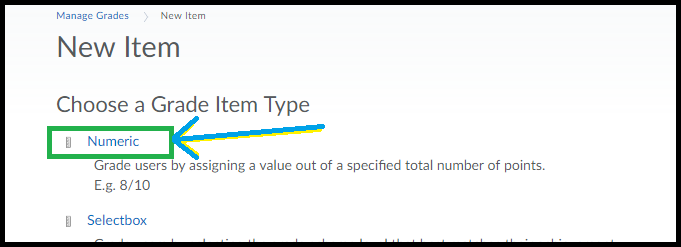
4. Choose ‘Numeric’ from the options that load.
A window will load that has all the options you can set for the grade.
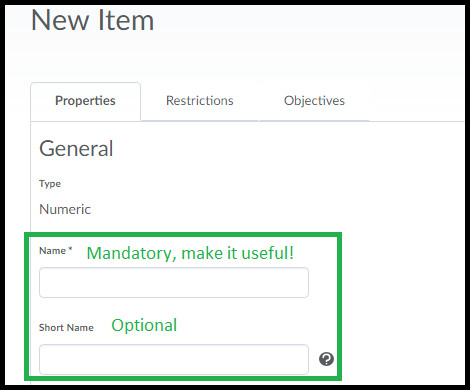
5. Give your grade a useful name. If the name you enter is really long do an optional short name as well so your gradebook isn’t unwieldy.
* Optional: Choose the Category, if you’re using them (it’s not mandatory, so if you’ve never heard of categories you can ignore this option for now). You can also enter a description here – if you want. Also optional.
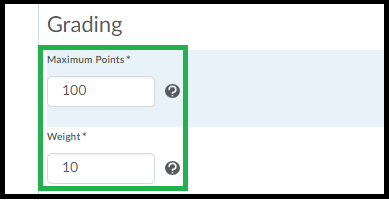
6. Enter the Maximum Points for this grade. If you’re using a weighted gradebook, you’ll also be asked for the grade’s weighting.
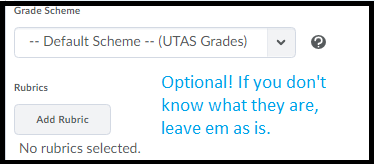
* Optional: There are some other optional settings here, if you want to grade via a rubric directly in the Gradebook – add a rubric here. You can also change the ‘scheme’ – the default is the HD, DN, CR etc scheme.
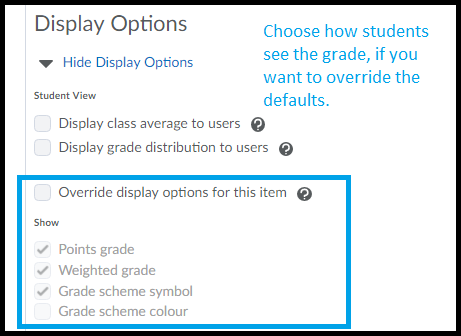
* Optional: The ‘Display options’ allow you to change how your students see the grade item. The default will be shown, click to over-ride the default if you want and select/deselect as you see fit. The options under ‘managing view’ control what ‘staff’ in the unit see.
7. Click ‘Save and Close’ if you are done. Or Save and New if you want to make more grade items.
Your grade is added to the bottom of the list. To re-order click the “More Options” button at the top of your ‘Manage Grades’ area and choose ‘Re-Order’.
Edit/Change how students see their grades
When you edit or create a grade item you can also control how students see this grade in their gradebook. There are some ‘defaults’ that you can use and change however this document will cover how to set up the grades on an individual basis (the default settings are covered here).
To get to the settings click ‘Grades’ on the toolbar – then click the ‘Manage Grades’ option at the top of the page.
To edit an individual grade (or category) – click on its name in the list. The settings page for that grade will open. You’ll need to scroll down past the settings until you see the heading ‘Display Options’. (click ‘view display options’ if you don’t see any items under the heading).
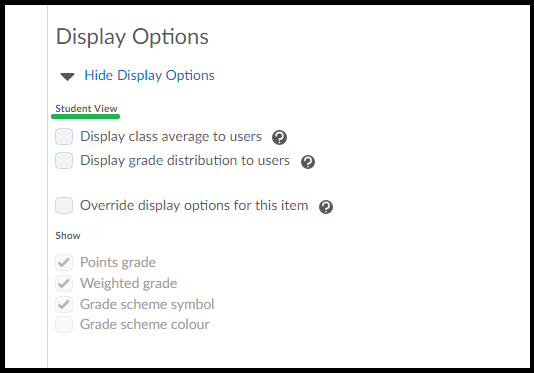
You should see a sub-heading called ‘Students View’ under which you will see checkboxes to turn on or off different information that will appear to students in the gradebook.
The first two options are for showing or not showing some basic class statistics. Click the (?) icon next to these options to read more about what they are.
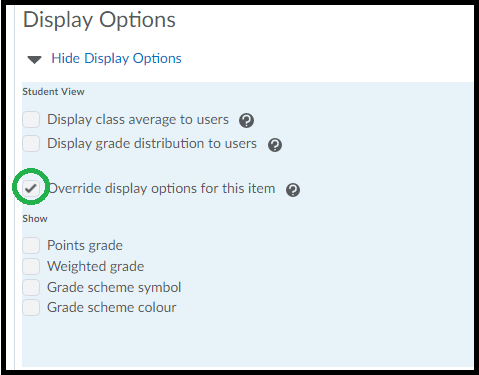
The next option is important – it is to Override the default settings. If you don’t know what your default settings are you can check by using the guide linked at the start of this document. Overriding the default settings allows you to have different settings for each grade item. If you leave this unchecked the rest of the options remain greyed out. To use the ‘Default’ view just leave this option unchecked.
You can then choose to turn on or off any combination of these options as you see fit.
Points grade = the points value as entered to the grade item.
Weighted grade = if you are using a weighted grade book, this is the grade as converted to the weighted grade.
Grade scheme symbol = if the grade is set up to use a scheme (by default every grade uses the UTAS Grades scheme of DN, CR, PP etc) – this will show or hide the ‘symbols’ – for example the default UTAS grade scheme would show a PP if the points received was 55/100 for example. If you are using a different grade scheme this is the option for showing/hiding it from students.
Grade scheme colour = again the default is the UTAS version, but you are able to set up your own. By default this is often left off student view but if turned on it will colour a grade item depending on the scheme you’ve chosen. For the default UTAS grades it is red for NN, green for the other grades.
The options below the ‘Student View’ under the sub-heading ‘Managing view’ relate to the view provided to any Staff/Lecturer/Tutor roles that view this grade in the gradebook. They are separate views – such that you can switch on any or all of the ‘Managing View’ options and they will not be shown to students unless those options are also turned on in the Student View or the default student view.
Click ‘Save’ when you are done with setting up the grade.
To check how students see the options you’ve chosen, click ‘View Grades’ and add some grades to the ‘View’ student grade items, then use the ‘Impersonating the Student View‘ guide to go and check how the grade options you’ve chosen appear to students. Note any grades you’ve set to a date, or to hidden, will not show to the ‘View Student’.
Generate a spreadsheet detailing the groups students belong to
If you use the Groups tool to organise groups of students in your MyLO site, you may find it helpful to download a spreadsheet listing the students and the Groups they are members of. Here’s how.
Step 1
Select the Grades tool from the MyLO Toolbar.
Step 2
Select the Export button. This appears towards the top left of the Grades tool when in Enter Grades view.
Step 3
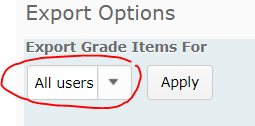
Now select whether you wish to include All Users (students) enrolled in the MyLO site in your spreadsheet, or specify only a certain group of students to appear in the spreadsheet. For example, you may only want to see students in a particular study mode, studying at a particular campus or enrolled in a particular unit code. If you want all users included, skip to Step 4.
If you wish to select a specific Group of students:
- select Groups from the dropdown menu, then the Apply button;
- select the Group you wish to view from the dropdown menu (only one can be selected), then select Apply again.

Step 4
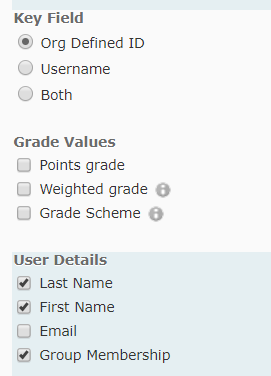
You can now choose the fields you wish to include in the export. Under Key field, leave the Org Defined ID option selected. Uncheck all the Grade Value options. Under User Details, check the Last Name, First Name and Group Membership fields checked.
Step 5
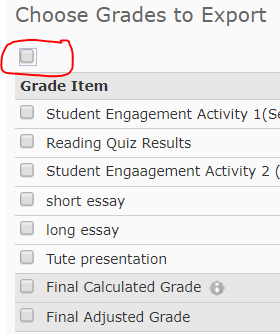
You won’t need any of the Choose Grades to Export options. The quickest way to deselect them all is to select the checkbox at the top of the list, then deselect it again (this selects all, then deselects all).
Step 6
Select the Export to Excel button that appears at the bottom of the screen.
A pop up window will appear as your spreadsheet is generated. The file will eventually appear. Select the file name to download it. The final name will normally include your unit code and name.
The resulting Excel spreadsheet will include your students on the left (one row per students), with each Group Category listed as a column header. An example is provided below.
Allow students to see a Grade Item / Hide a grade item
Many staff hide Grade Items from students until they have finished marking and moderating results. When a Grade Item is made available to students, they will see the full name of the Grade Item, together with any results you have made available to them, in their view of the Grades tool.
Is my Grade Item hidden?
To determine whether a Grade Item is hidden, go to the Grades tool. Select the Manage Grades tab.
You should now see a list of all the Grade Items included in your unit’s Grades tool. If your Grade Item has a closed-eye symbol to the right of its name, as shown in the example below, it is hidden to students. If you cannot see the closed-eye icon, it means that students can see the Grade Item.
To Hide or ‘un-hide’ a Grade Item
From the Manage Grades view, select the small black arrowhead to the right of the Grade Item name, then select Edit Grade Item from the menu.
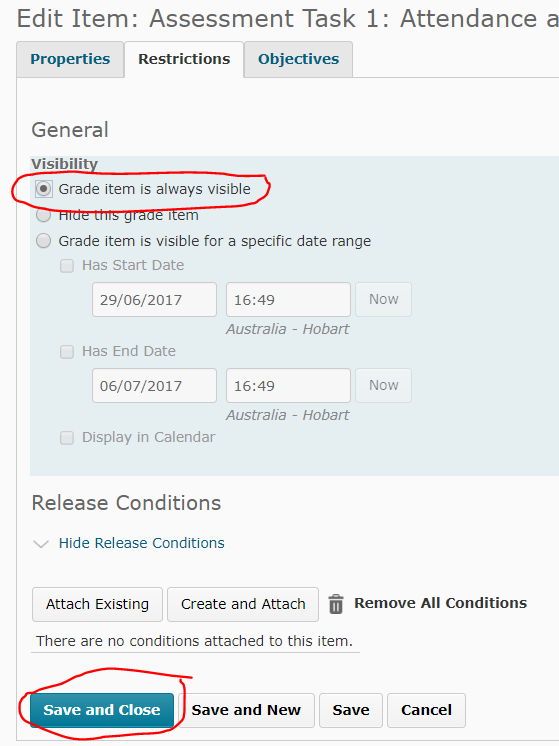
Select the Restrictions tab.
To Hide just choose the option for ‘Hide this grade item’
To unhide select the Grade Item is always visible option.
You can also select the third option to show the grade once a specific date has been reached.
When you’re done click Save and Close (towards the bottom of the screen) to save your change.
Student Engagement Activity: Track completion of a Quiz
MyLO Quizzes can be very useful for tracking student engagement. They can also be very convenient for you: a Quiz can automatically generate a score and send this score to a connected Student Engagement Activity Grade Item in the Grades tool.
Your local support team may already have some Quizzes, like practice Quizzes or academic integrity Quizzes, ready to go. These Quizzes may be incorporated into your unit as Student Engagement Activities. However, be wary of the relevance of such Quizzes: are your students really going to get anything out of completing them, or are the Quizzes merely being used for convenience?
If you have already prepared Quizzes for assessment purposes, you may also be able to use one of the Quizzes as a Student Engagement Activity. For this to occur, the Quiz must start and end between Week 1 and the end of Week 4 of semester. The title of the associated Grade Item must be altered to include the following text: #SEA.
Of course, you may also wish to develop a Quiz yourself. Quizzes, especially those that incorporate feedback, can be used to help students check their understanding of key terms, theories, concepts and facts included in a unit. For example, a short Quiz can prompt a student to check what they have learned after completing a reading or a lecture.
Quizzes used as Student Engagement Activities needn’t be complicated. Using question types with set answers, like multiple choice questions, means that Quiz attempts can be auto-marked. However, to be truly beneficial to students, Quizzes with set answers must be well-constructed and provide students with meaningful feedback. This post will link you to useful resources about writing good quality multiple choice questions.
If you have a local support team, they may be able to create a Quiz based on the information you provide. To avoid confusion, ensure that you provide the Quiz details, including questions, answers and feedback, in an appropriate format. This Word document provides a useful format for sharing Quiz information with support teams.
When set up correctly, a Quiz should be able to report results directly to a Student Engagement Activity Grade Item in the Grades tool. Thus, it is likely you won’t have to do any data collection yourself. However, there may be barriers that prevent this from happening in some cases.
- If a student fails to Submit a Quiz attempt, the attempt may get stuck In Progress. A score will NOT be recorded in the associated Grade Item until a Quiz attempt has been submitted.
- If you include long answer questions in your Quiz, these questions will not be auto-marked. You will need to mark them and Publish the results so that the final Quiz score appears in the related Grade Item.
Record Student Engagement Activity results in the Grades tool
This post assumes that you already have two Grade Items set up in the MyLO Grades tool to record Student Engagement Activity results. If you do not have these Grade Items set up, you should contact your local support team. General information about Student Engagement Activity reporting requirements in available here.
We recommend having your MyLO unit open in two browser tabs. This way, you can view the data you need in one tab, and enter results into the Grades tool in the other tab.
Step 1:
Select the Grades tool from the MyLO toolbar.
Step 2:
Locate the Grade Item column where you will record the results for the Student Engagement Activity. The column header will most likely SEA in the name. In most cases, you will need to input a score of 1 (for ‘engaged’) or 0 (for ‘not engaged’). If unsure about the name of your Student Engagement Activity Grade Items, or the marking scheme to use, contact your local support team.
There are two ways in which you can record the results. Either:
- Switch to Spreadsheet View: input results directly into the ‘spreadsheet-like’ view of the Grades tool; or
- Grade All: focus on recording results in one Grade Item at a time. Using this method also allows you to add comments/feedback, if you need to.
Option 1: Switch to Spreadsheet View
If you cannot already see fields to enter data into, select the Switch to Spreadsheet View button that appears towards the top right of the spreadsheet.
You should now see fields that you can enter records into, for example 0 or 1. Remember to select the Save button (bottom of the screen) to save your work. Unfortunately, there is no way to tab between fields – you will have to click inside each field to enter a mark.
Option 2: Grade All
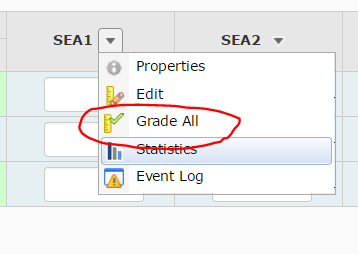
Select the black arrowhead to the right of the Grade Item, then select Grade All from the menu.
Scroll down until you see a table containing student names. Record grades for each student in the Grade column. You can add feedback/comments by clicking on the speech bubble symbol seen in the Feedback column. If feedback has already been recorded, the symbol will look slightly different. In the image below, Richard has received feedback and Melinda has no feedback.
Select the Save button (bottom of the screen) to save your work as you go. Select the Save and Close button to finish and return to the spreadsheet view of the Grades tool.
Useful tips and tricks
- Remember to select the Save button (bottom of the screen) regularly as there is no auto-save function in the Grades tool. If you are interrupted during marking, or you wish to take a break, press the Save button. That way, if your connection to MyLO times out due to inactivity, you won’t lose your work.
- You can filter your view so you only see students in a particular group, such as a study mode, tutorial group or unit group. This post will show you how.
Determine the status of a student’s Quiz attempt
From time to time, you may have a student report issues with the completion or submission of a Quiz. For example:
- “I accidentally closed the quiz/lost internet connection/received an error message, and now I can’t get back into the quiz”; or
- “I finished my quiz but I didn’t get a mark/any results”.
You may also find that some of your students don’t have Quiz results recorded in a corresponding Grade Item in the Grades tool.
These issues may be related to a Quiz attempt getting stuck In Progress.
Why does a Quiz attempt get stuck In Progress?
Students may be allowed several attempts at a Quiz. Whilst a student is completing a Quiz attempt, MyLO considers the attempt as being In Progress. Most Quizzes – especially those that contribute to the assessment of a unit – only allow students one attempt. Students are usually set a time limit in which to complete an attempt. If a student:
- forgets to submit their Quiz,
- closes a Quiz and doesn’t return until after the time limit has elapsed, or
- loses access due to a failed connection or accidental closing of a browser tab, and doesn’t return to the Quiz until after the time limit has elapsed,
then their attempt will get stuck In Progress. Even if an attempt is stuck In Progress, it is still counted as one attempt at a Quiz.
Check the status of a student’s Quiz attempt
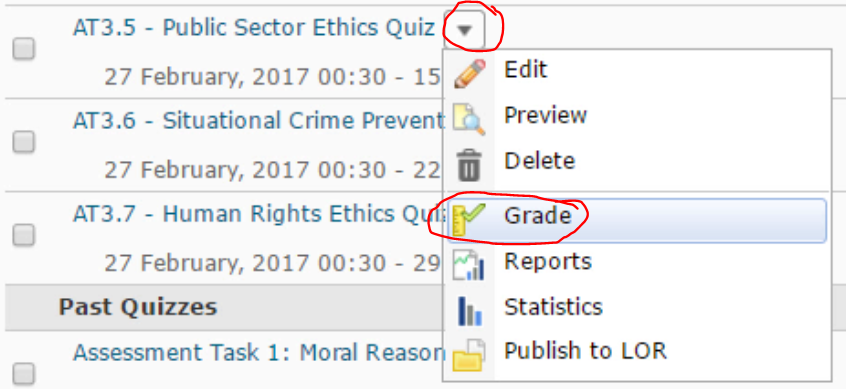
To check the status of a student’s Quiz attempt, or to discover who in the class has an attempt In Progress, go to the Quizzes tool and locate the Quiz you wish to investigate. Select the small black arrowhead that appears to the right of the Quiz name, then select the Grade option from the menu.
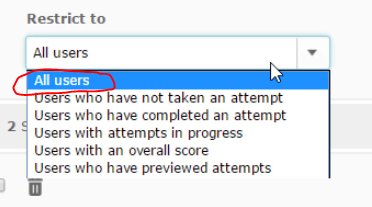
Scroll down until you see the Restrict to option. By default, Users who have completed an attempt will be selected in the drop-down menu. This option is too limiting as it will only find students who have successfully submitted attempts. Instead, select the All Users option. This will allow you to find all the data for the student in question, regardless of what they have/haven’t done with the Quiz. Alternatively, if you want to see ALL students who have an attempt in progress, select Users with attempts in progress.
Now, scroll up until you see the Search for field. To find results for one student, type their first name, surname or student number into the Search for field. Alternatively, if you wish to find ALL students in the class who have an attempt in progress, leave the field blank. Finally, select the search button (small magnifying glass).
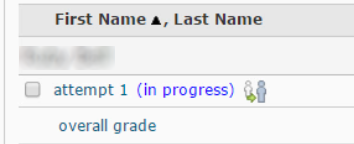
You should now see the search results towards the bottom of the screen. In this case, we can see two students who have met the search criteria. The first student has an attempt in progress. The second student has successfully submitted an attempt and has received a score as a result.

IMPORTANT: It is normal to see an attempt In Progress whilst a Quiz is still open to students, as In Progress indicates that a student is working through the Quiz. If the Quiz has closed and student’s attempt is still In Progress, this indicates that there could be a problem.
What do I do if a student’s attempt is stuck In Progress?
There are several options available to you. Your college or faculty’s support team should be able to investigate further, to help you choose the best course of action. This may be to:
- submit the student’s attempt on their behalf, so that a score can be generated;
- delete the in progress attempt so that the student can make another attempt; or
- submit the attempt (for records purposes) and provide the student with an additional attempt.
Filter Grades or Assignment Submissions so you see only a particular group of students
You can filter your view of Grades and Assignment Submissions Folders to see only results or submissions from students enrolled in a particular group. This can be very useful if you are responsible for marking students in a particular unit code or tutorial group. Here’s how.
Go to the Grades tool by selecting Grades from the MyLO toolbar in your unit OR go to Assessments > Assignments and open the Submission Folder that you wish to view by clicking on its name.
Select Groups from the View by drop-down menu (User is usually the default), then select the Apply button.
You will now need to choose one Group from the Group drop-down menu.
Common types of default Group include:
- Campus Groups: e.g. Default Group Campus Hobart
Choose a group in this category to only view students based on a particular campus.
*Warning: students studying off-campus are also counted as ‘Hobart’ students. - Mode Groups: e.g. Default Group Study Mode External/Internal
Choose a group in this category to see students studying externally (off-campus) or interally (on-campus) The External group includes all students studying off-campus. The Internal group includes students studying on-campus. - Unit Groups: e.g. Default Group Unit HGA237
Useful when you have a MyLO Unit serving more than one unit code.
Once you have chosen a Group, select the Apply button again.
You should now see only Grades/Submissions for those students who are members of your chosen Group. MyLO will generally remember this setting the next time you return to the Grades tools or Assignment Submission Folder using the same device.
To view all students again, select Users from the View By menu, then select the Apply button.

