Category
Content and Activity Development
Moving Content in MyLO
This document covers moving content like files, modules(folders) etc in the Content tool of MyLO.
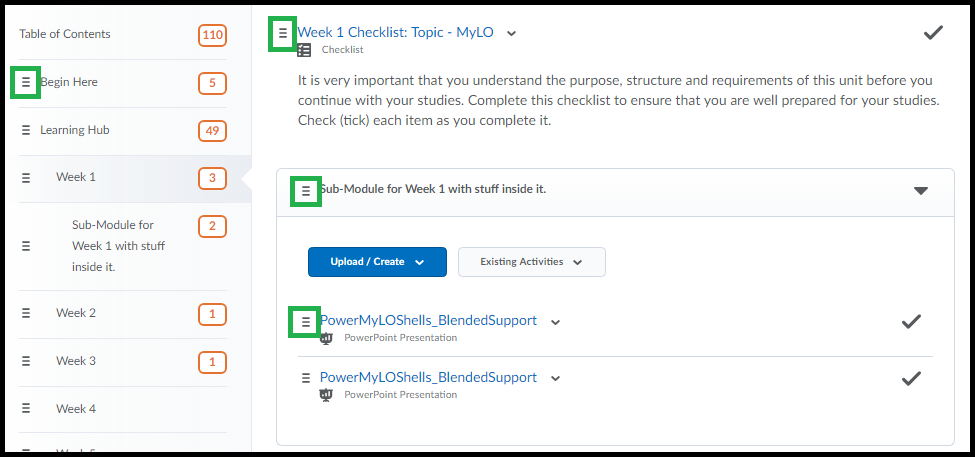
Each item in the content area, be it a single file, URL or a whole module – has an icon to the left of it that looks like this:
In the screenshot below I’ve highlighted some instances of this icon to show that it appears both in the Content Viewer (the right side of the content area) and the Left Side Menu.
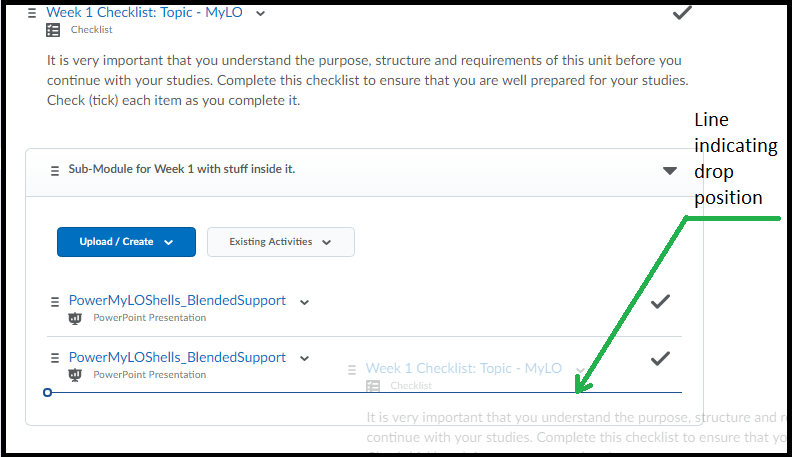
This icon indicated this item can be ‘dragged’ to somewhere else. To ‘drag’ any content item click the left mouse button and hold (or touch and hold if using a mobile device) until you see a ghosted version of the item appear as shown in the example below. You may also see your cursor change shape (example icon shown below is the default on my PC).
As you move your item you will see a line appear – this line indicates where the will end up if you release the mouse button/touch.
The exception to this is an empty folder – if you drag an item over an empty folder an area inside of it will turn ‘blue’ indicating the item will end up there.
You can Drag an item/module from somewhere in the Content area (on the right) to anywhere else in the content area. You can also Drag an item from anywhere in the Left Side Menu to somewhere else in the Left Side Menu. Keep an eye on where the ‘line’ is to ensure it is ‘dropped’ into the correct location.
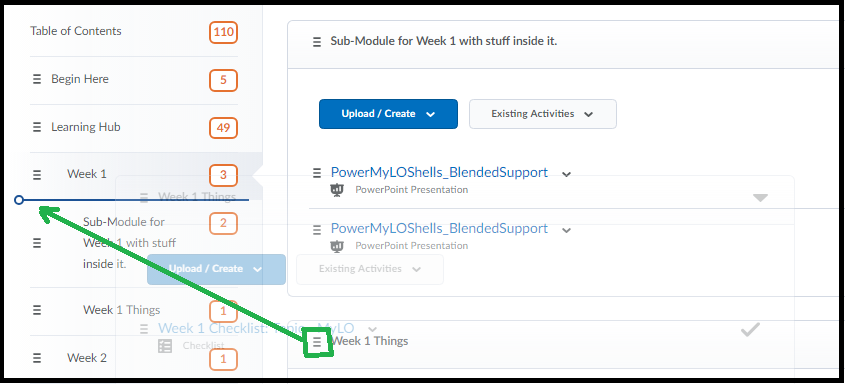
You can also drag an item from the Content Viewer (on the right) over to the Left Side Menu (on the left) by moving the icon over to the left. You will see either a Line that indicates where the item will be placed between modules as it’s own module [Shown Below]
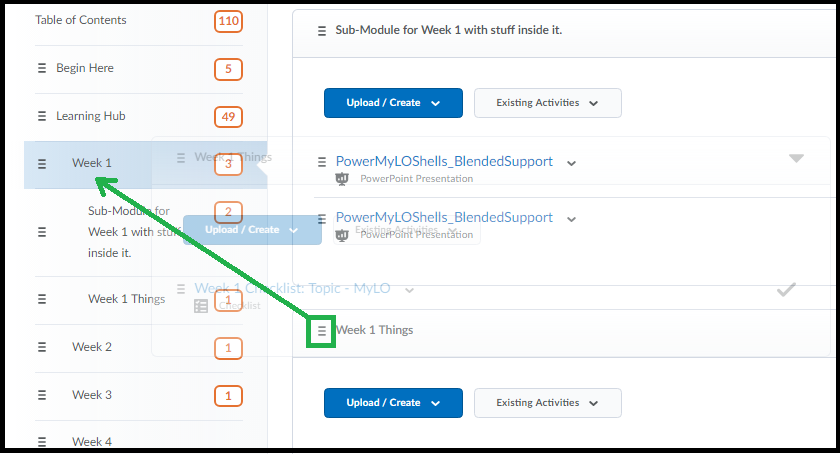
OR you will see a module(folder) highlighted indicating the item will end up Inside that module [Shown Below].
You can’t drag an item from the Left Side Menu over to the ‘content’ area. If you need to put one module INSIDE of another, you will need to do this by dragging it from somewhere in the Left Side Menu to somewhere else in the Left Side Menu then going into that module/folder to further move if necessary. Any item/module can be drag/dropped as many times as you need.
Lost something? Click each of the folders in your Left Side Menu and check the content viewer on the right – once you find your lost item, drag/drop to the correct location. Note some movements may require a couple of steps.
ADVANCED: How to force a space after the last element in an HTML page
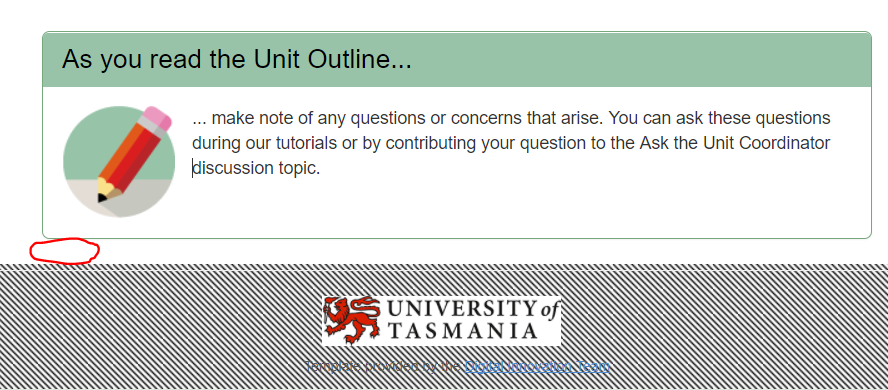
From time to time, your colleagues may ask for help because they cannot insert a new element at the bottom of an HTML page based on the ICB Template..
While this problem can be avoided through the use of spacer elements, it won’t always be avoidable.
Here’s how to insert a paragraph space after the last element on a page so that further elements can be added. This is an advanced technique, involving some basic editing of HTML Source Code! If you are not confident doing this yourself, ask your local support team for assistance.
Step 1
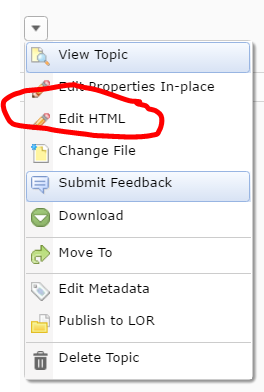
Ensure that your colleague has saved the page and is no longer editing it. Locate the page in the Content tool, select the little black arrowhead to the right of the page name, then choose Edit HTML from the menu.
Step 2
The WYSIWYG editor will open. Scroll to the bottom of the page.When you try to select this space/place your cursor in between the last element and the page footer, you will notice that you cannot select/get the cursor to appear. This means that there is no space remaining. You will need to code in a new space (essentially, a paragraph containing no characters).
Step 3
You should notice the HTML Source Editor symbol appears towards the bottom right corner of the page. It looks like this. – </>. Select the HTML Source Editor symbol.
Step 4
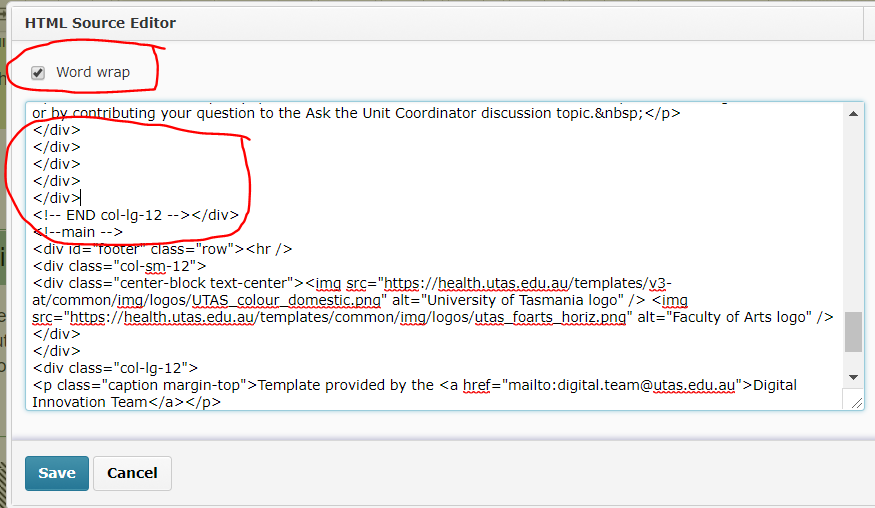
The HTML Source Editor will open. Ensure that the Word Wrap option is selected, then scroll down towards the very bottom of the source code. Around 18-20 lines up from the bottom, you should see the code shown in the image below. Look in particular for a line of code that says <!– END col-lg-12 –></div>. The next line of code should say <!–main –> . If you have trouble finding this snippet of code, press CTRL + F (PC) or Command + F on your keyboard, then type END col-lg-12 into the search field. Press Enter or Return on your keyboard. This should help you find the correct code snippet (it will usually highlight a matching result for you).
Step 5
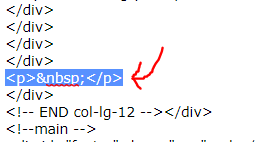
Once you have found the <!– END col-lg-12 –></div> code snippet, look just above it. You should see about five lines of code, each with the identical tag, </div>. Place your cursor just behind the fourth </div> tag in the list, then press the Enter or Return key on your keyboard to create a new line. Type the following text into the new line – <p> </p> – as shown below.
IMPORTANT!: The new code must go after the fourth </div> tag in the list. If you place it higher in the list, or at the end of the list, you may accidentally alter the alignment of text on the page, or the properties of an existing template element.
Step 6
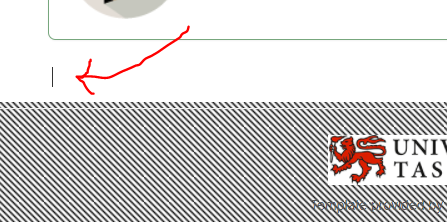
Press the Save button to return to the WYSIWYG view of the HTML page. A paragraph space should now appear at the bottom of the page. You should be able to place your cursor in this new space. You may wish to add some Spacer template elements to the area, so your colleague doesn’t ask you to repeat this process again for them in the near future. Don’t forget to save the changes you have made to the page!
Open a MyLO HTML page in editing mode
In MyLO, an HTML page is like a web page. It can contain different types of content, including formatted text, images and multimedia (like embedded videos). If a page is based on the Interactive Content Builder (ICB) template (open in new window), you can use a range of elements to improve general look and feel, as well as interactivity, of an HTML page.
To change the existing content of a page, remove existing content or add new content you will need to choose to edit the page.
Choose to edit a page
First, navigate to the page you wish to edit on your unit’s MyLO site. It can usually be found somewhere in the Content tool.
You can choose to edit the page BEFORE you open it, or AFTER you open it. Simply select the small black arrowhead that appears to the right of the page name. Select Edit HTML from the menu.
How will I know that a page is in editing mode?
When a page is in editing mode, you will notice that the editing toolbar appears towards the top of the page. These tools can be used to add media, insert hyperlinks (known as Quicklinks) and apply formatting to text.
Embed an Echo360 video in an HTML page
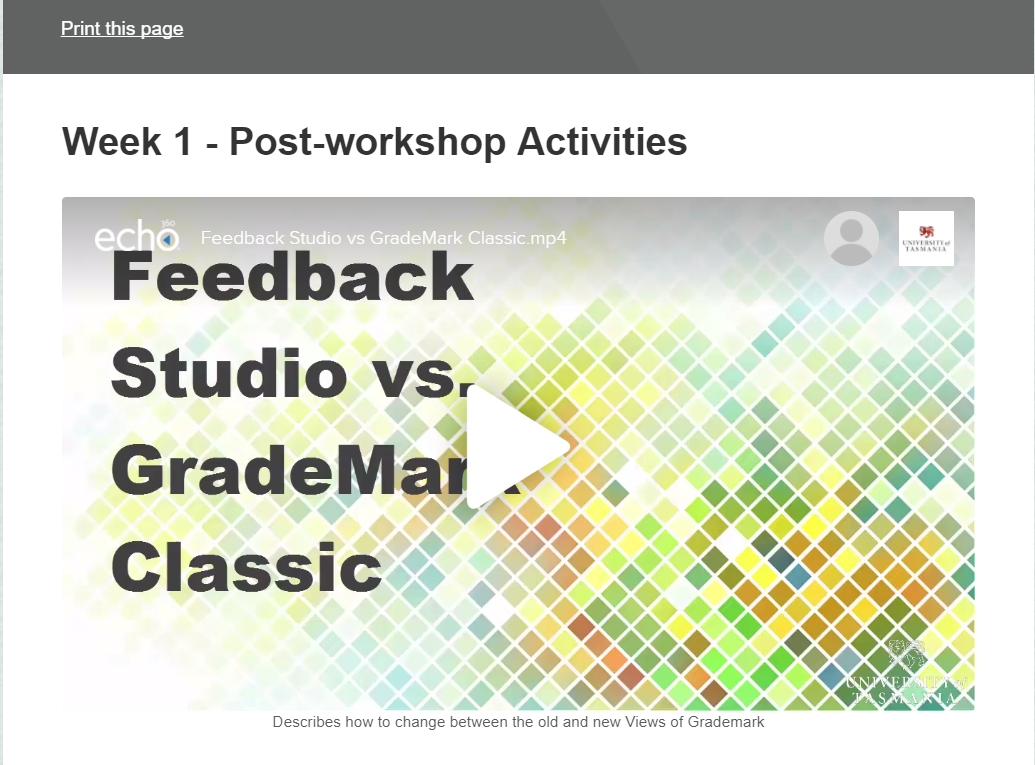
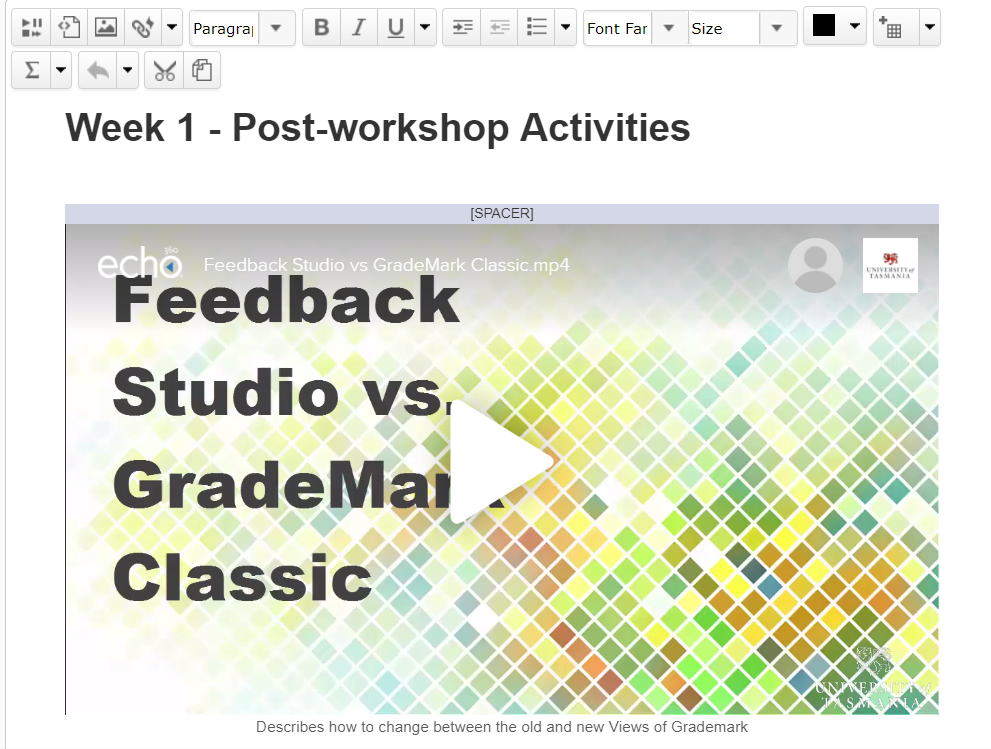
If you upload a video to your Echo360 Library, or to an Echo360 Section, you can embed the video in a page in your MyLO site using a feature called a Public Link. The resulting video may look something like this when inserted into an HTML page based on the ICB template.
If you embed an Echo360 video in an HTML page, you are using what is known as a Public Link. Public links will not allow you to track who has accessed the video. It is also possible for savvy students to obtain and share the link to the video with students outside your unit (and to the general public). If you would like to be able to track which students have accessed a video, and only allow access to UTAS users, we recommend that you upload your video to a unit Section and use a Quicklink to provide access to the video.
If you’re certain you want to use a Public Link, follow these instructions.
Before you start
Have the following open, each in a different browser tab.
- The HTML page in your MyLO site that you wish to add the video to, preferably already in editing mode.
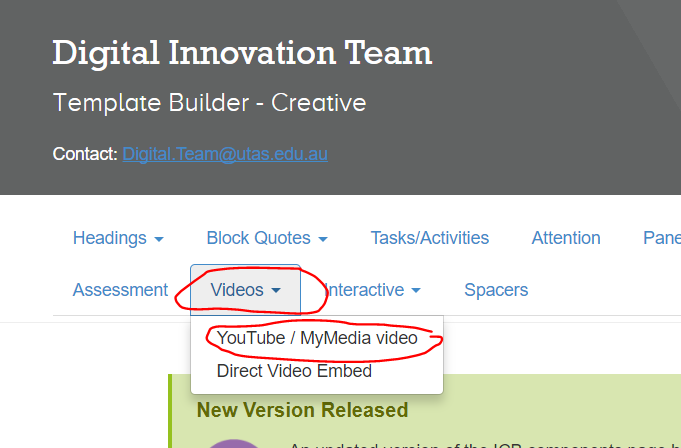
- The ICB Template page. You may wish to select the Video menu, then choose the YouTube/MyMedia video option, in advance.
- Your Echo360 Library or a unit Section. You can usually access these from a link in your MyLO site OR by logging in (via institution) at www.echo360.org.au (opens in new window)
Step 1
Locate the video you wish to use, either from the Echo360 Section for your unit, or from your Echo360 Library.
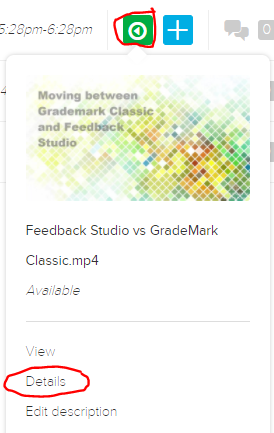
If you are using a video from an Echo360 Section, select the green icon to the right of the video name and choose Details from the menu.
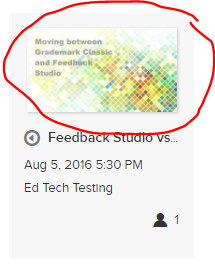
If you are using a video from your Library, you will need to locate the video and click on the preview image.
Step 2
You will see three tabs appear beneath the video. Select the Sharing tab.
Step 3
Scroll down until you see the heading Public links. If you cannot see a link there already, select the Add Public Link button.
Step 4
A link will now appear. Select the Embed button to the right.
Step 5
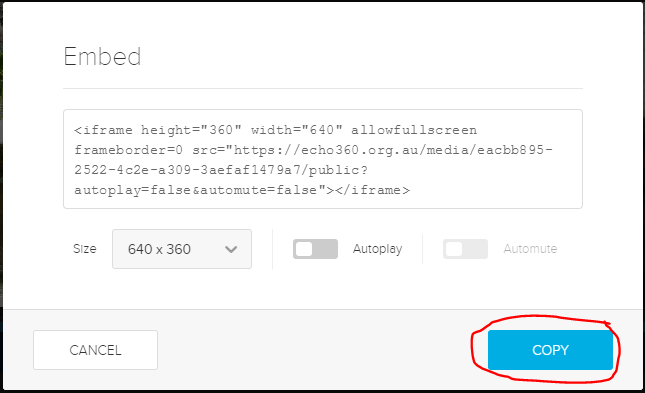
A new window will pop up. This contains the embed code. Select the Copy button. This will copy the code to your computer’s temporary memory.
Step 6
Now jump to the browser tab containing the ICB template page. If you haven’t already done so, select the Video menu, then choose the YouTube/MyMedia video option.
Step 7
Scroll down under the video until you see the Embed Code field. Place your cursor in the field, use one of the following keyboard shortcuts to paste in the embed code you copied earlier:
- On a PC, CTRL + V; or
- On a Mac, Command + V.
This should copy the code into the field. Once the code appears in the field, press the Copy to Clipboard button. This copies some more code into your computer’s temporary memory, to make your video more responsive to different screen widths and devices.
Step 8
Now jump to the browser tab containing your MyLO site. Ensure that the page you wish to add the video to is in editing mode. Place your cursor where you would like the video to appear, then use one of these keyboard shortcuts:
- On a PC, CTRL + V; or
- On a Mac, Command + V.
Your video should then appear on the page. You can replace the caption beneath the video by selecting it and replacing it with your own text OR you can select it and delete it.
Step 9
Continue to work on your page. When you’re finished, don’t forget to save!
Student Engagement Activity: Track completion of a Quiz
MyLO Quizzes can be very useful for tracking student engagement. They can also be very convenient for you: a Quiz can automatically generate a score and send this score to a connected Student Engagement Activity Grade Item in the Grades tool.
Your local support team may already have some Quizzes, like practice Quizzes or academic integrity Quizzes, ready to go. These Quizzes may be incorporated into your unit as Student Engagement Activities. However, be wary of the relevance of such Quizzes: are your students really going to get anything out of completing them, or are the Quizzes merely being used for convenience?
If you have already prepared Quizzes for assessment purposes, you may also be able to use one of the Quizzes as a Student Engagement Activity. For this to occur, the Quiz must start and end between Week 1 and the end of Week 4 of semester. The title of the associated Grade Item must be altered to include the following text: #SEA.
Of course, you may also wish to develop a Quiz yourself. Quizzes, especially those that incorporate feedback, can be used to help students check their understanding of key terms, theories, concepts and facts included in a unit. For example, a short Quiz can prompt a student to check what they have learned after completing a reading or a lecture.
Quizzes used as Student Engagement Activities needn’t be complicated. Using question types with set answers, like multiple choice questions, means that Quiz attempts can be auto-marked. However, to be truly beneficial to students, Quizzes with set answers must be well-constructed and provide students with meaningful feedback. This post will link you to useful resources about writing good quality multiple choice questions.
If you have a local support team, they may be able to create a Quiz based on the information you provide. To avoid confusion, ensure that you provide the Quiz details, including questions, answers and feedback, in an appropriate format. This Word document provides a useful format for sharing Quiz information with support teams.
When set up correctly, a Quiz should be able to report results directly to a Student Engagement Activity Grade Item in the Grades tool. Thus, it is likely you won’t have to do any data collection yourself. However, there may be barriers that prevent this from happening in some cases.
- If a student fails to Submit a Quiz attempt, the attempt may get stuck In Progress. A score will NOT be recorded in the associated Grade Item until a Quiz attempt has been submitted.
- If you include long answer questions in your Quiz, these questions will not be auto-marked. You will need to mark them and Publish the results so that the final Quiz score appears in the related Grade Item.
Writing multiple choice questions: Useful resources
To be effective learning and assessment tools, multiple choice questions must be well-considered and written.
These resources provide very useful tips, approaches and examples to help you write multiple choice questions:
- Writing Good Multiple Choice Test Questions, Center for Teaching, Vanderbilt University (opens in new window)
- Multiple Choice Questions – Some key principles, Center for Teaching and Learning, Johns Hopkins Bloomberg School of Public Health (opens in new window)
When writing multiple choice questions for assessment, also consider the University of Tasmania’s Guidelines for Good Assessment Practice (opens in new window).
Student Engagement Activity: Track completion of the AIM Test
First year students studying with the College of Arts and Law are all given access to the Academic Integrity Module, known as AIM. This module (housed in its own MyLO site) is intended to help students develop the skills they need to create academic work without infringing the University’s Academic Misconduct rules.
Students are encouraged to take the AIM Test, a Quiz included at the end of the module. Students can make multiple attempts at this Quiz. Once a student has successfully passed the Quiz with a result of 90% or more, they will have achieved the associated learning objective. It is possible to view a record of student attainment of this learning objective, then record the data into the MyLO Grades tool as one of your measures of Student Engagement.
These instructions show you how to access information about your students’ completion of the AIM Test. Once you have obtained this information, you can record the data into the Grades tool to meet the university’s Student Engagement Activity requirements.
Record Student Engagement Activity results in the Grades tool
This post assumes that you already have two Grade Items set up in the MyLO Grades tool to record Student Engagement Activity results. If you do not have these Grade Items set up, you should contact your local support team. General information about Student Engagement Activity reporting requirements in available here.
We recommend having your MyLO unit open in two browser tabs. This way, you can view the data you need in one tab, and enter results into the Grades tool in the other tab.
Step 1:
Select the Grades tool from the MyLO toolbar.
Step 2:
Locate the Grade Item column where you will record the results for the Student Engagement Activity. The column header will most likely SEA in the name. In most cases, you will need to input a score of 1 (for ‘engaged’) or 0 (for ‘not engaged’). If unsure about the name of your Student Engagement Activity Grade Items, or the marking scheme to use, contact your local support team.
There are two ways in which you can record the results. Either:
- Switch to Spreadsheet View: input results directly into the ‘spreadsheet-like’ view of the Grades tool; or
- Grade All: focus on recording results in one Grade Item at a time. Using this method also allows you to add comments/feedback, if you need to.
Option 1: Switch to Spreadsheet View
If you cannot already see fields to enter data into, select the Switch to Spreadsheet View button that appears towards the top right of the spreadsheet.
You should now see fields that you can enter records into, for example 0 or 1. Remember to select the Save button (bottom of the screen) to save your work. Unfortunately, there is no way to tab between fields – you will have to click inside each field to enter a mark.
Option 2: Grade All
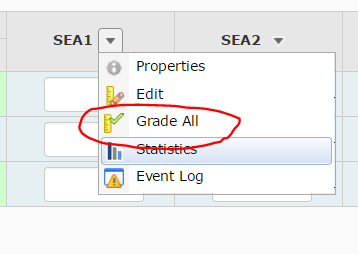
Select the black arrowhead to the right of the Grade Item, then select Grade All from the menu.
Scroll down until you see a table containing student names. Record grades for each student in the Grade column. You can add feedback/comments by clicking on the speech bubble symbol seen in the Feedback column. If feedback has already been recorded, the symbol will look slightly different. In the image below, Richard has received feedback and Melinda has no feedback.
Select the Save button (bottom of the screen) to save your work as you go. Select the Save and Close button to finish and return to the spreadsheet view of the Grades tool.
Useful tips and tricks
- Remember to select the Save button (bottom of the screen) regularly as there is no auto-save function in the Grades tool. If you are interrupted during marking, or you wish to take a break, press the Save button. That way, if your connection to MyLO times out due to inactivity, you won’t lose your work.
- You can filter your view so you only see students in a particular group, such as a study mode, tutorial group or unit group. This post will show you how.
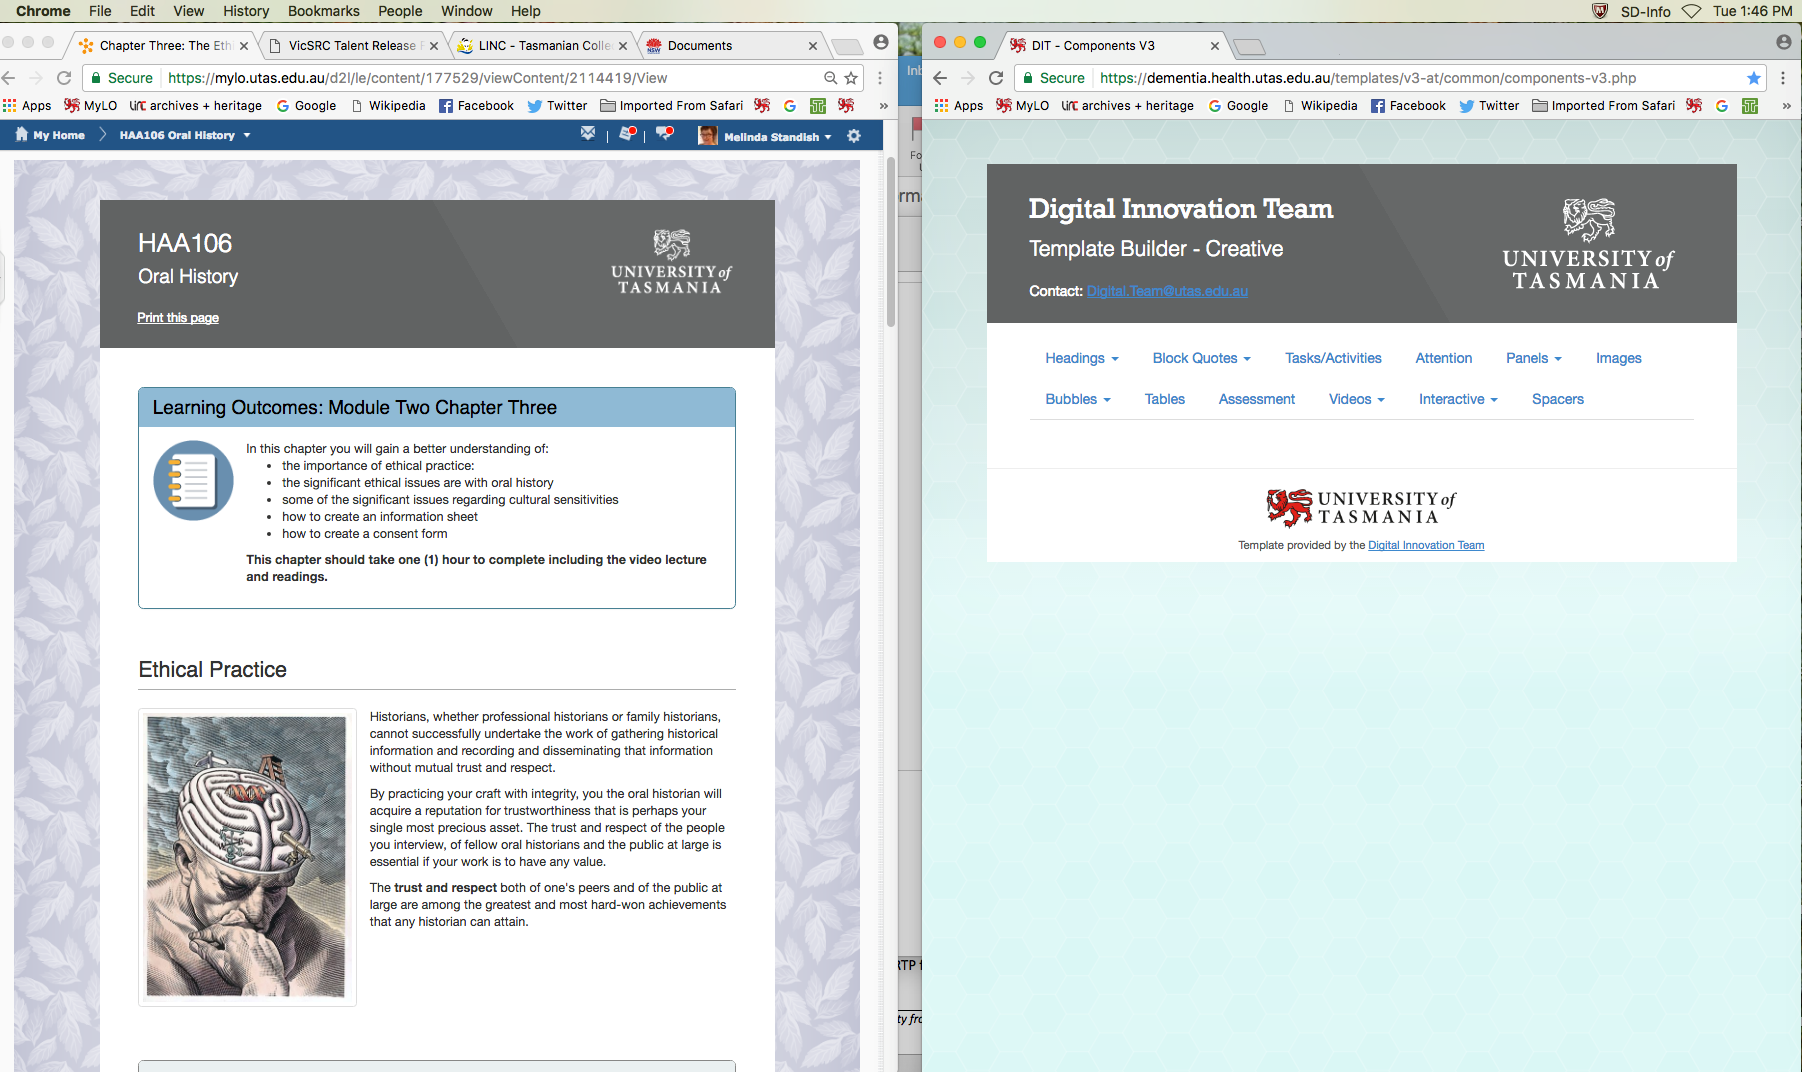
View your MyLO Unit across two (or more) browser tabs
It can be very helpful to view your MyLO site across two (or more) tabs. Working this way can be useful, for instance, when you:
- need to view one HTML page (e.g. Week 1) whilst editing another HTML page (e.g. Week 2); or
- record marks in the Grades tool whilst reading student contributions to a Discussion; or
- check a student’s use progress whilst writing them an email using the MyLO Email tool.
Here’s how you open your MyLO unit across multiple tabs when using the Google Chrome browser.
Step 1
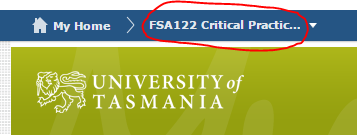
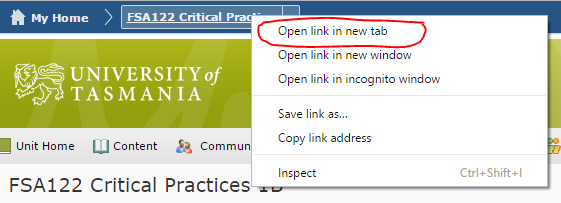
In one browser tab, log into your MyLO unit. Towards the top left of the page, you should be able to see My Home, followed by the unit code and name of your unit (the name may have been truncated slightly to fit the field). If you are using a PC, right click on the unit code/name. If you’re using a Mac, hold down the Control key on your keyboard as you click on the unit code/name. Note that you should be able to complete this step from almost anywhere in your unit – you don’t have to be on the unit Home page at the time.
Step 2
You should now see a menu appear. Select the Open link in new tab option.
Step 3
A new tab will now load. By default, the new tab will open on your unit’s Home page.
Tips
- Don’t have the same HTML page open for editing in both windows!
- If impersonating Student View in one tab, you will be restricted to Student View in the other tab. You cannot use different MyLO roles across browser tabs.
Add an image element to an HTML page in MyLO
The Interactive Content Builder (ICB) (opens in new window) template includes three Images options:
- Right, where an image is presented to the right of the screen with text wrapped around it.
- Left, where an image is presented to the left of the screen with text wrapped around it.
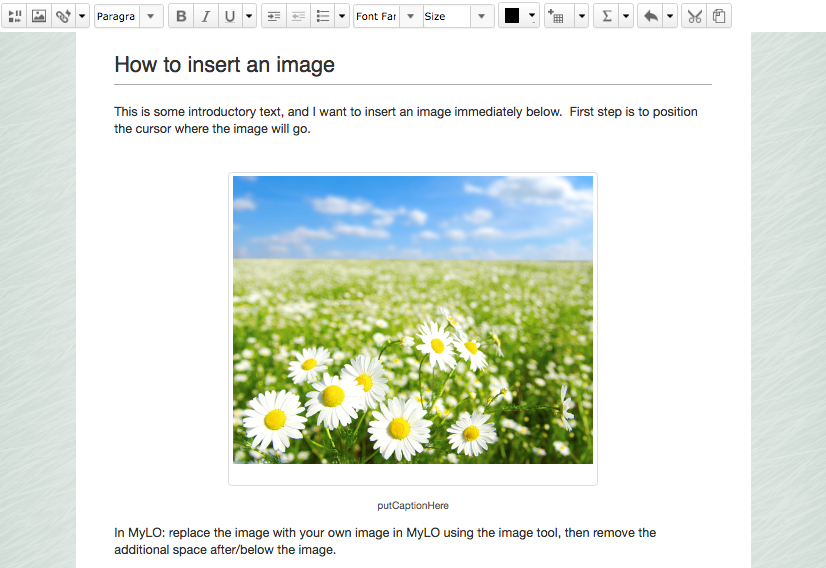
- Centre, where the image is centred. Text appears above and below the image: it will not wrap around the image.
All the image options contain a border around the image, and an area beneath it for a caption.
In this post, you will learn how to add an image element to an HTML page (based on the ICB template) in your MyLO site. Alternatively, you can see the process demonstrated in this video (opens in new window).
Step 1
Open your MyLO unit in a browser tab or window, then locate the HTML page that you wish to add the image element to. Keep the browser tab/window open. Open a new browser tab/window and navigate to the ICB Template Builder. You should now have two browser tabs or windows open: one with your MyLO HTML page; the other with the Template Builder page. You will be moving between these tabs/pages throughout this activity.
Step 2
Jump to the tab/window containing your HTML page. Select the black arrowhead to the right of the page name, then select Edit HTML. You can now edit the page.
Step 3
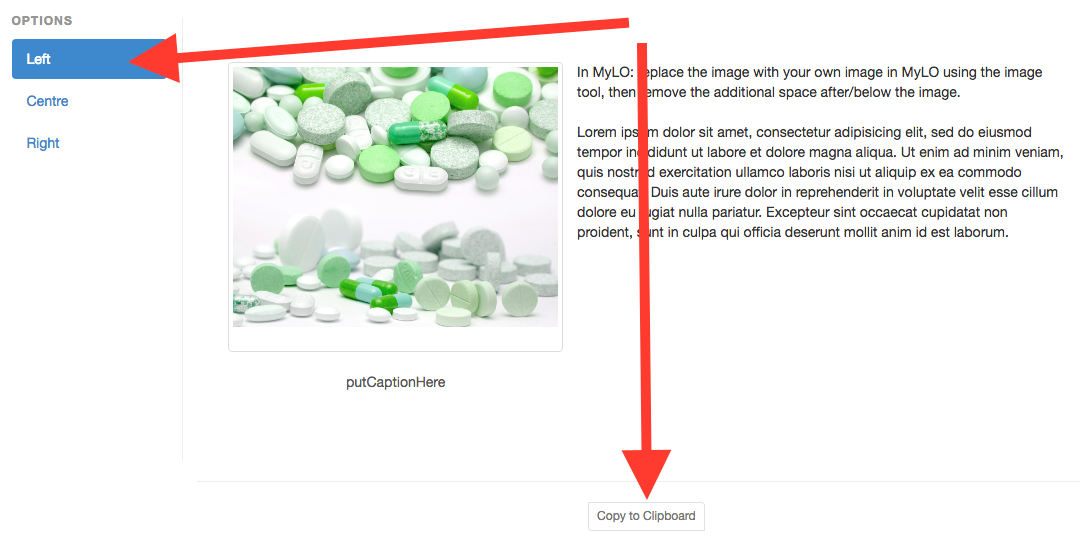
Now jump to the Template Builder page that you opened earlier. Select Images, then choose one of the options from the menu on the left (e.g. Left, Centre or Right). You may wish to move between the options until you have found your preferred element. Once you have located your preferred element, select the Copy to Clipboard button beneath it. This will copy the element to your computer’s temporary memory.
Step 4
Jump back to your MyLO HTML page, which should still be in editing mode. Place your cursor where you would like the image element to go to go, then select the following keys on your keyboard: CTRL and V (PC); or Command and V (Mac). This will paste the image element into your page.
Step 5
If you’re happy with the position of the image element, you may wish to press the Save button at the bottom of the page to save your changes. If you are not happy with the position or type of image element, select the following keys on your keyboard: CTRL and Z (PC); or Command and Z (Mac). This will undo the changes you just made.
Next Steps
Once you have inserted your image element, you can replace the image, caption text and (where relevant) the wrapped text.

