Tag
Quiz
Grading Solution: Students submit several items. Only a select number of these items will count towards the final grade for the assessment task
This solution would suit scenarios like this:
- Each week, students complete a Quiz as preparation for class. There are 12 Quizzes. The two lowest scores are dropped, so that the 10 remaining Quizzes contribute 10% each towards Assessment Task 2, worth a total of 10 marks.
- You wish to monitor student participation. Each week, a score is recorded for each student in a standalone Grade Item. The five highest scoring Grade Items are calculated to form the final grade for Assessment Task 2, worth a total of 10 marks.
Grading system and other requirements
This method requires the use of a weighted grading system. When marking, you will need to record ‘0’ as the grade for any un-submitted Quizzes or to represent non-attendance/lack of participation. Once the students have completed their final task, you will need to make a slight alteration to the Category settings so that the Category ‘drops’ the required number of Grade Items.
You will need to:
- Create one Category to represent the assessment task and use the options suggested here.
- Create one Grade Item per task, either standalone (for participation marking) or to be linked to a tool like a Quiz. Use the options suggested here. You must link each Grade Item to the Category that you have created.
- Link each Quiz (where relevant) with one of your new Grade Items. Note that you can skip this step if you have created Standalone Grade Items.
To see an example of what this solution might look like in the Grades tool, download this PDF.
When marking:
The Category Subtotal will calculate correctly only if you record a zero (0) for each un-submitted piece of work. Here are some instructions on how to mark un-submitted items with a 0 quickly.
Grading Solution: Distance students and face-to-face students complete different items as part of the same assessment task
This solution would suit scenarios like this:
Students will deliver a presentation and then respond to questions from teachers and peers for an Assessment Task worth 35 marks. Face-to-face (F2F) students deliver their presentation and respond to questions in class. You will use a standalone Grade Item to provide F2F students with a grade and feedback. Distance students will pre-record a presentation. They will submit a copy to a Dropbox (worth 70%). You make the presentations available for viewing by linking to them to Discussion Topic. You will mark the Discussion Topic to assess how students respond to questions about their presentation (worth 30%).
Grading system and other requirements
This method requires the use of a weighted grading system. See also the instructions for marking un-submitted and irrelevant items below.
You will need to:
- Create one Category to represent the assessment task and use the options described here.
- Create one Grade Item per assessment item and use the options described here. You must link each Grade Item to the Category that you have created.
- Link each Dropbox/Discussion/Quiz with one of your new Grade Items. If students perform a task in class and do not need to submit items electronically, you can skip this step.
To see an example of what this solution might look like in the Grades tool, download this PDF.
When marking:
- Do not record a mark for items that a student does not need to submit.
- If a student fails to submit an item that they are expected to complete, record a 0 as their grade.
In the example below, Tam is studying F2F, while View Student is studying by Distance. Tam has received a mark of 67/100 for the presentation she delivered in class. No marks need to be recorded for the other tasks, as the F2F Presentation is worth 100% of Assessment 3 (A3) for F2F students.
View Student, on the other hand, failed to participate in the Distance Q&A required of Distance students. To account for this, a 0 mark was recorded for this task, bringing down the student’s overall mark (Subtotal) for the assessment task accordingly.
Grading Solution: Grade a single assessment task comprising two or more items
This solution would suit scenarios like this:
- Students submit four items at different points, each to a separate Dropbox. Three submissions are each worth 10%. The fourth submission is worth 70% of Assessment Task 3.
- Students submit four items at different points during your unit, each to a separate Dropbox. Each submission is worth 25% of Assessment Task 3.
- Students complete 10 Quizzes. Each Quiz is worth 10% of Assessment Item 3.
- Students work in groups to create a Report. It is submitted to a group Dropbox and worth 70% of Assessment Item 3. Students then submit a personal reflection about the task to an individual Dropbox. This is worth 30% of Assessment Item 3.
Grading system and other requirements
This method requires the use of a weighted grading system. When marking, you will need to record a 0 for students who have not submitted work.
You will need to:
- Create one Category to represent the assessment task and use the options described here.
- Create one Grade Item per assessment item and use the options described here. You must link each Grade Item to the Category that you have created.
- Link each Dropbox/Discussion/Quiz with one of your new Grade Items. If students perform a task in class and do not need to submit items electronically, you can skip this step.
To see an example of what this solution might look like in the Grades tool, download this PDF.
When marking:
The Category Subtotal will calculate correctly only if you record a zero (0) for each un-submitted piece of work. Here are some instructions on how to mark un-submitted items with a 0 quickly.
Grading Solution: Grade a single assessment task comprising one item
This solution would suit scenarios like this:
- Students submit their work to a MyLO Dropbox. Their submission is worth 100% of Assessment Task 1.
- Students contribute to one Discussion Topic. Their contributions to the topic are worth 100% of Assessment Task 1.
- Students complete a Quiz. The Quiz is worth 100% of Assessment Task 1.
- Students complete a presentation in class. It is worth 100% of the Assessment Task. As no files will be submitted, you will use a Standalone Grade Item.
You will need to:
- Create one Grade Item and use the options described here.
- Link a Dropbox/Discussion/Quiz with your new Grade Item. If students perform their task in class and do not need to submit something electronically, you can skip this step.
To see an example of what this solution might look like in the Grades tool, download this PDF.
Attach a Rubric to an Assignment Submission Folder so that you can mark with it
Once you have created an electronic Rubric in MyLO, you can attach it to an Assignment Submission Folder. This post will show you how. Once you have attached the Rubric, you can mark with it.
Step 1
Before you finalise your Rubric and attach it, you must ensure that the Rubric is correctly set up. You may wish to return to the Rubrics tool and check the text and settings before finalising it.
WARNING
Once you have started marking with a Rubric, you must not edit it. If you do, you will lose any marks/feedback you have recorded in the Rubric to date. Please check your Rubric carefully before marking with it.
Step 2
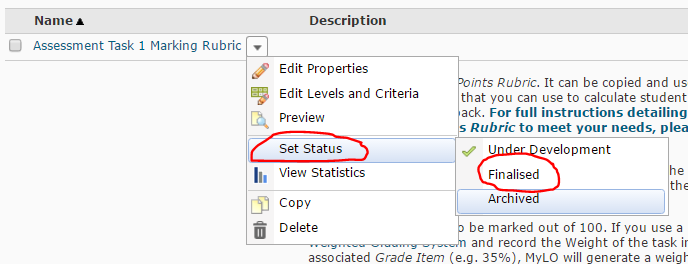
Select Rubrics from the MyLO toolbar, then locate your completed Rubric. Select the black arrowhead to the right of the rubric name. Select Set Status, then choose Finalised (a Rubric cannot be attached to another item unless finalised).
Step 3
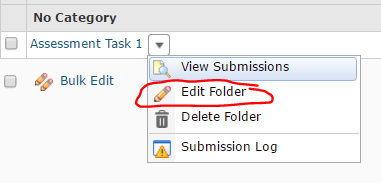
Select the Assignments tool from the MyLO toolbar. Locate the Assignment Submission Folder that you would like to attach the Rubric to. Select the black arrowhead next to the Submission Folder name, then choose Edit Folder from the menu.
Step 4
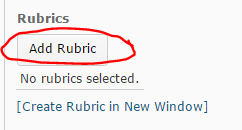
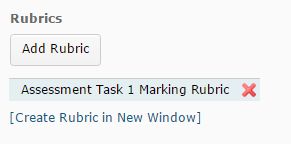
The Properties tab should open by default. Scroll down until you see the Rubrics heading. Select the Add Rubric button.
Step 5
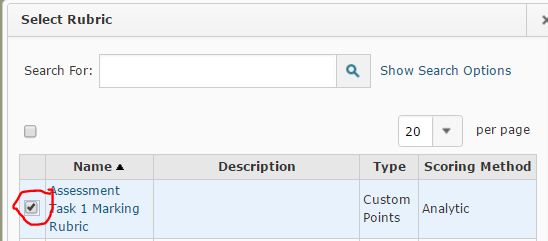
The Select Rubric window will open. Select a Rubric by checking the checkbox next to it, then select the Add Selected button (seen at the bottom of the window).
Step 6
You should now see the Rubric name appear under the Add Rubric button. Scroll down and select the Save and Close button. If you have selected the wrong Rubric, select the red cross (the Rubric name will now appear crossed out), then select the Add Rubric button to select a different Rubric.
You can now start marking Assignment Submissions with your Rubric.
Attach a Rubric to a Grade Item so that you can mark with it
Once you have created an electronic Rubric in MyLO, you can attach it to a Grade Item. We recommend attaching Rubrics to standalone Grade Items that will be used to grade Discussions, or to keep track of work that is performed in class, like participation or presentations. This page will show you how.
We recommend attaching Rubrics directly to an Assignment Submission Folder, rather than to the associated Grade Item. If you need to attach a Rubric to an Assignment Submission Folder instead, you will find these instructions more helpful.
NOTE: One of the down-sides of attaching a Rubric to a Grade Item, is that the Rubric Score will not articulate to the Grade Item (as it does when used with a Assignment Submission Folder) automatically. When you finish marking a Rubric, make note of the Rubric total score, then record this into the Grade Item Score field.
Step 1
Before you finalise your Rubric and attach it, you must ensure that the Rubric is correctly set up. You may wish to return to the Rubrics tool and check the text and settings before finalising it.
WARNING
Once you have started marking with a Rubric, you must not edit it. If you do, you will lose any marks/feedback you have recorded in the Rubric to date. Please check your Rubric carefully before marking with it.
Step 2
Select Rubrics from the MyLO toolbar, then locate your completed Rubric. Select the black arrowhead to the right of the rubric name. Select Set Status, then choose Finalised (a Rubric cannot be attached to another item unless finalised).
Step 3
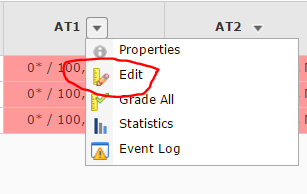
Select the Grades tool from the MyLO toolbar. Locate the Grade Item that you would like to attach the Rubric to. Select the black arrowhead next to the Grade Item name, then choose Edit from the menu.
Step 4
The Properties tab should open by default. Scroll down until you see the Rubrics heading. Select the Add Rubric button.
Step 5
The Select Rubric window will open. Select a Rubric by checking the checkbox next to it, then select the Add Selected button (seen at the bottom of the window).
Step 6
You should now see the Rubric name appear under the Add Rubric button. Scroll down and select the Save and Close button. If you have selected the wrong Rubric, select the red cross (the Rubric name will now appear crossed out), then select the Add Rubric button to select a different Rubric.
You can now start marking with your Rubric.
Create a Grade Item in the Grades tool
A Grade Item is a column of the Grades tool dedicated to tracking the grades associated with a particular task. It may be associated with a MyLO assessment tool like a Dropbox or Quiz, or it could be a standalone item used to track classroom participation or presentations.
These step-by-step instructions explain how to create a Grade Item.
Solutions to common grading scenarios
This table outlines common grading scenarios. Each scenario is linked to a solution that can be implemented in the Grades tool, to help you collect, mark and distribute grades in the most efficient manner possible. Full instructions are provided for each solution (click on the name of a solution to link to the instructions). If you do not see a scenario that applies to you, please contact the TSBE Flexible Education Team for further advice.
Choose a scenario from the left column, then refer to the solution shown in the right column.
| Scenarios | Solutions | |
|
} |
Grade a single assessment task comprising one item [click here for instructions] |
|
||
|
||
|
||
|
} |
Grade a single assessment task comprising two or more items [click here for instructions] |
|
||
|
||
|
||
|
} |
Distance students and face-to-face students complete different items as part of the same assessment task [click here for instructions] |
|
} |
Students submit the same assessment task at different times [click here for instructions] |
|
} |
Students submit several items. Only a select number of these items will count towards the final grade for the assessment task [click here for instructions] |
|
||
|
} |
Track student progress without generating a grade [click here for instructions] |
|
Publish final assessment marks to the Grades tool without releasing the marks and feedback to students
UTAS requires that academics do not release students’ final assessment task marks on MyLO until after the exam period and release of formal grades by the University. You can still mark students’ final assessment piece online and publish the marks to the Grades tool, but you will need to ensure that students cannot see the marks or feedback associated with their final assessment. This is achieved by:
- hiding the Assignment Submission Folder/Quiz Submission View and associated Grade Item from students; and
- ensuring that students cannot see Grades or Assignment Submission Folders in the My/User Progress tool.
These items must be hidden from students before you publish and grades or feedback. The instructions from page 3 of this [PDF] will show you how.
Help students locate Quiz results and feedback
Would you like your students to see the results of a Quiz that you have published? Make sure your students know where to look to get the information they need.
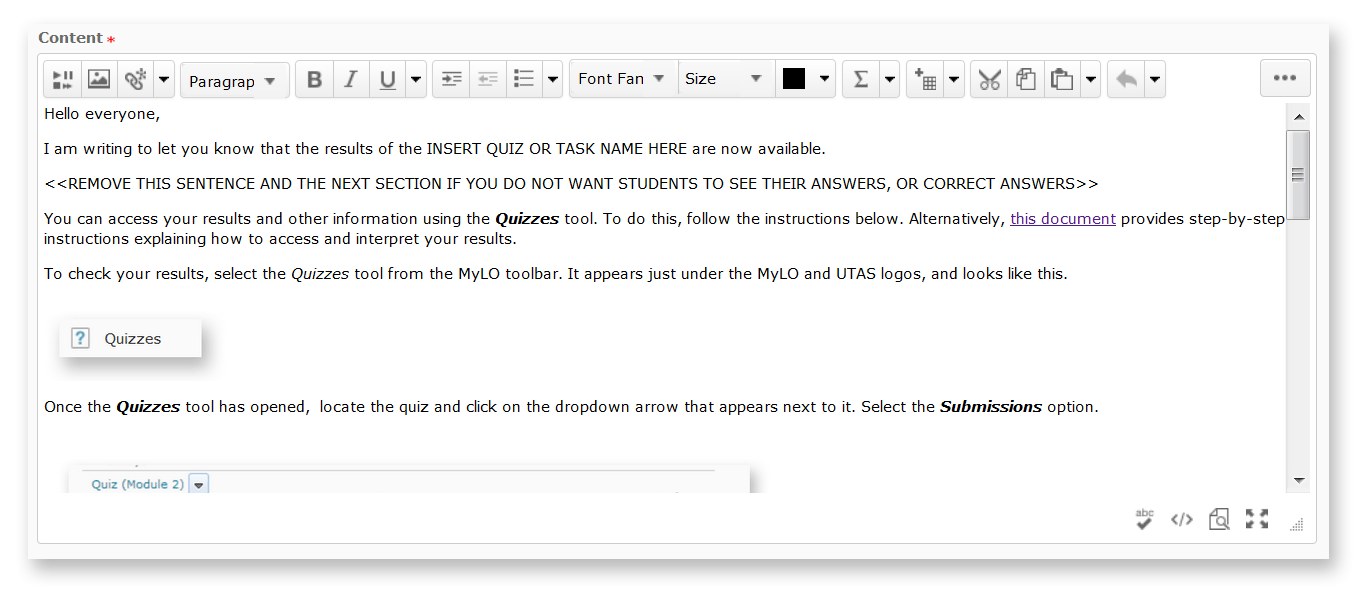
Use our template to quickly and easily create a News item, an HTML page, an email (sent from MyLO) or a Checklist item. The template contains instructions, with matching images, to help students find their results. You can see what it looks like by downloading this PDF. And yes – you can edit it to meet your needs.
To use the template, follow these steps:
1 – Use your mouse to highlight all the text in the box below.
<p>Hello everyone,</p> <p>I am writing to let you know that the results of the INSERT QUIZ OR TASK NAME HERE are now available.</p> <p><<REMOVE THIS SENTENCE AND THE NEXT SECTION IF YOU DO NOT WANT STUDENTS TO SEE THEIR ANSWERS, OR CORRECT ANSWERS>></p> <p>You can access your results and other information using the <em><strong>Quizzes</strong></em> tool. To do this, follow the instructions below. Alternatively, <a rel="noopener" href="https://mylo.utas.edu.au/d2l/lor/viewer/view.d2l?ou=6607&loIdentId=63929" target="_blank">this document</a> provides step-by-step instructions explaining how to access and interpret your results.</p> <p>To check your results, select <em>Assessments</em> then <em>Quizzes</em> from the MyLO toolbar. It appears just under the MyLO and UTAS logos</p> <p>Once the <em><strong>Quizzes</strong></em> tool has opened, locate the quiz and click on the dropdown arrow that appears next to it. Select the <em><strong>Submissions</strong></em><strong> </strong>option. <br /><br /><img src="http://blogs.utas.edu.au/teaching-at-tsbe/files/2015/01/Quiz-student-access-quiz-for-marks.gif" alt="Locating a quiz and selecting Submissions option" title="Locating a quiz and selecting Submissions option" height="116" width="537" /><br />You will see the number of attempts you have completed, along with your score for the quiz to the right. To see <<REMOVE ANY OPTIONS THAT DO NOT APPLY>> your answers and the correct answers, click on the attempt number (this will generally be<em> Attempt 1</em>).<br /><br /><img src="http://blogs.utas.edu.au/teaching-at-tsbe/files/2015/01/Quiz-student-access-quiz-for-marks-attempt-link.gif" alt="Image showing how to access answers, correct answers and so forth by clicking on the Attempt link" title="Image showing how to access answers, correct answers and so forth by clicking on the Attempt link" height="149" width="543" /></p> <p></p>
2 – Once all the text has been selected, right-click (CTRL + mouse click on a Mac) and select the Copy option or press CTRL and C on your keyboard (Command + C on a Mac). This will copy the code onto your computer’s temporary memory.
3 – Create a new Announcement, an HTML page, an email (sent from MyLO) or a Checklist item. The example seen below is a new Announcement. Give the new item a title/headline, then move on to the next field (where you put the bulk of your message/content). By default, the WYSIWYG (What You See Is What You Get) editor will open. Click on the HTML Code symbol, seen at the bottom right of the WYSIWYG editor. It looks like this </>
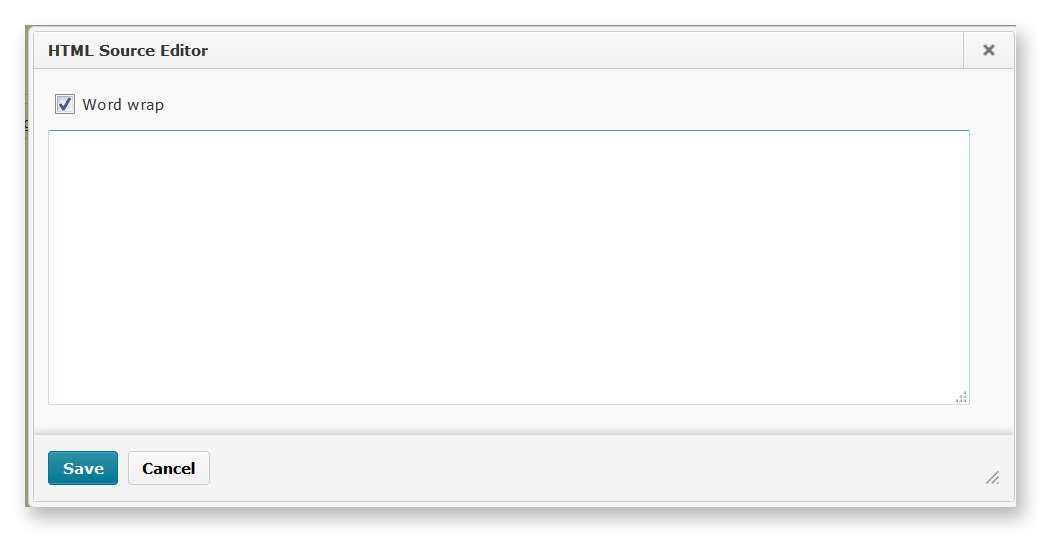
4 – A pop-up window will open.
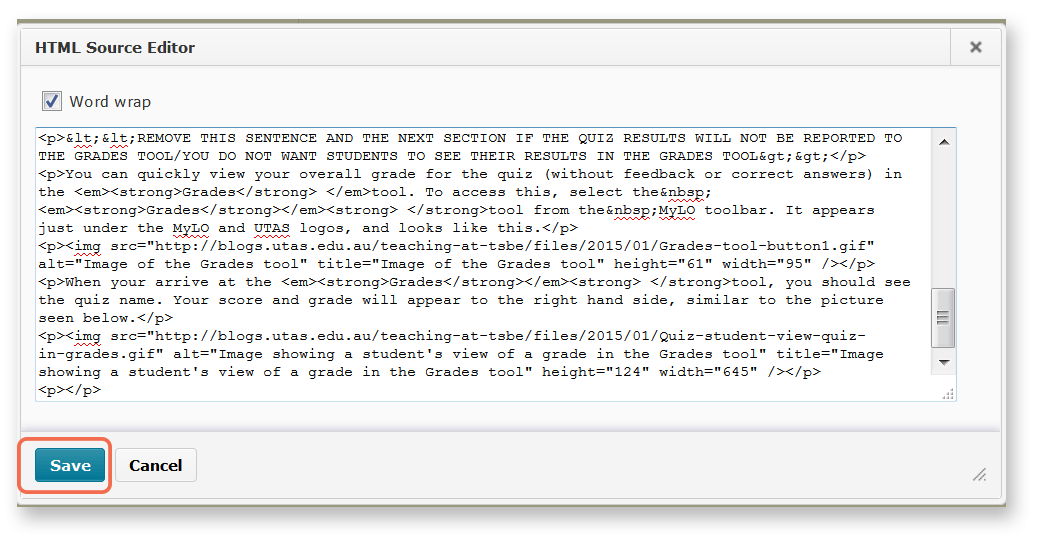
5 – Right-click (CTRL + click on a Mac) over the empty field and select Paste, or click your mouse on the empty field and press CTRL and V (Command + V on a Mac) your keyboard. The code will appear in the field. Click the Save button.
6 – The window will close. You will now notice that the template appears in the WYSIWYG view. You can edit it as you would a Word document, by adding or removing text. We have indicated sections that you may want to edit or remove using upper case text <<LIKE THIS>>. Remember to press Publish or Save (this will depend on which tool you are using) to save your changes.


