Create a MyLO Rubric to provide feedback (without scores)
You can use a MyLO Rubric to provide feedback to students, even if you don’t intend to generate a mark with the Rubric. This type of Rubric is known as an Analytic Text Only. NOTE: You will still need to choose an overall score (level) when marking.
Follow the instructions below to create a Rubric for feedback only. If you would like to use a Rubric for feedback and marking (e.g. to generate an overall score or Grade), check out this post instead.
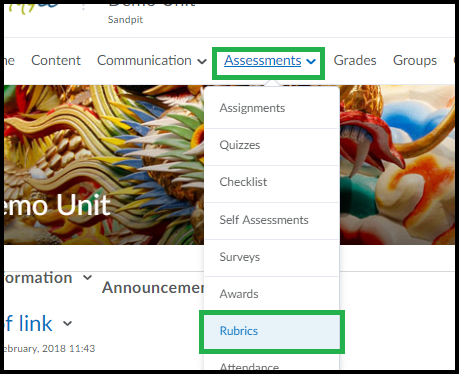
Step 1
Select Assessment > Rubrics from the MyLO toolbar.
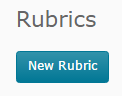
Step 2
Select the New Rubric button.
Step 3
Configure the Properties for your Rubric as shown in the image below.
- Give your Rubric a Name, and keep the Rubric Status as Under Development.
- You can give your Rubric a short Description if you wish to (this is optional).
- The Rubric Type must be set as Analytic.
- Record the Initial # of criteria. This will generally be five: one each for HD, DN, CR, PP and NN. As this Rubric is for feedback only, you may wish to use novel levels, such as Pass/Fail (two levels).
- Record the Initial # of criteria. This reflects how many rows will be seen in the Rubric (other than the Levels header and a final row for the Overall grade). You can add or remove criteria rows later if you need to.
Once you have set the Properties, scroll down and select the Save button.

Step 4
Select the Levels and Criteria tab.

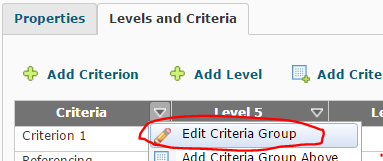
Step 5
By default, the level names are Level 5, Level 4 etc. You will need to change the Level names to names you would like to use. At this point, you can also add your Criterion Descriptions. Select the arrowhead next to Criteria (left cell, top row), then select Edit Criteria Group.
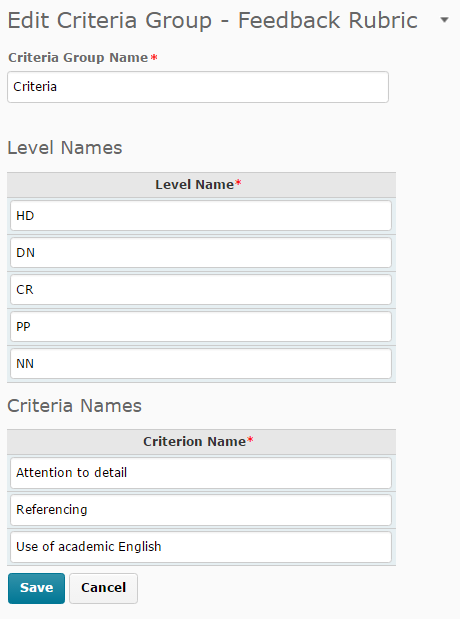
Replace the existing Level names with your own names, then add in the Criterion. For efficiency, you can tab between the fields. You can also paste text (e.g. from a Word document) into each cell using keyboard shortcuts or browser menu options. Scroll down and select the Save button when you have finished (you may need to scroll down to see it).
Step 6
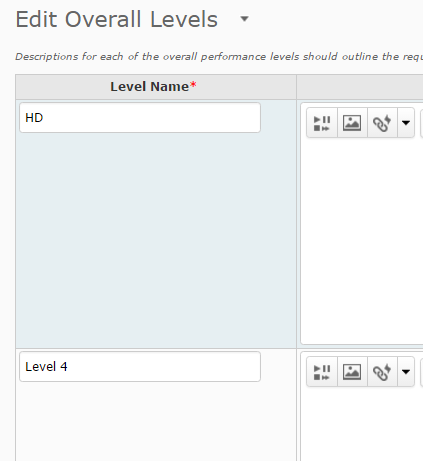
You will now need to edit the Level names in the Overall Score row (bottom row of the Rubric) to match those of the top row. To do this, select the arrowhead next to Overall Score (left cell, bottom row), then select Edit Levels.
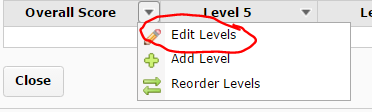
Edit the Overall Level Names. There is no need to add a Description or Feedback. When you have finished, scroll down and select the Save button at the bottom of the page.
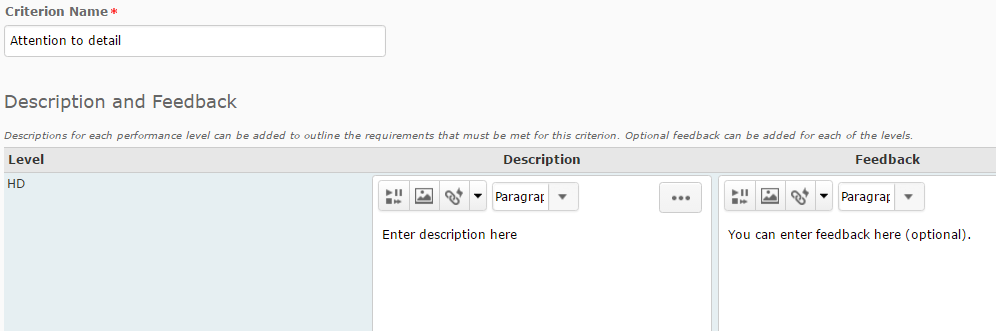
Step 7
You can now enter the Level descriptions for each criterion. You can either edit all the criterion descriptions for the same Level (e.g. those in the same column) by selecting the arrowhead next to a Level and choosing Edit Level…
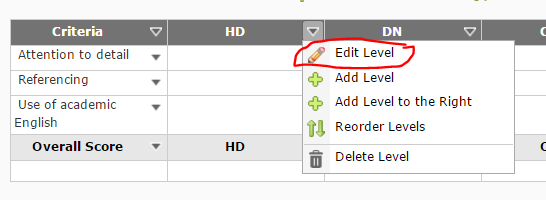
… or edit all the descriptions associated with one criterion (e.g. those in the same row), by selecting the arrowhead next to that criteria, then selecting Edit Criterion.
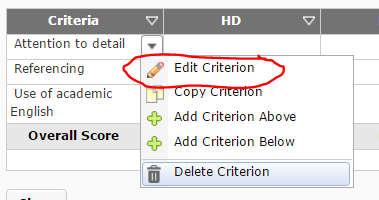
Whichever method you choose, type OR copy and paste in your descriptions into the Description field. You can add Feedback if you wish. A student will only see this feedback if you select this criterion level when marking their work.
Step 8
Continue entering the descriptions until your Rubric is complete. Remember to save your work by selecting the Save button (bottom left of the screen). Once your Rubric is finished, you will need to Finalise it and attach it to the relevant Assignment Submission Folder or Grade Item.
Comments
This post doesn't have any comments