Tool Review: Web Conferencing (Blackboard Collaborate Ultra)
What does it do?
Web comferencing allows staff and students to meet in real time in a virtual (online) space. During a session, participants can use text based chat, audio chat and/or video to communicate. An electronic whiteboard allows for the sharing and live annotation of PowerPoint presentations (though video and animations embedded in PowerPoint presentations will not work). When participant internet connections are reliable, live presentations of your computer screen can also be shared, allowing you to show students through a website, demonstrate the use of an Excel spreadsheet, annotate a Word document and so forth. The moderator of a session has some control over what the participants of the room are able to do with the available tools. The moderator is also able to record all or part of a session for later viewing. You can even invite an external presenter to join the session, even if they are not a UTAS staff member or student.
At present, the Web conferencing tool used at UTAS is Blackboard Collaborate Ultra (often referred to as Ultra). Ultra works on Mac and PC, and mobile devices (when the free Blackboard Student app is installed). Skype for Business is sometimes used, but this tends to be reserved for meetings between UTAS staff.
Useful terminology
- Room: an online space dedicated to your unit. The room is available anytime whilst the unit is active. Many staff refer to this room as a web room to help students differentiate between synchronous face-to-face activity, and synchronous online activity.
- Session: the term used to describe the activity that occurs in a room when the moderator and participants meet together. By default, your unit will have its own room. You can pre-book sessions to take place between set dates and times. These occur in addition to your unit room.
- Moderator: the person/people in control of permissions and functionality in the room. Moderators can remove other participants, control which tools participants can use, change the role of participants (to presenters or moderators), share materials via the room whiteboard and start a recording.
- Presenter: has the same permissions as a participant, but has the ability to share items on the room whiteboard.
- Participant: any person participating in a session that does not have the permissions of a moderator or a presenter.
What is Web conferencing best for?
- Real-time meetings between distributed learners.
- Virtual tutorials, workshops or lectures where interactivity between participants and/or moderator is desired. If a session is more for ‘show and tell’, a video recording is often more suitable than a web conference.
- Student meeting rooms to help support collaborative group work between students.
- Drop-in information sessions, or Q&A sessions about forthcoming assessment tasks.
- Guest lectures, where you would like the guest presenter to respond to student queries (these can be easier to run in a web conferencing setting than in a physical lecture theatre).
Capabilities and tools
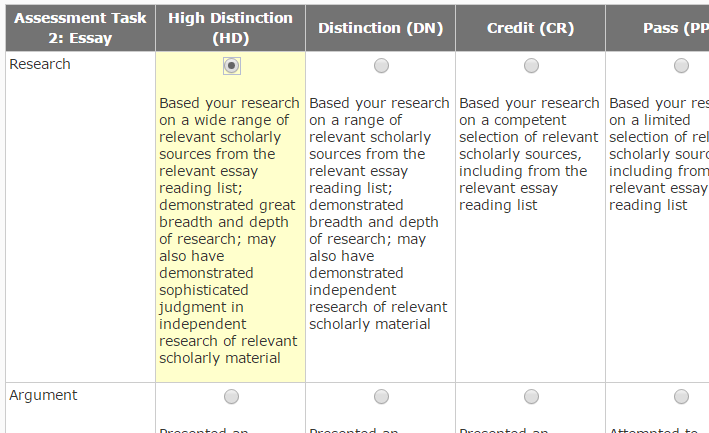
Mark with a Text Only (feedback) Rubric
A Text Only Rubric has no points associated with criterion and levels. Unlike a Custom Points Rubric, this type of Rubric will NOT calculate a score or Overall Level for you. You must select a level of achievement against each criterion, then specify and Overall Level.
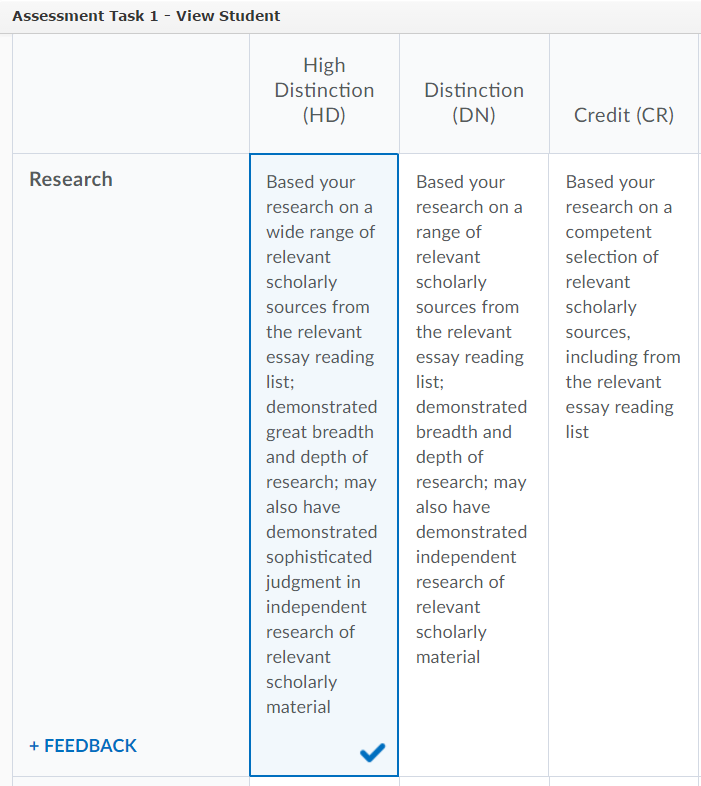
Please note that the ‘look’ of a Rubric may change depending on whether you are marking from an Assignment Submission Folder or from a Grade Item. We have represented this by providing two screen shots for each instruction: the view from an Assignment Submission Folder is always presented in the first image; the view from a Grade Item is always presented in the second image.
Please note that these instructions do not explain how to access a Rubric. You can see how to access a Rubric from an Assignment Submission Folder here, or from a Grade item here.
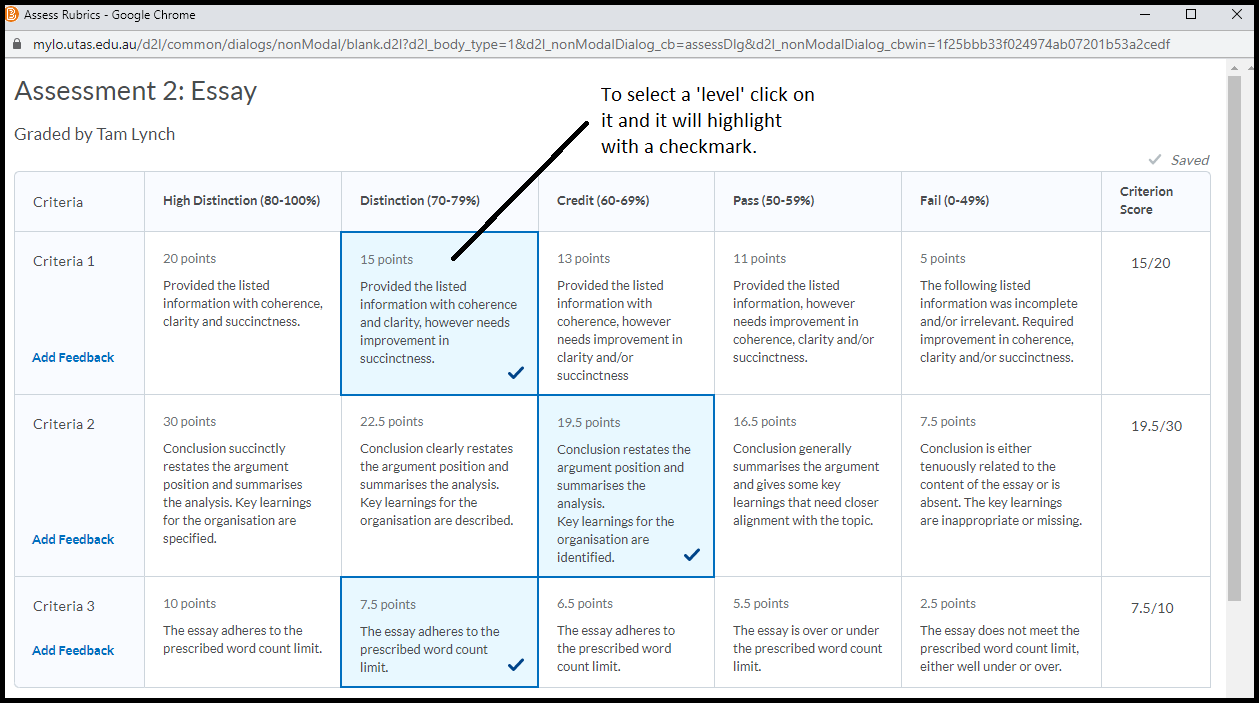
Choose a level for each criterion
Choose a level for each criterion by clicking on it. When marking a Rubric from an Assignment Submission Folder, you will notice that the selected level is highlighted by a selected radio button (see first image). When marking from a Grade Item the selected level will be highlighted, and a small check mark will appear in the bottom right corner (see second image). To change the level, simply click on a different level.
Edit the feedback associated with a level
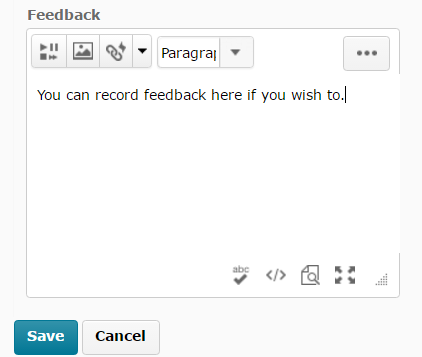
If you wish to provide a student with feedback in relation to a particular criterion, first select the level. You will notice that an editing icon appears. When marking from an Assignment Submission Folder, this icon will appear in the far right column (see top image). When marking from a Grade Item, you will need to select the + FEEDBACK link that appears in the far left column (see bottom image).
![]()
![]()
The editing views are slightly different. If you are marking from an Assignment Submission Folder, a new dialogue box will open. Here, you can record feedback if required (see top image). If you are marking from a Grade Item, you will see a Criterion Feedback field open at the bottom of the selected level. Type in your feedback, then select DONE to save it and keep marking.

From time to time, remember to click the Save button to save your work (appears underneath the Rubric).
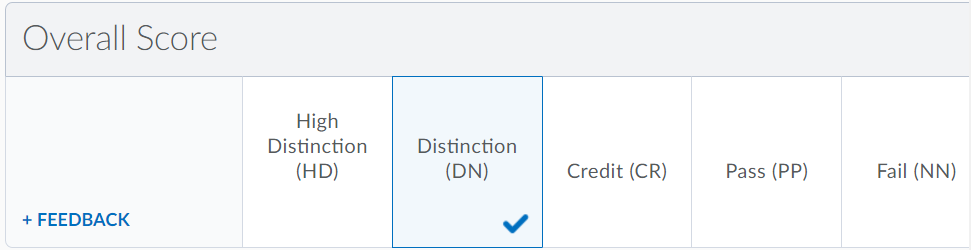
Choose an Overall Level
Once you have chosen levels against each criteria, you will need to select an Overall Level. To do this, select one of the level fields in the bottom row of the Rubric.

Save the Rubric
- If you’re marking from an Assignment Submission Folder, uncheck the Transfer rubric feedback to general feedback for the assignment option (this option is not very useful).

- Finally, select the Save & Record button.

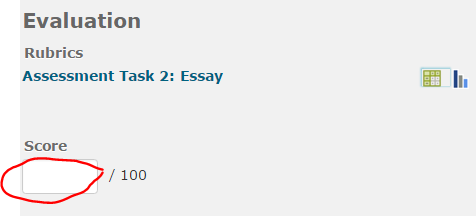
The overall score from the Rubric will not be reflected in the Evaluation Score field in an Assignment Submission Folder (see first image) or in the Grade field in a Grade Item (see second image). You will need to record the score manually. Remember to Save your work after recording the score.

Mark with a Custom Points Rubric (generates a score)
This post covers marking with a rubric that has been set up as a “Custom Points” rubric and that has been attached to either an assignment, discussion or grade item.
A Custom Points Rubric has points associated with each criterion and level of the Rubric. It calculates a total score (and overall level) for a student by adding the points they have scored against each criterion. You are then able to fine-tune this score by overwriting the default scores for each criteria/overall.
This post doesn’t cover setting up the rubric. If you have not done so – set up your rubric following these instruction: (Create a custom points rubric).
To access the rubric for each tool:
Assignment: Click “Evaluate” (or ‘draft saved’) on the right side of the screen in the assignment. The rubrics are then shown as links on the right-side menu area.
Discussion: Click the [v] icon next to the Topic you are assessing then choose “Assess Topic”. From the list of students shown click “Topic Score” and the rubric is shown on the top of the window that loads.
Grade Item (ie, directly into the gradebook): Click the [v] next to the name of the grade and choose “Grade All”. From the window that loads you will see a link to the rubric on the right-side column for each student row.
Note: The Rubric tool will save your work as you go. It is also not possible to edit the rubric in the rubric tool once you’ve started marking, so be sure to preview it in the rubric tool before you start marking to ensure it is correct.
Step 1: Click the ‘level’ for each criteria that best represents the Feedback you wish to provide to students about their work.
The rubric tool is essentially a “feedback” tool – useful for you to calculate a score but primarily the idea is to provide students with useful informative feedback about why the score was arrived at.
The “default” score associated with this level (as set up in the rubric tool) is then shown on the right of the rubric window. You may need to resize this window if you have a large rubric, or scroll sideways to see it.
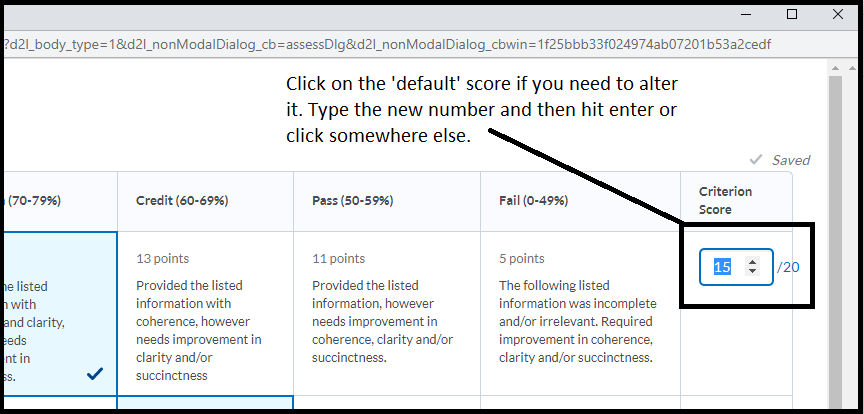
Step 2: Edit the points and feedback associated with a level if required.
Once you’re happy with the criteria levels you’ve chosen to provide to students – you can then alter the score associated with either each level OR the overall score that was calculated.
To edit the score for an individual criteria click on the score as shown on the right of the rubric. Type your new number in and hit enter/return or click elsewhere. Your new score will be highlighted with an asterix to indicate the default was changed. The ‘x’ shown next to the new score will return this score to the default.
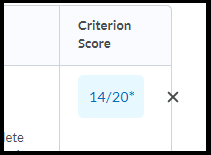 (Showing the score was changed from the default, the X returns the score to the default)
To add written feedback click the ‘add feedback’ link on the left, a box will appear for you to type into. Please note, once you add written feedback here it stays put on the page. Don’t click the X unless you want to wipe what you’ve written*.

Step 3: Check the total at the lower part of the rubric. You can also overwrite this score by clicking on it & typing a new score. You can overwrite the default chosen ‘level’ if your rubric has them – click on the new one to overwrite the default.

Step 4: Click “Close” button at the end of the rubric to finalise the process. Double check the correct score is sent to the ‘score’ field of the tool you’re working in. If it doesn’t – it usually means you have missed a criteria.
* Don’t ask me why it was designed like that, I have no idea why the standard computer logic of x=close was broken for this tool – but here we both are, sighing loudly and reaching for the schnapps.
Access a Rubric from a Grade Item
You may need to mark directly into a Grade Item in the Grades tool. This generally happens when the ‘product’ that students will be assessed on cannot be submitted to an Assignment Submission Folder. For example, you may be assessing student participation or a presentation delivered face-to-face. A Grade Item is often also used to mark contributions to online Discussions. These instructions will show you how to access a Rubric when marking a Grade Item.
Step 1
Open the Grades tool by selecting it from the MyLO toolbar.
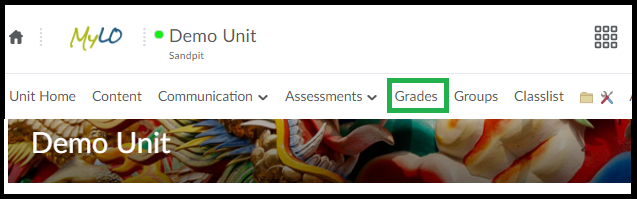
Go to the “Enter Grades” tab.
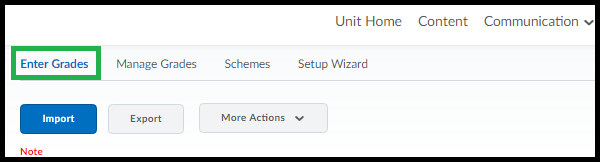
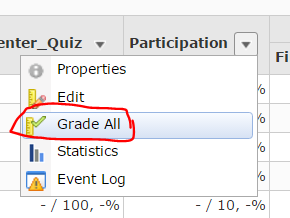
Locate the Grade Item that you wish to mark. You may need to scroll sideways to find it. Select the arrowhead to the right of the Grade Item name, then select Grade All from the menu.
Step 2
The Grade Item page will open. Scroll down until you see the list of student names. TIP: You can filter the names you see by searching for a specific student name OR selecting a specific Group of students. Next to each student’s name, you will see several cells. The first is the Grade cell, where you can record the student’s grade (as a score). The fourth is for Feedback. Clicking on the speech bubble icon in this cell will allow you to add general text feedback for the student to read. The fifth cell, Assessment, contains an icon that will launch the associated Rubric. Click on the icon to launch the Rubric.
![]()
Remember to SAVE on each page!!
Instructions showing how to mark with a Custom Points Rubric (generates a score) are available here. Instructions showing how to mark with a Text Only Rubric (for feedback only) are available here.
Mark Using Rubric from an Assignment Submission Folder submission
Step 1
Go to the Assignments tool from the toolbar.
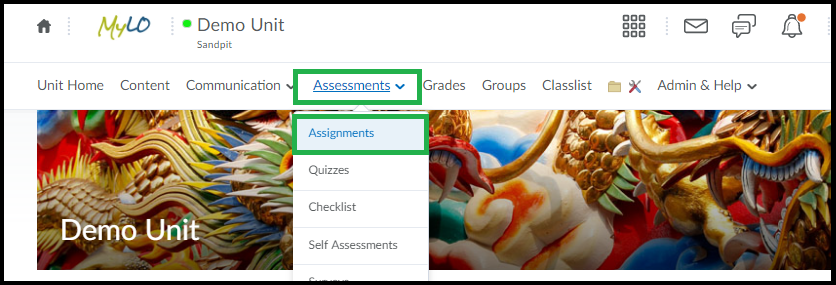
Click on the assignment you wish to mark.
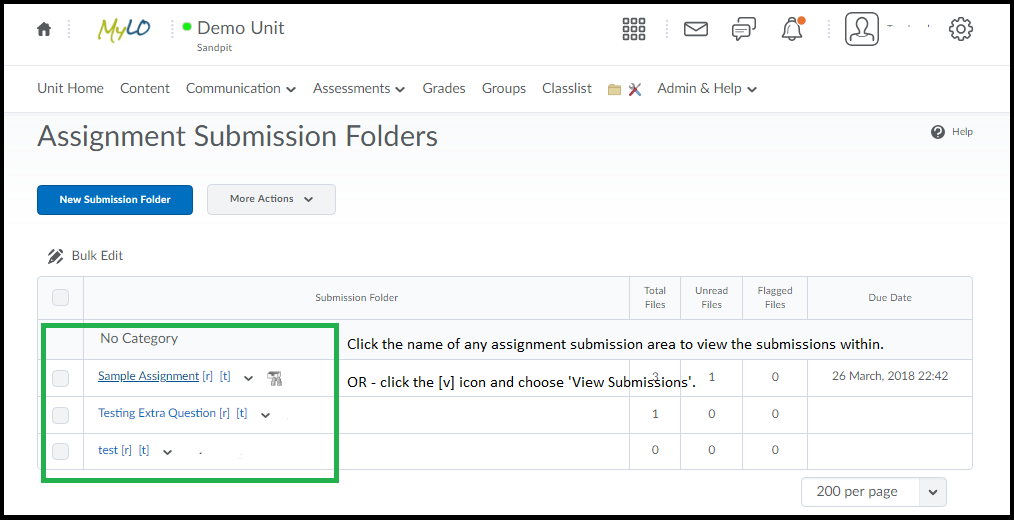
Step 2
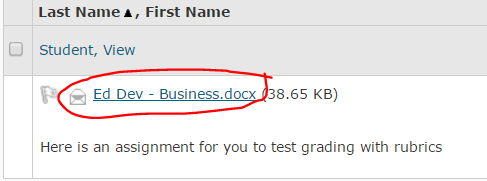
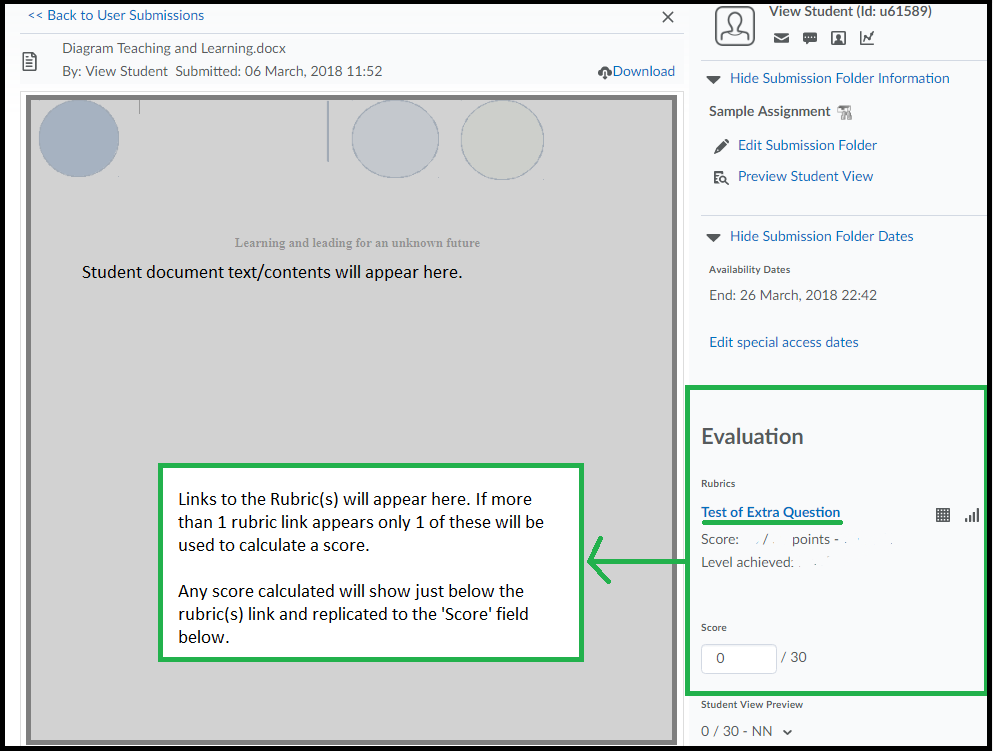
A new page will load. Scroll down until you see a list of student submissions. The student’s names will appear, followed by the files they have submitted. You can view an individual file by clicking on the file name (this is usually the quickest option, especially if students have submitted cover sheets which you do not have to mark).
A preview of the student’s work will load, as the screenshot below shows the content of the assignment will appear to the left, the “Evaluation” area to the right.
Step 3
Click on the name of the rubric to load it up – it will appear in a new window. You may need to resize the window to see the whole rubric. The example below shows a “Custom Points” rubric, this being the most commonly used rubric.
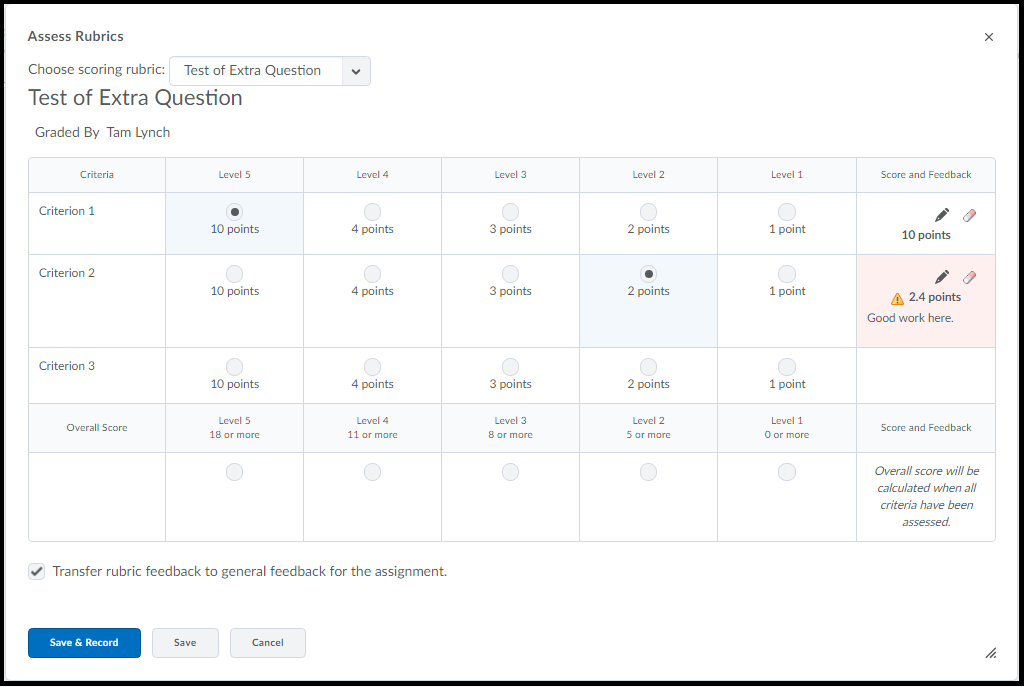
You will see the list of criteria and levels arranged somewhat like above (yours is likely to have more text than this example). To “choose” a level just click the radio button. It is more important to choose the option that contains the most relevant feedback for your student – the default score can be altered.
To alter the score click the Pencil icon – over on the right of the rubric – then enter an alternate score and/or optional feedback text. When you do this you’ll notice a small icon (see above, the second criteria shows as red shaded and an icon in the ‘Score and Feedback’ area indicating that a ‘custom’ score was entered for this criteria.
To have the rubric fully calculate a score you MUST choose an option for EVERY criteria.
When you have completed the rubric choose “Save and Record” to send the score to the ‘Score’ field of the assignment (which then is sent to grades).
(The option you see in the screenshot ‘Transfer rubric feedback’ relates to any text you have typed that gets transferred to the “Feedback” area, this option is on by default but is optional).
When you click Save and Record you will see the score appear in the ‘Score’ field. If none appears it may mean there is a score missing for one of the criteria. You can click on the rubric at any time to edit/alter the mark – just remember to hit save and record each time.
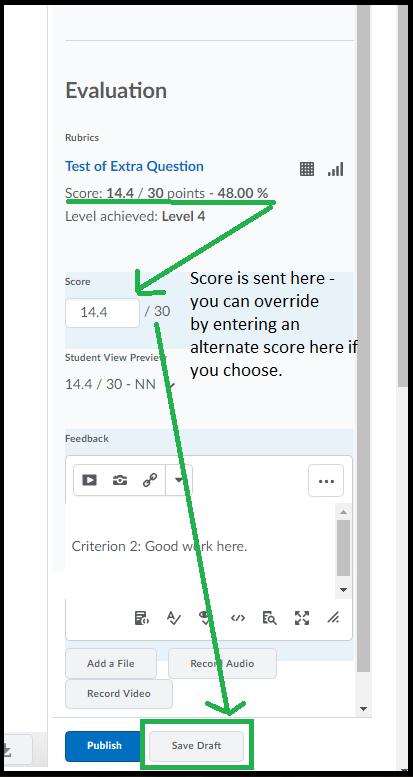
As you can see from the above screenshot the rubric score that was calculated – when I click ‘Save and Record’ – is sent to the ‘Score’ field. You can always alter the score here too if you want.
Remember if you are marking and do not want to release the score to students YET – click ‘Save Draft’.
Instructions showing how to mark with a Text Only Rubric (for feedback only) are available here.
Change your Dialog Setting to increase ease of marking with a Rubric
In the past, when marking a submission to an Assignment Submission Folder, a Rubric would open over the top of a student’s work. To get back to the student’s work, you would either have to save and close the Rubric, or open Grademark in a new browser tab so that you could view the student’s work in one tab and view the Rubric in another tab. Tedious! A personal Dialog setting in MyLO allows you to choose to open ‘dialogue boxes’ in a new window (or pop-up). This means that a Rubric will open in a new window so you can minimise it while looking at a student’s work, move it around your screen easily, or maximise the window so you can see the whole Rubric easily. Yay! To see a demonstration of the difference this setting makes, view this brief video (02:46, opens in new window).
Follow these instructions to change the setting.
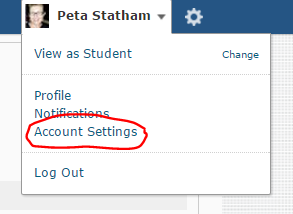
Step 1
Towards the top right of your screen, you should see your name. Click the arrowhead to the left of your name, then select Account Settings.
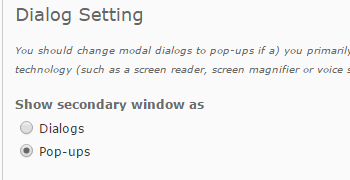
Step 2
Scroll down until you see Dialog Setting heading. Choose the Pop-ups option from the Show secondary window as option, as seen below. Select the Save and Close button (bottom of the screen).
You’re done!
Tool Review: Rubrics
What does it do?
The Rubrics tool can create rubrics for assessment and feedback purposes. Many academics have reported that using electronic Rubrics makes the process of marking, feedback and moderation far more efficient. The following table compares the two most common types of MyLO Rubrics: Analytic > Text Only; and Analytic > Custom Points. Alternatively, this video demonstrates the two Rubric types, and points out the main differences between them (4:25, opens in new window).
Tool capabilities
Custom Points Rubric |
Text Only Rubric |
||
| Assign a weighting (value) to each criterion | |
||
| Indicate level acheived for each criterion | |
||
| Calculate a total score based on levels achieved for each criterion | |
||
| Hide overall/criterion scores from students (e.g. only show level descriptor like HD, DN etc) | N/A | ||
| Alter criterion/overall scores whilst marking | N/A | ||
| Use with an Assignment Submission Folder | |
||
| Use with a Grade Item |
Helpful resources and instructions
- Samples of rubrics
- Samples of assessment criteria for online Discussion activities
- Create a MyLO Rubric that will calculate a Grade (Custom Points Rubric)
- Create a MyLO Rubric to provide feedback (Text Only Rubric)
- Attach a Rubric to an Assignment Submission Folder so you can mark with it
- Attach a Rubric to a Grade Item so you can mark with it (best for Discussions or Presentations)
- Access a Rubric from an Assignment Submission Folder submission (when marking)
- Access a Rubric from a Grade Item (when marking)
- Mark with a Text Only (feedback) Rubric
- Mark with a Custom Points Rubric (generates a score)
- Override the score generated by a Custom Points Rubric
- Use Rubric statistics to assist with assessment moderation
Useful shortcuts when adding and editing text in MyLO
You may find that using keyboard shortcuts increases speed, and reduces the likelihood of accidentally de-selecting text, when copying text (e.g. from a Word document) and pasting it into HTML Pages, Discussion Posts, Announcements, Quizzes and Rubrics in MyLO.
With practice, these shortcuts will become second nature. Always ensure that you have the correct text selected, have your cursor in the correct position or have the correct field selected before using these shortcuts (does not apply to Undo shortcut).
PC |
Mac |
|||||
|---|---|---|---|---|---|---|
Copy |
CTRL | + | C | Command | + | C |
Paste |
CTRL | + | V | Command | + | V |
Undo |
CTRL | + | Z | Command | + | Z |
Select All Text(in the active window/cell) |
CTRL | + | A | Command | + | A |
Monitoring and reporting on student engagement
In November 2016, Academic Senate determined that actions must be taken to monitor student engagement in all units. A student is considered actively engaged when they undertake and complete activities. Students who display minimal or no engagement with unit activities may be subject to university-initiated withdrawal.
If you are coordinating a unit, you will be expected to participate in the engagement monitoring process from Semester 2, 2017.
What you will need to do
You will need to incorporate two activities that can be used as indicators of student engagement in your unit. Both activities must occur within the first four weeks of semester. Records of student participation in these activities must be recorded in the Grades tool of your unit’s MyLO site. The data must be recorded in the Grades tool by the Friday (5pm) of Week 4.
The university will pull engagement data from your unit’s MyLO Grades tool*: you will need to ensure that your MyLO unit is set up correctly to facilitate collection of the data. This means that you will need to:
- Identify two activities that will be used to measure student engagement;
- Clearly identify the two activities to students in your Unit Outline;
- Set up two Grade Items in your unit’s Grades tool using the correct naming conventions; and
- Record participation data in the Grade Items. This may occur automatically (e.g. when a Quiz activity is used), or manually.
*Though we were initially advised that a computer script would automatically draw student engagement data from MyLO Grades, it appears unlikely that this technology will be developed in time for Semester 2. As a result, Unit Coordinators may need to review the Student Engagement Activity data that they have recorded in their MyLO Grades tool, and report any disengaged students. We will update this page as soon as we receive further information about the reporting procedure for Semester 2, 2017.
Identify two activities
The activities need to indicate active student participation: they do not need to provide a measure of student learning. You can use activities that already occur within the first four weeks of your unit, or you may wish to add new activities. The following table provides a list of common activities. It also indicates whether reporting to the Grades tool can be automated, or whether a level of manual data input (from the teaching team) will be required. Engagement should be reflected by a simple scoring (assuming that 0 indicates a lack of engagement).
Activity |
Reporting to Grade Item |
|
|---|---|---|
| Students… | Auto Input | Manual Input |
| Students complete a Quiz (could be non-assessable/assessable) | |
|
| Students complete an assessable SCORM package (advanced) | |
|
| Students view an introductory video or lecture via Echo360 ALP (MyMedia) | |
|
| Students submit to an Assignment Submission Folder | |
|
| Students attend a class/classes face to face or online (e.g. a web conference) | |
|
| Students add themselves to a MyLO Group | |
|
| Students contribute to an introductory Discussion or Discussion Activity | |
|
| Students participate in a Survey | |
|
| Students complete a Checklist | |
|
| Students mark a Content item as complete | |
|
Clearly identify the two engagement activities to students through your Unit Outline
The type of Unit Outline that you use may vary depending on your College or Discipline. The latest version of the UTAS Unit Outline Proforma (available here) includes a section called Specific attendance/performance requirements. Here you can record details of your Student Engagement Activities so that students clearly understand what is required of them.
Set up two Grade Items using the correct naming conventions
You must include two Grade Items in your unit’s Grades tool: one for each Engagement Activity. If your College or Faculty has a support team, they may set up the Grade Items for you by request.
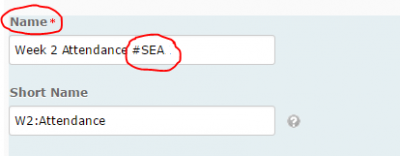
The full name of these Grade Items must incorporate the phrase #SEA. When you create or edit a Grade Item, record the correct name into the Name field in the Properties tab.
The way you set up the Grade Items will vary according to the type of engagement activity that you have designed. These Solutions to Common Grading Scenarios will help you determine the best way to set up your Grade Items. Some Grade Items will be standalone, that is, not connected to any MyLO tool. Others may be directly connected to a tool like a Quiz.
For further advice about setting up Grade Items, please contact your Faculty or School’s online/blended learning support team.
Record participation data in the Grade Items
By 5pm Friday of the end of Week 4, the Grade Items associated with each Engagement Activity must have a score recorded for each student (e.g. 0 for non-engagement, and 1 for engagement). The way you record this data will depend on the type of activity and the way you have set up your Grade Items. Tutors and other members of the teaching team may need some training to ensure that they know how to record these scores efficiently and correctly.
For further advice about recording data in Grade Items, please contact your Faculty or School’s online/blended learning support team.
Provide a link to an individual MyMedia (Echo360) recording on a HTML page
Many MyLO units include a link to a MyMedia Echo360 section. This provides students with access to a list of all the recordings (known as classes) associated with the unit. Though access to a full list of recordings is very useful, students can find it difficult to keep track of which recordings they should watch during a given week, especially if recordings are not clearly named or not listed in order. It is possible to provide students with a link to a single recording using the External Learning Tools feature. Here’s how to add a link to an HTML page. Step 2 onward can also be applied to Announcements and Discussion Posts.
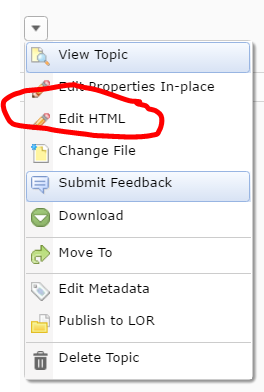
Step 1
In Content, locate the page you wish to add the link to. Choose to edit the page by selecting the Edit HTML button or select the black arrowhead next to the page’s name and select Edit HTML.
![]()
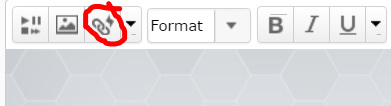
Step 2
Place your cursor on the page by clicking (once) where you would like the link to appear. Now select the Quicklinks tool from the editing toolbar. It will be the third icon from the left.
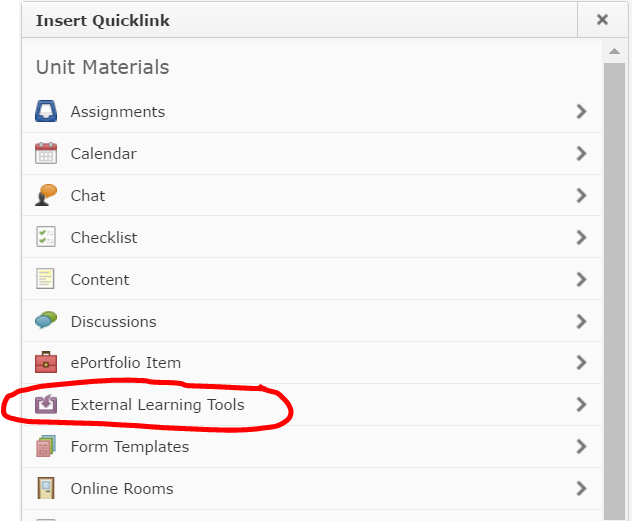
Step 3
The Quicklinks window will open. Select the External Learning Tools option.
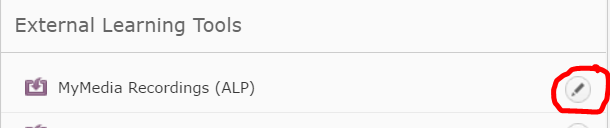
Step 4
Select the small pencil (Options) icon that appears to the right of the MyMedia Recordings (ALP) option.
Step 5
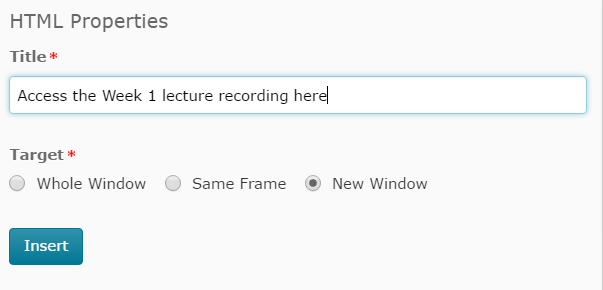
At this point, you can rename the link by changing the text in the Title field (by default, it will say MyMedia Recordings (ALP)). For example, Access the Week 1 lecture recording here (opens in new window). We recommend including the phase “(opens in new window)” in the link title for accessibility purposes.
Select the New Window option. Finally, select the Insert button.
Step 6
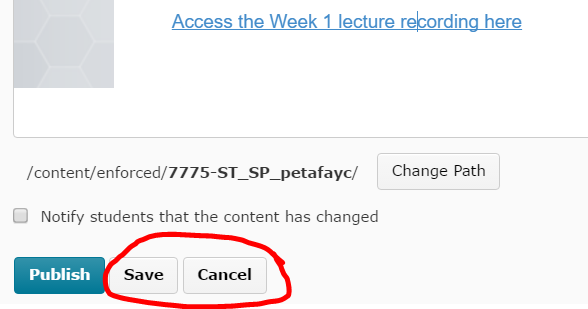
The link will now appear in your page. You will now need to tell it which recording to show students. First, scroll to the bottom of your page and select the Save button, then Cancel button. If the page is already available to students, you will need to select the Update option instead.
Step 7
Now that your page is back in preview mode, click on the link that you have just created to open your Echo360 MyMedia section in a new tab.
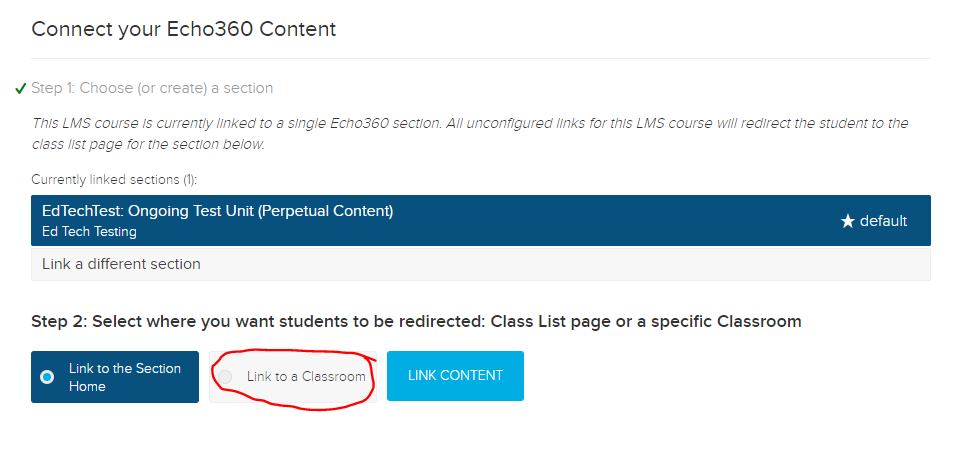
If you are linking to a section for the first time from this unit, you will need to choose a Course (unit code), Term (semester and year), and Section (the semester and year again) first. If you have already linked to the section from this MyLO unit, you will be presented with the section straight away. Select the Link to Classroom option.
Step 8
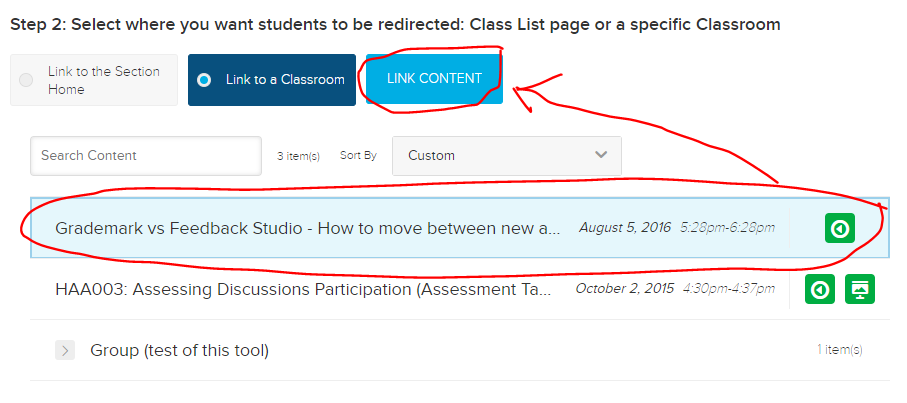
A list of all the recordings will appear. Select the recording you wish students to view by clicking on it so that it becomes highlighted. Scroll back towards the top and select the Link Content button.
That’s it! You’re done.