Tag
Grade item
How to create a numerical grade item
The numeric grade is the one you’re likely to use the most so here’s how to make one!
Follow these basic steps.
1. Go to the ‘Grades’ tool.
2. Go to ‘Manage Grades’ tab.
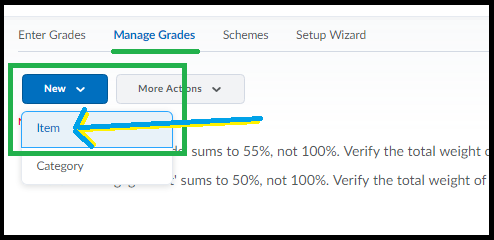
3. Click New then choose ‘Item’.
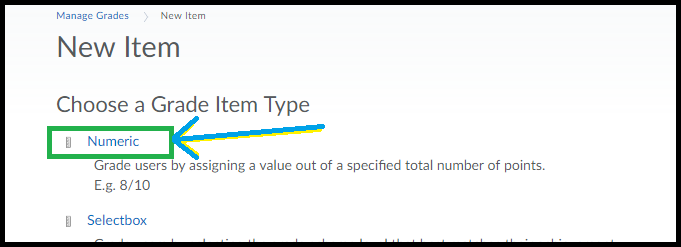
4. Choose ‘Numeric’ from the options that load.
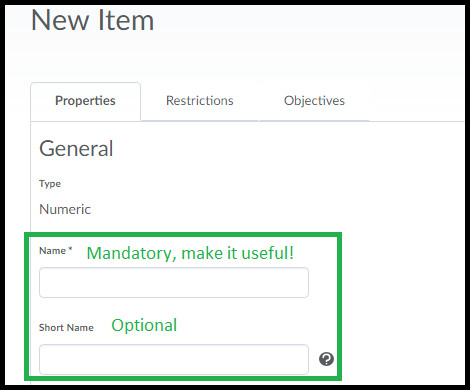
A window will load that has all the options you can set for the grade.
5. Give your grade a useful name. If the name you enter is really long do an optional short name as well so your gradebook isn’t unwieldy.
* Optional: Choose the Category, if you’re using them (it’s not mandatory, so if you’ve never heard of categories you can ignore this option for now). You can also enter a description here – if you want. Also optional.
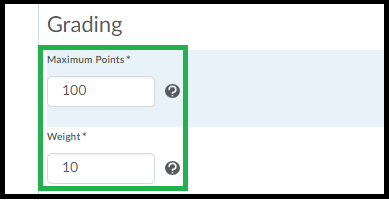
6. Enter the Maximum Points for this grade. If you’re using a weighted gradebook, you’ll also be asked for the grade’s weighting.
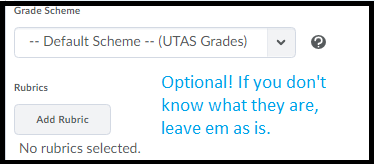
* Optional: There are some other optional settings here, if you want to grade via a rubric directly in the Gradebook – add a rubric here. You can also change the ‘scheme’ – the default is the HD, DN, CR etc scheme.
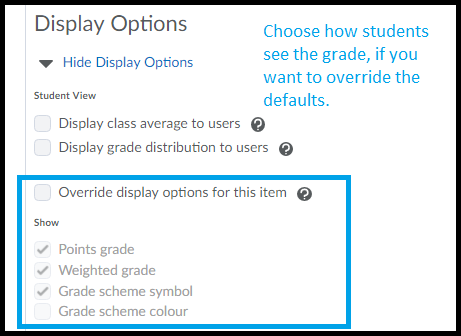
* Optional: The ‘Display options’ allow you to change how your students see the grade item. The default will be shown, click to over-ride the default if you want and select/deselect as you see fit. The options under ‘managing view’ control what ‘staff’ in the unit see.
7. Click ‘Save and Close’ if you are done. Or Save and New if you want to make more grade items.
Your grade is added to the bottom of the list. To re-order click the “More Options” button at the top of your ‘Manage Grades’ area and choose ‘Re-Order’.
Allow students to see a Grade Item / Hide a grade item
Many staff hide Grade Items from students until they have finished marking and moderating results. When a Grade Item is made available to students, they will see the full name of the Grade Item, together with any results you have made available to them, in their view of the Grades tool.
Is my Grade Item hidden?
To determine whether a Grade Item is hidden, go to the Grades tool. Select the Manage Grades tab.
You should now see a list of all the Grade Items included in your unit’s Grades tool. If your Grade Item has a closed-eye symbol to the right of its name, as shown in the example below, it is hidden to students. If you cannot see the closed-eye icon, it means that students can see the Grade Item.
To Hide or ‘un-hide’ a Grade Item
From the Manage Grades view, select the small black arrowhead to the right of the Grade Item name, then select Edit Grade Item from the menu.
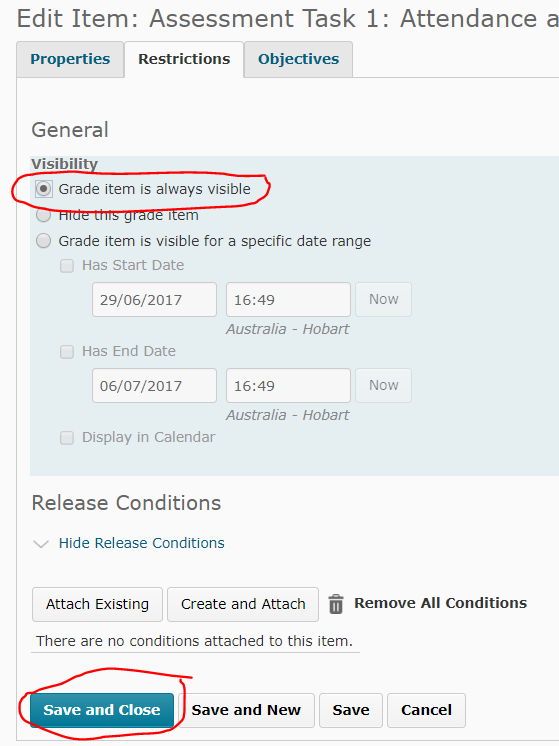
Select the Restrictions tab.
To Hide just choose the option for ‘Hide this grade item’
To unhide select the Grade Item is always visible option.
You can also select the third option to show the grade once a specific date has been reached.
When you’re done click Save and Close (towards the bottom of the screen) to save your change.
Mark with a Text Only (feedback) Rubric
A Text Only Rubric has no points associated with criterion and levels. Unlike a Custom Points Rubric, this type of Rubric will NOT calculate a score or Overall Level for you. You must select a level of achievement against each criterion, then specify and Overall Level.
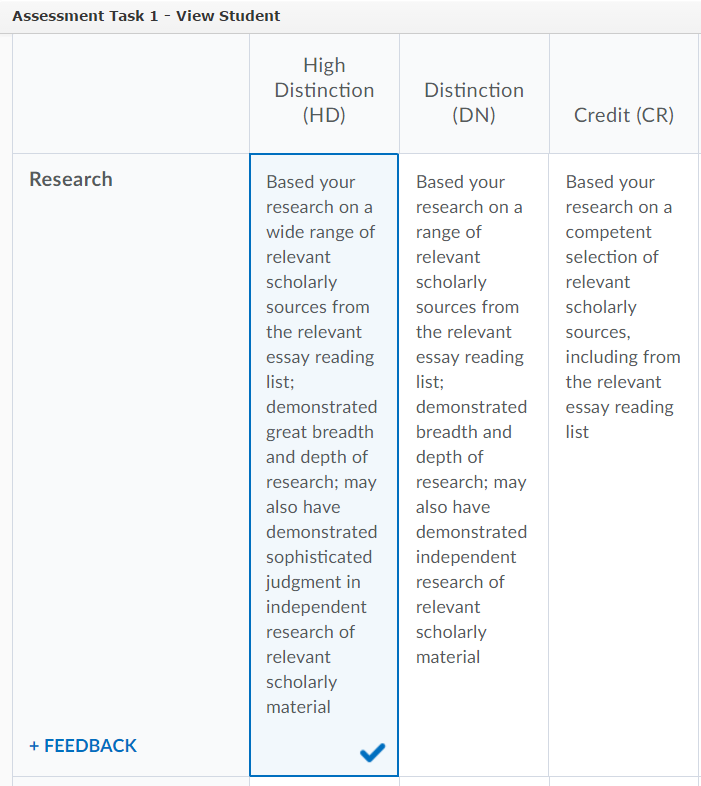
Please note that the ‘look’ of a Rubric may change depending on whether you are marking from an Assignment Submission Folder or from a Grade Item. We have represented this by providing two screen shots for each instruction: the view from an Assignment Submission Folder is always presented in the first image; the view from a Grade Item is always presented in the second image.
Please note that these instructions do not explain how to access a Rubric. You can see how to access a Rubric from an Assignment Submission Folder here, or from a Grade item here.
Choose a level for each criterion
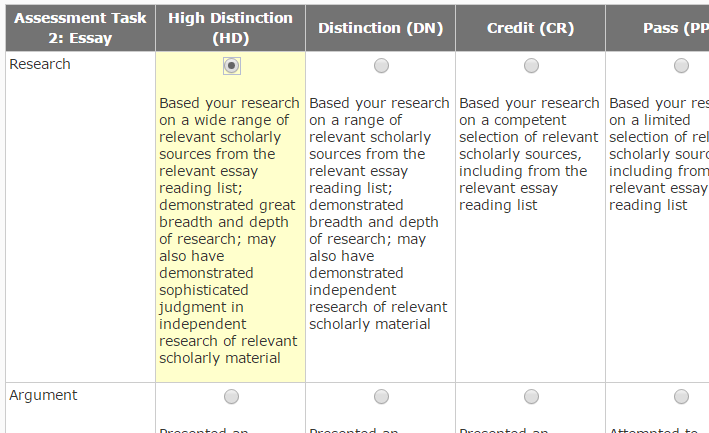
Choose a level for each criterion by clicking on it. When marking a Rubric from an Assignment Submission Folder, you will notice that the selected level is highlighted by a selected radio button (see first image). When marking from a Grade Item the selected level will be highlighted, and a small check mark will appear in the bottom right corner (see second image). To change the level, simply click on a different level.
Edit the feedback associated with a level
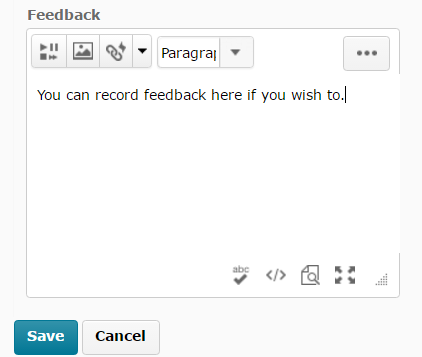
If you wish to provide a student with feedback in relation to a particular criterion, first select the level. You will notice that an editing icon appears. When marking from an Assignment Submission Folder, this icon will appear in the far right column (see top image). When marking from a Grade Item, you will need to select the + FEEDBACK link that appears in the far left column (see bottom image).
The editing views are slightly different. If you are marking from an Assignment Submission Folder, a new dialogue box will open. Here, you can record feedback if required (see top image). If you are marking from a Grade Item, you will see a Criterion Feedback field open at the bottom of the selected level. Type in your feedback, then select DONE to save it and keep marking.
From time to time, remember to click the Save button to save your work (appears underneath the Rubric).
Choose an Overall Level
Once you have chosen levels against each criteria, you will need to select an Overall Level. To do this, select one of the level fields in the bottom row of the Rubric.
Save the Rubric
- If you’re marking from an Assignment Submission Folder, uncheck the Transfer rubric feedback to general feedback for the assignment option (this option is not very useful).
- Finally, select the Save & Record button.
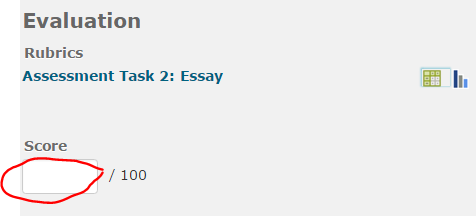
The overall score from the Rubric will not be reflected in the Evaluation Score field in an Assignment Submission Folder (see first image) or in the Grade field in a Grade Item (see second image). You will need to record the score manually. Remember to Save your work after recording the score.
Mark with a Custom Points Rubric (generates a score)
This post covers marking with a rubric that has been set up as a “Custom Points” rubric and that has been attached to either an assignment, discussion or grade item.
A Custom Points Rubric has points associated with each criterion and level of the Rubric. It calculates a total score (and overall level) for a student by adding the points they have scored against each criterion. You are then able to fine-tune this score by overwriting the default scores for each criteria/overall.
This post doesn’t cover setting up the rubric. If you have not done so – set up your rubric following these instruction: (Create a custom points rubric).
To access the rubric for each tool:
Assignment: Click “Evaluate” (or ‘draft saved’) on the right side of the screen in the assignment. The rubrics are then shown as links on the right-side menu area.
Discussion: Click the [v] icon next to the Topic you are assessing then choose “Assess Topic”. From the list of students shown click “Topic Score” and the rubric is shown on the top of the window that loads.
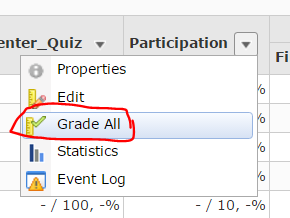
Grade Item (ie, directly into the gradebook): Click the [v] next to the name of the grade and choose “Grade All”. From the window that loads you will see a link to the rubric on the right-side column for each student row.
Note: The Rubric tool will save your work as you go. It is also not possible to edit the rubric in the rubric tool once you’ve started marking, so be sure to preview it in the rubric tool before you start marking to ensure it is correct.
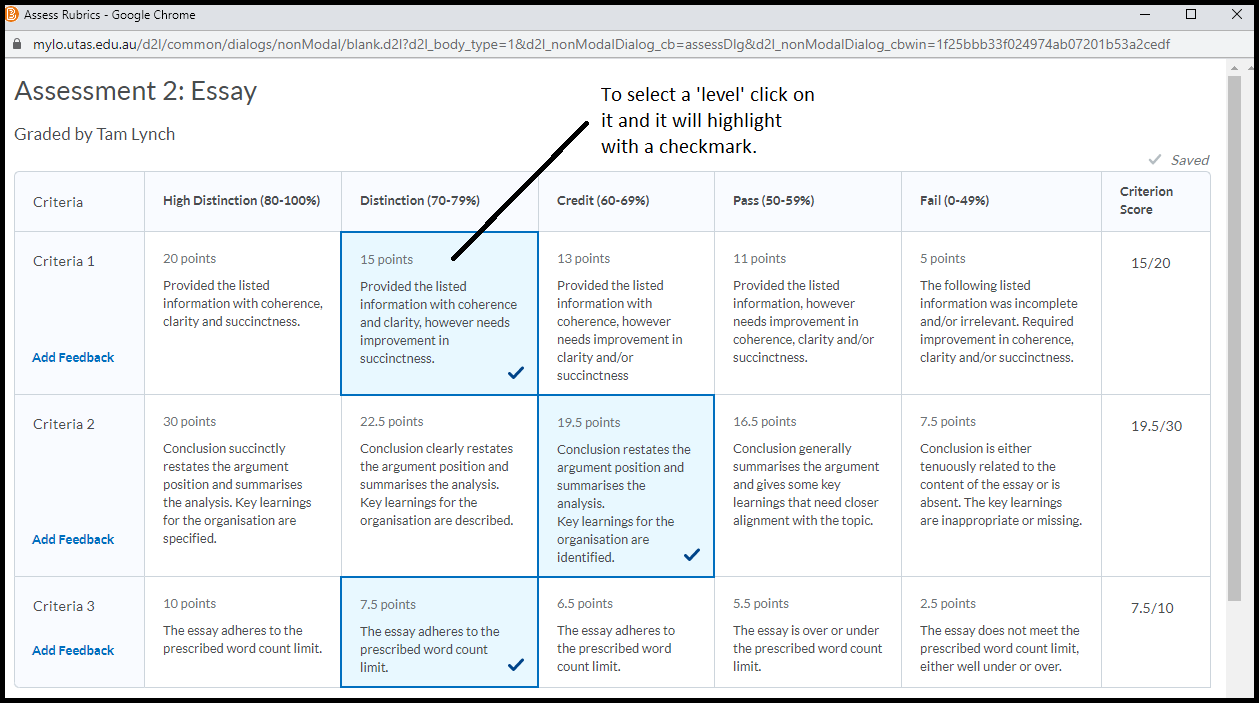
Step 1: Click the ‘level’ for each criteria that best represents the Feedback you wish to provide to students about their work.
The rubric tool is essentially a “feedback” tool – useful for you to calculate a score but primarily the idea is to provide students with useful informative feedback about why the score was arrived at.
The “default” score associated with this level (as set up in the rubric tool) is then shown on the right of the rubric window. You may need to resize this window if you have a large rubric, or scroll sideways to see it.
Step 2: Edit the points and feedback associated with a level if required.
Once you’re happy with the criteria levels you’ve chosen to provide to students – you can then alter the score associated with either each level OR the overall score that was calculated.
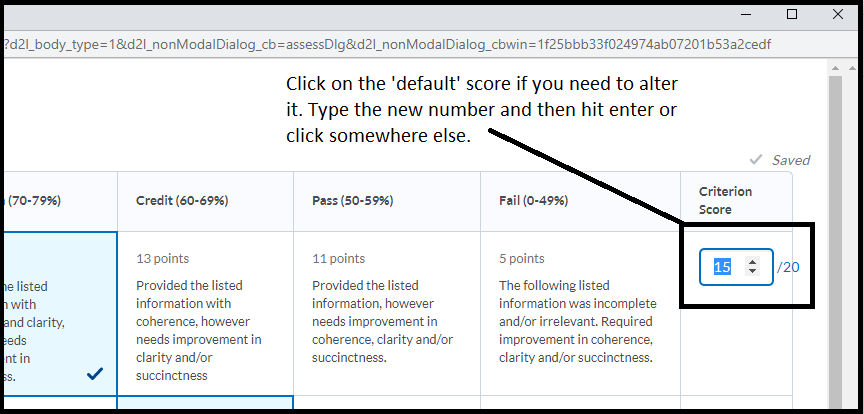
To edit the score for an individual criteria click on the score as shown on the right of the rubric. Type your new number in and hit enter/return or click elsewhere. Your new score will be highlighted with an asterix to indicate the default was changed. The ‘x’ shown next to the new score will return this score to the default.
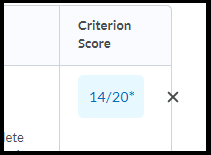 (Showing the score was changed from the default, the X returns the score to the default)
To add written feedback click the ‘add feedback’ link on the left, a box will appear for you to type into. Please note, once you add written feedback here it stays put on the page. Don’t click the X unless you want to wipe what you’ve written*.
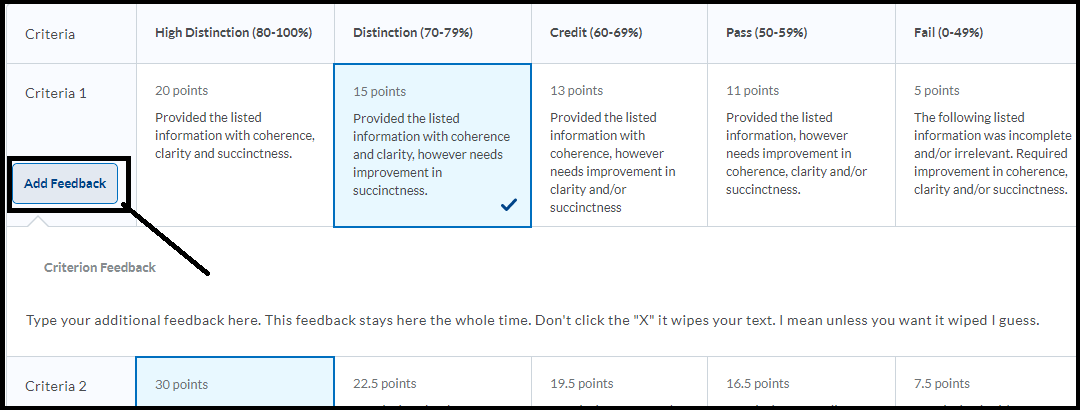
Step 3: Check the total at the lower part of the rubric. You can also overwrite this score by clicking on it & typing a new score. You can overwrite the default chosen ‘level’ if your rubric has them – click on the new one to overwrite the default.
Step 4: Click “Close” button at the end of the rubric to finalise the process. Double check the correct score is sent to the ‘score’ field of the tool you’re working in. If it doesn’t – it usually means you have missed a criteria.
* Don’t ask me why it was designed like that, I have no idea why the standard computer logic of x=close was broken for this tool – but here we both are, sighing loudly and reaching for the schnapps.
Access a Rubric from a Grade Item
You may need to mark directly into a Grade Item in the Grades tool. This generally happens when the ‘product’ that students will be assessed on cannot be submitted to an Assignment Submission Folder. For example, you may be assessing student participation or a presentation delivered face-to-face. A Grade Item is often also used to mark contributions to online Discussions. These instructions will show you how to access a Rubric when marking a Grade Item.
Step 1
Open the Grades tool by selecting it from the MyLO toolbar.
Go to the “Enter Grades” tab.
Locate the Grade Item that you wish to mark. You may need to scroll sideways to find it. Select the arrowhead to the right of the Grade Item name, then select Grade All from the menu.
Step 2
The Grade Item page will open. Scroll down until you see the list of student names. TIP: You can filter the names you see by searching for a specific student name OR selecting a specific Group of students. Next to each student’s name, you will see several cells. The first is the Grade cell, where you can record the student’s grade (as a score). The fourth is for Feedback. Clicking on the speech bubble icon in this cell will allow you to add general text feedback for the student to read. The fifth cell, Assessment, contains an icon that will launch the associated Rubric. Click on the icon to launch the Rubric.
Remember to SAVE on each page!!
Instructions showing how to mark with a Custom Points Rubric (generates a score) are available here. Instructions showing how to mark with a Text Only Rubric (for feedback only) are available here.
Grading Solution: Track student progress without generating a grade
This solution would suit scenarios like this:
- You/your tutors monitor students’ participation in weekly tutorials and workshops. Participation is not assessable; however, you wish to collect data about participation to inform the ongoing development of your unit.
- You/your tutors monitor students’ participation in weekly tutorials and workshops for assessment purposes. You would prefer to make a judgement about a student’s participation overall (rather than have MyLO calculate a score automatically), and record a mark based on your judgement.
Grading system and other requirements
This method requires the use of a weighted grading system. You will need to develop your own scoring system for tracking student participation. For example, a simple system might be as follows:
- 0 – indicates non-attendance;
- 1 – indicates attendance but minimal participation;
- 2 – indicates a reasonable level of participation; and
- 3 – indicates a high level of participation.
Your Category will initially need to be assigned a weighting (e.g. if participation is worth 10% of the unit, assign a Weight of 10). This will allow you to track how students perform over time using the Category Subtotal. This weighting is changed to 0% later in the unit, so that it does not impact on the Final Calculated Grade. If you wish to track participation, we suggest that you export the Category and Subtotal to an Excel spreadsheet before you change the Category weight to 0. This way, you will retain a record of the Subtotal. If you wish to manually generate a final overall participation mark for assessment purposes, you should create a Standalone Grade Item and record grades into it before you change the Category weight to 0.
When marking, you will need to record 0 as the grade for any un-submitted Quizzes or to represent non-attendance/lack of participation.
You will need to:
- Create one Category to represent the assessment task (if participation is assessable) to organise your weekly items. Use the options suggested here.
- Create one Grade Item for each week. Use the options suggested here. You must link each Grade Item to the Category that you have created.
- If you wish to manually generate an overall grade for the assessment task, we suggest creating another standalone Grade Item that is not linked to the Category you have created. Weight the Grade Item accordingly (e.g. if the assessment is worth 10%, record 10 as the weight). Use the options suggested here.
To see an example of what this solution might look like in the Grades tool, download this PDF.
Grading Solution: Students submit several items. Only a select number of these items will count towards the final grade for the assessment task
This solution would suit scenarios like this:
- Each week, students complete a Quiz as preparation for class. There are 12 Quizzes. The two lowest scores are dropped, so that the 10 remaining Quizzes contribute 10% each towards Assessment Task 2, worth a total of 10 marks.
- You wish to monitor student participation. Each week, a score is recorded for each student in a standalone Grade Item. The five highest scoring Grade Items are calculated to form the final grade for Assessment Task 2, worth a total of 10 marks.
Grading system and other requirements
This method requires the use of a weighted grading system. When marking, you will need to record ‘0’ as the grade for any un-submitted Quizzes or to represent non-attendance/lack of participation. Once the students have completed their final task, you will need to make a slight alteration to the Category settings so that the Category ‘drops’ the required number of Grade Items.
You will need to:
- Create one Category to represent the assessment task and use the options suggested here.
- Create one Grade Item per task, either standalone (for participation marking) or to be linked to a tool like a Quiz. Use the options suggested here. You must link each Grade Item to the Category that you have created.
- Link each Quiz (where relevant) with one of your new Grade Items. Note that you can skip this step if you have created Standalone Grade Items.
To see an example of what this solution might look like in the Grades tool, download this PDF.
When marking:
The Category Subtotal will calculate correctly only if you record a zero (0) for each un-submitted piece of work. Here are some instructions on how to mark un-submitted items with a 0 quickly.
Grading Solution: Distance students and face-to-face students complete different items as part of the same assessment task
This solution would suit scenarios like this:
Students will deliver a presentation and then respond to questions from teachers and peers for an Assessment Task worth 35 marks. Face-to-face (F2F) students deliver their presentation and respond to questions in class. You will use a standalone Grade Item to provide F2F students with a grade and feedback. Distance students will pre-record a presentation. They will submit a copy to a Dropbox (worth 70%). You make the presentations available for viewing by linking to them to Discussion Topic. You will mark the Discussion Topic to assess how students respond to questions about their presentation (worth 30%).
Grading system and other requirements
This method requires the use of a weighted grading system. See also the instructions for marking un-submitted and irrelevant items below.
You will need to:
- Create one Category to represent the assessment task and use the options described here.
- Create one Grade Item per assessment item and use the options described here. You must link each Grade Item to the Category that you have created.
- Link each Dropbox/Discussion/Quiz with one of your new Grade Items. If students perform a task in class and do not need to submit items electronically, you can skip this step.
To see an example of what this solution might look like in the Grades tool, download this PDF.
When marking:
- Do not record a mark for items that a student does not need to submit.
- If a student fails to submit an item that they are expected to complete, record a 0 as their grade.
In the example below, Tam is studying F2F, while View Student is studying by Distance. Tam has received a mark of 67/100 for the presentation she delivered in class. No marks need to be recorded for the other tasks, as the F2F Presentation is worth 100% of Assessment 3 (A3) for F2F students.
View Student, on the other hand, failed to participate in the Distance Q&A required of Distance students. To account for this, a 0 mark was recorded for this task, bringing down the student’s overall mark (Subtotal) for the assessment task accordingly.
Grading Solution: Grade a single assessment task comprising two or more items
This solution would suit scenarios like this:
- Students submit four items at different points, each to a separate Dropbox. Three submissions are each worth 10%. The fourth submission is worth 70% of Assessment Task 3.
- Students submit four items at different points during your unit, each to a separate Dropbox. Each submission is worth 25% of Assessment Task 3.
- Students complete 10 Quizzes. Each Quiz is worth 10% of Assessment Item 3.
- Students work in groups to create a Report. It is submitted to a group Dropbox and worth 70% of Assessment Item 3. Students then submit a personal reflection about the task to an individual Dropbox. This is worth 30% of Assessment Item 3.
Grading system and other requirements
This method requires the use of a weighted grading system. When marking, you will need to record a 0 for students who have not submitted work.
You will need to:
- Create one Category to represent the assessment task and use the options described here.
- Create one Grade Item per assessment item and use the options described here. You must link each Grade Item to the Category that you have created.
- Link each Dropbox/Discussion/Quiz with one of your new Grade Items. If students perform a task in class and do not need to submit items electronically, you can skip this step.
To see an example of what this solution might look like in the Grades tool, download this PDF.
When marking:
The Category Subtotal will calculate correctly only if you record a zero (0) for each un-submitted piece of work. Here are some instructions on how to mark un-submitted items with a 0 quickly.
Attach a Rubric to an Assignment Submission Folder so that you can mark with it
Once you have created an electronic Rubric in MyLO, you can attach it to an Assignment Submission Folder. This post will show you how. Once you have attached the Rubric, you can mark with it.
Step 1
Before you finalise your Rubric and attach it, you must ensure that the Rubric is correctly set up. You may wish to return to the Rubrics tool and check the text and settings before finalising it.
WARNING
Once you have started marking with a Rubric, you must not edit it. If you do, you will lose any marks/feedback you have recorded in the Rubric to date. Please check your Rubric carefully before marking with it.
Step 2
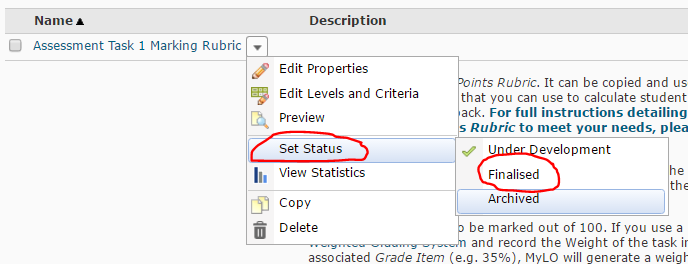
Select Rubrics from the MyLO toolbar, then locate your completed Rubric. Select the black arrowhead to the right of the rubric name. Select Set Status, then choose Finalised (a Rubric cannot be attached to another item unless finalised).
Step 3
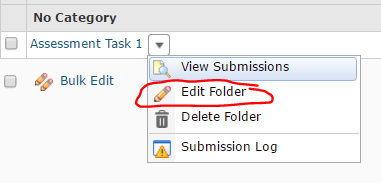
Select the Assignments tool from the MyLO toolbar. Locate the Assignment Submission Folder that you would like to attach the Rubric to. Select the black arrowhead next to the Submission Folder name, then choose Edit Folder from the menu.
Step 4
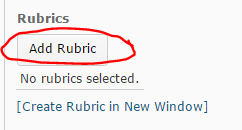
The Properties tab should open by default. Scroll down until you see the Rubrics heading. Select the Add Rubric button.
Step 5
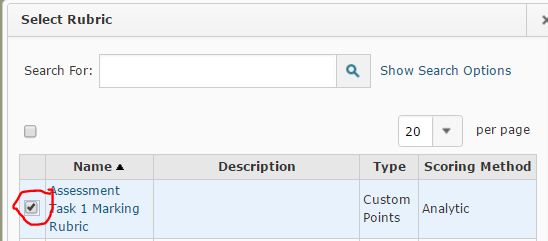
The Select Rubric window will open. Select a Rubric by checking the checkbox next to it, then select the Add Selected button (seen at the bottom of the window).
Step 6
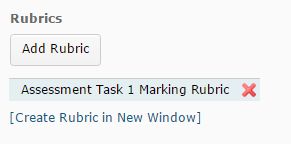
You should now see the Rubric name appear under the Add Rubric button. Scroll down and select the Save and Close button. If you have selected the wrong Rubric, select the red cross (the Rubric name will now appear crossed out), then select the Add Rubric button to select a different Rubric.
You can now start marking Assignment Submissions with your Rubric.


