Video Recording Tips and How To
This video recording guide is intended to be used to assist staff to record short video segments for use in their UTAS units. This guide focuses on recording with technology available in house at the university.
How to set up LAP access (Special Access) to quizzes/assignments or set extensions/alternate dates for things for specific students.
Need to give a student an extension? Need to give someone an extra 30min on a quiz attempt? Or a second attempt? Here’s how!
Quiz or Assignment tool – the process is the same but I’ll cover getting to the necessary page for each tool.
For Quiz – go to the Quizzes tool then click the [v] and go to “Edit” and then click the “Restrictions tab”.
For Assignment – go to the Assignments tool then click the [v] and go to “Edit Folder” and then click the Restrictions tab.
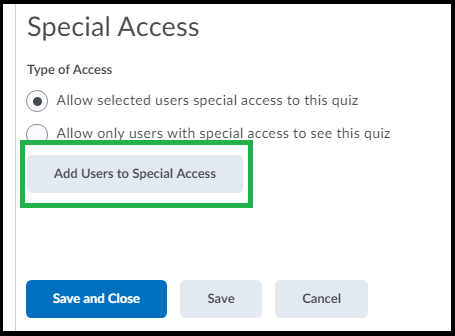
When you’re in the “Restrictions” tab, scroll down until you see the “Add Users to Special Access” button. Click on that and a new window will load up.
On this page you’ll see a bunch of settings and then a list of all students, the settings will depend on the tool in question. I’ll cover both below.
First select the student(s) that the settings will apply to from the list of students. Note if you have students who need different settings you’ll need to do that one at a time, but if the students need the same settings you can select more than one, each one you select from the list will have the settings applied that you change.
Quiz Special Access Options:
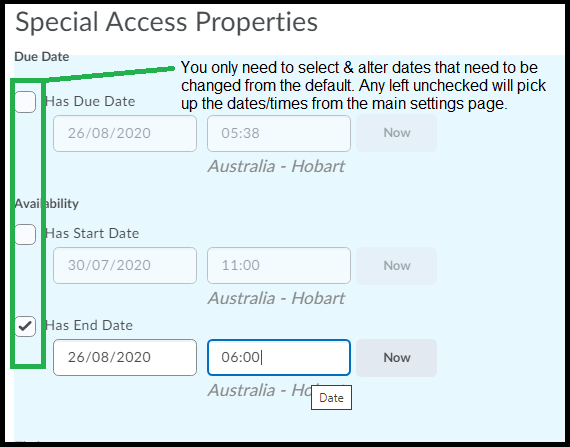
In the quiz tool special access can be given to allow students alternate dates. Change those using the start/due/end access date area.
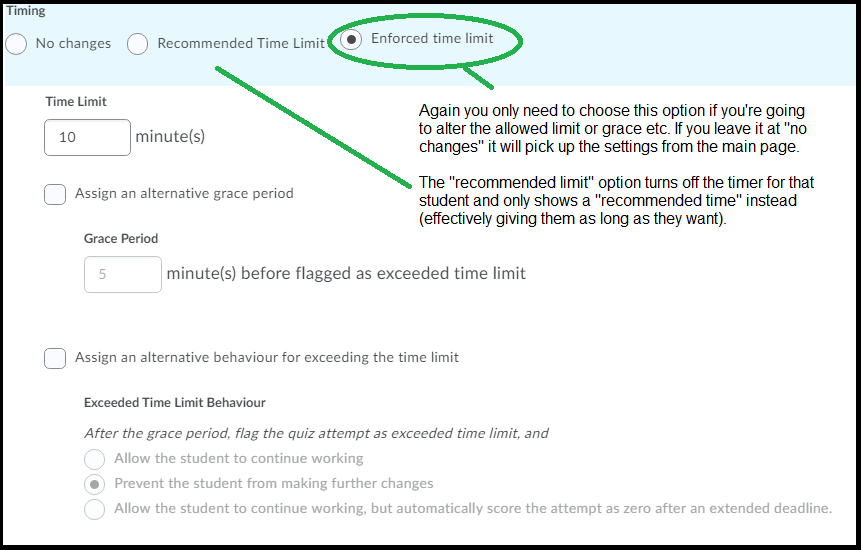
You can change the default “timing” (how long they get when they start an attempt) by selecting the “enforced” option and entering a new time in. Please note: enter the entire total time that the student will need, it doesn’t add them it just overwrites the default entirely. (ie if everyone else gets 70min and your student needs 10min extra you would enter 80 into the attempt time).
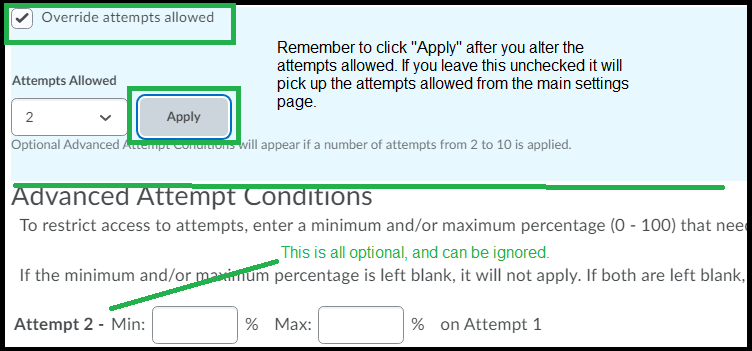
You can also change the default attempts, useful if you want to give your student another attempt but want to keep the data from the first attempt intact. You can then also specify if the higher of both is kept or average etc. To do so select “overwrite attempts allowed” and choose a new number of attempts allowed here then click “apply”. If you choose a number more than 1 some extra “advanced” options show up but you can entirely ignore those if you don’t need them. I’m not going to cover what they do.
Here you can also, if needed, bypass the requirement to use lockdown browser if lockdown is set for this quiz. Note you won’t see this option unless the lockdown browser is enabled for the quiz. It bypasses the entire lockdown browser (so both browser & monitor) if you choose this option.
Assignment Special Access Options
For the assignment tool your options are generally limited to giving the student different dates.
Once you’ve made your student selection & changed whatever aspects you need to change, click “Add special access” at the bottom of the page.
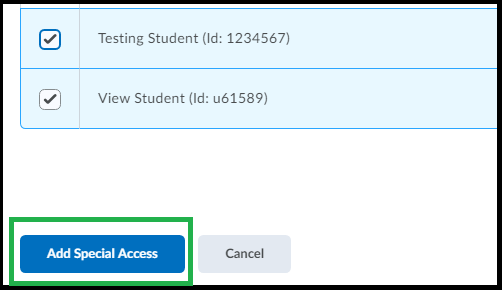
You’ll now return to the Restrictions panel and you’ll see the list of students that you gave special access to at the end of the page. Click the pencil icon to make changes to any specific student’s special access, or the x to delete the special access for that student.
You can add more students, click “add users to special access” again.
The options just below the heading?
The first option is the default & simply over-writes the usual access for a few students, but leaves the rest of the students access alone.
The second option means ONLY those students in the list below will see the assignment/quiz. Useful for allowing a second attempt to a quiz/assignment you would prefer was hidden to everyone else OR to set up a ‘supplementary’ assignment/quiz for specific students that again you want to kept hidden from everyone else.
Upload Video & Get Link from Echo360
To Upload:
1. Go to the Echo360 link from MyLO – it’s a link from the MyLO Homepage under “Other Systems” menu (look for Echo360 ALP) and enter your email then ‘University of Tasmania’ and if you’re not already logged in it will then ask you for your email & utas password.
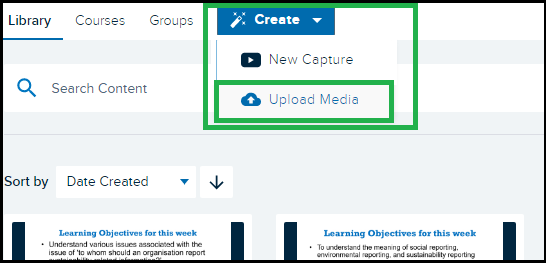
2. Click the ‘Create’ button top left of the page and choose ‘Upload Media’.
3. A window will load that you can drag & drop a file into (or click on the icon in the middle of the window to select a file manually).
The file will be loaded to the area in your library.
The video will process for a while. Depending on how long the video is & how busy the site is the processing time can be quite long, upwards of an hour or more. Once the video is finished processing you can then download or edit. To view the video just click on the video thumbnail in the ‘My Content’ area & use the play controls on the preview screen to play.
To Get Link
Note: This link can only be created by the person who “owns” the recording -ie the person who was logged in & uploaded it.
Step 1: Log into Echo360 again (if you have a MyLO unit with a link to Echo360 recordings, it’s a good shortcut as it’ll log you in automatically when you click on it).
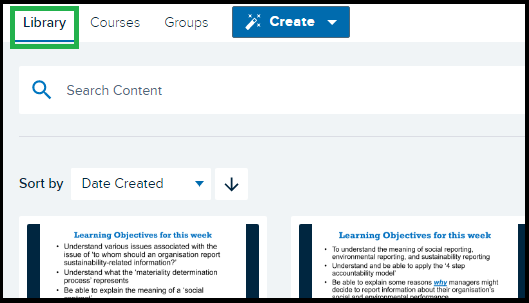
Step 2: Click ‘Library’ top left – your videos will load.
Step 4: Find the video you wish to create a permanent re-useable link for – you may need to use the search tools to find it.
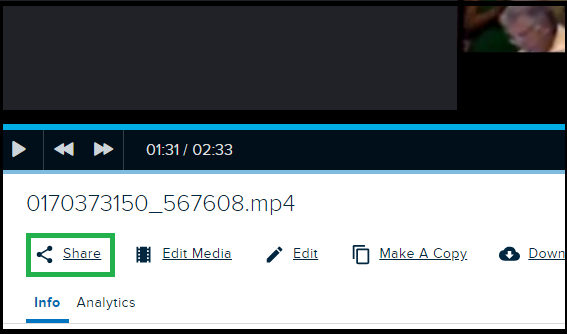
Step 5: When you find your video click on it to preview & check it is the correct video. Then find the ‘Share’ link just under the preview.
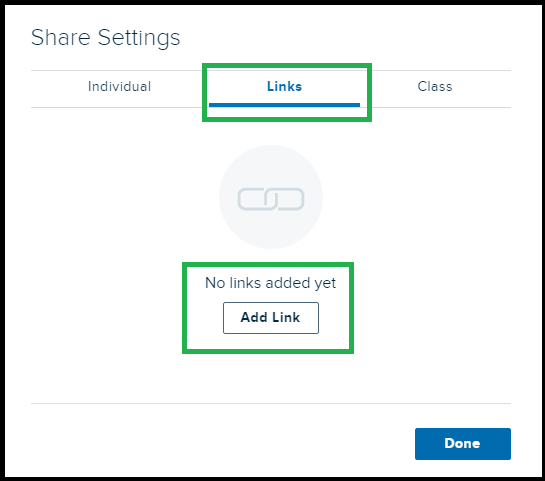
Step 6: A small window will load. Click the middle tab at the top for ‘Links’ then click ‘Add Link’.
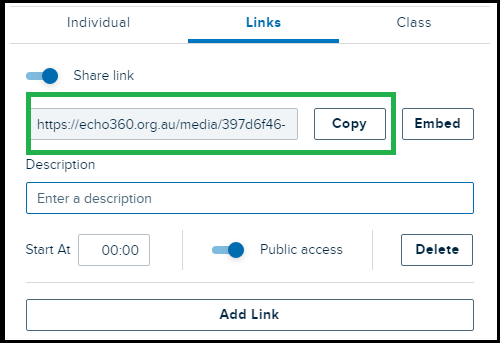
Step 7: Once you click that a section will show on the little popup window that has a bunch of stuff & a long URL, copy that URL – it’s the permanent public link to this video. You can paste this into MyLO discussion posts or to a Word doc for an assignment submission.
Copying & Splitting Echo360 Recorded Video
To split up a video on Echo360 you don’t need to have any extra software, you can do it via the Echo360 interface. If you do have your own software and know how to use it of course you can do it by downloading & editing but this guide covers using only Echo360.
First: Enable Copying
You will need to enable “Copying” in Echo360. You will only need to do this Once Per Unit.
Click into Echo360 for your unit (via MyLO if the link is there, or log into Echo360.org.au via institution). Make sure you can see your class list of videos.
Click ‘Settings’ at the top right.
Click ‘Features’ from the menu to the left.
Toggle ON the option for copying by instructors.
Click to see this part in action (no sound)
Next: Make Copies
Make a copy of your video for each part you need. So if you have a video that you want to split into 3 parts you’ll need to make 3 copies. That way the original full length video is still there too.
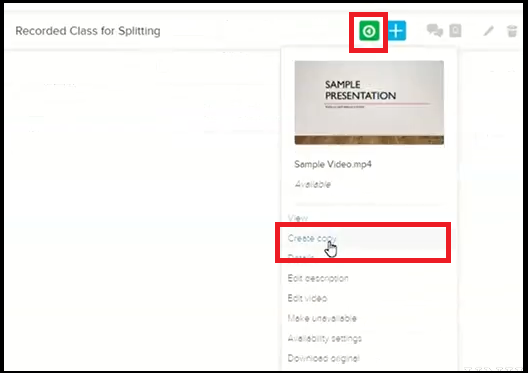
Click the green play button to the right of the recording & choose “Make Copy” then click “OK” on the confirmation window.
Each copy goes to Your Echo360 Library, so keep a mental count on how many times you click this option. You won’t see the copies in the class list yet.
Next: Find the copies in Your Library
Head to your Library by clicking Library top left of the window.
It helps to also name the copies to more useful names. To do so, click the video to go into the preview. Below the preview are options for ‘Edit’ which lets you name the video & Edit Media which lets you edit the video itself. Click ‘Edit’ to rename.
Make sure you name the copies in a way that tells the student what the video is, if you have a topic that might be useful to add as well.
Next: Edit each copied part
To edit the media click on the video to preview then click ‘Edit Media’. You get a confirmation window here, click OK on that – each copy is treated separately. Editing one won’t affect the others.
You can use the playhead to preview the video. If you’ve added some ‘break’ slides or an obvious point at which to cut you should be able to see what time in the timeline the segment you want to keep is at.
Most of the time you’ll only need to “Top & Tail” your videos.
To top/tail a video – drag the left side pink part in and the right side pink part in.
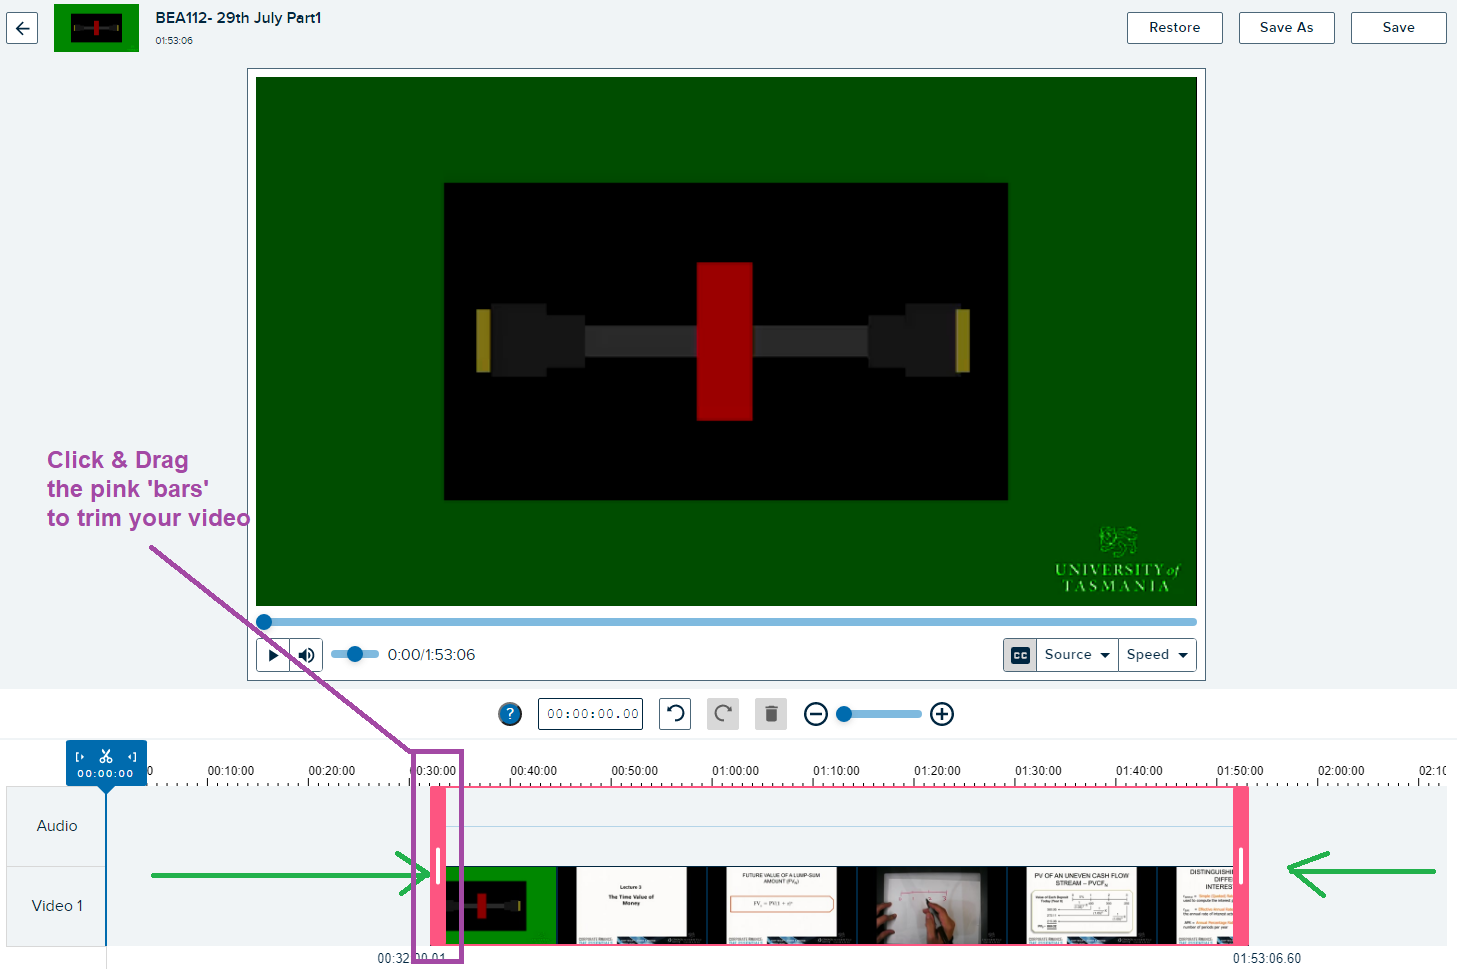
When you’re done click ‘Save’ above (top right). You’ll get a little popup confirmation – if this doesn’t appear right away wait a little bit before trying again, sometimes it’s slow.
Finally! Adding to the Class!
Once processed the videos can now be shared to the class. They will remain in your personal library as well. Just click the video and then from the options below the preview choose “Share”.
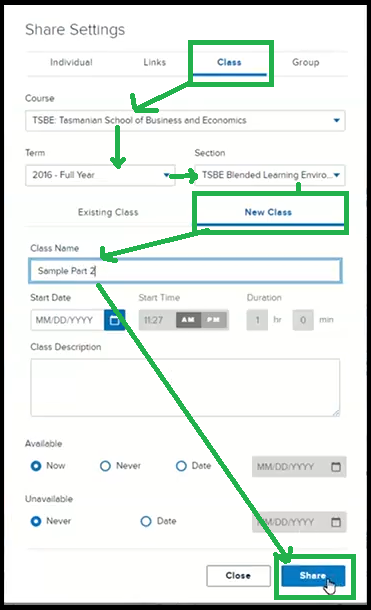
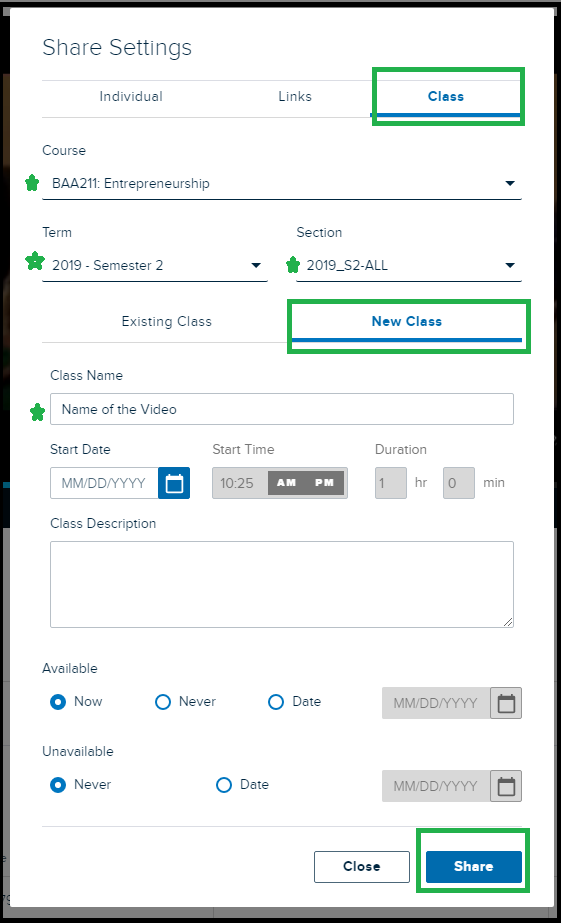
Click the “Class” option then find your unit from the list. (ignore the example text in my screenshot, find your own unit & semester)
Choose the Semester and cohort.
Click “New Class” (in this software class means video).
Give it a useful title & click ‘share’, it won’t re-process & will be immediately available in the unit’s echo360.
Rubric Maker – Copying from Word
The Rubric maker tool is a website built by Kevin Lyall & Connor Deckers of ‘MyLO Mate’ fame that allows you to easily convert a rubric from a word document to MyLO without having to re-type everything or calculate the scores manually.
The link is: https://www.utas.edu.au/building-elearning/resources/mylo-rubric-generator
This basic help document won’t go into everything, but will cover the basics of taking a simple Rubric from Word through the Rubric Maker and into MyLO.
Step 1: Have your Rubric Ready in Word!
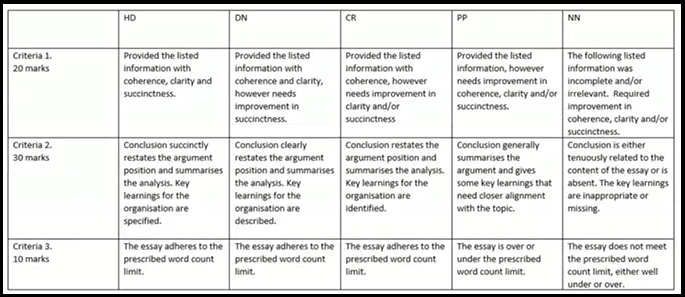
The rubric maker assumes you have a rubric set up in word using the standard UTAS grading system, HD (80-100), DN (70-79), CR (60-69), PP (50-59), NN (0-49).
Your rubric does NOT need to be marking out of 100 points.
You only need to know what the point value or weighting of Each Criteria are.
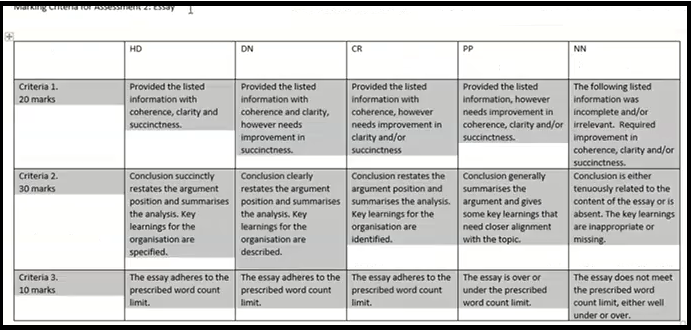
Take a look at the example rubric below. It marks out of 60. Each criteria has a points value. It will work just fine in the rubric maker tool. Note that to work correctly your table needs to have separate cells for each criteria & its levels. Merged cells will not work, they’re not supported in either the rubric maker or in MyLO, so you’ll need to split any merged cells back into the individual cells.
Step 2: Open the Rubric Maker Page
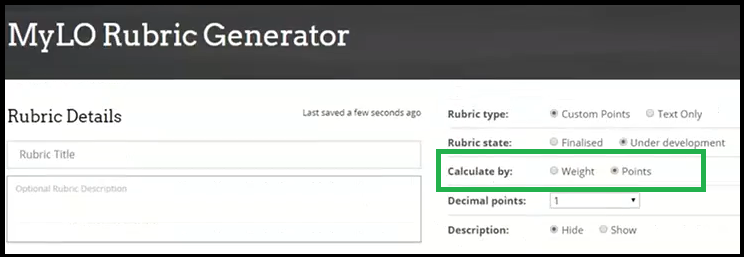
Let’s open the rubric maker page. Don’t be put off by the options you see, the defaults should work just fine. The only thing you might want to check is if you are using weights (ie, percentages) for your criteria values – check the option under ‘Calculate by’ to ‘Weight’ or if you’re using points values check ‘Points’.
If you choose ‘Weight’ here you will get an additional option to choose how much your rubric should calculate to (if not 100). Useful if you’ve had a rubric set up with weighted criteria values but that then needs to calculate to something other than 100. Not sure? It’s okay, you can change this option at any time.
Step 3: Copy the Criteria/Description part of your table in Word to the clipboard.
Back in Word, select the criteria & their descriptions. You don’t need to select any column headers. See below.
Copy this part to the clipboard (cntrl-c or option-c)
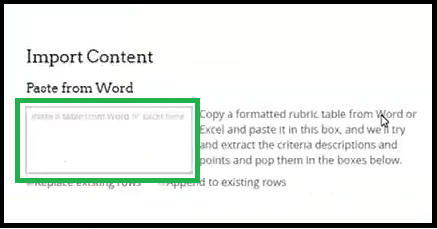
Step 4: Paste into the ‘Import Content’ – ‘Paste from Word’ part of the Rubric Maker
Back in the Rubric Maker page – find the ‘Paste from Word’ box and click in it, then cntrl-p (option-p) to paste the clipboard contents in.
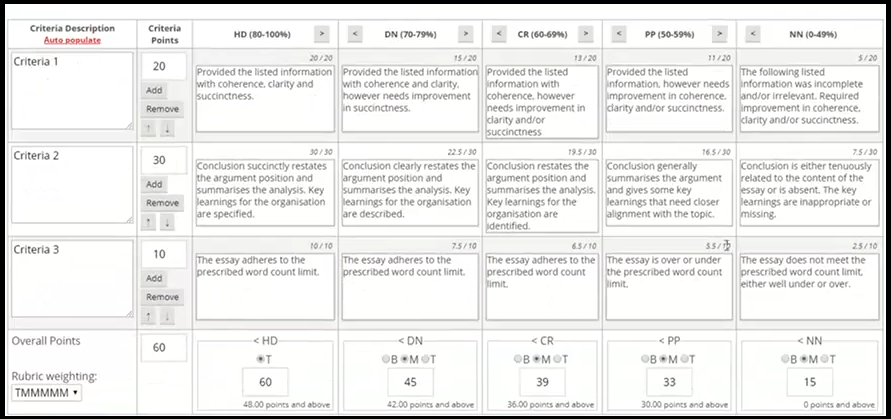
Once you do this you will immediately see the contents of your clipboard pasted underneath populating the cells/rows of the table. In the example below you can see it has auto-populated the descriptions and points values.
Points Defaults: At the bottom of each column you can see there is a choice of “B M T” these are the default values that will be added as cell values, they are Bottom (the lowest score in that range), Middle (a midpoint between the two) and Top (the topmost value of that range). Only the very left-most column is hard-wired to Top only as this is how MyLO calculates the rubric total. Here we’re just choosing some defaults, you can edit these however you like in MyLO once you’ve imported it.
Step 5: Check & Name your Rubric!
Important, now take a look at the content that was created. Check that ‘Criteria Points’ column is set correctly. You can edit any of the values in the Description, Points (or weights), & any of the ‘Levels’ by just clicking & typing. Make sure the ‘Overall Points’ value is calculating the way you want it. You can make adjustments to the Points/Weights if anything is out.
While you’re here – add a name to your rubric at the top of the page. Make it a useful name, usually the name of the assessment it’ll be attached to.
Step 6: Download the Zip File to your computer
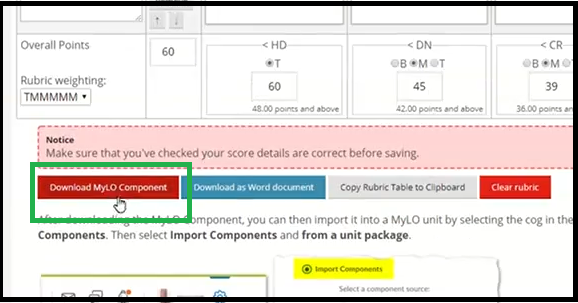
When you’re happy with your setup scroll down to the area under the rubric table and click the ‘Download MyLO Component’ button.
This will send a ZIP file to your default ‘Downloads’ directory. You will need to keep this ZIP file handy (don’t unzip it).
Step 7: Go to Import/Copy etc Tool in MyLO
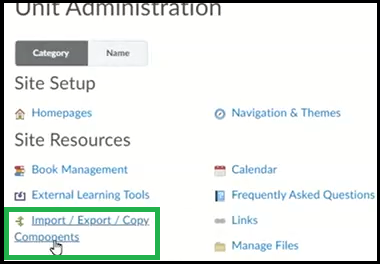
In your MyLO unit head to ‘Admin & Help’ then ‘Unit Admin’ then find ‘Import/Export/Copy’ and click this option.
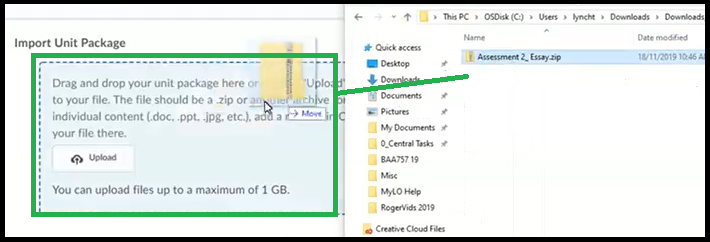
Click ‘Import’ and then drag & drop your ZIP file into the space provided.
Choose ‘Import all components’.
On successful import you can leave this window (either click ‘view content’ or ‘rubric’ or just close it out).
Step 8: Head on into the Rubric tool to finalise the Rubric.
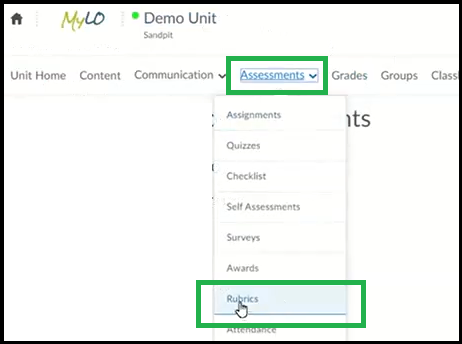
Go to Assessments – Rubrics from the menu in MyLO.
Click on your imported rubric to edit.
First check the values, criteria descriptions and overall values. Make any adjustments here. You can also ‘tweak’ the value in each cell but note the column with the highest value is used to determine the overall score of the rubric, so be careful making adjustments to scores in the ‘HD’ column.
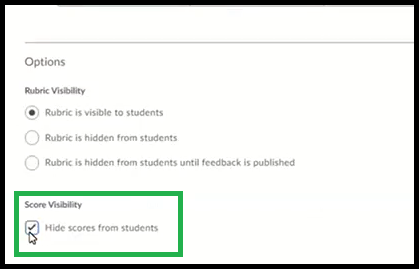
Scroll down to the ‘Options’ section under the rubric table & click on it to check any options you wish to use. I usually check the option ‘Hide Scores from Students’. It means students will see what the criteria & level chosen but will only see the overall score at the end (makes moderation easier).
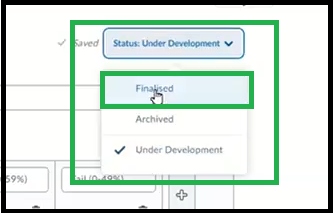
When you’re happy with your rubric scroll up to the top & choose ‘Finalised’ from the option at the top. It is now ready to attach to an assignment or grade item.
The rubric tool in MyLO auto-saves as you go, so once you’ve finalised it you can go ahead and use it somewhere. See below for further help.
Attaching a rubric to Assignment
Check saved assignment grades without releasing to gradebook!
MyLO Mate extension now has a new feature that allows you to preview unpublished marks in your Assignments!
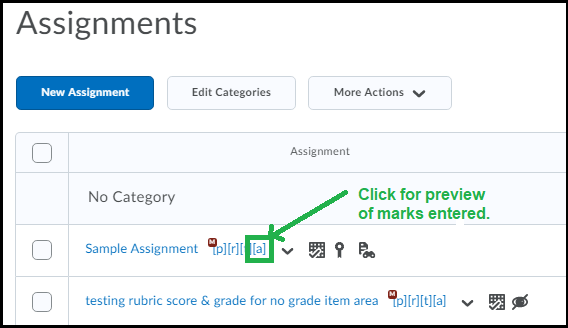
First for those who aren’t yet using the MyLO-Mate extension, head on over to this link: https://www.utas.edu.au/building-elearning/resources/mylo-mate or (direct download link for Chrome here) & install to your browser. With the default settings in MyLO Mate you will see new options appear as letters in square brackets next to things like quizzes, assignments etc. These are shortcuts to the settings pages within each tool. For example the [p] link opens the properties page, [r] opens restrictions page.
The new feature is listed in the Assignment tool. You will see an [a] link for any assignment that has marks saved with ‘Draft Saved’.
When you click on this link it opens a new window showing the grades as given in the assignment + any feedback noted. You can copy this page to word or just keep open to read noting any students who’s marks need reviewing. There is a ‘save to spreadsheet’ link just at the top of the window. (example below)
This feature can be used to preview grades before they are published. It does NOT publish the grades for you, so it is a safe way to moderate your assignments & see feedback written in the feedback field.
(note the [a] shortcut is used in the others tools is shortcut for the ‘assessment’ page & does not open grades in tools other than assignments)
Thanks to Connor Deckers & Kevin Lyall for this incredible browser tool!
Share Echo360 Recording from Personal Library to Class
If you have recorded a video from the Universal Personal Capture – the default location of the upload is your personal library.
To share a video from your library:
Go to Echo360.org.au (or follow the link from your MyLO site)
The link to your library is on the top left of the page.
Find the video you wish to upload. If you need to – you can sort the list by date and put it as newest first.
Click on the video (this lets you check it’s the correct one).
Find the ‘Share’ link under the preview window & click it.
When the window pops up choose ‘Class’, then from the dropdown menus choose your unit, semester & the section (there’s usually only 1 section). Click ‘New Class’ & give the item a name. Then click ‘share’ – you don’t need to fill out any date details.
The video will be immediately available at the end of the list of videos of the unit you chose.
Export Grade Columns – Ready for Importing Later
In order to import grades to MyLO the format of the spreadsheet must be exactly correct. This post will cover how to export a file that will then be ready for re-importing, should you have any reason to fill grades to a spreadsheet for later import.
1. Ensure your grades exist in MyLO first. Creating Grades is covered here.
2. Go to ‘Grades’ tool & then to ‘Enter Grades’.
3. Click ‘Export’ button at the top.
You will now see a new screen with options to select.
OPTIONAL: If you need to send particular groups of students to staff (ie, Launceston campus students to marker A & Hobart to Marker B) choose the groups at the top first. Remember to click “Apply” after you choose the group. Click it again to be sure. You can only export one category or group at a time.

4. Select the following:
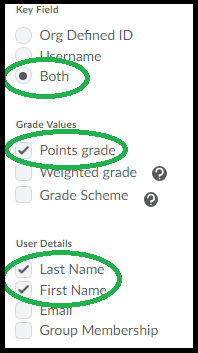
Under ‘Key Field’ select ‘Both’. (you only need to import Username, but having both is useful).
Under ‘Grades Values’ ONLY select Points Grades (even if you have weighted grades, you must select ‘Points’ or it won’t import).
Under ‘User Details’ you don’t need to select names – however for someone marking presentations for example it can help to have the names listed. Don’t select group membership unless needed (ie, you’re sorting the file by one of the group sets).
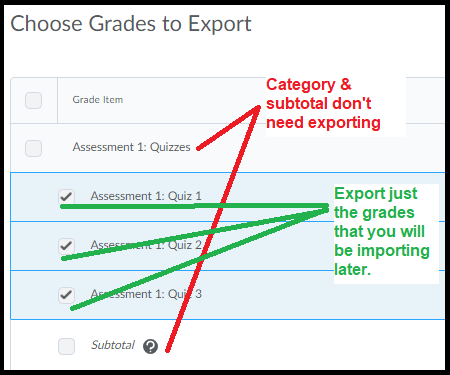
Under ‘Choose Grades to Export’ select the grades you will be importing later. You should avoid selecting categories & subtotals (these are calculated by MyLO directly, you shouldn’t need to be importing them), but you can select grades that are inside of categories.
Click ‘Export to CSV’. This file can be read by Excel & other spreadsheet software.
This file is now able to be filled & re-imported directly so long as the formatting is not altered & the file type is kept as ‘CSV’.
Please ensure your markers know not to alter any column headers or delete columns or remove any #’s.
Pre-Fill a Long Answer Quiz Question
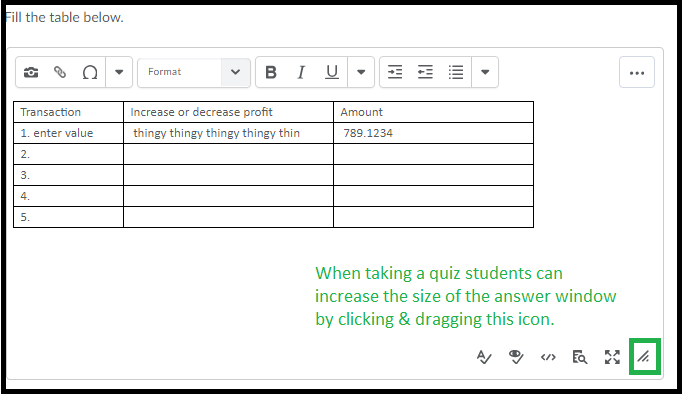
Did you know you can create a quiz question that allows the student to enter text directly into tables or have other information in the answer box for them to use?
The way to do this is relatively simple but there are a few things you need to remember:
* The Written Response question type is the only type that allows you to pre-fill the answer box.
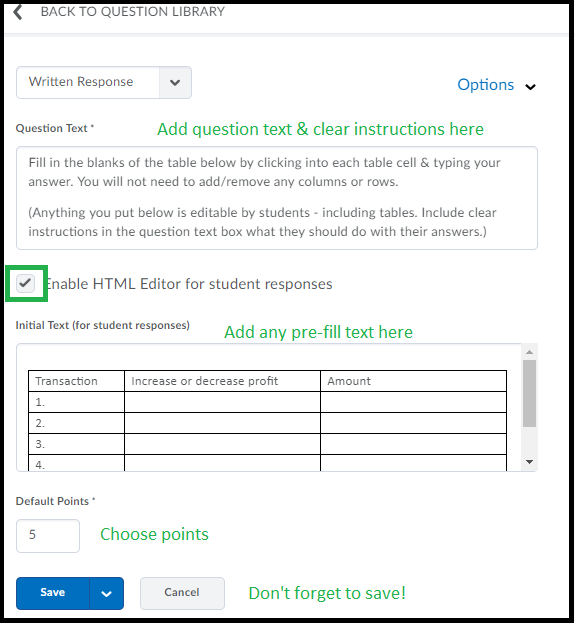
* If you are using tables or other formatting (like lists) you need to also turn on the ‘Use HTML’ option. This will be explained in the setup below.
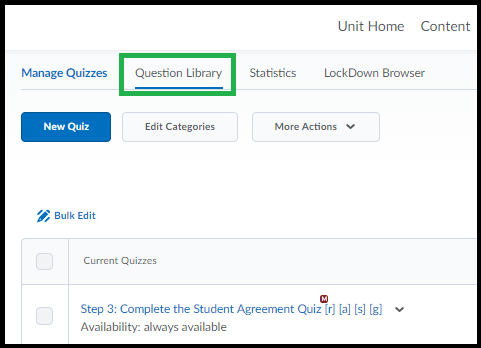
To create a long answer question with pre-filled answers – click on ‘Assessment’ then ‘Quizzes’ – then go to the ‘Question Library’ tab.
Create new long Written Response question – as shown (or if you have existing question, click on it to edit).
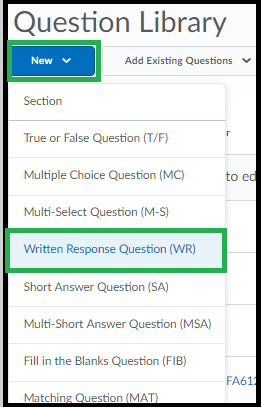
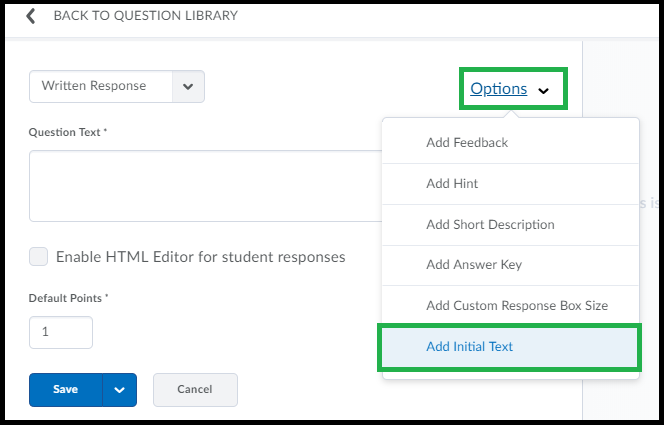
When the question loads, click the ‘Options’ menu just to the top-right. Choose ‘Add Initial Text’.
The answer box is shown below the question text. You can type directly into the pre-fill answer area or you can copy in text. If you are needing a table you’ll need to copy it in from Word or similar. If you are planning to use tables or require the student to use tables you should also turn on the option use HTML Editor.
You can also increase the size of the answer box for students by clicking ‘Options’ & ‘Add Custom Response Box Size’. Ignore the right hand side of the screen. It is not very useful.
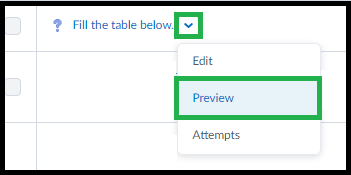
Once you’ve saved the question it will then be listed in your Question Library (you can preview from here to get a better idea of how the question will look). To edit just click on it. Once you’re satisfied with the question you can then add it to a quiz.
Remind the students that they can increase the size of the answer box – if necessary – by using the small icon to the lower-right of the answer area for the question, this will help with questions that have quite large tables.
Use Echo360 to convert/edit/compress video
Echo360 is used at UTAS to host video recorded in class but can also be used by staff/students to upload their own video. The video can then be edited (very basic editing, you can’t add captions or combine multiple video). Once upload all video is ‘processed’ by the system to compress file size & convert to MP4 format so you can also use the site to convert other formats to one standard format (mp4) & compress large video.
Whatever you do – DON’T leave it until the last minute to run video through the site – it can take HOURS to process!
You can upload the following formats to Echo360:
AVI, FLV, M4V, MP4, MOV, WMV, MP3 & WMA
(though depending on the codecs the video might not be compatible, if you’re not sure try it anyway).
Upload:
1. Go to Echo360, the easiest way is to find a unit that has a link to some recordings, this link will also log you in or head to https://echo360.org.au/ If it asks for username/password use the same ones you use for MyLO.
2. Click the ‘Create’ button top left.
3. Click ‘Upload Media’
4. A window will load that you can drag & drop a file into (or click on the icon in the middle of the window to select a file manually).
The file will be loaded to the area in “Library” – you can see a link on the top of the Echo360 page.
The video will process for a while. Depending on how long the video is & how busy the site is the processing time can be quite long, upwards of an hour or more. Once the video is finished processing you can then download or edit. To view the video just click on the video thumbnail in the ‘My Content’ area & use the play controls on the preview screen to play.
Edit:
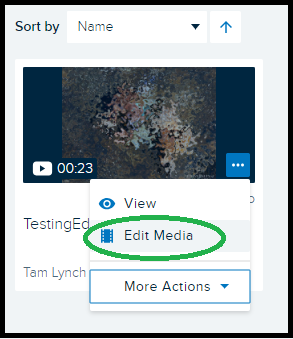
When viewing your video in ‘Thumbnail’ view (the default) you will see a small menu when your cursor is over the thumbnail.
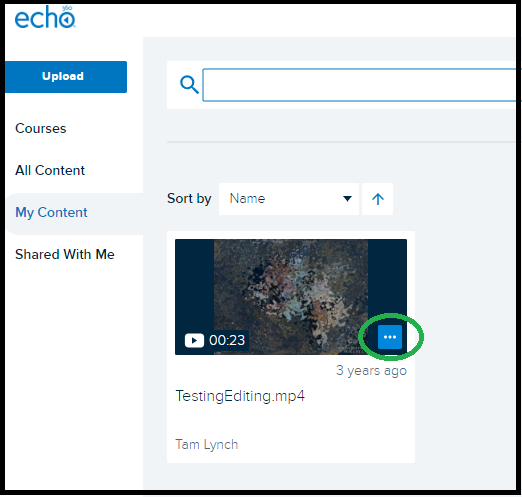
When you click this menu icon you can choose ‘Edit Media’ to edit the video.
The editor has changed recently, for now follow the instruction: https://learn.echo360.com/hc/en-us/articles/360035035812-Editing-Videos
Download:
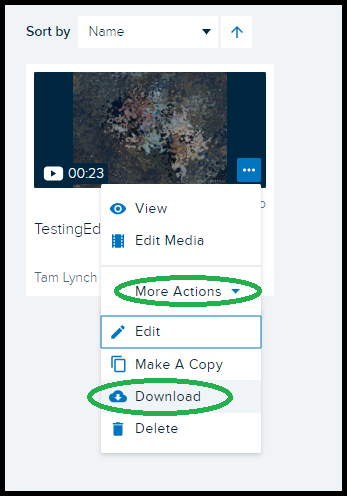
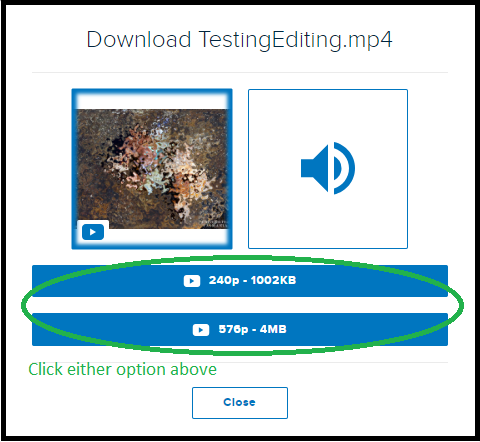
To download the processed file – choose ‘More Actions’ then ‘Download’. You can choose from a smaller or slightly larger file size once you click either it will download to your browsers default download folder (or you will be prompted to save – depending on your browser).
Don’t forget to give this video a watch to ensure the processing was successful & everything looks as it should.

